Aop demo
Posted Xuuuuu
tags:
篇首语:本文由小常识网(cha138.com)小编为大家整理,主要介绍了Aop demo相关的知识,希望对你有一定的参考价值。
之前在学习 spring 的时候,在 spring 实战中看到了「AOP」,也就是切面。当时是第一次接触这个新概念,所以用了很多的时间去理解其中的术语,和相关的用法。在前面的文章中,也介绍了一些 和 AOP 相关的。过了这么久,终于想起来写一个 demo 给大家 look look。
项目构建
在构建项目时,推荐使用 IDEA,因为这个软件真的好用的一批。
在 IDEA 中构建一个 Maven 项目,并在项目中构建 class、xml 以及测试类。项目结构如下图
代码展示
pom.xml
 1<dependencies>
 2    <!--服务依赖-->
 3    <dependency>
 4        <groupId>javax.servlet</groupId>
 5        <artifactId>javax.servlet-api</artifactId>
 6        <version>3.1.0</version>
 7        <scope>provided</scope>
 8    </dependency>
 9    <!--测试依赖-->
10    <dependency>
11        <groupId>junit</groupId>
12        <artifactId>junit</artifactId>
13        <version>4.11</version>
14        <scope>test</scope>
15    </dependency>
16    <!--Spring和aop相关依赖-->
17    <dependency>
18        <groupId>org.springframework</groupId>
19        <artifactId>spring-core</artifactId>
20        <version>4.0.5.RELEASE</version>
21    </dependency>
22    <dependency>
23        <groupId>org.springframework</groupId>
24        <artifactId>spring-beans</artifactId>
25        <version>4.0.5.RELEASE</version>
26    </dependency>
27    <dependency>
28        <groupId>org.springframework</groupId>
29        <artifactId>spring-context</artifactId>
30        <version>4.0.5.RELEASE</version>
31    </dependency>
32    <dependency>
33        <groupId>org.springframework</groupId>
34        <artifactId>spring-aop</artifactId>
35        <version>4.0.5.RELEASE</version>
36    </dependency>
37    <!--aspectj依赖-->
38    <dependency>
39        <groupId>org.aspectj</groupId>
40        <artifactId>aspectjweaver</artifactId>
41        <version>1.8.1</version>
42    </dependency>
43
44</dependencies>
class 代码
 1public class Book {
 2  // 连接点(Joinpoint)。类里面可以被增强的方法,这些方法称为连接点
 3  public void add() {
 4      System.out.println("add...........");
 5  }
 6}
 7public class MyBook {
 8  //这些都是通知(Advice)
 9  public void before1() {
10      System.out.println("前置增强......");
11  }
12
13  public void after1() {
14      System.out.println("后置增强......");
15  }
16
17  //环绕通知
18  public void around1(ProceedingJoinPoint proceedingJoinPoint) throws Throwable {
19    //方法之前
20    System.out.println("方法之前.....");
21
22    //执行被增强的方法
23    proceedingJoinPoint.proceed();
24
25    //方法之后
26    System.out.println("方法之后.....");
27  }
28}
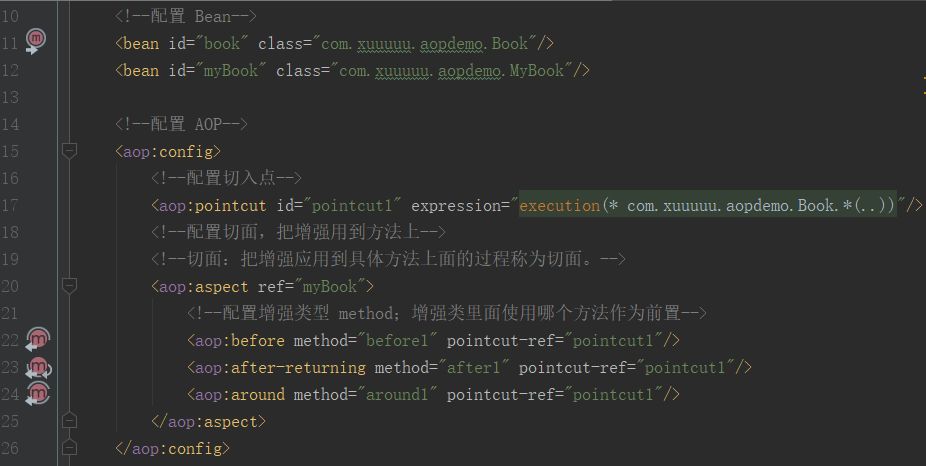
aop.xml
 1<!--配置 Bean-->
 2<bean id="book" class="com.xuuuuu.aopdemo.Book"/>
 3<bean id="myBook" class="com.xuuuuu.aopdemo.MyBook"/>
 4
 5<!--配置 AOP-->
 6<aop:config>
 7    <!--配置切入点-->
 8    <aop:pointcut id="pointcut1" expression="execution(* com.xuuuuu.aopdemo.Book.*(..))"/>
 9    <!--配置切面,把增强用到方法上-->
10    <!--切面:把增强应用到具体方法上面的过程称为切面。-->
11    <aop:aspect ref="myBook">
12        <!--配置增强类型 method;增强类里面使用哪个方法作为前置-->
13        <aop:before method="before1" pointcut-ref="pointcut1"/>
14        <aop:after-returning method="after1" pointcut-ref="pointcut1"/>
15        <aop:around method="around1" pointcut-ref="pointcut1"/>
16    </aop:aspect>
17</aop:config>
AopTest
 1public class AopTest {
 2  @Test
 3  public void testService() {
 4    //通过XML文件加载程序配置
 5    ApplicationContext context = new ClassPathXmlApplicationContext("aop.xml");
 6    //获取 bean。id 默认为第一个字母为小写的类的名称
 7    Book book = (Book) context.getBean("book");
 8    //调用切点方法
 9    book.add();
10  }
11}
代码分析
1、我们通过 pom.xml 引入项目所需要的依赖;
2、在 MyBook.class 中,我们定义了前置通、后置通知方法;为了方便,我们定义了一个环绕方法「around1」,它可以按照方法里面的代码顺序执行方法,在要正式执行切点方法时,我们就会调用「proceedingJoinPoint.proceed()」方法来执行切点方法。
3、在 Book.class 中写我们想定义的切点方法。当程序运行这个切点方法「add()」时,我们定义的与切点方法相关联的切面方法就会被程序自动调用。
4、切点和切面都定义好后,我们就在 aop.xml 中告诉 Spring 我们要装配的 Bean;并且指定切点、前置通知、后置通知以及环绕通知,如果还有异常通知的话,也需要在其中指定。
AOP 配置好后,在 IDEA 中就是这样的,我们点击左边的图标,IDEA 就会跳转到相应的文件中。
运行结果如下图
PS:点击阅读原文即可查看项目代码
推荐阅读
以上是关于Aop demo的主要内容,如果未能解决你的问题,请参考以下文章