Nginx+uwsgi+virtualenv+Django+Mysql架构
Posted 魔库技术网
tags:
篇首语:本文由小常识网(cha138.com)小编为大家整理,主要介绍了Nginx+uwsgi+virtualenv+Django+Mysql架构相关的知识,希望对你有一定的参考价值。
架构图:
环境准备
版本选择
Django 1.5.x 支持 Python 2.6.5 Python 2.7, Python 3.2 和 3.3.
Django 1.6.x 支持 Python 2.6.X, 2.7.X, 3.2.X 和 3.3.X
Django 1.7.x 支持 Python 2.7, 3.2, 3.3, 和 3.4 (注意:Python 2.6 不支持了)
Django 1.8.x 支持 Python 2.7, 3.2, 3.3, 3.4 和 3.5. (长期支持版本 LTS)
Django 1.9.x 支持 Python 2.7, 3.4 和 3.5. 不支持 3.3 了
Django 1.10.x 支持 Python 2.7, 3.4 和 3.5.
Django 1.11.x 下一个长期支持版本,将于2017年4月发布
Django环境搭建
1、先安装 mysql及升级Python 2.7(这个不描述了,网上有相应的教程)
2、安装pip 9.0
升级pip:
#wget https://bootstrap.pypa.io/get-pip.py
#python get-pip.py
#which pip
#pip2.7
#whereis pip
#ln -s /usr/local/bin/pip2.7 /usr/bin/pip
3、安装pip install virtualenv(采用虚拟环境搭建线上运行环境,主要避免一台服务器上Python运行着不同的程序之间的依赖影响。采用该方式可以做到相互独立)
配置virtualenvvenv 虚拟环境
生效虚拟环境:. venv/bin/activate 或者(source .venv/bin/activate)
安装Django1.10
pip install django==1.10
创建django项目
#django-admin startproject blog 创建项目(本次主要采用已有的项目部署)
MySQL修改:setting.py配置文件

DATABASES = {
'default': {
'ENGINE': 'django.db.backends.mysql', 数据库驱动
'NAME': 'blog',
'USER': 'root',
'PASSWORD': '',
'HOST': 'localhost',
'PORT': '3306',
}
}
#pip install MySQL-python 安装数据Python MySQL驱动
基本部署完成后可以运行以下命令进行测试:
#python manage.py runserver 0.0.0.0:80
打开浏览器输入部署该项目的服务器IP(本地测试输出127.0.0.1)
Uwsgi nginx Django结构部署
Uwsgi部署
1、安装uwsgi程序
#. venv/bin/activate 激活虚拟环境(uwsgi、Django)都需要安装到虚拟环境
pip install pip install uwsgi
2、查看安装版本:uwsgi –version
3、测试 uwsgi 是否正常:
新建test.py 文件,内容如下:
def application(env, start_response):
start_response('200 OK',[('Content-Type','text/html')])
return"Hello World"
然后在终端运行:
uwsgi --http :8001--wsgi-file test.py
在浏览器内输入:http://127.0.0.1:8001,查看是否有"HelloWorld"输出,若没有输出,请检查你的安装过程。
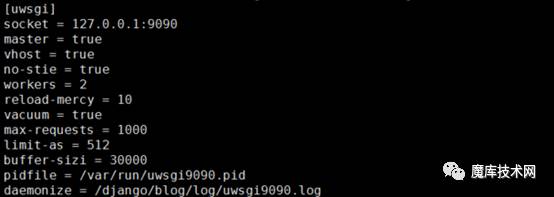
4、uwsgi配置文件
[uwsgi]
socket = 127.0.0.1:9090
master = true //主进程
vhost = true //多站模式
no-stie = true //多站模式时不设置入口模块和文件
workers = 2 //子进程数
reload-mercy = 10
vacuum = true //退出、重启时清理文件
max-requests = 1000
limit-as = 512
buffer-sizi = 30000
pidfile = /var/run/uwsgi9090.pid //pid文件,用于下面的脚本启动、停止该进程
daemonize = /django/blog/log/uwsgi9090.log //输出有关详细日志

5、添加uwsgi与django链接桥梁(非常重要)
#!/usr/bin/env python
# coding: utf-8
import os
import sys
from django.core.wsgi import get_wsgi_application
reload(sys)
sys.setdefaultencoding('utf8')
os.environ.setdefault("DJANGO_SETTINGS_MODULE", "blog.settings")
application = get_wsgi_application()
6、启动uwsgi程序脚本:/etc/init.d/uwsgi9090 (把Nginx部署完成后进行调试)
#! /bin/sh
# chkconfig: 2345 55 25
# Description: Startup script for uwsgi webserver on Debian. Place in /etc/init.d and
# run 'update-rc.d -f uwsgi defaults', or use the appropriate command on your
# distro. For CentOS/Redhat run: 'chkconfig --add uwsgi'
### BEGIN INIT INFO
# Provides: uwsgi
# Required-Start: $all
# Required-Stop: $all
# Default-Start: 2 3 4 5
# Default-Stop: 0 1 6
# Short-Description: starts the uwsgi web server
# Description: starts uwsgi using start-stop-daemon
### END INIT INFO
# Author: licess
# website: http://lnmp.org
PATH=/usr/local/sbin:/usr/local/bin:/sbin:/bin:/usr/sbin:/usr/bin
DESC="uwsgi daemon"
NAME=uwsgi9090
DAEMON=/django/blog/venv/bin/uwsgi
CONFIGFILE=/etc/$NAME.ini
PIDFILE=/var/run/$NAME.pid
SCRIPTNAME=/etc/init.d/$NAME
set -e
[ -x "$DAEMON" ] || exit 0
do_start() {
$DAEMON $CONFIGFILE || echo -n "uwsgi already running"
}
do_stop() {
$DAEMON --stop $PIDFILE || echo -n "uwsgi not running"
rm -f $PIDFILE
echo "$DAEMON STOPED."
}
do_reload() {
$DAEMON --reload $PIDFILE || echo -n "uwsgi can't reload"
}
do_status() {
ps aux|grep $DAEMON
}
case "$1" in
status)
echo -en "Status $NAME: \n"
do_status
;;
start)
echo -en "Starting $NAME: \n"
do_start
;;
stop)
echo -en "Stopping $NAME: \n"
do_stop
;;
reload|graceful)
echo -en "Reloading $NAME: \n"
do_reload
;;
*)
echo "Usage: $SCRIPTNAME {start|stop|reload}" >&2
exit 3
;;
esac
exit 0
uwsgi9090
Django部署
1、执行命令将静态文件拷贝到绝对路径
python manage.py collectstatic
查看是否已经全部复制完成 :cd /django/blog/static/
2、修改Django项目配置(添加静态文件绝对路径到Django项目的settings.py配置中)
STATIC_URL = '/static/'
STATIC_ROOT='/django/blog/static'
STATICFILES_DIRS = [
os.path.join(BASE_DIR, "static")

Nginx部署
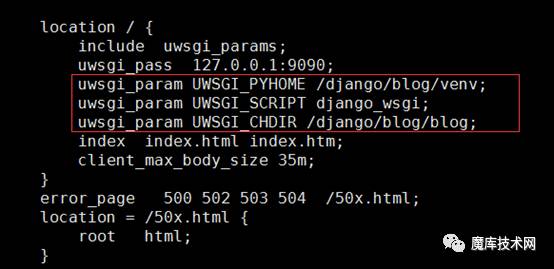
1、nginx.conf配置文件加载django_wsgi接口(让uswgi与Django联通)
location / {
include uwsgi_params;
uwsgi_pass 127.0.0.1:9090; //必须和uwsgi中的设置一致
uwsgi_param UWSGI_PYHOME /django/blog/venv; //Python程序目录,虚拟目录
uwsgi_param UWSGI_SCRIPT django_wsgi;//入口文件,即wsgi.py相对于项目根目录的位置,“.”相当于一层目录
uwsgi_param UWSGI_CHDIR /django/blog/blog; //项目的根目录
index index.html index.htm;
client_max_body_size 35m;
}

2、添加Django项目中的静态文件到Nginx中
开启相关服务进行测试
1、开启MySQL数据库
/etc/init.d/mysqld start
2、开启nginx服务
/etc/init.d/nginx start

3、开启uwsgi服务
/etc/init.d/uwsgi9090 start
4、查看运行日志
5、单独测试uwsgi加载Django项目运行结果是否正常
uwsgi --http :8000 --chdir /django/blog/blog/ --moduledjango_wsgi
以上是关于Nginx+uwsgi+virtualenv+Django+Mysql架构的主要内容,如果未能解决你的问题,请参考以下文章