跟着老杜学MyBatis+第5天+在WEB中应用MyBatis(使用MVC架构模式)
Posted yangbocsu
tags:
篇首语:本文由小常识网(cha138.com)小编为大家整理,主要介绍了跟着老杜学MyBatis+第5天+在WEB中应用MyBatis(使用MVC架构模式)相关的知识,希望对你有一定的参考价值。
跟着老杜学MyBatis+第5天+在WEB中应用MyBatis(使用MVC架构模式)
六、在WEB中应用MyBatis(使用MVC架构模式)
目标:
- 掌握mybatis在web应用中怎么用
- mybatis三大对象的作用域和生命周期
- ThreadLocal原理及使用
- 巩固MVC架构模式
- 为学习MyBatis的接口代理机制做准备
实现功能:
- 银行账户转账
使用技术:
- html + Servlet + MyBatis
WEB应用的名称:
- bank
6.1 需求描述
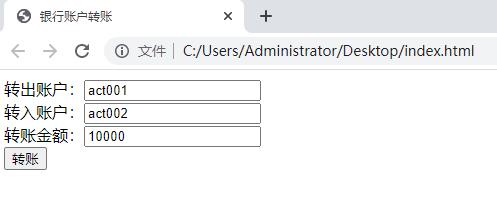
6.2 数据库表的设计和准备数据


/*
 Navicat Premium Data Transfer

 Source Server         : localhost
 Source Server Type    : mysql
 Source Server Version : 80016
 Source Host           : localhost:3306
 Source Schema         : powernode

 Target Server Type    : MySQL
 Target Server Version : 80016
 File Encoding         : 65001

 Date: 29/10/2022 17:06:33
*/

SET NAMES utf8mb4;
SET FOREIGN_KEY_CHECKS = 0;

-- ----------------------------
-- Table structure for t_act
-- ----------------------------
DROP TABLE IF EXISTS `t_act`;
CREATE TABLE `t_act`  (
  `id` bigint(20) NOT NULL AUTO_INCREMENT,
  `actno` varchar(255) CHARACTER SET utf8mb4 COLLATE utf8mb4_unicode_ci NULL DEFAULT NULL,
  `balance` decimal(10, 2) NULL DEFAULT NULL,
  PRIMARY KEY (`id`) USING BTREE
) ENGINE = InnoDB AUTO_INCREMENT = 1 CHARACTER SET = utf8mb4 COLLATE = utf8mb4_unicode_ci ROW_FORMAT = Dynamic;

-- ----------------------------
-- Records of t_act
-- ----------------------------
INSERT INTO `t_act` VALUES (1, 'act001', 50000.00);

SET FOREIGN_KEY_CHECKS = 1;
6.3 实现步骤
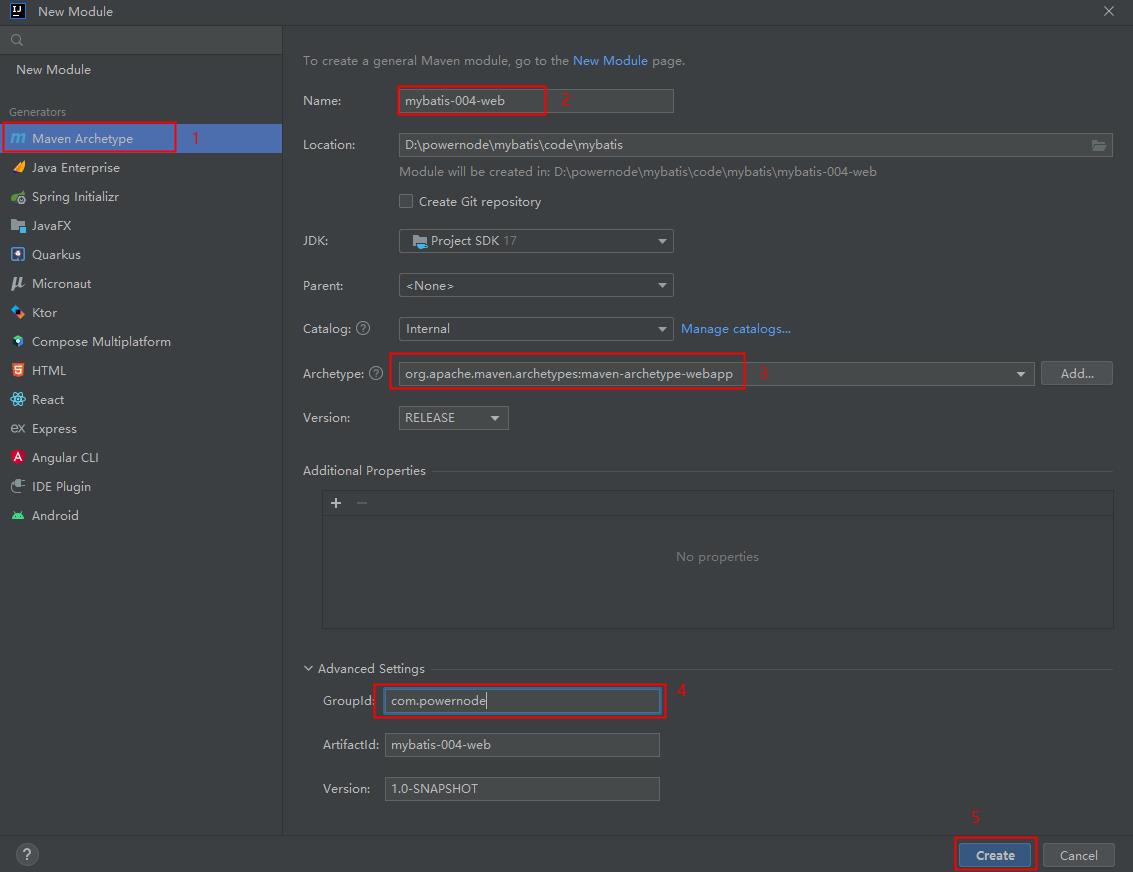
第一步:环境搭建
- IDEA中创建Maven WEB应用(mybatis-004-web)
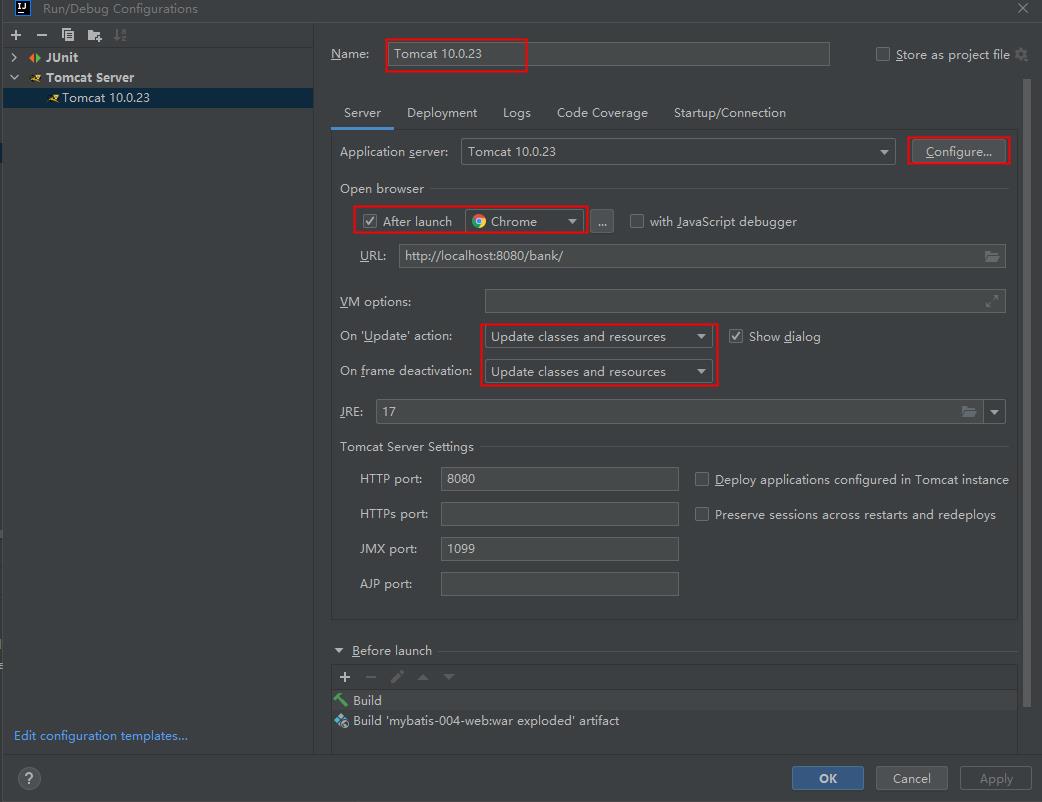
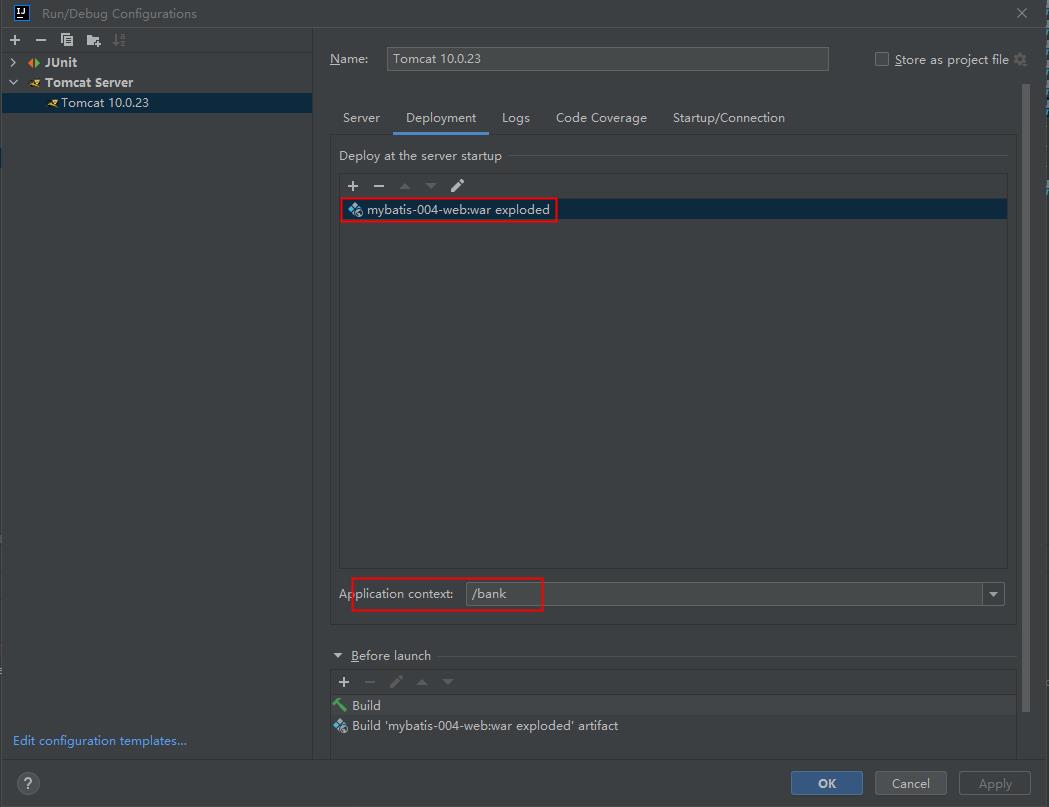
- IDEA配置Tomcat,这里Tomcat使用10+版本。并部署应用到tomcat。
-
默认创建的maven web应用没有java和resources目录,包括两种解决方案
-
- 第一种:自己手动加上。
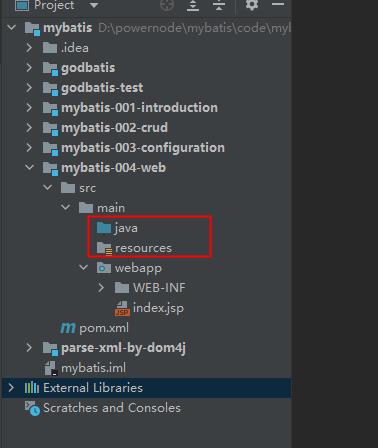
-
- 第二种:修改maven-archetype-webapp-1.4.jar中的配置文件
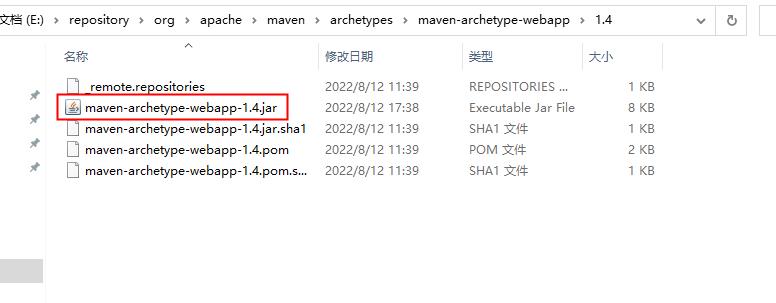
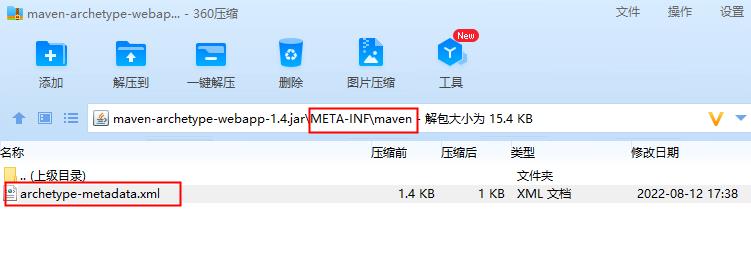
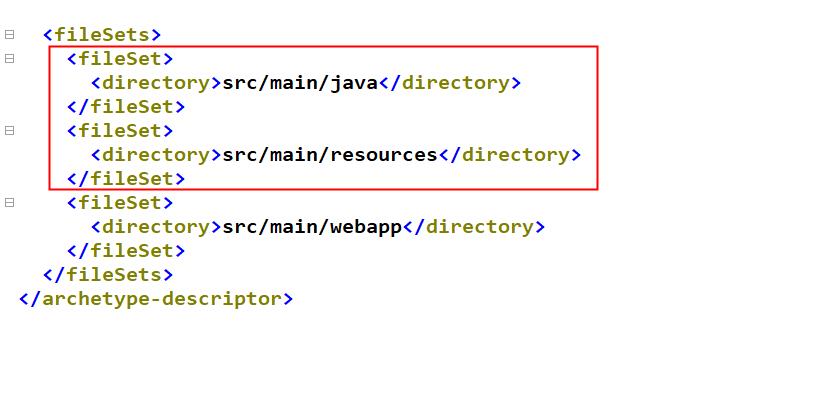
- web.xml文件的版本较低,可以从tomcat10的样例文件中复制,然后修改
<?xml version="1.0" encoding="UTF-8"?>
<web-app xmlns="http://xmlns.jcp.org/xml/ns/javaee"
         xmlns:xsi="http://www.w3.org/2001/XMLSchema-instance"
         xsi:schemaLocation="http://xmlns.jcp.org/xml/ns/javaee
                      http://xmlns.jcp.org/xml/ns/javaee/web-app_4_0.xsd"
         version="4.0"
         metadata-complete="false">
    <!-- <servlet> -->
    <!--     <servlet-name>test</servlet-name> -->
    <!--     <servlet-class>cn.yangbocsu.bank.web.AccountServlet</servlet-class> -->
    <!-- </servlet> -->

    <!-- <servlet-mapping> -->
    <!--     <servlet-name>test</servlet-name> -->
    <!--     <url-pattern>/transfer</url-pattern> -->
    <!-- </servlet-mapping> -->
</web-app>
-
删除index.jsp文件,因为我们这个项目不使用JSP。只使用html。
-
确定pom.xml文件中的打包方式是war包。
-
引入相关依赖
-
- 编译器版本修改为17
- 引入的依赖包括:mybatis,mysql驱动,junit,logback,servlet。
<project xmlns="http://maven.apache.org/POM/4.0.0"
         xmlns:xsi="http://www.w3.org/2001/XMLSchema-instance"
         xsi:schemaLocation="http://maven.apache.org/POM/4.0.0
                             http://maven.apache.org/maven-v4_0_0.xsd">
  <modelVersion>4.0.0</modelVersion>

  <groupId>cn.yangbocsu</groupId>
  <artifactId>mybatis_004_web</artifactId>
  <packaging>war</packaging>
  <version>1.0</version>

  <!-- <name>mybatis_004_web maven</name> -->
  <name>mybatis_004_web</name>
  <url>http://maven.apache.org</url>
  <dependencies>
    <!--mybatis依赖-->
    <dependency>
      <groupId>org.mybatis</groupId>
      <artifactId>mybatis</artifactId>
      <version>3.5.10</version>
    </dependency>
    <!--mysql驱动依赖-->
    <dependency>
      <groupId>mysql</groupId>
      <artifactId>mysql-connector-java</artifactId>
      <version>8.0.30</version>
    </dependency>

    <!--junit依赖-->
    <dependency>
      <groupId>junit</groupId>
      <artifactId>junit</artifactId>
      <version>4.13.2</version>
      <scope>test</scope>
    </dependency>

    <!--logback依赖-->
    <dependency>
      <groupId>ch.qos.logback</groupId>
      <artifactId>logback-classic</artifactId>
      <version>1.2.11</version>
    </dependency>

    <!--servlet依赖-->
    <dependency>
      <groupId>javax.servlet</groupId>
      <artifactId>javax.servlet-api</artifactId>
      <version>4.0.1</version>
    </dependency>

  </dependencies>

  <build>
    <finalName>mybatis_004_web</finalName>
    <pluginManagement>
      <plugins>
        <plugin>
          <artifactId>maven-clean-plugin</artifactId>
          <version>3.1.0</version>
        </plugin>
        <plugin>
          <artifactId>maven-resources-plugin</artifactId>
          <version>3.0.2</version>
        </plugin>
        <plugin>
          <artifactId>maven-compiler-plugin</artifactId>
          <version>3.8.0</version>
        </plugin>
        <plugin>
          <artifactId>maven-surefire-plugin</artifactId>
          <version>2.22.1</version>
        </plugin>
        <plugin>
          <artifactId>maven-war-plugin</artifactId>
          <version>3.2.2</version>
        </plugin>
        <plugin>
          <artifactId>maven-install-plugin</artifactId>
          <version>2.5.2</version>
        </plugin>
        <plugin>
          <artifactId>maven-deploy-plugin</artifactId>
          <version>2.8.2</version>
        </plugin>
      </plugins>
    </pluginManagement>
  </build>
</project>
-
引入相关配置文件,放到resources目录下(全部放到类的根路径下)
-
- mybatis-config.xml
- AccountMapper.xml
- logback.xml
- jdbc.properties
jdbc.driver=com.mysql.cj.jdbc.Driver
jdbc.url=jdbc:mysql://localhost:3306/powernode
jdbc.username=root
jdbc.password=root
<?xml version="1.0" encoding="UTF-8" ?>
<!DOCTYPE configuration
        PUBLIC "-//mybatis.org//DTD Config 3.0//EN"
        "http://mybatis.org/dtd/mybatis-3-config.dtd">
<configuration>

    <properties resource="jdbc.properties"/>

    <environments default="dev">
        <environment id="dev">
            <transactionManager type="JDBC"/>
            <dataSource type="POOLED">
                <property name="driver" value="$jdbc.driver"/>
                <property name="url" value="$jdbc.url"/>
                <property name="username" value="$jdbc.username"/>
                <property name="password" value="$jdbc.password"/>
            </dataSource>
        </environment>
    </environments>
    <mappers>
        <!--一定要注意这里的路径哦!!!-->
        <mapper resource="AccountMapper.xml"/>
    </mappers>
</configuration>
<?xml version="1.0" encoding="UTF-8" ?>
<!DOCTYPE mapper
        PUBLIC "-//mybatis.org//DTD Mapper 3.0//EN"
        "http://mybatis.org/dtd/mybatis-3-mapper.dtd">

<mapper namespace="account">

</mapper>
第二步:前端页面index.html
<!DOCTYPE html>
<html lang="en">
<head>
    <meta charset="UTF-8">
    <title>银行转账</title>
</head>
<body>
    <form action="/bank/transfer" method="post">
        转出账号:<input type="text" name="fromActno"><br>
        转入账号:<input type="text" name="toActno"><br>
        转账金额:<input type="text" name="money"><br>
        <input type="submit" value="转账">
    </form>
</body>
</html>
第三步:创建pojo包、service包、dao包、web包、utils包
- com.powernode.bank.pojo
- com.powernode.bank.service
- com.powernode.bank.service.impl
- com.powernode.bank.dao
- com.powernode.bank.dao.impl
- com.powernode.bank.web.controller
- com.powernode.bank.exception
- com.powernode.bank.utils:将之前编写的SqlSessionUtil工具类拷贝到该包下。
第四步:定义pojo类:Account
package com.powernode.bank.pojo;

/**
 * 银行账户类
 * @author 老杜
 * @version 1.0
 * @since 1.0
 */
public class Account
    private Long id;
    private String actno;
    private Double balance;

    @Override
    public String toString()
        return "Account" +
                "id=" + id +
                ", actno='" + actno + '\\'' +
                ", balance=" + balance +
                '';


    public Account()


    public Account(Long id, String actno, Double balance)
        this.id = id;
        this.actno = actno;
        this.balance = balance;


    public Long getId()
        return id;


    public void setId(Long id)
        this.id = id;


    public String getActno()
        return actno;


    public void setActno(String actno)
        this.actno = actno;


    public Double getBalance()
        return balance;


    public void setBalance(Double balance)
        this.balance = balance;
第五步:编写AccountDao接口,以及AccountDaoImpl实现类
分析dao中至少要提供几个方法,才能完成转账:
- 转账前需要查询余额是否充足:selectByActno
- 转账时要更新账户:update
package com.powernode.bank.dao;

import com.powernode.bank.pojo.Account;

/**
 * 账户数据访问对象
 * @author 老杜
 * @version 1.0
 * @since 1.0
 */
public interface AccountDao

    /**
     * 根据账号获取账户信息
     * @param actno 账号
     * @return 账户信息
     */
    Account selectByActno(String actno);

    /**
     * 更新账户信息
     * @param act 账户信息
     * @return 1表示更新成功,其他值表示失败
     */
    int update(Account act);

package com.powernode.bank.dao.impl;

import com.powernode.bank.dao.AccountDao;
import com.powernode.bank.pojo.Account;
import com.powernode.bank.utils.SqlSessionUtil;
import org.apache.ibatis.session.SqlSession;

public class AccountDaoImpl implements AccountDao
    @Override
    public Account selectByActno(String actno)
        SqlSession sqlSession = SqlSessionUtil.openSession();
        Account act = (Account)sqlSession.selectOne("selectByActno", actno);
        sqlSession.close();
        return act;


    @Override
    public int update(Account act)
        SqlSession sqlSession = SqlSessionUtil.openSession();
        int count = sqlSession.update("update", act);
        sqlSession.commit();
        sqlSession.close();
        return count;
第六步:AccountDaoImpl中编写了mybatis代码,需要编写SQL映射文件了
<?xml version="1.0" encoding="UTF-8" ?>
<!DOCTYPE mapper
        PUBLIC "-//mybatis.org//DTD Mapper 3.0//EN"
        "http://mybatis.org/dtd/mybatis-3-mapper.dtd">

<mapper namespace="account">
    <select id="selectByActno" resultType="com.powernode.bank.pojo.Account">
        select * from t_act where actno = #actno
    </select>
    <update id="update">
        update t_act set balance = #balance where actno = #actno
    </update>
</mapper>
第七步:编写AccountService接口以及AccountServiceImpl
package com.powernode.bank.exception;

/**
 * 余额不足异常
 * @author 老杜
 * @version 1.0
 * @since 1.0
 */
public class MoneyNotEnoughException extends Exception
    public MoneyNotEnoughException()
    public MoneyNotEnoughException(String msg) super(msg);

package com.powernode.bank.exception;

/**
 * 应用异常
 * @author 老杜
 * @version 1.0
 * @since 1.0
 */
public class AppException extends Exception
    public AppException()
    public AppException(String msg) super(msg);

package com.powernode.bank.service;

import com.powernode.bank.exception.AppException;
import com.powernode.bank.exception.MoneyNotEnoughException;

/**
 * 账户业务类。
 * @author 老杜
 * @version 1.0
 * @since 1.0
 */
public interface AccountService

    /**
     * 银行账户转正
     * @param fromActno 转出账户
     * @param toActno 转入账户
     * @param money 转账金额
     * @throws MoneyNotEnoughException 余额不足异常
     * @throws AppException App发生异常
     */
    void transfer(String fromActno, String toActno, double money) throws MoneyNotEnoughException, AppException;

package com.powernode.bank.service.impl;

import com.powernode.bank.dao.AccountDao;
import com.powernode.bank.dao.impl.AccountDaoImpl;
import com.powernode.bank.exception.AppException;
import com.powernode.bank.exception.MoneyNotEnoughException;
import com.powernode.bank.pojo.Account;
import com.powernode.bank.service.AccountService;

public class AccountServiceImpl implements AccountService

    private 以上是关于跟着老杜学MyBatis+第5天+在WEB中应用MyBatis(使用MVC架构模式)的主要内容,如果未能解决你的问题,请参考以下文章