OpenCV 例程 300篇243. 特征检测之 FAST 算法
Posted YouCans
tags:
篇首语:本文由小常识网(cha138.com)小编为大家整理,主要介绍了OpenCV 例程 300篇243. 特征检测之 FAST 算法相关的知识,希望对你有一定的参考价值。
【youcans 的 OpenCV 例程 300篇】243. 特征检测之 FAST 算法
6.6.1 FAST 算法简介
FAST(Features From Accelerated Segment Test) 是一种特征点检测算法,用于特征提取但不涉及特征描述。
SIFT、SURF 的计算量很大,难以满足实时性的要求。Edward Rosten 在 2006 年提出了 FAST特征检测算法。FAST 算法通过与圆周像素的比较结果判别特征点,计算速度快、可重复性高,非常适合实时视频的处理。
FAST 算法将角点定义为:如果像素点与其周围邻域内多个像素相差较大,则该像素点可能是角点。
因此,在以像素点为中心的圆周上均匀地取 16 个像素点,如果其中连续 N 个像素点与中心点的像素值之差都大于设置的阈值,则中心像素被判定为角点。具体有两种情况,一是连续 N 个像素点都比中心点更亮,二是连续 N 个像素点都比中心点更暗,且亮度差都大于设置的阈值 t。
为了提高检测效率,可以通过初步筛选剔除大量的非角点:如果取 N=12,则圆周与横轴纵轴的 4 个交点中必有 3个满足上述亮度差的条件。计算 p1、p9、p5、p13 与中心点 p 的像素差,若其中至少 3 个像素差满足阈值条件,则作为候选点,否则剔除。
在 OpenCV 中,采用分别检测横轴、纵轴的两个交点进行初步筛选:(1)计算 p1、p9 与中心点 p 的像素差,若不满足阈值条件则剔除;(2)计算 p5、p13 与中心点 p 的像素差,若不满足阈值条件则剔除。

FAST 算法的实现步骤为:
(1)设置比较阈值 t,用于比较像素值的差异是否足够大。
(2)构建移动窗口,从以像素 p 为中心、半径为 3 的圆周上,选择 16个像素点,编号为 p1~p16。
(3)计算像素 pk 与中心点 p 的像素差并进行比较: ( I p k − I p > t ) o r ( I p − I p k > t ) (I_pk-I_p>t) \\ or \\ (I_p-I_pk>t) (Ipk−Ip>t) or (Ip−Ipk>t)
3.1 计算 p1、p9、p5、p13 与 p 的像素差,若其中至少 3 个像素差大于阈值 t(或小于 -t),则 P 为候选点,否则 p 不是特征点;
3.2 若 p 是候选点,计算 p1~p16 与中心点 p 的像素差,若至少有连续 9 个(或 12个)点的像素差都大于阈值 t(或小于 -t),则 P 是特征点。
(4)非极大值抑制:邻域中如果存在多个特征点,只保留响应值最大的特征点。
FAST 算法的优点和不足:
(1)FAST 算法简单快速, 比其它算法快很多;
(2)FAST 算法对噪声的影响非常敏感,阈值 t 的大小对结果的影响很大;
(3)FAST 基本算法不产生多尺度特征,也没有方向信息,因此不具有尺度不变性、旋转不变性。
6.6.2 OpenCV 中的 FastFeatureDetector 类
OpenCV 提供了丰富的特征检测算法,而且继承了 cv::Feature2D 类,采用了统一的定义和封装。
OpenCV 中提供 cv::FastFeatureDetector 类实现 FastFeatureDetector 方法,继承了 cv::Feature2D 类,通过 create 静态方法创建。
FastFeatureDetector 类的构造函数为:
static Ptr< FastFeatureDetector >
cv::FastFeatureDetector::create (int threshold=10, bool nonmaxSuppression=true, FastFeatureDetector::DetectorType type=FastFeatureDetector::TYPE_9_16)
在 Python 语言中,OpenCV 提供了 FastFeatureDetector 类的接口函数 cv.FastFeatureDetector.create(), 实例化 FastFeatureDetector 类。
cv.FastFeatureDetector.create([, threshold=10, nonmaxSuppression=true, type=FastFeatureDetector::TYPE_9_16]) → retval
cv.FastFeatureDetector_create([, threshold=10, nonmaxSuppression=true, type=FastFeatureDetector::TYPE_9_16]) → retval
FastFeatureDetector.detect(image, [, mask]) → keypoints
参数说明:
- image:输入图像,单通道
- keypoints :检测到的关键点,是一个特殊的数据结构,包括以下属性:
- Point2f pt:坐标
- float size:关键点的邻域直径
- float angle:关键点的方向,取值为 [0,360)
- float response:关键点的响应强度
- int octave:关键点所在的图像金字塔的组
- int class_id:关键点的 id 编号
- threshold:差分阈值 t,可选项,默认值为 10
- nonmaxSuppression:是否进行非最大值抑制,可选项,默认为 true
- type:检测方案类型,默认值 TYPE_9_16
- FastFeatureDetector::TYPE_9_16,表示圆周上16个像素点/连续9个像素点满足条件
- FastFeatureDetector::TYPE_7_12,表示圆周上12个像素点/连续7个像素点满足条件
- FastFeatureDetector::TYPE_5_8,表示圆周上8个像素点/连续5个像素点满足条件
- mask:掩模图像,8 位单通道,指定查找关键点的区域,可选项
注意事项:
- 函数 cv.FastFeatureDetector.create() 实例化 FastFeatureDetector 类,构造一个 FastFeatureDetector 对象。
- 差分阈值 threshold 的取值非常重要,严重影响检测结果。
例程 14.25:特征检测之 FAST 算法
# 14.25 特征检测之 FAST 算子
# # 读取基准图像
img = cv.imread("../images/Circuit04.png", flags=1) # 基准图像
gray = cv.cvtColor(img, cv.COLOR_BGR2GRAY) # (425, 558)
height, width = gray.shape[:2]
print("shape of image: ", height, width)
fast = cv.FastFeatureDetector_create() # 初始化 FAST 对象
# 默认值:threshold=10, nonmaxSuppression=true, type=FastFeatureDetector::TYPE_9_16
kpNMS1 = fast.detect(img, None) # 检测关键点
imgFASTnms1 = cv.drawKeypoints(img, kpNMS1, None, color=(255, 0, 0))
# 关闭非极大抑制
fast.setNonmaxSuppression(0) # nonmaxSuppression=false
kp1 = fast.detect(img, None)
imgFAST1 = cv.drawKeypoints(img, kp1, None, color=(255, 0, 0))
print("\\nthreshold: ".format(fast.getThreshold()))
print("num of Keypoints without NMS: ".format(len(kp1)))
print("num of Keypoints with NMS: ".format(len(kpNMS1)))
fastT2 = cv.FastFeatureDetector_create(threshold=20) # 设置差分阈值为 20
kpNMS2 = fastT2.detect(img, None) # 检测关键点
imgFASTnms2 = cv.drawKeypoints(img, kpNMS2, None, color=(255, 0, 0))
# 关闭非极大抑制
fastT2.setNonmaxSuppression(0) # nonmaxSuppression=false
kp2 = fastT2.detect(img, None)
imgFAST2 = cv.drawKeypoints(img, kp2, None, color=(255, 0, 0))
print("\\nthreshold: ".format(fastT2.getThreshold()))
print("num of Keypoints without NMS: ".format(len(kp2)))
print("num of Keypoints with NMS: ".format(len(kpNMS2)))
fastT3 = cv.FastFeatureDetector_create(threshold=40) # 设置差分阈值为 40
kpNMS3 = fastT3.detect(img, None) # 检测关键点
imgFASTnms3 = cv.drawKeypoints(img, kpNMS3, None, color=(255, 0, 0))
# 关闭非极大抑制
fastT3.setNonmaxSuppression(0) # nonmaxSuppression=false
kp3 = fastT3.detect(img, None)
imgFAST3 = cv.drawKeypoints(img, kp3, None, color=(255, 0, 0))
print("\\nthreshold: ".format(fastT3.getThreshold()))
print("num of Keypoints without NMS: ".format(len(kp3)))
print("num of Keypoints with NMS: ".format(len(kpNMS3)))
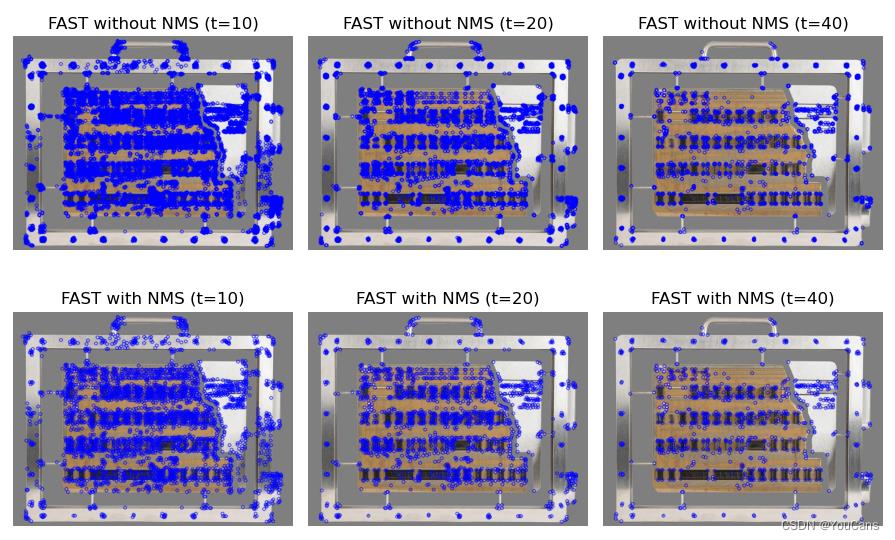
plt.figure(figsize=(9, 6))
plt.subplot(231), plt.title("FAST without NMS (t=10)")
plt.axis('off'), plt.imshow(cv.cvtColor(imgFAST1, cv.COLOR_BGR2RGB))
plt.subplot(232), plt.title("FAST without NMS (t=20)")
plt.axis('off'), plt.imshow(cv.cvtColor(imgFAST2, cv.COLOR_BGR2RGB))
plt.subplot(233), plt.title("FAST without NMS (t=40)")
plt.axis('off'), plt.imshow(cv.cvtColor(imgFAST3, cv.COLOR_BGR2RGB))
plt.subplot(234), plt.title("FAST with NMS (t=10)")
plt.axis('off'), plt.imshow(cv.cvtColor(imgFASTnms1, cv.COLOR_BGR2RGB))
plt.subplot(235), plt.title("FAST with NMS (t=20)")
plt.axis('off'), plt.imshow(cv.cvtColor(imgFASTnms2, cv.COLOR_BGR2RGB))
plt.subplot(236), plt.title("FAST with NMS (t=40)")
plt.axis('off'), plt.imshow(cv.cvtColor(imgFASTnms3, cv.COLOR_BGR2RGB))
plt.tight_layout()
plt.show()
运行结果:
threshold: 10
num of Keypoints without NMS: 12100
num of Keypoints with NMS: 3704
threshold: 20
num of Keypoints without NMS: 5591
num of Keypoints with NMS: 1892
threshold: 40
num of Keypoints without NMS: 1974
num of Keypoints with NMS: 840
参考文献:Edward Rosten and Tom Drummond, “Machine learning for high speed corner detection” in 9th European Conference on Computer Vision, vol. 1, 2006, pp. 430–443.

【本节完】
版权声明:
youcans@xupt 原创作品,转载必须标注原文链接:(https://blog.csdn.net/youcans/article/details/127333535)
Copyright 2022 youcans, XUPT
Crated:2022-10-15240. OpenCV 中的 Shi-Tomas 角点检测
241. 尺度不变特征变换(SIFT)
242. 加速稳健特征检测算法(SURF)
243. 特征检测之 FAST 算法
以上是关于OpenCV 例程 300篇243. 特征检测之 FAST 算法的主要内容,如果未能解决你的问题,请参考以下文章