Kotlin 协程协程底层实现 ④ ( 结构化并发 | viewModelScope 作用域示例 )
Posted 韩曙亮
tags:
篇首语:本文由小常识网(cha138.com)小编为大家整理,主要介绍了Kotlin 协程协程底层实现 ④ ( 结构化并发 | viewModelScope 作用域示例 )相关的知识,希望对你有一定的参考价值。
文章目录
常见的 CoroutineScope 协程作用域 :
- GlobalScope : 该作用域是 进程级别的 , 与应用进程同级 , 即使 Activity 被销毁 , 协程任务也可以继续执行 ;
- MainScope : 该 作用域仅在 Activty 中 , 如果 Activity 被销毁 , 则 在 onDestory 生命周期函数中取消协程任务 ;
- viewModelScope : 该作用与仅在 ViewModel 中使用 , 与 ViewModel 生命周期绑定 ;
- lifecycleScope : 该作用与仅在 Activity 中使用 , 与 Activity 生命周期绑定 ;
一、viewModelScope 作用域作用
viewModelScope 协程作用域 需要绑定 ViewModel 生命周期 , 在特定界面中 , 如可旋转屏幕的 Activity 界面中 , 如果使用 MainScope 协程作用域 , 当屏幕旋转时 , 就会在 onDestory 生命周期函数中 取消协程作用域 , 此时协程相关的临时数据都被取消了 ;
当旋转 Activity 界面时 , 会调用当前 Activity 的 onDestory 生命周期函数 , 自然对应的协程作用域也会被取消 , 因此引入 viewModelScope 作用域 , 避免协程临时数据被销毁 ;
二、viewModelScope 作用域示例
项目地址 :
在 Module 模块下的 build.gradle 中
- 导入 kotlin-kapt 插件 ;
- 启用 DataBinding , 在 build.gradle # android 层级下配置
dataBinding enabled = true即可 , 配置效果如下 :
plugins
    id 'com.android.application'
    id 'kotlin-android'
    id 'kotlin-kapt'


android
    defaultConfig
        applicationId "kim.hsl.coroutine"


    dataBinding
        enabled = true
在 布局文件 中 , 选中根组件 , 一般是 androidx.constraintlayout.widget.ConstraintLayout 组件 , 如 :
<?xml version="1.0" encoding="utf-8"?>
<androidx.constraintlayout.widget.ConstraintLayout
	xmlns:android="http://schemas.android.com/apk/res/android"
    xmlns:app="http://schemas.android.com/apk/res-auto"
    xmlns:tools="http://schemas.android.com/tools"
    android:layout_width="match_parent"
    android:layout_height="match_parent"
    tools:context=".MainActivity">
    <!-- 布局主要内容 -->

</androidx.constraintlayout.widget.ConstraintLayout>
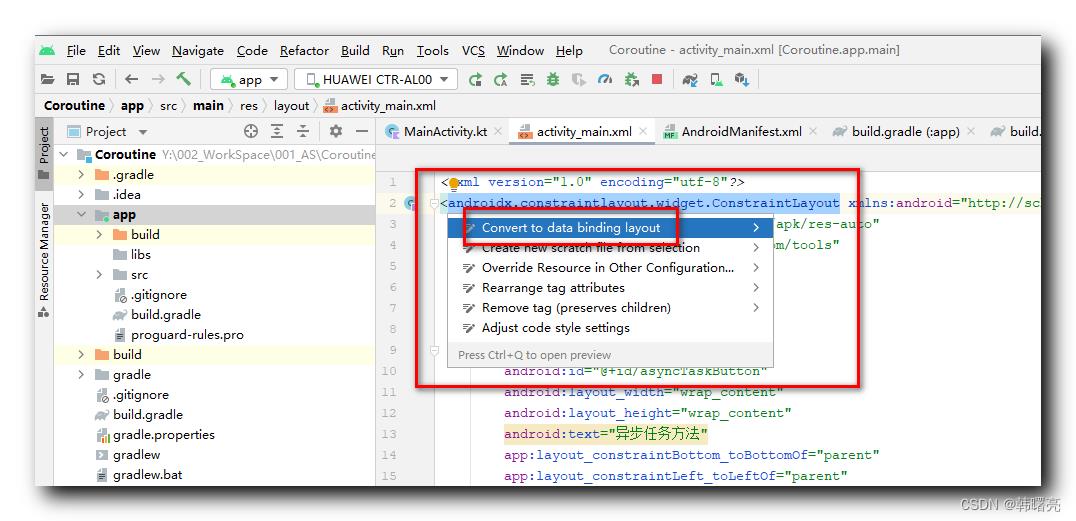
使用 " Alt + 回车 " 快捷键 , 弹出如下下拉菜单 ,

选择菜单中的 " Convert to data binding layout " 选项 , UI 布局会变成如下格式 :
<?xml version="1.0" encoding="utf-8"?>
<layout xmlns:android="http://schemas.android.com/apk/res/android"
    xmlns:app="http://schemas.android.com/apk/res-auto"
    xmlns:tools="http://schemas.android.com/tools">

    <data>

    </data>

    <androidx.constraintlayout.widget.ConstraintLayout
        android:layout_width="match_parent"
        android:layout_height="match_parent"
        tools:context=".MainActivity">
		<!-- 布局主要内容 -->

    </androidx.constraintlayout.widget.ConstraintLayout>
</layout>
设置完毕后 , 先构建应用 , Android Studio 中选择 " 菜单栏 | Build | Make Project " 选项 , 或者使用 " Ctrl + F9 " 快捷键 , 首先要编译生成相关数据绑定类 ;
MainActivity 代码 :
package kim.hsl.coroutine

import android.os.Bundle
import androidx.activity.viewModels
import androidx.appcompat.app.AppCompatActivity
import androidx.databinding.DataBindingUtil
import kim.hsl.coroutine.databinding.ActivityMainBinding


class MainActivity : AppCompatActivity()

    private val mainViewModel: MainViewModel by viewModels()

    override fun onCreate(savedInstanceState: Bundle?)
        super.onCreate(savedInstanceState)

        // 设置布局文件
        val binding = DataBindingUtil.setContentView<ActivityMainBinding>(this,R.layout.activity_main)

        // 设置数据源
        binding.viewmodel = mainViewModel

        // 设置声明周期管理器
        binding.lifecycleOwner = this

        // 设置点击事件
        binding.button.setOnClickListener
            // 更新 mainViewModel 数据
            mainViewModel.setStudentData()
ViewModel 代码 :
package kim.hsl.coroutine

import androidx.lifecycle.MutableLiveData
import androidx.lifecycle.ViewModel
import androidx.lifecycle.viewModelScope
import kotlinx.coroutines.launch

class MainViewModel() : ViewModel()
    // 在布局文件中配置的属性
    val student = MutableLiveData<Student>()

    // 该方法用于刷新数据
    fun setStudentData()
        viewModelScope.launch
            student.value = Student("Tom", 18)


data class Student(val name: String, val age: Int)
布局文件代码 :
<?xml version="1.0" encoding="utf-8"?>
<layout xmlns:android="http://schemas.android.com/apk/res/android"
    xmlns:app="http://schemas.android.com/apk/res-auto"
    xmlns:tools="http://schemas.android.com/tools">

    <data>
        <variable
            name="viewmodel"
            type="kim.hsl.coroutine.MainViewModel" />
    </data>

    <androidx.constraintlayout.widget.ConstraintLayout
        android:layout_width="match_parent"
        android:layout_height="match_parent"
        tools:context=".MainActivity">


        <Button
            android:id="@+id/button"
            android:layout_width="wrap_content"
            android:layout_height="wrap_content"
            android:text="@viewmodel.student.name"
            app:layout_constraintBottom_toBottomOf="parent"
            app:layout_constraintLeft_toLeftOf="parent"
            app:layout_constraintRight_toRightOf="parent"
            app:layout_constraintTop_toTopOf="parent"
            app:layout_constraintVertical_bias="0.2"
            app:layout_constraintHorizontal_bias="0.5" />

    </androidx.constraintlayout.widget.ConstraintLayout>
</layout>
项目地址 :
以上是关于Kotlin 协程协程底层实现 ④ ( 结构化并发 | viewModelScope 作用域示例 )的主要内容,如果未能解决你的问题,请参考以下文章
Kotlin 协程协程底层实现 ② ( 协程调度器 | 协程任务泄漏 | 结构化并发 )
Kotlin 协程协程底层实现 ② ( 协程调度器 | 协程任务泄漏 | 结构化并发 )
Kotlin 协程协程底层实现 ③ ( 结构化并发 | MainScope 作用域 | 取消协程作用域 | Activity 实现 CoroutineScope 协程作用域接口 )
Kotlin 协程协程底层实现 ③ ( 结构化并发 | MainScope 作用域 | 取消协程作用域 | Activity 实现 CoroutineScope 协程作用域接口 )
Kotlin 协程协程启动 ⑤ ( 协程作用域构建器 | runBlocking 函数 | coroutineScope 函数 | supervisorScope 函数 )
Kotlin 协程协程启动 ⑤ ( 协程作用域构建器 | runBlocking 函数 | coroutineScope 函数 | supervisorScope 函数 )