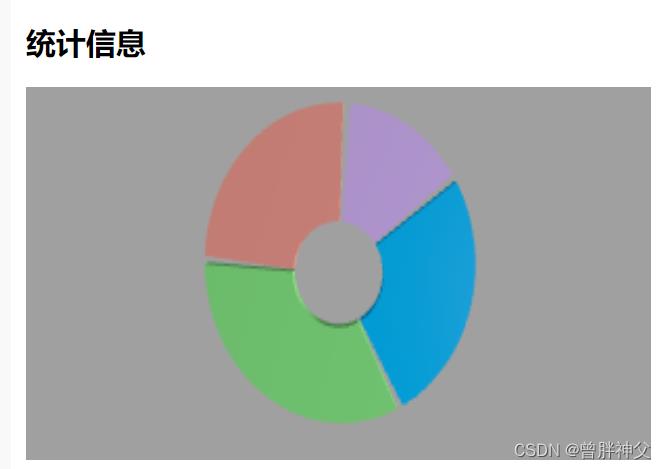
使用ThreeJS绘制一个饼图
Posted 曾胖神父
tags:
篇首语:本文由小常识网(cha138.com)小编为大家整理,主要介绍了使用ThreeJS绘制一个饼图相关的知识,希望对你有一定的参考价值。
总体思路
使用THREE.Shape绘制一个外边圆弧和内边圆弧,让外边圆弧剔除内边圆弧,由于内边圆弧半径是可控的,所以也能通过这种办法绘制正常圆弧。最后使用THREE.ExtrudeGeometry挤出最终的图形,形成3D扇形图。制作单个扇形图之后,以此类推,制作剩下的扇形,最终将获得的扇形图集合,置入同一个THREE.Group中,形成一个3D饼图
具体代码(饼图)
import * as THREE from'three'
//饼图继承Group(对象组合)类
class Pie extends THREE.Group
    constructor (option)
      super()

      this.option = Object.assign(
        intervalAngle: 3,//每个扇形之间间距度数,代表每个扇形之间的间距,为0的话则无间距
        interval: 0,//每个扇形距离原本中心坐标点的额外距离,如果过高会导致扇形离中心点散开
      , option)
      //总值
      let sum = 0
      //总间距=扇形数量x每个扇形之间间距度数
      this.totalInterval = this.option.intervalAngle * this.option.items.length
       //遍历传入的数组,获取总值
      this.option.items.forEach(item =>
        sum += item.value
      )
      //绘制扇形总角度为
      this.totalAngle = 360 - this.totalInterval
      //随机起始度数
      let current = Math.random() * 360
      //根据传入的数组绘制多个扇形
      for (let i = 0, len = this.option.items.length; i < len; i++)
        let item = this.option.items[i]
        //扇形
        let geometry = this.sector(5, 15, current, current + item.value / sum * this.totalAngle, this.option.height)
        // 赋予扇形材质
        let mesh = new THREE.Mesh(geometry, new THREE.MeshPhongMaterial( color: item.color, opacity: 1, transparent: true ))
        //扇形中心坐标点=(起始度数+最终度数)/2*Π/180
        let center = (current + current + item.value / sum * this.totalAngle) / 2 * Math.PI / 180
        //扇形坐标点=扇形中心坐标点*离中心点距离
        mesh.position.x += this.option.interval * Math.cos(center);
        mesh.position.y += this.option.interval * Math.sin(center);

        this.add(mesh)
        //起始度数加上值对应的间隔度数(值对应的间隔度数=总间隔度数*(值与总值的比例))
        current += item.value / sum * this.totalAngle
        //起始度数加上单位间隔度数
        current += this.option.intervalAngle

      //调整整体饼图的旋转角度,可加。也可在外部调整
      // this.rotation.x = -Math.PI / 3

    //绘制扇形(内边圆半径,外边圆半径,起始角度,终止角度,高度)
    sector (inRadius, outRadius, begin, end, height)
      var shape = new THREE.Shape()
      //如果内边圆半径为0
      if (inRadius == 0)
        //那么绘制扇形的圆心点为0
        shape.moveTo(0, 0)
       else
        //否则设置绘制扇形的圆心点内边圆半径
        shape.moveTo(inRadius, 0)
        //绘制内边框扇形圆弧
        shape.absarc(0, 0, inRadius, begin / 180 * Math.PI, end / 180 * Math.PI, false)


      shape.lineTo(outRadius * Math.cos(end / 180 * Math.PI), outRadius * Math.sin(end / 180 * Math.PI))
       //绘制外边框扇形圆弧
      shape.absarc(0, 0, outRadius, end / 180 * Math.PI, begin / 180 * Math.PI, true)

      shape.lineTo(inRadius * Math.cos(begin / 180 * Math.PI), inRadius * Math.sin(begin / 180 * Math.PI))
      //将绘制的平面扇形挤出设置的高度,使其变成3D扇形(shape平面扇形,amount挤压高度,bevelEnabled是否设置斜角,steps指定拉伸体沿深度方向分成多少段)
      return new THREE.ExtrudeGeometry(shape,  amount: height, bevelEnabled: false, steps: 1 )

    //添加文字(暂无)
    addText (text, x, y, z)


  export default Pie
具体代码(使用场景实例)
<template>
  <div class="hisotyChart">

  </div>
</template>
<style scoped lang="scss">
.hisotyChart
  width: 90%;
    height:100%;
  // height: 100vh;
  // width: 100vw;
  margin-bottom: 3%;
  background-color: cornflowerblue;
  canvas
    width: 100%;
    height:100%;


</style>
<script>
import * as THREE from 'three';
import  OrbitControls  from 'three/examples/jsm/controls/OrbitControls';
import Pie from './3DChart/3DPie';


const $ = s => document.querySelector(s);
let pyramid = null;
//展示模型
let showModel = null;
//摄像头
let camera = null;
//场景
let scene = null;

//灯光
let light = null;
//渲染器
let render = null;
//用户交互插件
let controls = null;
let group = new THREE.Group();

export default
  name: 'HisotyChart',
  data()
    return

    ;
  ,
  methods:


    //场景初始化
    initScene()
      console.log("绘制场景");
      scene = new THREE.Scene();
      scene.background = new THREE.Color(0xa0a0a0);
      console.log("绘制场景结束");
    ,
    //初始化摄像头
    initCamera()
      console.log("绘制场景");
      camera = new THREE.PerspectiveCamera(45, window.innerWidth / window.innerHeight, 0.1, 1000);
      // -7.951022465039643, y: 50.66599857875026, z: 84.02389415272548
      camera.position.set(0, 0, 0);
      console.log(camera);

      camera.lookAt(new THREE.Vector3(0, 0, 0));
    ,
    //初始化灯光
    initLight()
      scene.add(new THREE.AmbientLight(0x444444));
      light = new THREE.SpotLight(0xffffff);
      // light.position.set(0, 1.25, 1.25);
      // light.position.set(0, -110, 20);
      light.matrixWorldAutoUpdate = true;
      light.position.set(165.8, 35.6, 80.6);

      //告诉点光需要开启阴影投射
      light.castShadow = true;
      light.shadow.bias = -0.000005;
      light.shadow.mapSize.width = 2048; //阴影贴图宽度设置为1024像素
      light.shadow.mapSize.height = 2048; //阴影贴图高度设置为1024像素
      var ligntCameraHelper = new THREE.SpotLightHelper(light, 20);
      ligntCameraHelper.visible = false;
      // let Ambient = new THREE.AmbientLight(0x404040, 2);
      scene.add(ligntCameraHelper);
      scene.add(light);
      var shadowCameraHelper = new THREE.CameraHelper(light.shadow.camera);
      shadowCameraHelper.visible = false;
      // let Ambient = new THREE.AmbientLight(0x404040, 2);
      scene.add(shadowCameraHelper);
    ,
    //3D饼图初始化
    initPie()
      pyramid = new Pie(
        items: [
          value: Math.random() * 10,
          color: '#DE5347'
        ,
          value: Math.random() * 10,
          color: '#3DCE3D'
        ,
          value: Math.random() * 10,
          color: '#0080FF'
        ,

        value: Math.random() * 10,
          color: '#A473EA'
      ],
        text: (item) =>
          return 'value-' + item.value

      );
      pyramid.rotation.x = -Math.PI / 3;
      group.add(pyramid);
      scene.add(group);
    ,

    //渲染器初始化
    initRender()
      console.log("渲染渲染器");
      render = new THREE.WebGLRenderer( antialias: true );
     // render.setSize(window.innerWidth, window.innerHeight);
      //修改渲染器输出格式
      render.outputEncoding = THREE.sRGBEncoding;
      render.shadowMap.enabled = true;
      render.shadowMap.type = THREE.PCFSoftShadowMap;
      //渲染器添加toneMapping效果
      // render.toneMapping = THREE.ACESFilmicToneMapping;
      //告诉渲染器需要阴影效果
      render.setClearColor('#1F2025', 1.0);
      render.domElement.style.width="100%";
      render.domElement.style.height="100%";
      $('.hisotyChart').appendChild(render.domElement);

    ,
    //用户插件初始化
    initControls()
      controls = new OrbitControls(camera, render.domElement);
      // 使动画循环使用时阻尼或自转 意思是否有惯性
      controls.enableDamping = true;
      //动态阻尼系数 就是鼠标拖拽旋转灵敏度
      //controls.dampingFactor = 0.25;
      //是否可以缩放
      controls.enableZoom = true;
      //是否自动旋转
      controls.autoRotate = true;
      controls.autoRotateSpeed = 0.5;
      //设置相机距离原点的最远距离
      controls.minDistance = 1;
      //设置相机距离原点的最远距离
      controls.maxDistance = 500;
      //是否开启右键拖拽
      controls.enablePan = true;
    ,


    render()
      render.render(scene, camera);


    ,

    //窗口变动触发的函数
    onWindowResize()
      camera.aspect = window.innerWidth / window.innerHeight;
      camera.updateProjectionMatrix();
      this.render();
      //render.setSize(window.innerWidth, window.innerHeight);
    ,
    animate()
      //更新
      requestAnimationFrame(this.animate);

      this.render();
    ,

    //绘制
    draw()
      console.log("开始绘制");
      this.initScene();
      this.initCamera();
      this.initRender();
      this.initLight();
      this.initControls();
      this.initPie();

      this.animate();
      window.onresize = this.onWindowResize;


  ,
  created()

  ,
  mounted()
    this.draw();


</script>

<!-- <template>
  <div class="hisotyChart">

  </div>
</template>
<script>
  export default
     name:"HisotyChart"

</script>
<style scoped lang="scss">
   .hisotyChart
     height: 90%;
     width: 100%;
     margin-bottom: 3%;
     background-color: cornflowerblue;


</style> -->
最终效果(空心圆饼图)

最终效果(标准实心圆饼图)

设置内边圆为0,即可获得实心圆

设置扇形间距距离为0,使其无间距。
最终效果如下

以上是关于使用ThreeJS绘制一个饼图的主要内容,如果未能解决你的问题,请参考以下文章