Linux网络配置实战服务器Network静态路由配置
Posted 江湖有缘
tags:
篇首语:本文由小常识网(cha138.com)小编为大家整理,主要介绍了Linux网络配置实战服务器Network静态路由配置相关的知识,希望对你有一定的参考价值。
【Linux网络配置实战】服务器Network静态路由配置
- 一、环境介绍
- 二、检查各节点IP地址
- 三、在route01上启动IP包转发
- 四、查看当前两节点互通情况
- 五、在server01配置静态路由
- 六、在server02配置静态路由
- 七、检查server01和server02连通情况
- 八、server01配置永久路由
- 九、server02配置永久静态路由
- 十、测试server01与server02互通情况
一、环境介绍
1.环境规划
| hostname | IP地址 | 网关 | 系统版本 |
|---|---|---|---|
| server01 | 192.168.20.66 | 192.168.20.1 | centos7.6 |
| route01 | 192.168.20.254/24-172.16.10.254/24 | — | centos7.6 |
| server02 | 172.16.10.66 | 172.16.10.1 | centos7.6 |
2.实验目的
server02与server01可以互通
二、检查各节点IP地址
1.检查server01服务器上
[root@server01 ~]# ifconfig
eth0: flags=4163<UP,BROADCAST,RUNNING,MULTICAST>  mtu 1500
        inet 192.168.20.66  netmask 255.255.255.0  broadcast 192.168.20.255
        inet6 fe80::2a6e:d4ff:fe89:5da4  prefixlen 64  scopeid 0x20<link>
        ether 28:6e:d4:89:5d:a4  txqueuelen 1000  (Ethernet)
        RX packets 6020  bytes 682748 (666.7 KiB)
        RX errors 0  dropped 0  overruns 0  frame 0
        TX packets 112  bytes 17061 (16.6 KiB)
        TX errors 0  dropped 0 overruns 0  carrier 0  collisions 0

lo: flags=73<UP,LOOPBACK,RUNNING>  mtu 65536
        inet 127.0.0.1  netmask 255.0.0.0
        inet6 ::1  prefixlen 128  scopeid 0x10<host>
        loop  txqueuelen 1000  (Local Loopback)
        RX packets 4  bytes 344 (344.0 B)
        RX errors 0  dropped 0  overruns 0  frame 0
        TX packets 4  bytes 344 (344.0 B)
        TX errors 0  dropped 0 overruns 0  carrier 0  collisions 0
2.检查server02服务器网卡
[root@server02 ~]# ifconfig
eth0: flags=4163<UP,BROADCAST,RUNNING,MULTICAST>  mtu 1500
        inet 172.16.10.66  netmask 255.255.255.0  broadcast 172.16.10.255
        inet6 fe80::2a6e:d4ff:fe89:cc37  prefixlen 64  scopeid 0x20<link>
        ether 28:6e:d4:89:cc:37  txqueuelen 1000  (Ethernet)
        RX packets 6030  bytes 686378 (670.2 KiB)
        RX errors 0  dropped 0  overruns 0  frame 0
        TX packets 107  bytes 16548 (16.1 KiB)
        TX errors 0  dropped 0 overruns 0  carrier 0  collisions 0

lo: flags=73<UP,LOOPBACK,RUNNING>  mtu 65536
        inet 127.0.0.1  netmask 255.0.0.0
        inet6 ::1  prefixlen 128  scopeid 0x10<host>
        loop  txqueuelen 1000  (Local Loopback)
        RX packets 4  bytes 344 (344.0 B)
        RX errors 0  dropped 0  overruns 0  frame 0
        TX packets 4  bytes 344 (344.0 B)
        TX errors 0  dropped 0 overruns 0  carrier 0  collisions 0
3.检查route01上的网卡
[root@route01 ~]# ifconfig
eth0: flags=4163<UP,BROADCAST,RUNNING,MULTICAST>  mtu 1500
        inet 192.168.20.254  netmask 255.255.255.0  broadcast 192.168.20.255
        inet6 fe80::2a6e:d4ff:fe89:7954  prefixlen 64  scopeid 0x20<link>
        ether 28:6e:d4:89:79:54  txqueuelen 1000  (Ethernet)
        RX packets 5762  bytes 655197 (639.8 KiB)
        RX errors 0  dropped 0  overruns 0  frame 0
        TX packets 117  bytes 17132 (16.7 KiB)
        TX errors 0  dropped 0 overruns 0  carrier 0  collisions 0

eth1: flags=4163<UP,BROADCAST,RUNNING,MULTICAST>  mtu 1500
        inet 172.16.10.254  netmask 255.255.255.0  broadcast 172.16.10.255
        inet6 fe80::2a6e:d4ff:fe89:d1a0  prefixlen 64  scopeid 0x20<link>
        ether 28:6e:d4:89:d1:a0  txqueuelen 1000  (Ethernet)
        RX packets 3012  bytes 349027 (340.8 KiB)
        RX errors 0  dropped 0  overruns 0  frame 0
        TX packets 23  bytes 1499 (1.4 KiB)
        TX errors 0  dropped 0 overruns 0  carrier 0  collisions 0

lo: flags=73<UP,LOOPBACK,RUNNING>  mtu 65536
        inet 127.0.0.1  netmask 255.0.0.0
        inet6 ::1  prefixlen 128  scopeid 0x10<host>
        loop  txqueuelen 1000  (Local Loopback)
        RX packets 12  bytes 1040 (1.0 KiB)
        RX errors 0  dropped 0  overruns 0  frame 0
        TX packets 12  bytes 1040 (1.0 KiB)
        TX errors 0  dropped 0 overruns 0  carrier 0  collisions 0
三、在route01上启动IP包转发
[root@route01 ~]# cd /proc/sys/net/ipv4/
[root@route01 ipv4]# echo 1 > /proc/sys/net/ipv4/ip_forward
[root@route01 ipv4]#
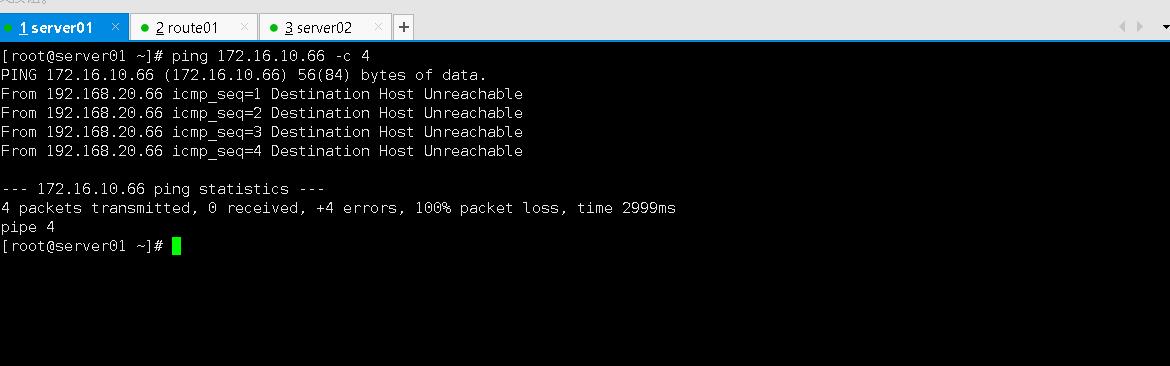
四、查看当前两节点互通情况
1.查看server01和server02连通状态

2.查看当前server01路由表
[root@server01 ~]# route
Kernel IP routing table
Destination     Gateway         Genmask         Flags Metric Ref    Use Iface
default         gateway         0.0.0.0         UG    0      0        0 eth0
link-local      0.0.0.0         255.255.0.0     U     1002   0        0 eth0
192.168.20.0    0.0.0.0         255.255.255.0   U     0      0        0 eth0
3.查看当前server01路由表
[root@server02 ~]# route
Kernel IP routing table
Destination     Gateway         Genmask         Flags Metric Ref    Use Iface
default         gateway         0.0.0.0         UG    0      0        0 eth0
link-local      0.0.0.0         255.255.0.0     U     1002   0        0 eth0
172.16.10.0     0.0.0.0         255.255.255.0   U     0      0        0 eth0
五、在server01配置静态路由
1.添加静态路由
[root@server01 ~]# route add -net 172.16.10.0/24 gw 192.168.20.254
2.查看当前路由表
[root@server01 ~]# route
Kernel IP routing table
Destination     Gateway         Genmask         Flags Metric Ref    Use Iface
default         gateway         0.0.0.0         UG    0      0        0 eth0
link-local      0.0.0.0         255.255.0.0     U     1002   0        0 eth0
172.16.10.0     192.168.20.254  255.255.255.0   UG    0      0        0 eth0
192.168.20.0    0.0.0.0         255.255.255.0   U     0      0        0 eth0
六、在server02配置静态路由
1.添加静态路由
[root@server02 ~]# route add -net 192.168.20.0/24 gw 172.16.10.254
2.查看当前路由表
[root@server02 ~]# route
Kernel IP routing table
Destination     Gateway         Genmask         Flags Metric Ref    Use Iface
default         gateway         0.0.0.0         UG    0      0        0 eth0
link-local      0.0.0.0         255.255.0.0     U     1002   0        0 eth0
172.16.10.0     0.0.0.0         255.255.255.0   U     0      0        0 eth0
192.168.20.0    172.16.10.254   255.255.255.0   UG    0      0        0 eth0
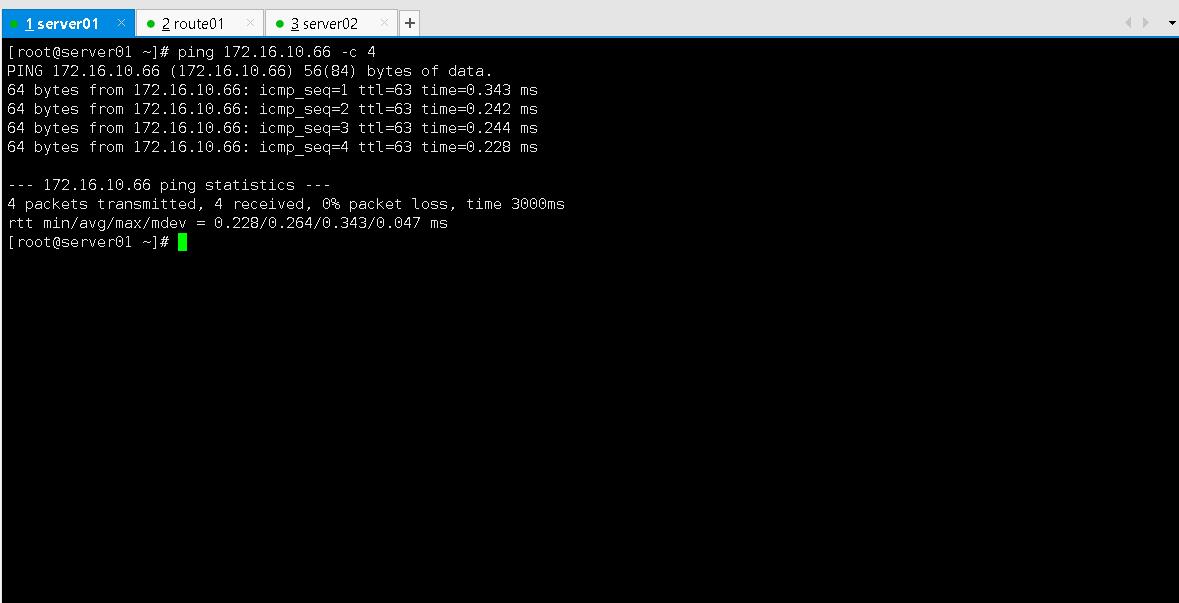
七、检查server01和server02连通情况


八、server01配置永久路由
1.在server01上删除临时静态路由
[root@server01 ~]# route delete -net 172.16.10.0/24
[root@server01 ~]# route
Kernel IP routing table
Destination     Gateway         Genmask         Flags Metric Ref    Use Iface
default         gateway         0.0.0.0         UG    0      0        0 eth0
link-local      0.0.0.0         255.255.0.0     U     1002   0        0 eth0
192.168.20.0    0.0.0.0         255.255.255.0   U     0      0        0 eth0
2.新增网卡配置文件写入路由
[root@server01 ~]# !73
cd /etc/sysconfig/network-scripts/
[root@server01 network-scripts]# vim route-eth0
[root@server01 network-scripts]# cat route-eth0
172.16.10.0/24 via 192.168.20.254
3.重启网路服务
[root@server01 network-scripts]# service network restart
Restarting network (via systemctl):                        [  OK  ]
4.查看路由状态
[root@server01 network-scripts]# route
Kernel IP routing table
Destination     Gateway         Genmask         Flags Metric Ref    Use Iface
default         gateway         0.0.0.0         UG    0      0        0 eth0
link-local      0.0.0.0         255.255.0.0     U     1002   0        0 eth0
172.16.10.0     192.168.20.254  255.255.255.0   UG    0      0        0 eth0
192.168.20.0    0.0.0.0         255.255.255.0   U     0      0        0 eth0
九、server02配置永久静态路由
1.删除临时静态路由
route delete -net 192.168.20.0/24    # 删除临时路由
cd /etc/sysconfig/network-scripts/    # 进入网卡配置文件目录
2.新增网卡配置文件写入路由
[root@server02 network-scripts]# vim route-eth1
[root@server02 network-scripts]# cat route-eth1
192.168.20.0/24 via 172.16.10.254
3.重启网络
[root@server02 network-scripts]# service network restart
Restarting network (via systemctl):                        [  OK  ]
4.查看静态路由表
[root@server02 network-scripts]# route
Kernel IP routing table
Destination     Gateway         Genmask         Flags Metric Ref    Use Iface
default         gateway         0.0.0.0         UG    100    0        0 eth0
172.16.10.0     0.0.0.0         255.255.255.0   U     100    0        0 eth0
192.168.20.0    172.16.10.254   255.255.255.0   UG    100    0        0 eth0
十、测试server01与server02互通情况

以上是关于Linux网络配置实战服务器Network静态路由配置的主要内容,如果未能解决你的问题,请参考以下文章