原迹手写之贝赛尔曲线(穿过已知点画平滑曲线(3次贝塞尔曲线)
Posted _ArcticOcean
tags:
篇首语:本文由小常识网(cha138.com)小编为大家整理,主要介绍了原迹手写之贝赛尔曲线(穿过已知点画平滑曲线(3次贝塞尔曲线)相关的知识,希望对你有一定的参考价值。
为了把一串点连成光滑的曲线,先研究贝塞尔曲线,又搞B样条插值。。。。都没有成功(数学没那么强)。
后来在
“[翻译] AGG 之贝塞尔插值 ”http://liyiwen.javaeye.com/blog/705489 。看到一种比较好的方法:
运用贝塞尔曲线的光滑性来穿过这些点。
大致思路就是 先算出相邻原始点的中点,在把相邻中点连成的线段平移到对应的原始点,以平移后的中点作为控制点,相邻原始点为起始点画贝塞尔曲线,这样就保证了连接处的光滑。而贝塞尔曲线本身是光滑的,所以就把这些原始点用光滑曲线连起来了。

我封装了一个函数,留着以后用。
(c++版,其它语言只要把数组和可变数组稍微变一下就能用)
[cpp] view plain copy
- void createCurve(CvPoint *originPoint,int originCount,vector<CvPoint> &curvePoint)
- //控制点收缩系数 ,经调试0.6较好,CvPoint是<a href="http://lib.csdn.net/base/opencv" class='replace_word' title="OpenCV知识库" target='_blank' style='color:#df3434; font-weight:bold;'>OpenCV</a>的,可自行定义结构体(x,y)
- float scale = 0.6;
- CvPoint midpoints[originCount];
- //生成中点
- for(int i = 0 ;i < originCount ; i++)
- int nexti = (i + 1) % originCount;
- midpoints[i].x = (originPoint[i].x + originPoint[nexti].x)/2.0;
- midpoints[i].y = (originPoint[i].y + originPoint[nexti].y)/2.0;
- //平移中点
- CvPoint extrapoints[2 * originCount];
- for(int i = 0 ;i < originCount ; i++)
- int nexti = (i + 1) % originCount;
- int backi = (i + originCount - 1) % originCount;
- CvPoint midinmid;
- midinmid.x = (midpoints[i].x + midpoints[backi].x)/2.0;
- midinmid.y = (midpoints[i].y + midpoints[backi].y)/2.0;
- int offsetx = originPoint[i].x - midinmid.x;
- int offsety = originPoint[i].y - midinmid.y;
- int extraindex = 2 * i;
- extrapoints[extraindex].x = midpoints[backi].x + offsetx;
- extrapoints[extraindex].y = midpoints[backi].y + offsety;
- //朝 originPoint[i]方向收缩
- int addx = (extrapoints[extraindex].x - originPoint[i].x) * scale;
- int addy = (extrapoints[extraindex].y - originPoint[i].y) * scale;
- extrapoints[extraindex].x = originPoint[i].x + addx;
- extrapoints[extraindex].y = originPoint[i].y + addy;
- int extranexti = (extraindex + 1)%(2 * originCount);
- extrapoints[extranexti].x = midpoints[i].x + offsetx;
- extrapoints[extranexti].y = midpoints[i].y + offsety;
- //朝 originPoint[i]方向收缩
- addx = (extrapoints[extranexti].x - originPoint[i].x) * scale;
- addy = (extrapoints[extranexti].y - originPoint[i].y) * scale;
- extrapoints[extranexti].x = originPoint[i].x + addx;
- extrapoints[extranexti].y = originPoint[i].y + addy;
- CvPoint controlPoint[4];
- //生成4控制点,产生贝塞尔曲线
- for(int i = 0 ;i < originCount ; i++)
- controlPoint[0] = originPoint[i];
- int extraindex = 2 * i;
- controlPoint[1] = extrapoints[extraindex + 1];
- int extranexti = (extraindex + 2) % (2 * originCount);
- controlPoint[2] = extrapoints[extranexti];
- int nexti = (i + 1) % originCount;
- controlPoint[3] = originPoint[nexti];
- float u = 1;
- while(u >= 0)
- int px = bezier3funcX(u,controlPoint);
- int py = bezier3funcY(u,controlPoint);
- //u的步长决定曲线的疏密
- u -= 0.005;
- CvPoint tempP = cvPoint(px,py);
- //存入曲线点
- curvePoint.push_back(tempP);
- //三次贝塞尔曲线
- float bezier3funcX(float uu,CvPoint *controlP)
- float part0 = controlP[0].x * uu * uu * uu;
- float part1 = 3 * controlP[1].x * uu * uu * (1 - uu);
- float part2 = 3 * controlP[2].x * uu * (1 - uu) * (1 - uu);
- float part3 = controlP[3].x * (1 - uu) * (1 - uu) * (1 - uu);
- return part0 + part1 + part2 + part3;
- float bezier3funcY(float uu,CvPoint *controlP)
- float part0 = controlP[0].y * uu * uu * uu;
- float part1 = 3 * controlP[1].y * uu * uu * (1 - uu);
- float part2 = 3 * controlP[2].y * uu * (1 - uu) * (1 - uu);
- float part3 = controlP[3].y * (1 - uu) * (1 - uu) * (1 - uu);
- return part0 + part1 + part2 + part3;
翻译] AGG 之贝塞尔插值
文章分类:综合技术
原文地址:http://www.antigrain.com/research/
bezier_interpolation/index.html#PAGE_BEZIER_INTERPOLATION
Interpolation with Bezier Curves 贝塞尔插值
A very simple method of smoothing polygons 一种非常简单的多边形平滑方法
翻译:唐风
之前 comp.graphic.algorithms 上有一个讨论,是关于怎么样使用曲线对多边形进行插值处理,使得最终产生的曲线是光滑的而且能通过所有的顶点。Gernot Hoffmann 建议说使用著名的 B-Spline 来进行插值。这里有他当时的文章 。B-Spline 在这里效果很好,它看起来就像是一个固定在多边形顶点上的橡皮尺(elastic ruler)。
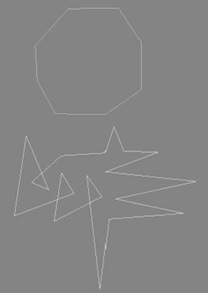
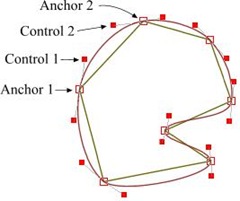 但我有个大胆的推测,我觉得肯定还存在更简单的方法。比如,使用三次贝塞曲线(cubic Bezier)进行近似。贝塞尔曲线有两个固定点(起点和终点),另加两个决定曲线形状的控制点(CP)。关于贝塞尔曲线的更多知识可以在搜索引擎中找到,比如,你可以参考 Paul Bourke 的站点 。 现在给贝塞尔曲线的锚点(固定点),也就是多边形的某一对顶点,那么问题是,我们怎么计算控制点的位置?我运行 Xara X 然后画出了右边这个图形,这很简单,所以我决定尝试下计算出它们的坐标。很显然,多边形两条相邻边的两个控制点与这两个控制点之间的顶点应该在一条直线 上,只有这样,两条相邻的插值曲线才能平滑地连接在一起。所以,这两个控制点应该是相对于顶点是对称的,不过,也不全是……,因为真正的对称就要求它们与 中心点的距离应该是相等的,但对于我们的情况中并不完全是这样的。一开始,我试着先算出多边形两条边的角平分线,然后把控制点放在这条角平分线的垂直线 上。但从图上可以看到,控制点的连线并不会总是垂直于角平分线的。
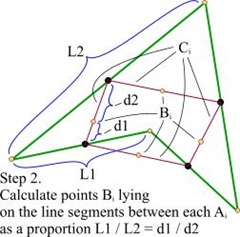
最终,我找到一个非常简单的办法,不需要任何复杂的数学计算。首先,我们计算出多边形所有边线的中点,Ai。
然后连接起相邻边中点,得到很多线段,记为 Ci 。并用图记的方法计算出 Bi 点。
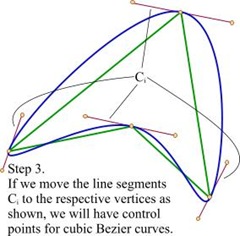
最后一步,只需要简单地将 Ci 进行平移,平移的路径就是每条线段上 Bi 到对应顶点的路径。就这样,我们计算出了贝塞尔曲线的控制点,平滑的结果看起来也很棒。
这里还可以做一点小小的改进,因为我们已经得到了一条决定控制点的直线,所以,我们可以根据需要,使控制点在这条直线上移动,这样可以改变插值曲线 的状态。我使用了一个与控制点和顶点初始距离相关的系数 K ,用来沿直线移动控制点。控制点离顶点越远,图形看起来就越锐利。
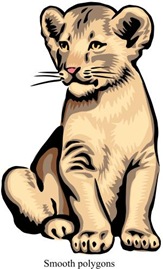
下面是用原始形状和系统K=1.0的贝塞尔插值两种方法来描画的 SVG 的狮子。
下面是放大图
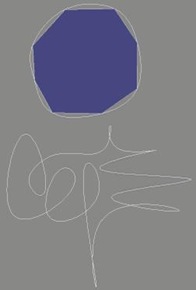
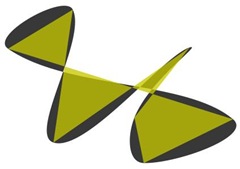
这个方法对于自相关的多边形也适用,下面的例子可以看到,结果非常有意思:
这个方法只是探索和经验式的,如果从严格的数学模型的角度看它可能是错误的。但在实际使用中的效果已经足够好了,而 且这个方法只需要最小的计算量。下面的代码就是用来画出上面狮子图像的。这些代码并没有进行优化,只是用来演示的。里面有些变量计算了两次,在实际程序 中,如果连续的步骤中都用到同一个变量值,我们可以先缓存变量值进行复用(以避免重复的计算)。
This method is pure heuristic and empiric. It probably gives

a wrong result from the point of view of strict mathematical

modeling. But in practice the result is good enough and it

requires absolute minimum of calculations. Below is the source code

that has been used to generate the lions shown above. It's

not optimal and just an illustration. It calculates some variables

twice, while in real programs we can store and reuse them in the

<div class="dp-highlighter bg_cpp" style="font-family: Consolas, "Courier New", Courier, mono, serif; font-size: 12px; width: 700.906px; overflow-x: auto; overflow-y: hidden; padding-top: 1px; position: relative; margin: 18px 0px !important; background-color: rgb(231, 229, 220);"><div class="bar" style="padding-left: 45px;"><div class="tools" style="padding: 3px 8px 10px 10px; font-stretch: normal; font-size: 9px; line-height: normal; font-family: Verdana, Geneva, Arial, Helvetica, sans-serif; color: silver; border-left: 3px solid rgb(108, 226, 108); background-color: rgb(248, 248, 248);"><strong>[cpp]</strong> <a target=_blank href="http://blog.csdn.net/microchenhong/article/details/6316332#" class="ViewSource" title="view plain" style="color: rgb(160, 160, 160); text-decoration: none; border: none; padding: 1px; margin: 0px 10px 0px 0px; display: inline-block; width: 16px; height: 16px; text-indent: -2000px; background-image: url("images/default/ico_plain.gif"); background-attachment: initial; background-color: inherit; background-size: initial; background-origin: initial; background-clip: initial; background-position: left top; background-repeat: no-repeat;">view plain</a><span data-mod="popu_168"> <a target=_blank href="http://blog.csdn.net/microchenhong/article/details/6316332#" class="CopyToClipboard" title="copy" style="color: rgb(160, 160, 160); text-decoration: none; border: none; padding: 1px; margin: 0px 10px 0px 0px; display: inline-block; width: 16px; height: 16px; text-indent: -2000px; background-image: url("images/default/ico_copy.gif"); background-attachment: initial; background-color: inherit; background-size: initial; background-origin: initial; background-clip: initial; background-position: left top; background-repeat: no-repeat;">copy</a></span><div style="position: absolute; left: 822px; top: 7421px; width: 18px; height: 18px; z-index: 99;"></div><span data-mod="popu_169"> </span></div></div><ol start="1" class="dp-cpp" style="padding: 0px; border: none; color: rgb(92, 92, 92); margin: 0px 0px 1px 45px !important; background-color: rgb(255, 255, 255);"><li class="alt" style="border-top: none; border-right: none; border-bottom: none; border-left: 3px solid rgb(108, 226, 108); list-style: decimal-leading-zero outside; color: inherit; line-height: 18px; margin: 0px !important; padding: 0px 3px 0px 10px !important;"><span style="margin: 0px; padding: 0px; border: none; color: black; background-color: inherit;"><span class="comment" style="margin: 0px; padding: 0px; border: none; color: rgb(0, 130, 0); background-color: inherit;">// Assume we need to calculate the control</span><span style="margin: 0px; padding: 0px; border: none; background-color: inherit;">  </span></span></li><li style="border-top: none; border-right: none; border-bottom: none; border-left: 3px solid rgb(108, 226, 108); list-style: decimal-leading-zero outside; line-height: 18px; margin: 0px !important; padding: 0px 3px 0px 10px !important; background-color: rgb(248, 248, 248);"><span style="margin: 0px; padding: 0px; border: none; color: black; background-color: inherit;">   <span class="comment" style="margin: 0px; padding: 0px; border: none; color: rgb(0, 130, 0); background-color: inherit;">// points between (x1,y1) and (x2,y2).</span><span style="margin: 0px; padding: 0px; border: none; background-color: inherit;">  </span></span></li><li class="alt" style="border-top: none; border-right: none; border-bottom: none; border-left: 3px solid rgb(108, 226, 108); list-style: decimal-leading-zero outside; color: inherit; line-height: 18px; margin: 0px !important; padding: 0px 3px 0px 10px !important;"><span style="margin: 0px; padding: 0px; border: none; color: black; background-color: inherit;">   <span class="comment" style="margin: 0px; padding: 0px; border: none; color: rgb(0, 130, 0); background-color: inherit;">// Then x0,y0 - the previous vertex,</span><span style="margin: 0px; padding: 0px; border: none; background-color: inherit;">  </span></span></li><li style="border-top: none; border-right: none; border-bottom: none; border-left: 3px solid rgb(108, 226, 108); list-style: decimal-leading-zero outside; line-height: 18px; margin: 0px !important; padding: 0px 3px 0px 10px !important; background-color: rgb(248, 248, 248);"><span style="margin: 0px; padding: 0px; border: none; color: black; background-color: inherit;">   &l以上是关于原迹手写之贝赛尔曲线(穿过已知点画平滑曲线(3次贝塞尔曲线)的主要内容,如果未能解决你的问题,请参考以下文章
