Vue 教程(三十八)配置文件环境分离
Posted _否极泰来_
tags:
篇首语:本文由小常识网(cha138.com)小编为大家整理,主要介绍了Vue 教程(三十八)配置文件环境分离相关的知识,希望对你有一定的参考价值。
Vue 教程(三十八)配置文件环境分离
-
修改配置文件
- 在项目根目录下新建文件夹【build】,在该目录下新建三个文件分别为:【base.config.js】、【prod.config.js】【dev.config.js】
base.config.js 内容如下:
// 导入Node中path常量
const path = require("path");
const webpack = require("webpack");
const htmlWebpackPlugin = require("html-webpack-plugin");

module.exports =
  entry: "./src/main.js",
  output:
    path: path.resolve(__dirname, "../dist"),
    filename: "bundle.js",
    // publicPath: 'dist/'
  ,
  resolve:
    // alias:别名
    alias:
      vue$: "vue/dist/vue.esm.js",
    ,
  ,
  module:
    rules: [

        test: /\\.css$/,
        /**
         * css-loader:只负责将css文件进行加载
         * style-loader:负责将样式添加到DOM中
         * 使用多个loader时,是从右向左
         */
        use: ["style-loader", "css-loader"],
      ,

        test: /\\.vue$/,
        use: ["vue-loader"],
      ,
    ],
  ,
  plugins: [
    new webpack.BannerPlugin(
      "Copyright 2002-2021 the original author or authors.Licensed under the Apache License, Version 2.0 (the 'License');"
    ),
    new HtmlWebpackPlugin(
      template: "index.html",
    ),
  ],
;
prod.config.js 内容如下:
// 导入Node中path常量
const UglifyjsWebpackPlugin = require("uglifyjs-webpack-plugin");
const baseConfig = require("./base.config");
const webpackMerge = require("webpack-merge");

module.exports = webpackMerge(baseConfig,
  plugins: [new UglifyjsWebpackPlugin()],
);
dev.config.js 内容如下:
// 导入Node中path常量 const webpackMerge = require("webpack-merge"); const baseConfig = require("./base.config"); module.exports = webpackMerge(baseConfig, devServer: // 为哪—个文件夹提供本地服务,默认是根文件夹,我们这里要写,/dist contentBase: "./dist", // 端口号 port: 8080, // 页面实时刷新 inline: true, // historyApiFallback:在SPA页面中,依赖HTML5的 history模式 , ); -
安装模块
npm install webpack-merge@4.1.5
- 修改 package.json 文件
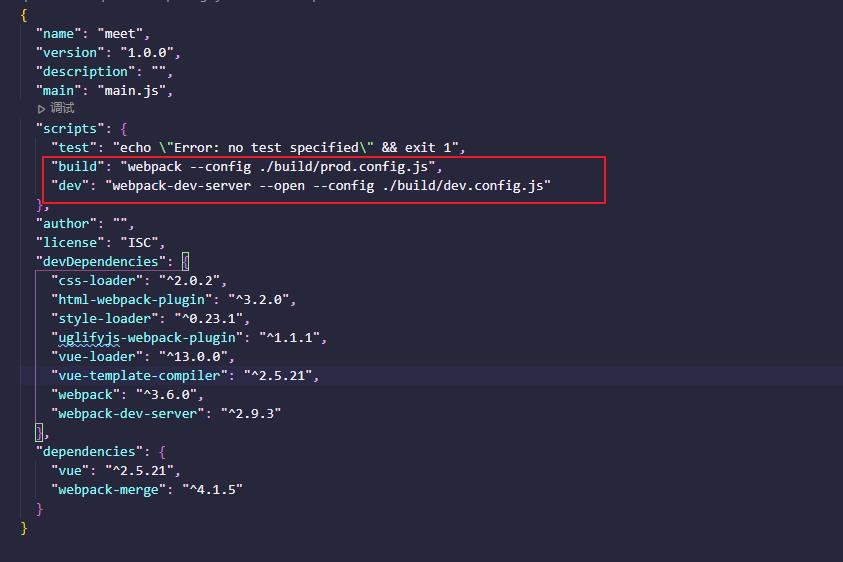
  "name": "meet",
  "version": "1.0.0",
  "description": "",
  "main": "main.js",
  "scripts":
    "test": "echo \\"Error: no test specified\\" && exit 1",
    "build": "webpack --config ./build/prod.config.js",
    "dev": "webpack-dev-server --open --config ./build/dev.config.js"
  ,
  "author": "",
  "license": "ISC",
  "devDependencies":
    "css-loader": "^2.0.2",
    "html-webpack-plugin": "^3.2.0",
    "style-loader": "^0.23.1",
    "uglifyjs-webpack-plugin": "^1.1.1",
    "vue-loader": "^13.0.0",
    "vue-template-compiler": "^2.5.21",
    "webpack": "^3.6.0",
    "webpack-dev-server": "^2.9.3"
  ,
  "dependencies":
    "vue": "^2.5.21",
    "webpack-merge": "^4.1.5"
- 配置 package.json
参数 :
webpack-dev-server - - open 参数可以自动打开浏览器
webpack-dev-server - -open chrome 默认打开谷歌浏览器
[外链图片转存失败,源站可能有防盗链机制,建议将图片保存下来直接上传(img-VjX9fBkF-1628407219062)(37%20%E3%80%90vue%E3%80%91%E6%90%AD%E5%BB%BA%E6%9C%AC%E5%9C%B0%E6%9C%8D%E5%8A%A1%E5%99%A8%2004d180b4f1044dbaa70b0c5f700a4500/Untitled%201.png)]
  "name": "meet",
  "version": "1.0.0",
  "description": "",
  "main": "main.js",
  "scripts":
    "test": "echo \\"Error: no test specified\\" && exit 1",
    "build": "webpack",
    "dev": "webpack-dev-server --open"
  ,
  "author": "",
  "license": "ISC",
  "devDependencies":
    "css-loader": "^2.0.2",
    "html-webpack-plugin": "^3.2.0",
    "style-loader": "^0.23.1",
    "uglifyjs-webpack-plugin": "^1.1.1",
    "vue-loader": "^13.0.0",
    "vue-template-compiler": "^2.5.21",
    "webpack": "^3.6.0",
    "webpack-dev-server": "^2.9.3"
  ,
  "dependencies":
    "vue": "^2.5.21"
- 验证配置
npm run build
npm run dev

修改配置文件 package.json:module.exports = webpackMerge(baseConfig,配置属性);
– 以上为《Vue 教程(三十八)配置文件环境分离》,如有不当之处请指出,我后续逐步完善更正,大家共同提高。谢谢大家对我的关注。
——厚积薄发(yuanxw)
以上是关于Vue 教程(三十八)配置文件环境分离的主要内容,如果未能解决你的问题,请参考以下文章