ActiveMQ-与Spring整合(监听消费者)-主题篇
Posted 闲言博客
tags:
篇首语:本文由小常识网(cha138.com)小编为大家整理,主要介绍了ActiveMQ-与Spring整合(监听消费者)-主题篇相关的知识,希望对你有一定的参考价值。
1.导入依赖
    <dependencies>
        <!-- activemq所需要的jar包 -->
        <dependency>
            <groupId>org.apache.activemq</groupId>
            <artifactId>activemq-all</artifactId>
            <version>5.15.9</version>
        </dependency>
        <dependency>
            <groupId>org.apache.xbean</groupId>
            <artifactId>xbean-spring</artifactId>
            <version>4.17</version>
        </dependency>
        <dependency>
            <groupId>com.fasterxml.jackson.core</groupId>
            <artifactId>jackson-databind</artifactId>
            <version>2.11.3</version>
        </dependency>
        <!-- activeMQ对JMS的支持,整合Spring和ActiveMQ -->
        <dependency>
            <groupId>org.springframework</groupId>
            <artifactId>spring-jms</artifactId>
            <version>5.2.10.RELEASE</version>
        </dependency>
        <dependency>
            <groupId>org.apache.activemq</groupId>
            <artifactId>activemq-pool</artifactId>
            <version>5.15.9</version>
        </dependency>
        <dependency>
            <groupId>junit</groupId>
            <artifactId>junit</artifactId>
            <version>4.12</version>
            <scope>compile</scope>
        </dependency>
    </dependencies>
2.创建spring配置文件
spring-activemq.xml
<?xml version="1.0" encoding="UTF-8"?>
<beans xmlns="http://www.springframework.org/schema/beans"
       xmlns:xsi="http://www.w3.org/2001/XMLSchema-instance"
       xmlns:context="http://www.springframework.org/schema/context"
       xsi:schemaLocation="http://www.springframework.org/schema/beans http://www.springframework.org/schema/beans/spring-beans.xsd http://www.springframework.org/schema/context https://www.springframework.org/schema/context/spring-context.xsd">

    <!-- 扫描包 -->
    <context:component-scan base-package="cn.bloghut" />

    <!-- 配置生产者 -->
    <bean id="jmsFactory" class="org.apache.activemq.pool.PooledConnectionFactory" destroy-method="stop">
        <property name="connectionFactory" ref="mqUrl" />
        <!--最大连接数-->
        <property name="maxConnections" value="100" />
    </bean>

    <!-- 真正可以生产Connection的ConnectionFactory,对应的JMS服务厂商提供 -->
    <bean id="mqUrl" class="org.apache.activemq.ActiveMQConnectionFactory">
        <property name="brokerURL" value="tcp://127.0.0.1:61616" />
    </bean>

    <!-- 这个是主题目的地,点对点的 -->
    <bean id="destinationTopic" class="org.apache.activemq.command.ActiveMQTopic">
        <constructor-arg index="0" value="mq-spring-topic" />
    </bean>

    <!-- Spring提供的JMS工具类,他可以进行消息发送,接收等 -->
    <bean id="jmsTemplate" class="org.springframework.jms.core.JmsTemplate">
        <!--绑定工厂-->
        <property name="connectionFactory" ref="jmsFactory" />
        <!--绑定主题-->
        <property name="defaultDestination" ref="destinationTopic"/>
        <property name="messageConverter" >
            <bean class="org.springframework.jms.support.converter.SimpleMessageConverter" />
        </property>
    </bean>

    <!--配置监听器-->
    <bean id="jmsContainer" class="org.springframework.jms.listener.DefaultMessageListenerContainer">
        <!--绑定工厂-->
        <property name="connectionFactory" ref="jmsFactory"/>
        <!--绑定主题或队列-->
        <property name="destination" ref="destinationTopic"/>
        <!--绑定自定义的监听器-->
        <property name="messageListener" ref="myMessageListener"/>
    </bean>

</beans>
3.创建消息生产者
public interface SpringMQ_Produce
	//生产消息
	void send(String messageStr);


@Service("springProduce")
public class SpringProduceImpl implements SpringProduce

	@Autowired
	private JmsTemplate jmsTemplate;

	public void send(String messageStr)
		jmsTemplate.send((session)->
			TextMessage textMessage = session.createTextMessage(messageStr);
			return textMessage;
		);
4.创建监听器类
@Component("myMessageListener")
public class MyMessageListener implements MessageListener

    @Override
    public void onMessage(Message message)
        if (message != null)
            TextMessage text = (TextMessage) message;
            try
                System.out.println("监听器监听到主题消息:==》"+text.getText());
             catch (JMSException e)
                e.printStackTrace();
5.创建测试发送消息方法
public class App
    ApplicationContext atx = null;
    private SpringProduce sp = null;

        atx = new ClassPathXmlApplicationContext("spring-activemq.xml");
        sp = (SpringProduce) atx.getBean("springProduce");


    @Test
    public void testProduct()
        for (int i = 0; i < 3; i++)
            sp.send("发送消息到主题!!! >");
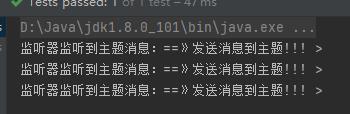
控制台输出
以上是关于ActiveMQ-与Spring整合(监听消费者)-主题篇的主要内容,如果未能解决你的问题,请参考以下文章
框架篇——Spring整合ActiveMQ(MQ服务端与消费端演示)