IDEA创建基于maven的springMVC项目
Posted 小小本科生
tags:
篇首语:本文由小常识网(cha138.com)小编为大家整理,主要介绍了IDEA创建基于maven的springMVC项目相关的知识,希望对你有一定的参考价值。
俗话说:一图胜千言。为了小伙伴们能快速搭建起一个基于Maven的springMVC项目,能上图的咱绝不多bb,能上代码的咱绝不上图。
话不多说,直入正题。既然要创建基于Maven的项目,首先要确保你的maven和Tomcat已经配置成功了。
一、创建项目
(1)打开IDEA,file->new->project。首先选中Maven项目,勾选Create from archetype
注意,这里有两个webapp类型的archetype,一定要选择下面这个带maven的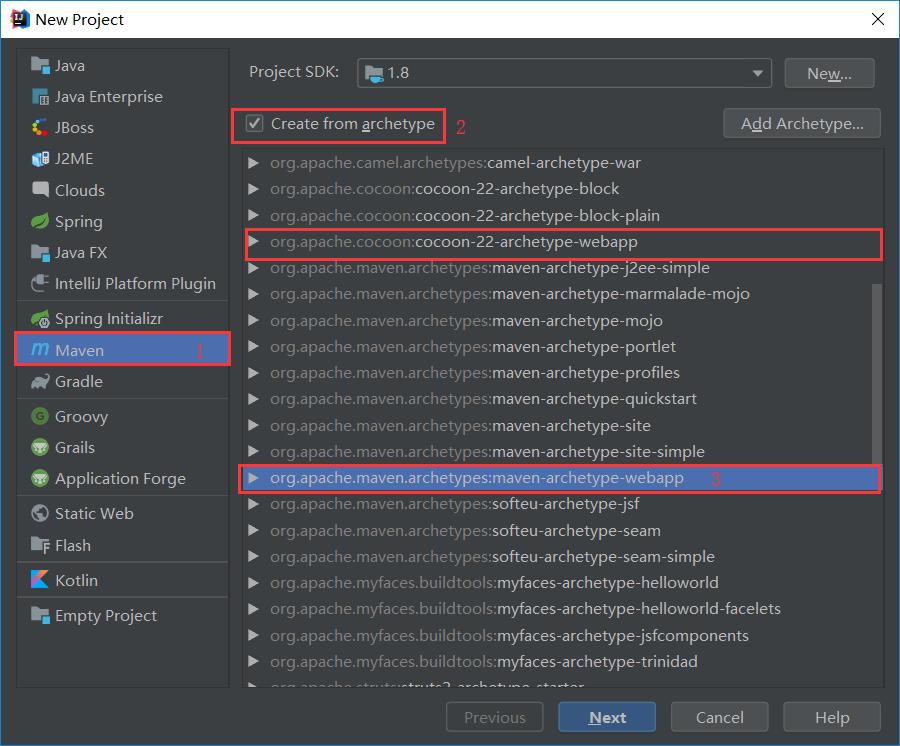
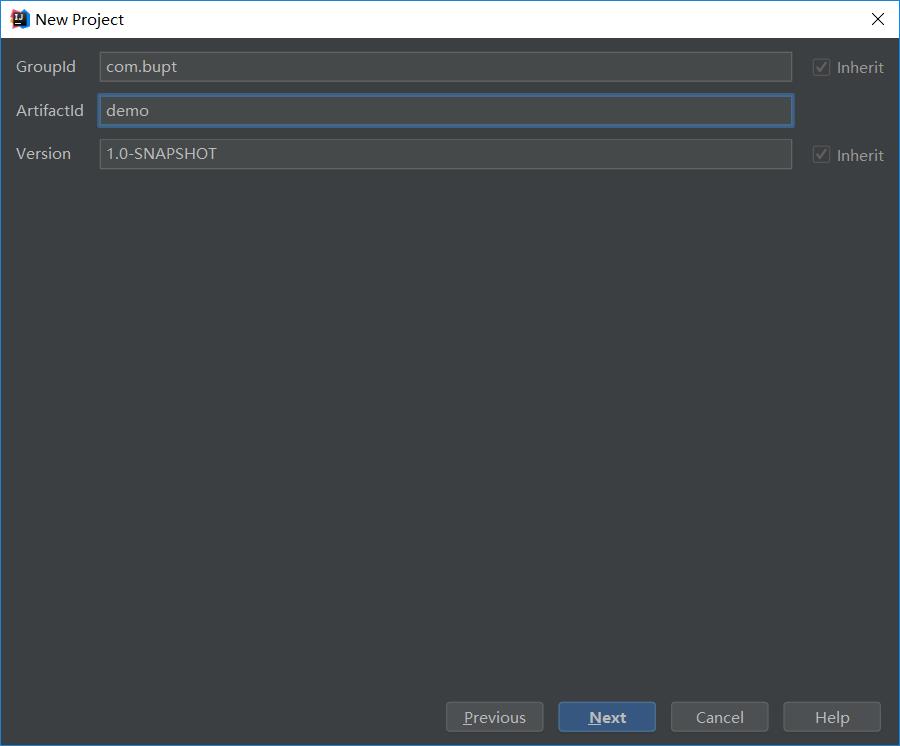
(2)点击next,下面这个界面根据个人条件随便填写,一般ArtifactId会被用作项目名
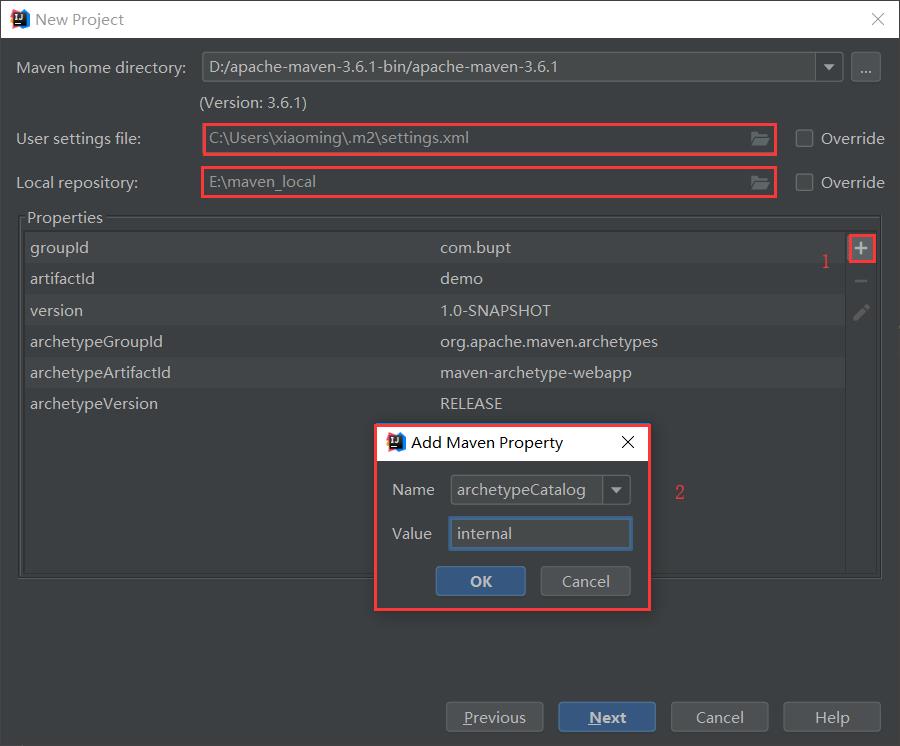
(3)点击next,如果你的maven已经配置成功,User settings file和Local repository都是自动填写好的,不用改动。这里为了项目构建得更快,点击+号添加一个archetypeCatalog属性,value值为internal。
(4)点击next,确定项目名称和项目存储位置无误。
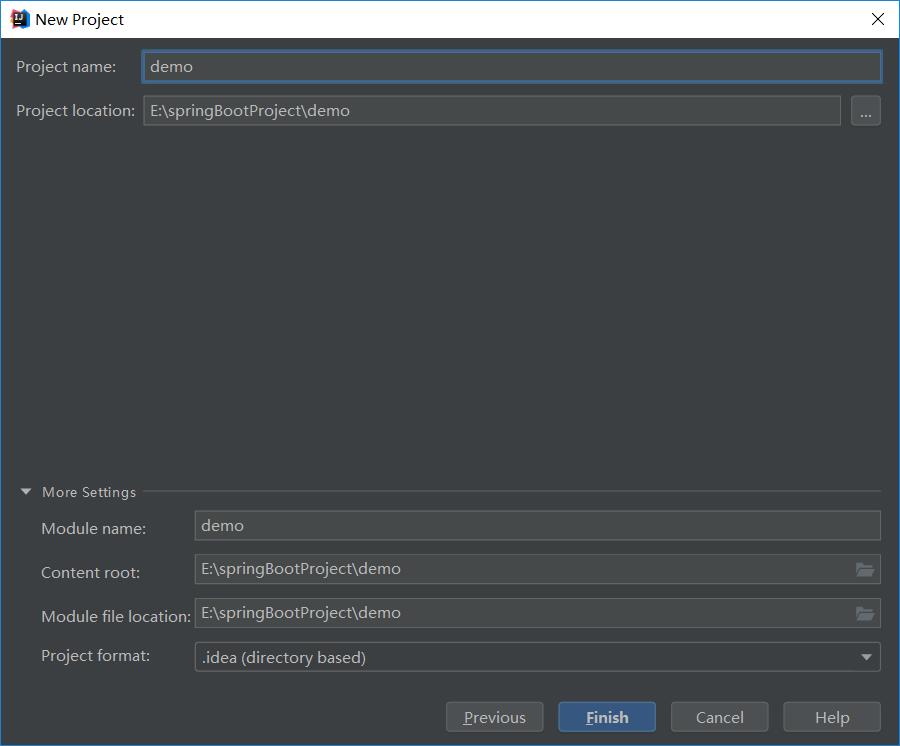
(5)点击Finish,项目成功创建。此时右下角会弹出如下提示,选择Enable Auto-Import即可,这样每次pom文件产生变化IDEA都会自动帮你导入。
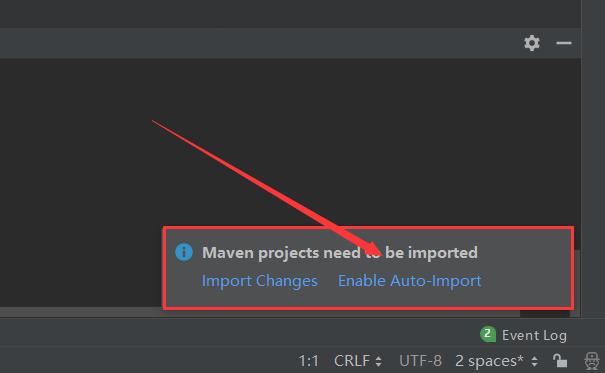
但是此时的项目目录结构还不完整,项目依赖和spring配置也需要修改。
二、添加依赖
(1)找到pom.xml,在里面添加常用依赖
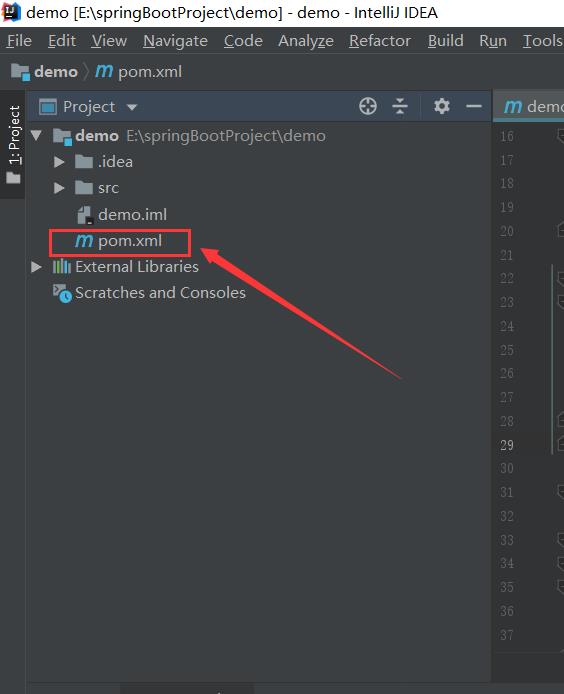
下面是我常用的依赖,小伙伴们可以参考一下
<properties>
    <project.build.sourceEncoding>UTF-8</project.build.sourceEncoding>
    <maven.compiler.source>1.7</maven.compiler.source>
    <maven.compiler.target>1.7</maven.compiler.target>
    <spring.version>5.1.5.RELEASE</spring.version>
  </properties>

  <dependencies>
    <!-- https://mvnrepository.com/artifact/junit/junit -->
    <dependency>
      <groupId>junit</groupId>
      <artifactId>junit</artifactId>
      <version>4.12</version>
    </dependency>
    <!-- https://mvnrepository.com/artifact/org.slf4j/slf4j-log4j12 -->
    <!--<dependency>-->
      <!--<groupId>org.slf4j</groupId>-->
      <!--<artifactId>slf4j-log4j12</artifactId>-->
      <!--<version>1.7.25</version>-->
      <!--<scope>test</scope>-->
    <!--</dependency>-->

    <!-- https://mvnrepository.com/artifact/ch.qos.logback/logback-classic -->
    <dependency>
      <groupId>ch.qos.logback</groupId>
      <artifactId>logback-classic</artifactId>
      <version>1.2.3</version>
    </dependency>

    <!-- https://mvnrepository.com/artifact/org.springframework/spring-core -->
    <dependency>
      <groupId>org.springframework</groupId>
      <artifactId>spring-core</artifactId>
      <version>$spring.version</version>
    </dependency>

    <!-- https://mvnrepository.com/artifact/org.springframework/spring-beans -->
    <dependency>
      <groupId>org.springframework</groupId>
      <artifactId>spring-beans</artifactId>
      <version>$spring.version</version>
    </dependency>

    <dependency>
      <groupId>org.springframework</groupId>
      <artifactId>spring-tx</artifactId>
      <version>$spring.version</version>
    </dependency>


    <!-- https://mvnrepository.com/artifact/org.springframework/spring-context -->
      <dependency>
          <groupId>org.springframework</groupId>
          <artifactId>spring-context</artifactId>
        <version>$spring.version</version>
      </dependency>
    <!-- https://mvnrepository.com/artifact/org.springframework/spring-web -->
    <dependency>
      <groupId>org.springframework</groupId>
      <artifactId>spring-web</artifactId>
      <version>$spring.version</version>
    </dependency>
    <!-- https://mvnrepository.com/artifact/org.springframework/spring-webmvc -->
    <dependency>
      <groupId>org.springframework</groupId>
      <artifactId>spring-webmvc</artifactId>
      <version>$spring.version</version>
    </dependency>
    <!-- https://mvnrepository.com/artifact/org.springframework/spring-test -->
    <dependency>
      <groupId>org.springframework</groupId>
      <artifactId>spring-test</artifactId>
      <version>$spring.version</version>
    </dependency>
    <!-- https://mvnrepository.com/artifact/org.springframework/spring-jdbc -->
    <dependency>
      <groupId>org.springframework</groupId>
      <artifactId>spring-jdbc</artifactId>
      <version>$spring.version</version>


    </dependency>
    <!-- https://mvnrepository.com/artifact/javax.servlet/javax.servlet-api -->
    <dependency>
      <groupId>javax.servlet</groupId>
      <artifactId>javax.servlet-api</artifactId>
      <version>3.1.0</version>
      <scope>provided</scope>
    </dependency>

    <!-- https://mvnrepository.com/artifact/com.fasterxml.jackson.core/jackson-databind -->
    <dependency>
      <groupId>com.fasterxml.jackson.core</groupId>
      <artifactId>jackson-databind</artifactId>
      <version>2.9.8</version>
    </dependency>

    <!-- https://mvnrepository.com/artifact/commons-collections/commons-collections -->
    <dependency>
      <groupId>commons-collections</groupId>
      <artifactId>commons-collections</artifactId>
      <version>3.2.2</version>
    </dependency>
      <!-- https://mvnrepository.com/artifact/org.mybatis/mybatis -->
      <dependency>
          <groupId>org.mybatis</groupId>
          <artifactId>mybatis</artifactId>
          <version>3.4.6</version>
      </dependency>
    <!-- https://mvnrepository.com/artifact/org.mybatis/mybatis-spring -->
    <dependency>
      <groupId>org.mybatis</groupId>
      <artifactId>mybatis-spring</artifactId>
      <version>1.3.2</version>
    </dependency>
    <!-- https://mvnrepository.com/artifact/mysql/mysql-connector-java -->
    <dependency>
      <groupId>mysql</groupId>
      <artifactId>mysql-connector-java</artifactId>
      <version>5.1.37</version>
    </dependency>


    <!-- https://mvnrepository.com/artifact/com.mchange/c3p0 -->
    <dependency>
      <groupId>com.mchange</groupId>
      <artifactId>c3p0</artifactId>
      <version>0.9.5.2</version>
    </dependency>

    <!-- https://mvnrepository.com/artifact/net.coobird/thumbnailator -->
    <!--图片处理-->
    <dependency>
      <groupId>net.coobird</groupId>
      <artifactId>thumbnailator</artifactId>
      <version>0.4.8</version>
    </dependency>

    <!-- https://mvnrepository.com/artifact/org.thymeleaf/thymeleaf -->
    <dependency>
      <groupId>org.thymeleaf</groupId>
      <artifactId>thymeleaf</artifactId>
      <version>3.0.11.RELEASE</version>
    </dependency>
    <!-- https://mvnrepository.com/artifact/com.github.penggle/kaptcha -->
    <!--用于生成验证码-->
    <dependency>
      <groupId>com.github.penggle</groupId>
      <artifactId>kaptcha</artifactId>
      <version>2.3.2</version>
    </dependency>

    <!-- https://mvnrepository.com/artifact/commons-fileupload/commons-fileupload -->
    <dependency>
      <groupId>commons-fileupload</groupId>
      <artifactId>commons-fileupload</artifactId>
      <version>1.3.2</version>
    </dependency>


  </dependencies>
基于maven的项目是创建成功了,但是springMVC在哪呢?
(2)右键项目名称,选择Add Framework Support,来添加springMVC
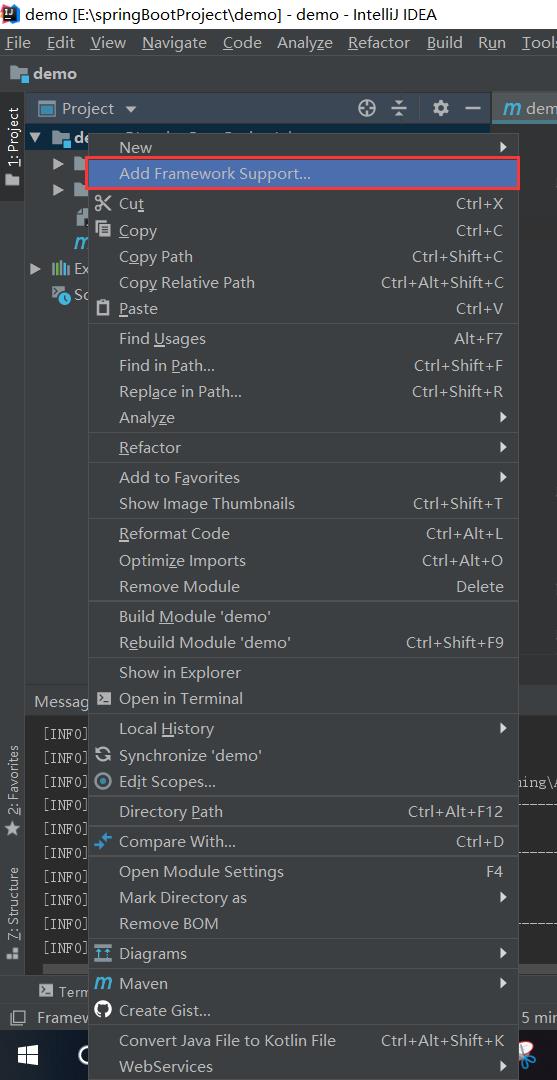
啧啧啧,找来找去也没有找到跟spring相关的东西。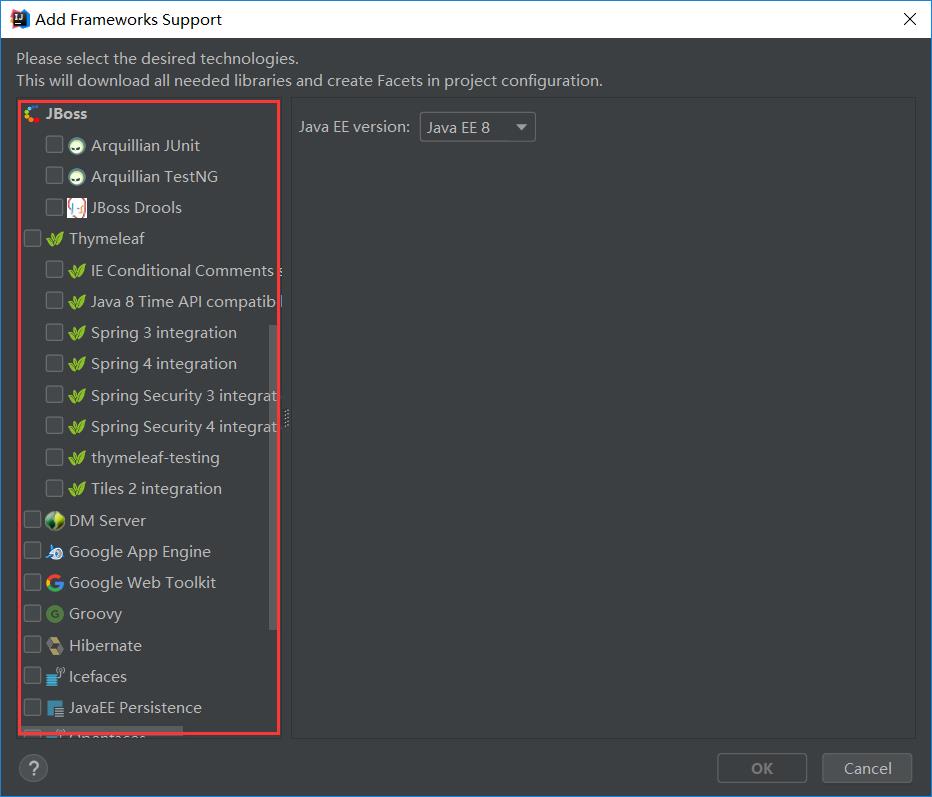
不要着急,因为我们之前在pom文件中已经导入了spring依赖,但是可能还不太全。
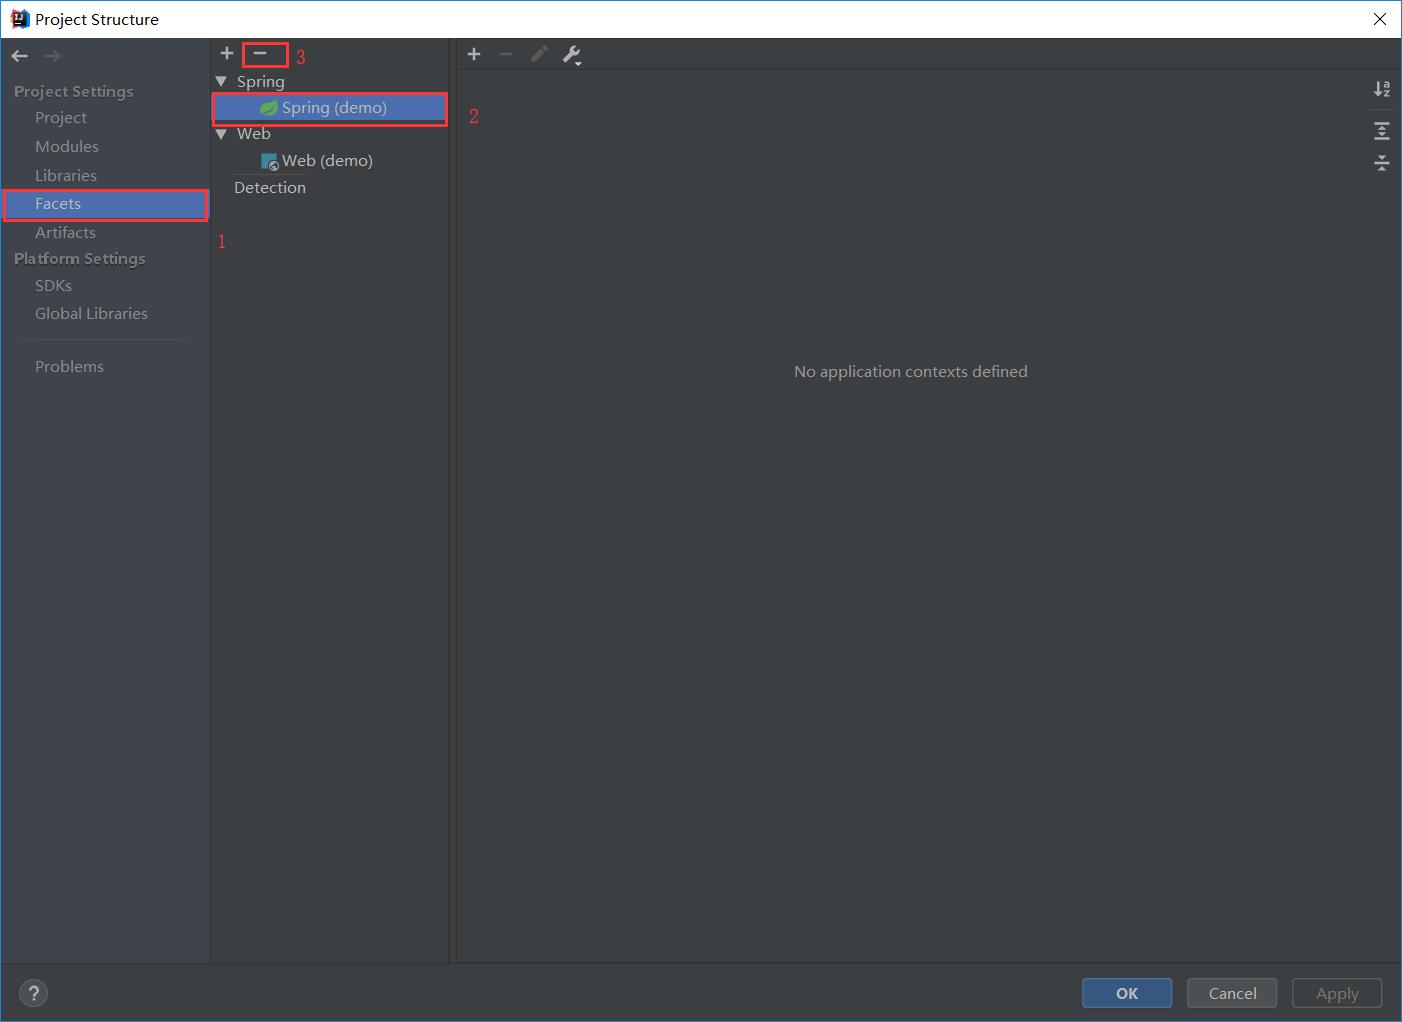
(3)关掉此界面,依次点击file->Product Structure。选中Facets模块,果不其然,里面已经有Spring了,将spring选中点击-号将其删除,apply->ok。然后我们会添加完整版的springMVC框架。
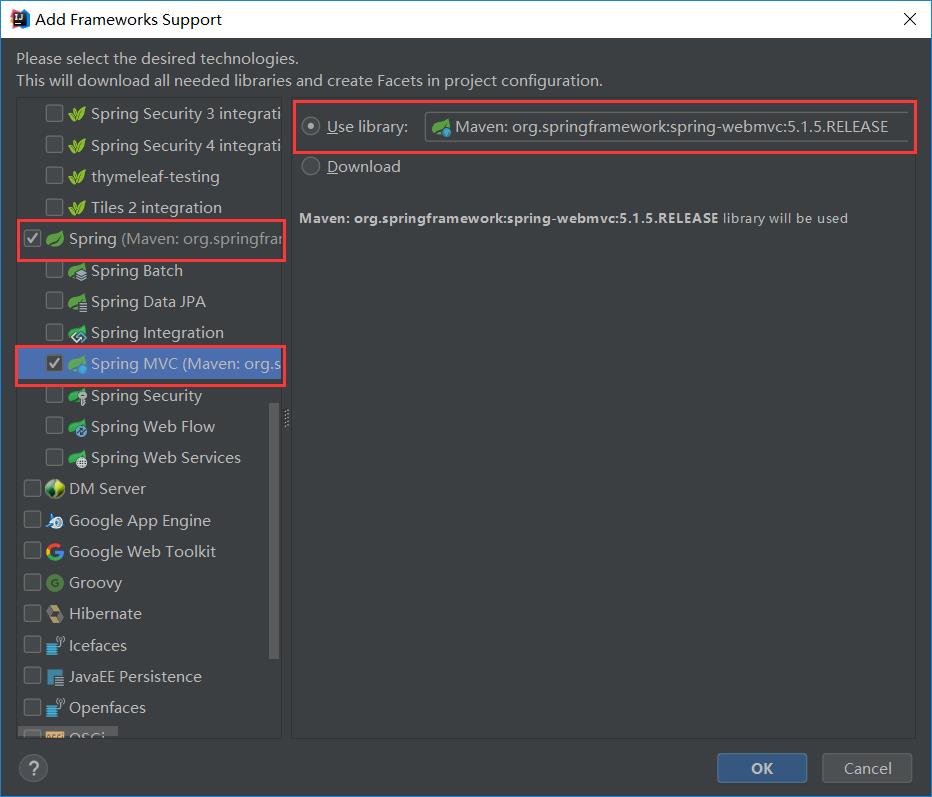
(4)此时再依次右键项目名->选择Add Framework Support,这次终于可以找到spring相关了。选中spring,再选中其下的Spring MVC。如果你之前已经跟着我在pom文件中添加依赖了,则此时直接选择Use library即可,IDEA会自动选择好已添加的spring MVC依赖;如果没有就选择下面的Download,IDEA会下载相关依赖并导入。
三、完善目录
此时IDEA自动生成的目录并不能满足web项目的需求,需要我们自己完善。
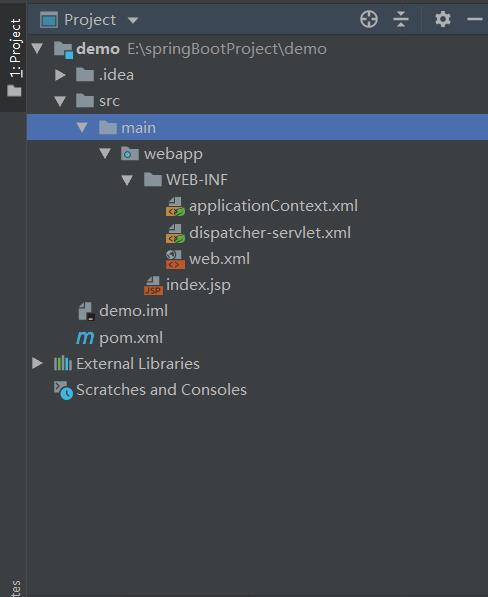
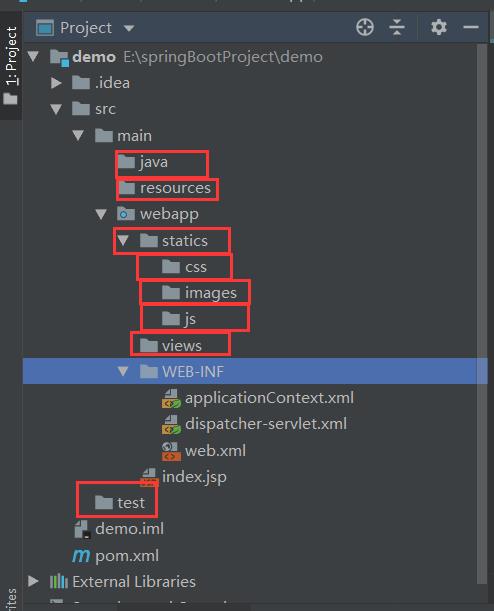
(1)右键src->new->Directory,新建test目录
在main下新建java目录
在main下新建resources目录
在webapp下新建statics目录,放静态资源
在webapp下新建views目录,放视图资源
在statics下创建js,css,images目录
建成之后如下图所示:
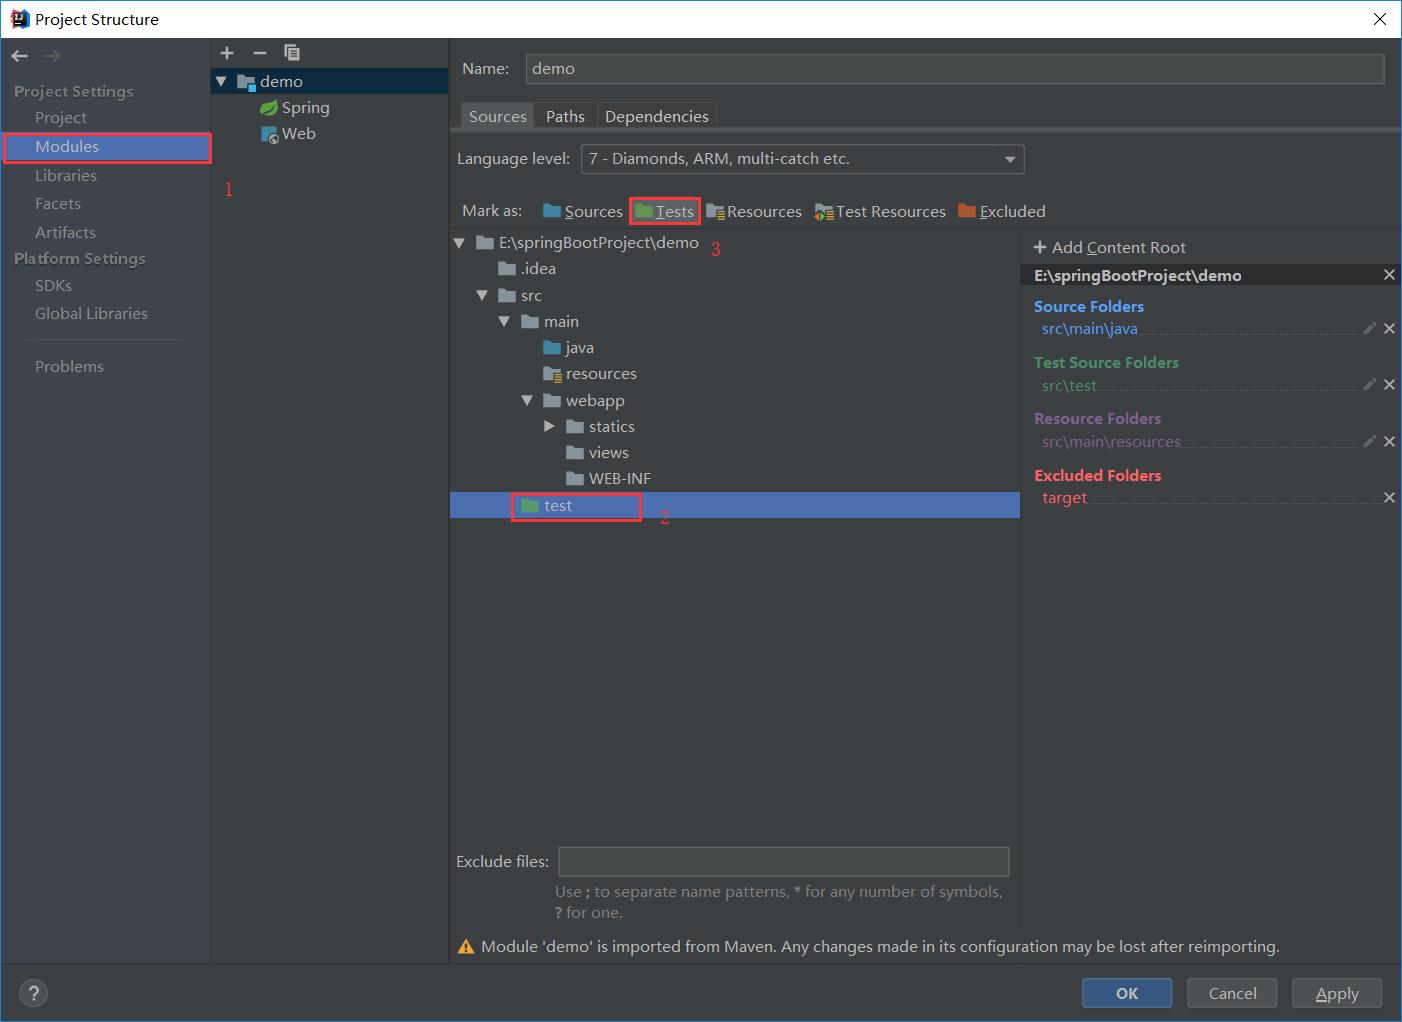
(2)然后我们给各个目录分类,依次点击file->Product Structure,选中Modules模块。在右侧目录树中选中java目录点击上面的Sources标志目录变为蓝色;选中resources目录,点击Resources标志;选中test目录,点击上面的Tests标志。
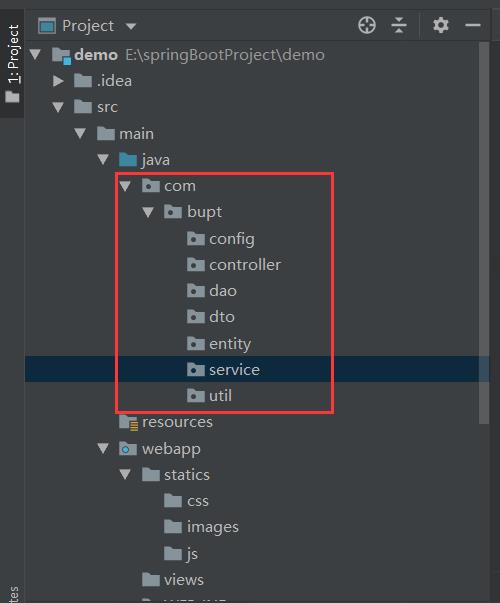
(3)目录分好类之后便可以在里面建包了,比如,我在java文件下建了如下包:
四、配置SpringMVC
(1)找到web.xml此时里面已经有IDEA自动生成的内容,但是其版本太低,将其更换为下面的即可
web.xml
<?xml version="1.0" encoding="UTF-8"?>
<web-app xmlns="http://xmlns.jcp.org/xml/ns/javaee"
         xmlns:xsi="http://www.w3.org/2001/XMLSchema-instance"
         xsi:schemaLocation="http://xmlns.jcp.org/xml/ns/javaee http://xmlns.jcp.org/xml/ns/javaee/web-app_3_1.xsd"
         version="3.1">

    <display-name>Archetype Created Web Application</display-name>
    <!--欢迎页,左侧目录中可找到,IDEA已自动生成了此页面-->
    <welcome-file-list>
        <welcome-file>index.jsp</welcome-file>
    </welcome-file-list>

    <!--配置springmvc DispatcherServlet-->
    <servlet>
        <servlet-name>springMVC</servlet-name>
        <servlet-class>org.springframework.web.servlet.DispatcherServlet</servlet-class>
        <init-param>
            <!--配置dispatcher.xml作为mvc的配置文件-->
            <param-name>contextConfigLocation</param-name>
            <param-value>/WEB-INF/dispatcher-servlet.xml</param-value>
        </init-param>
        <load-on-startup>1</load-on-startup>
        <async-supported>true</async-supported>
    </servlet>
    <servlet-mapping>
        <servlet-name>springMVC</servlet-name>
        <url-pattern>/</url-pattern>
    </servlet-mapping>
    <!--把applicationContext.xml加入到配置文件中-->
    <context-param>
        <param-name>contextConfigLocation</param-name>
        <param-value>/WEB-INF/applicationContext.xml</param-value>
    </context-param>
    <listener>
        <listener-class>org.springframework.web.context.ContextLoaderListener</listener-class>
    </listener>
</web-app>
(2)此文件中并没有列出所有配置而是将dispatcherServlet的配置放在了/WEB-INF/dispatcher-servlet.xml中,将上下文配置放在了/WEB-INF/applicationContext.xml中
找到dispatcher-servlet.xml,做如下配置,具体配置原理写在注释中
<?xml version="1.0" encoding="UTF-8"?>
<beans xmlns="http://www.springframework.org/schema/beans"
       xmlns:xsi="http://www.w3.org/2001/XMLSchema-instance"
       xmlns:context="http://www.springframework.org/schema/context"
       xmlns:mvc="http://www.springframework.org/schema/mvc"
       xsi:schemaLocation="http://www.springframework.org/schema/beans http://www.springframework.org/schema/beans/spring-beans.xsd http://www.springframework.org/schema/context http://www.springframework.org/schema/context/spring-context.xsd http://www.springframework.org/schema/mvc http://www.springframework.org/schema/mvc/spring-mvc.xsd">
    <!--此文件负责整个mvc中的配置-->

    <!--启用spring的一些annotation -->
    <context:annotation-config/>

    <!-- 配置注解驱动 可以将request参数与绑定到controller参数上 -->
    <mvc:annotation-driven/>

    <!--静态资源映射-->
    <!--本项目把静态资源放在了webapp的statics目录下,资源映射如下-->
    <mvc:resources mapping="/css/**" location="/statics/css/"/>
    <mvc:resources mapping="/js/**" location="/statics/js/"/>
    <mvc:resources mapping="/image/**" location="/statics/images/"/>
    <mvc:default-servlet-handler />  <!--这句要加上,要不然可能会访问不到静态资源,具体作用自行百度-->

   <!-- 对模型视图名称的解析,即在模型视图名称添加前后缀(如果最后一个还是表示文件夹,则最后的斜杠不要漏了) 使用html-->
    <bean id="htmlViewResolver" class="org.springframework.web.servlet.view.InternalResourceViewResolver">
        <property name="contentType" value="text/html;charset=UTF-8"></property>
        <property name="prefix" value="/views/"/><!--设置html文件的目录位置-->
        <property name="order" value="0"></property>
        <property name="suffix" value=".html"/>
    </bean>

    <!-- 自动扫描装配 -->
    <context:component-scan base-package="com.bupt.controller"/>
</beans>
(3)找到applicationContext.xml,基本没什么配置 ,就是扫描一下组件
<?xml version="1.0" encoding="UTF-8"?>
<beans xmlns="http://www.springframework.org/schema/beans"
       xmlns:xsi="http://www.w3.org/2001/XMLSchema-instance"
       xmlns:context="http://www.springframework.org/schema/context"
       xsi:schemaLocation="http://www.springframework.org/schema/beans http://www.springframework.org/schema/beans/spring-beans.xsd
                           http://www.springframework.org/schema/context http://www.springframework.org/schema/context/spring-context.xsd">
    <context:component-scan base-package="com.bupt"/>
</beans>
五、配置Tomcat
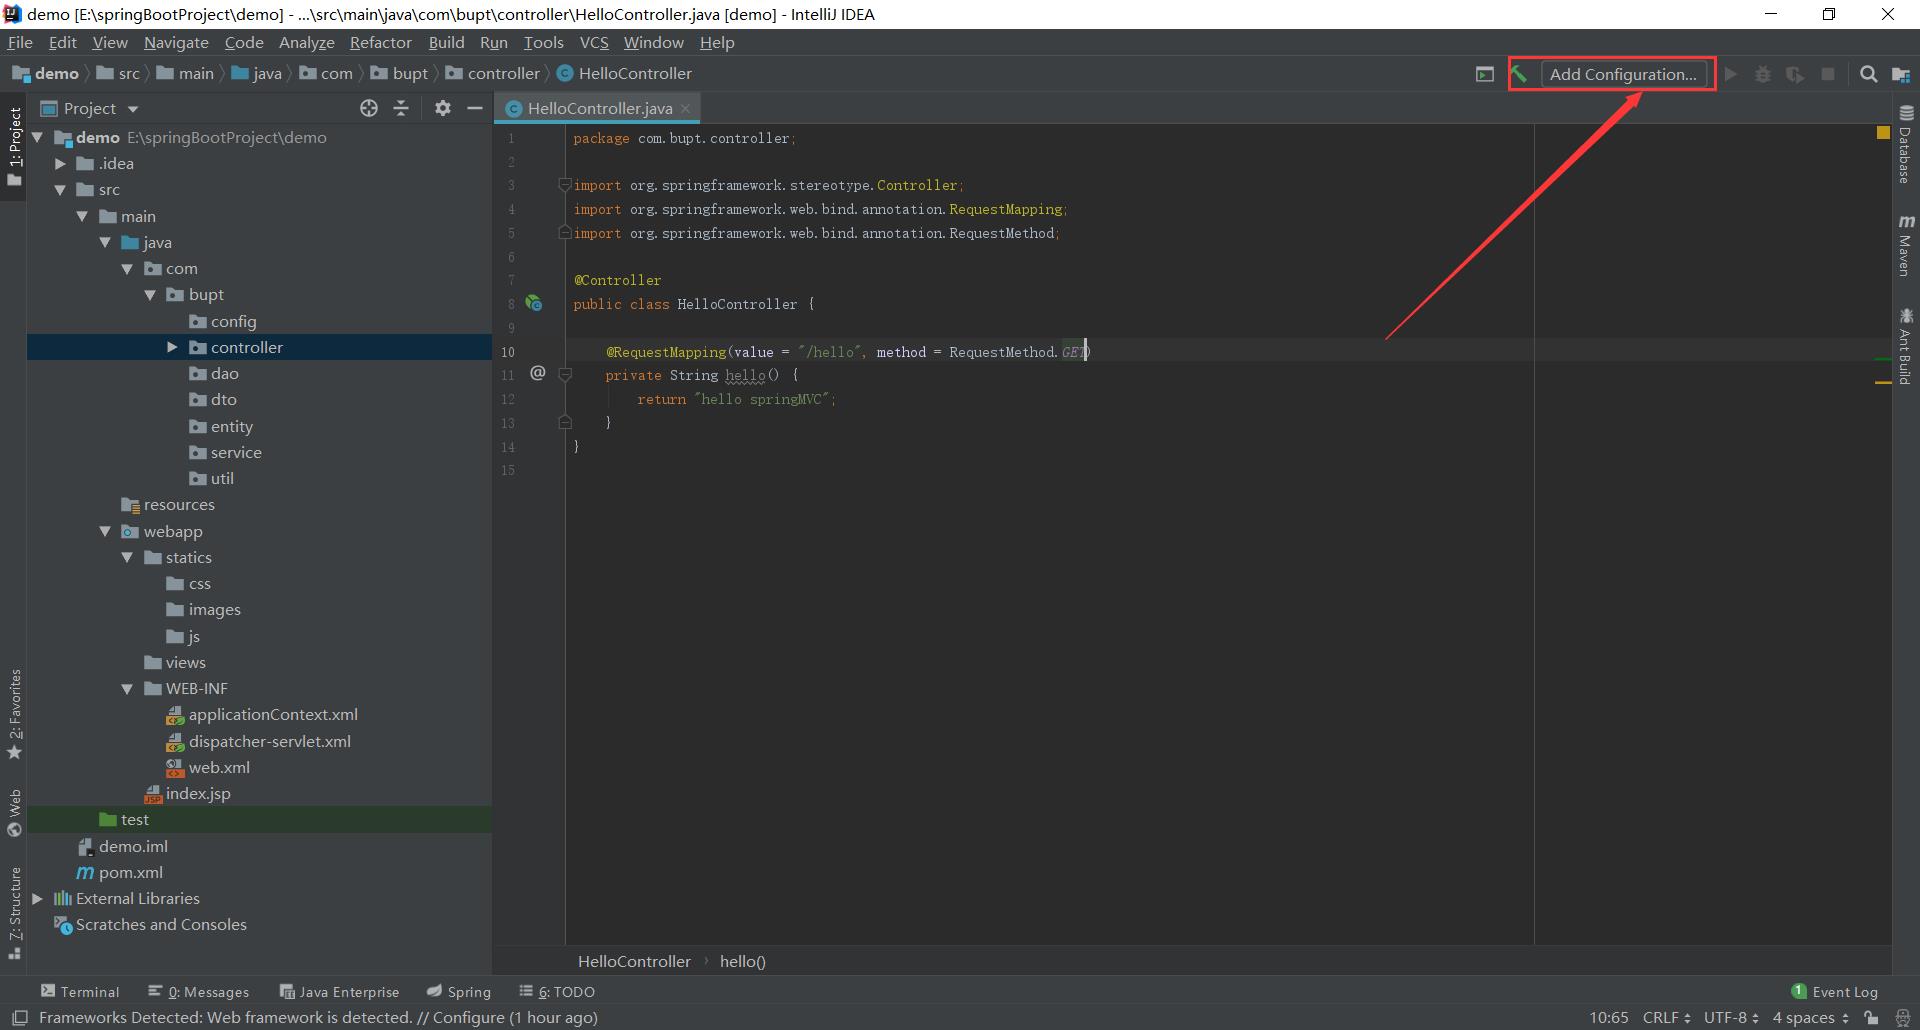
(1)点击Add Configuration
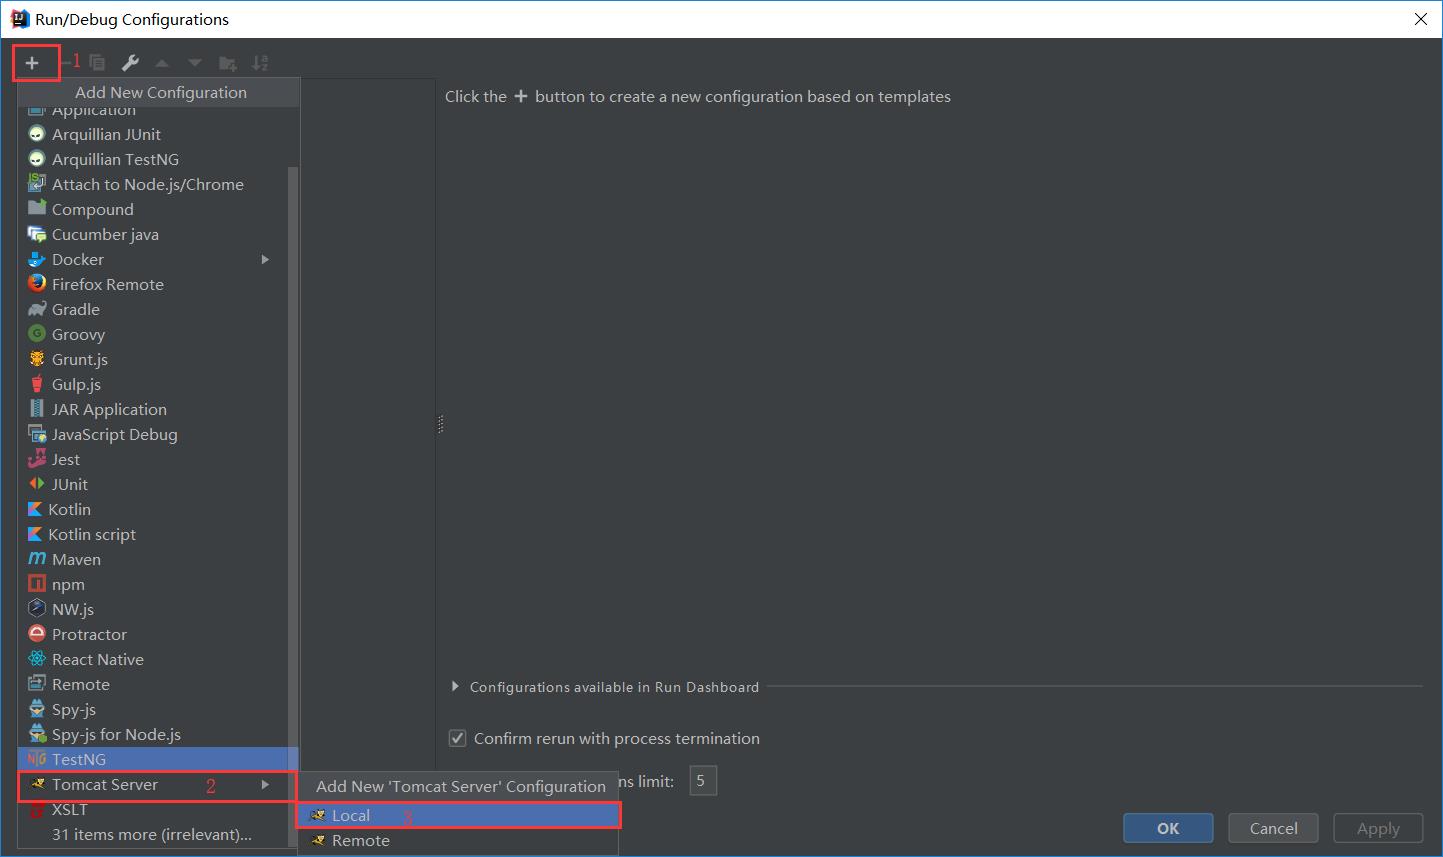
(2)点击+号,Tomcat Server->Local,如果找不到Tomcat Server就点击下面的31items more
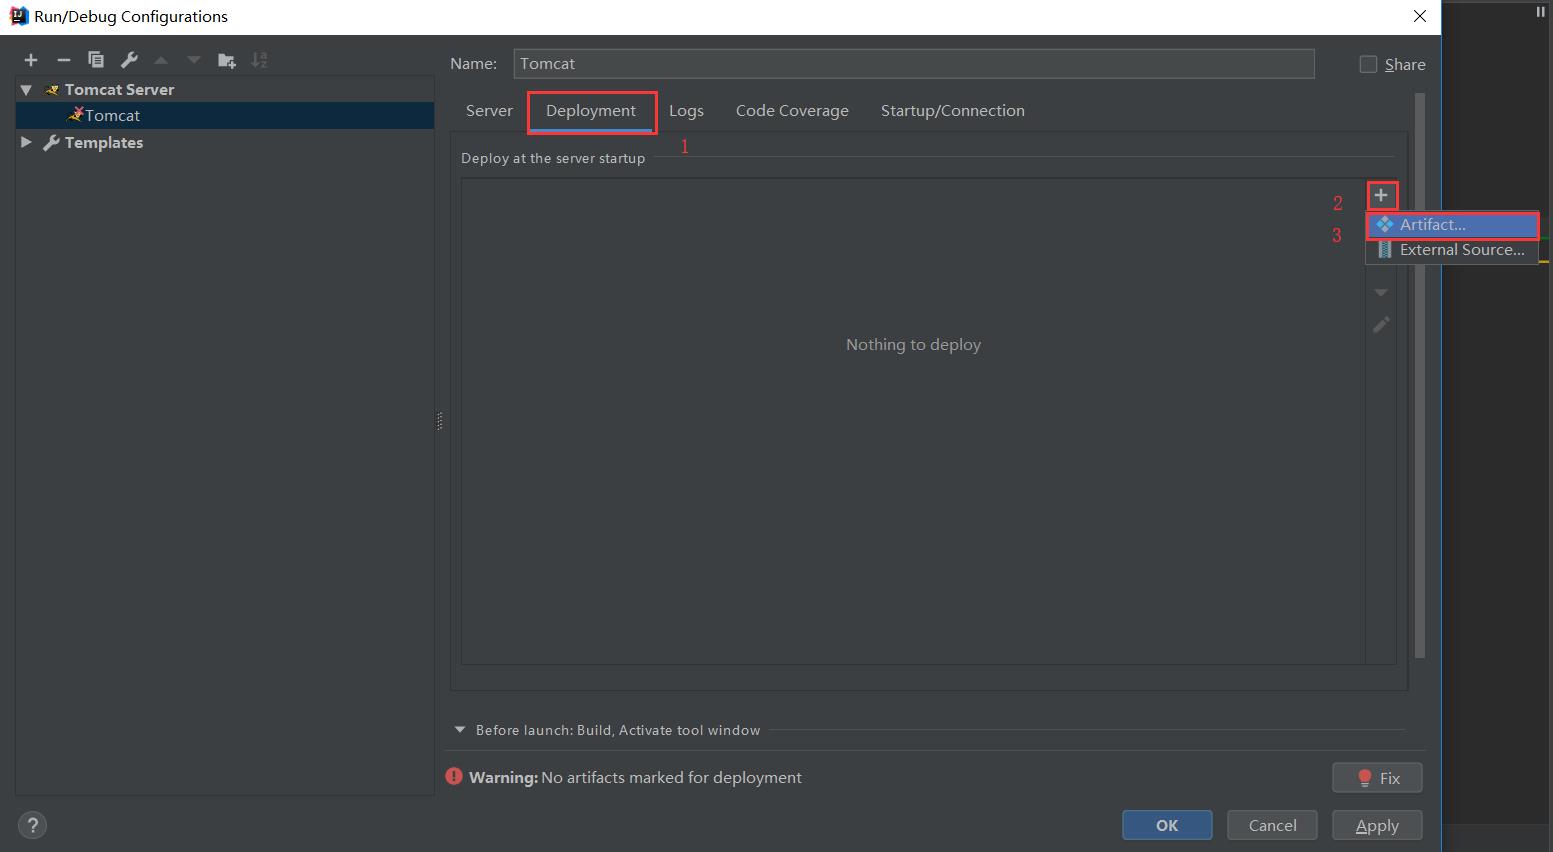
(3)进入tomcat配置界面后,选择Deployment选项卡,点击右边的+号,选择Artifact...
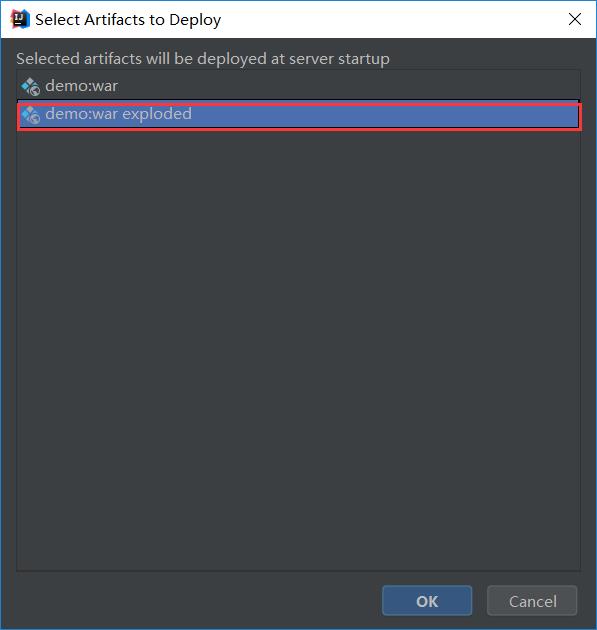
(4)选择下面的war exploded,点击ok
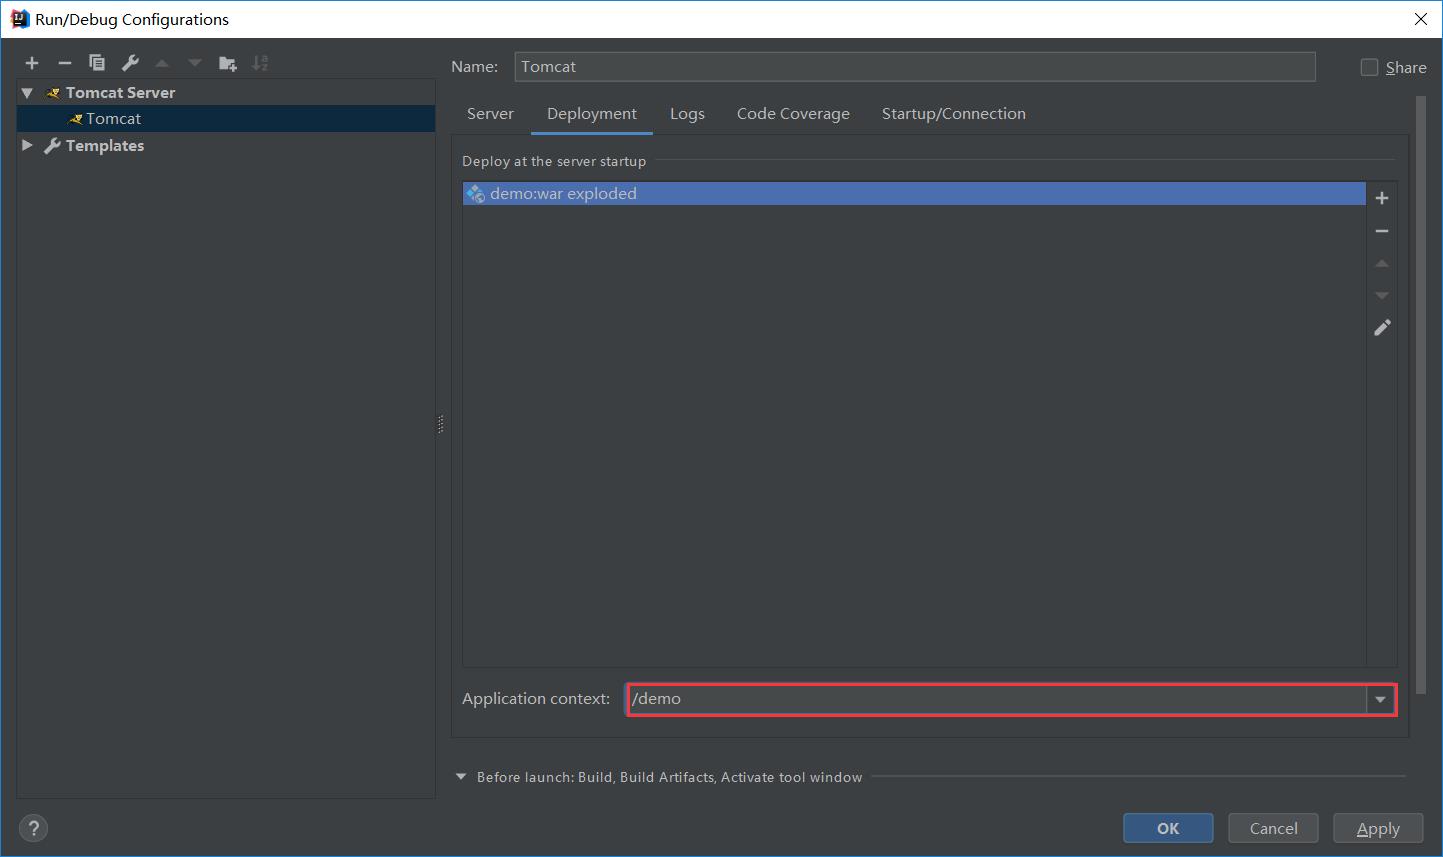
(5)这里取一个好记的名字
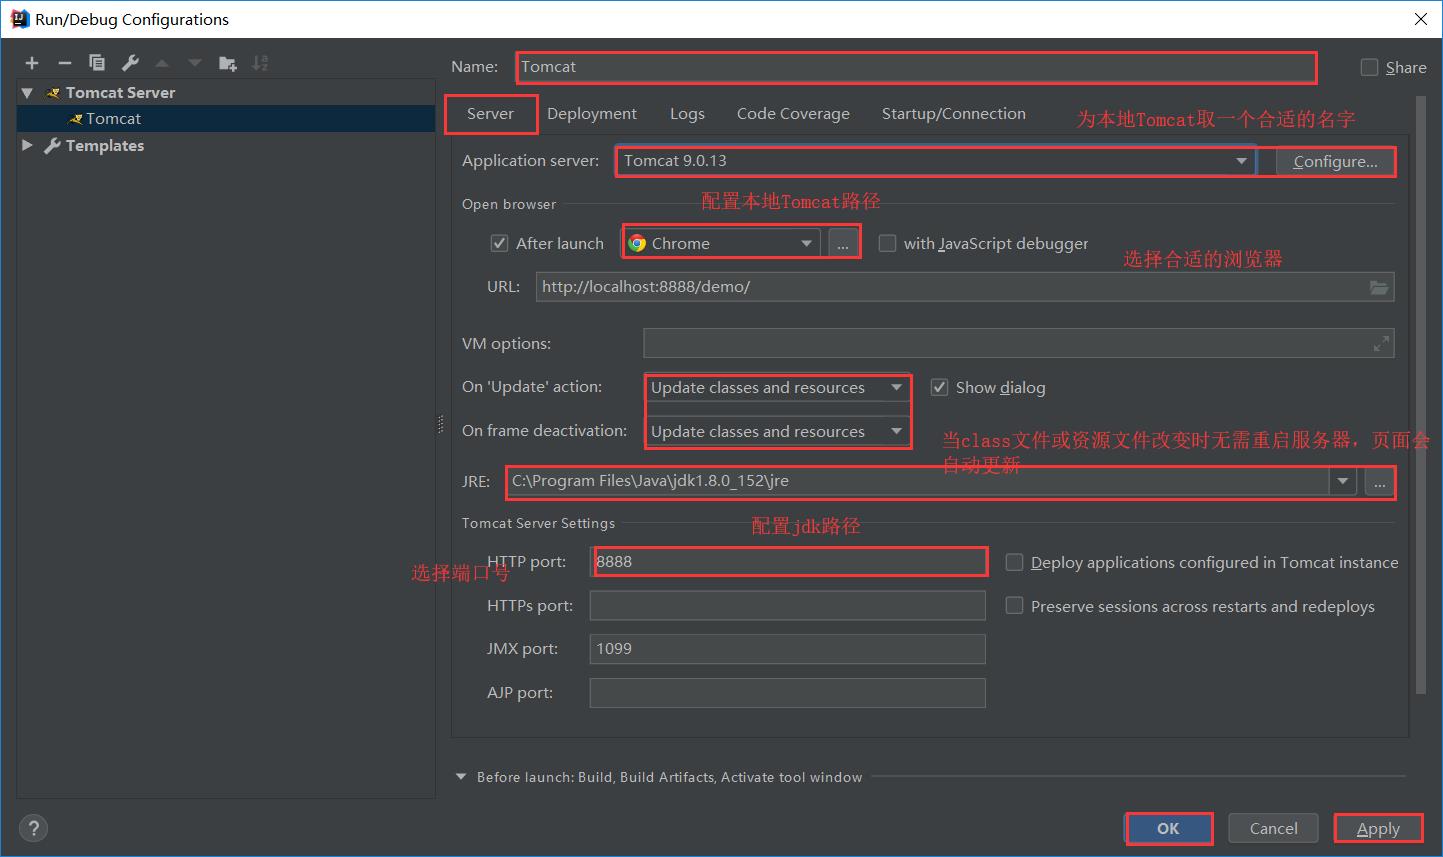
(6)切换到server选项卡,按照下图配置
(7)点击启动按钮,启动Tomcat服务器
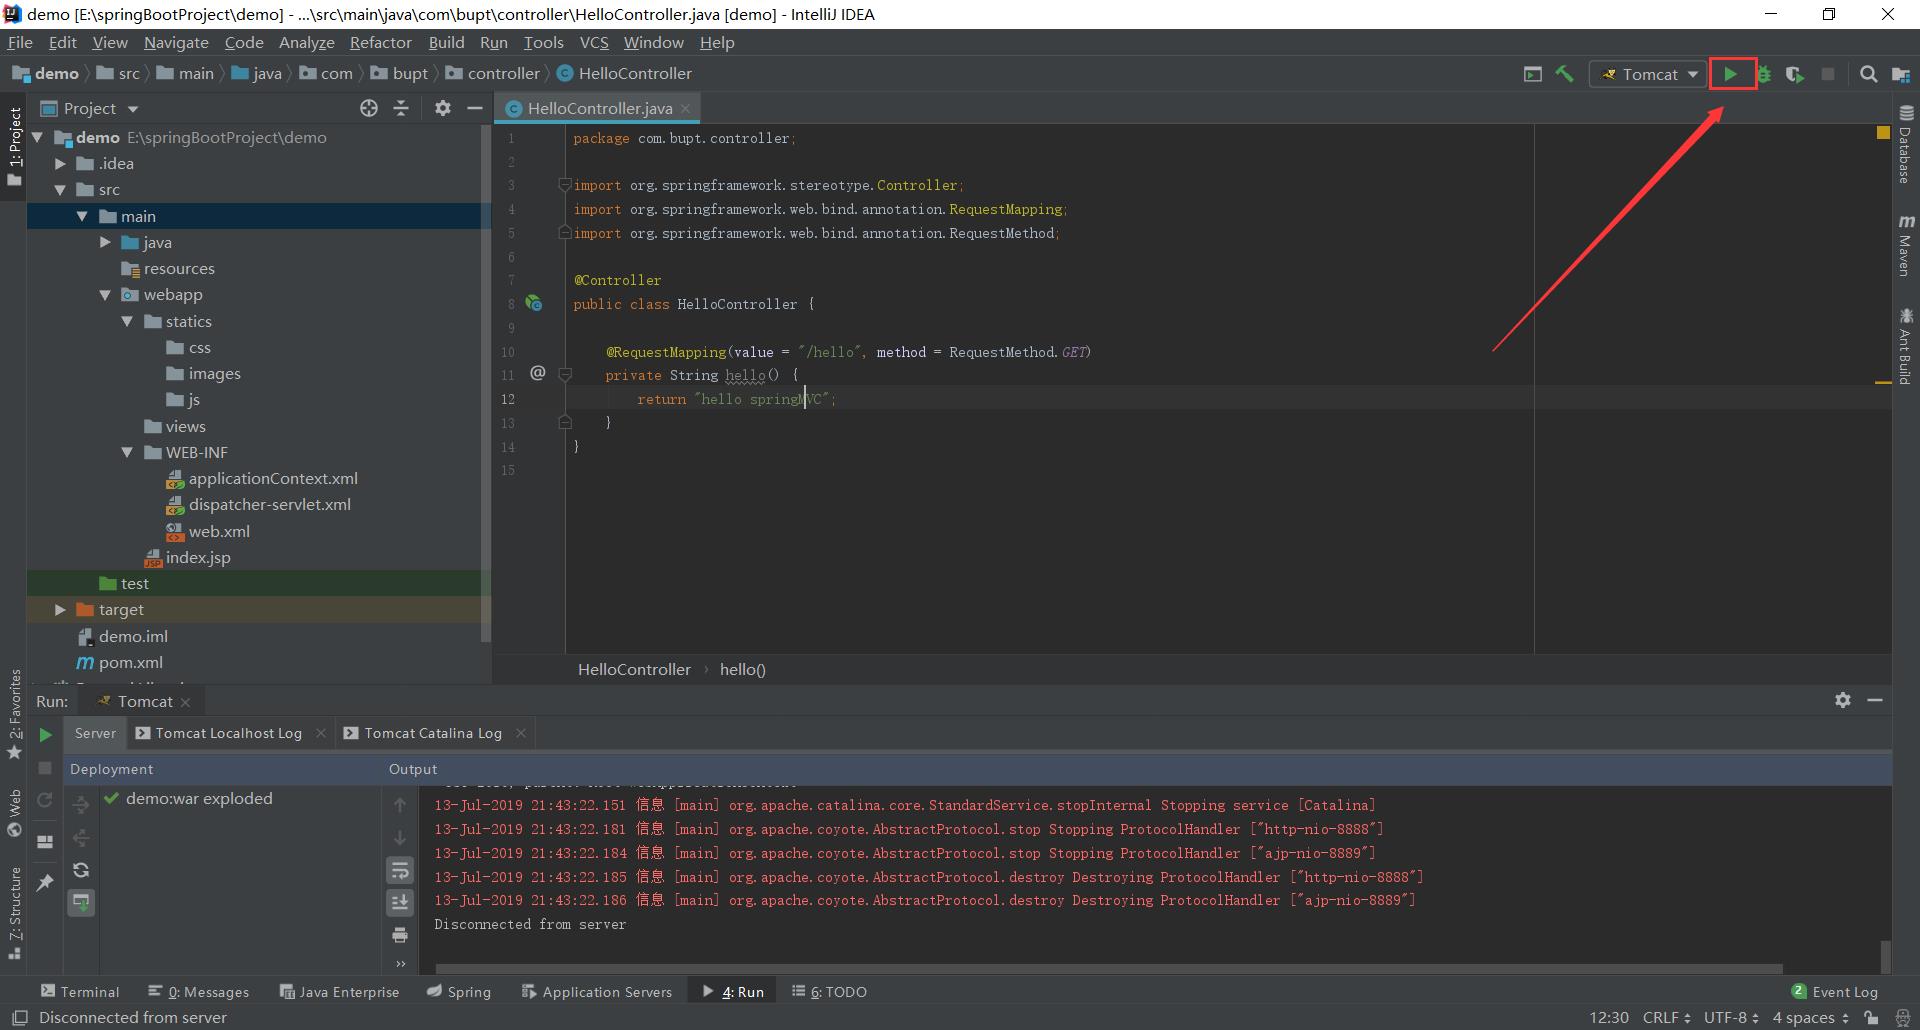
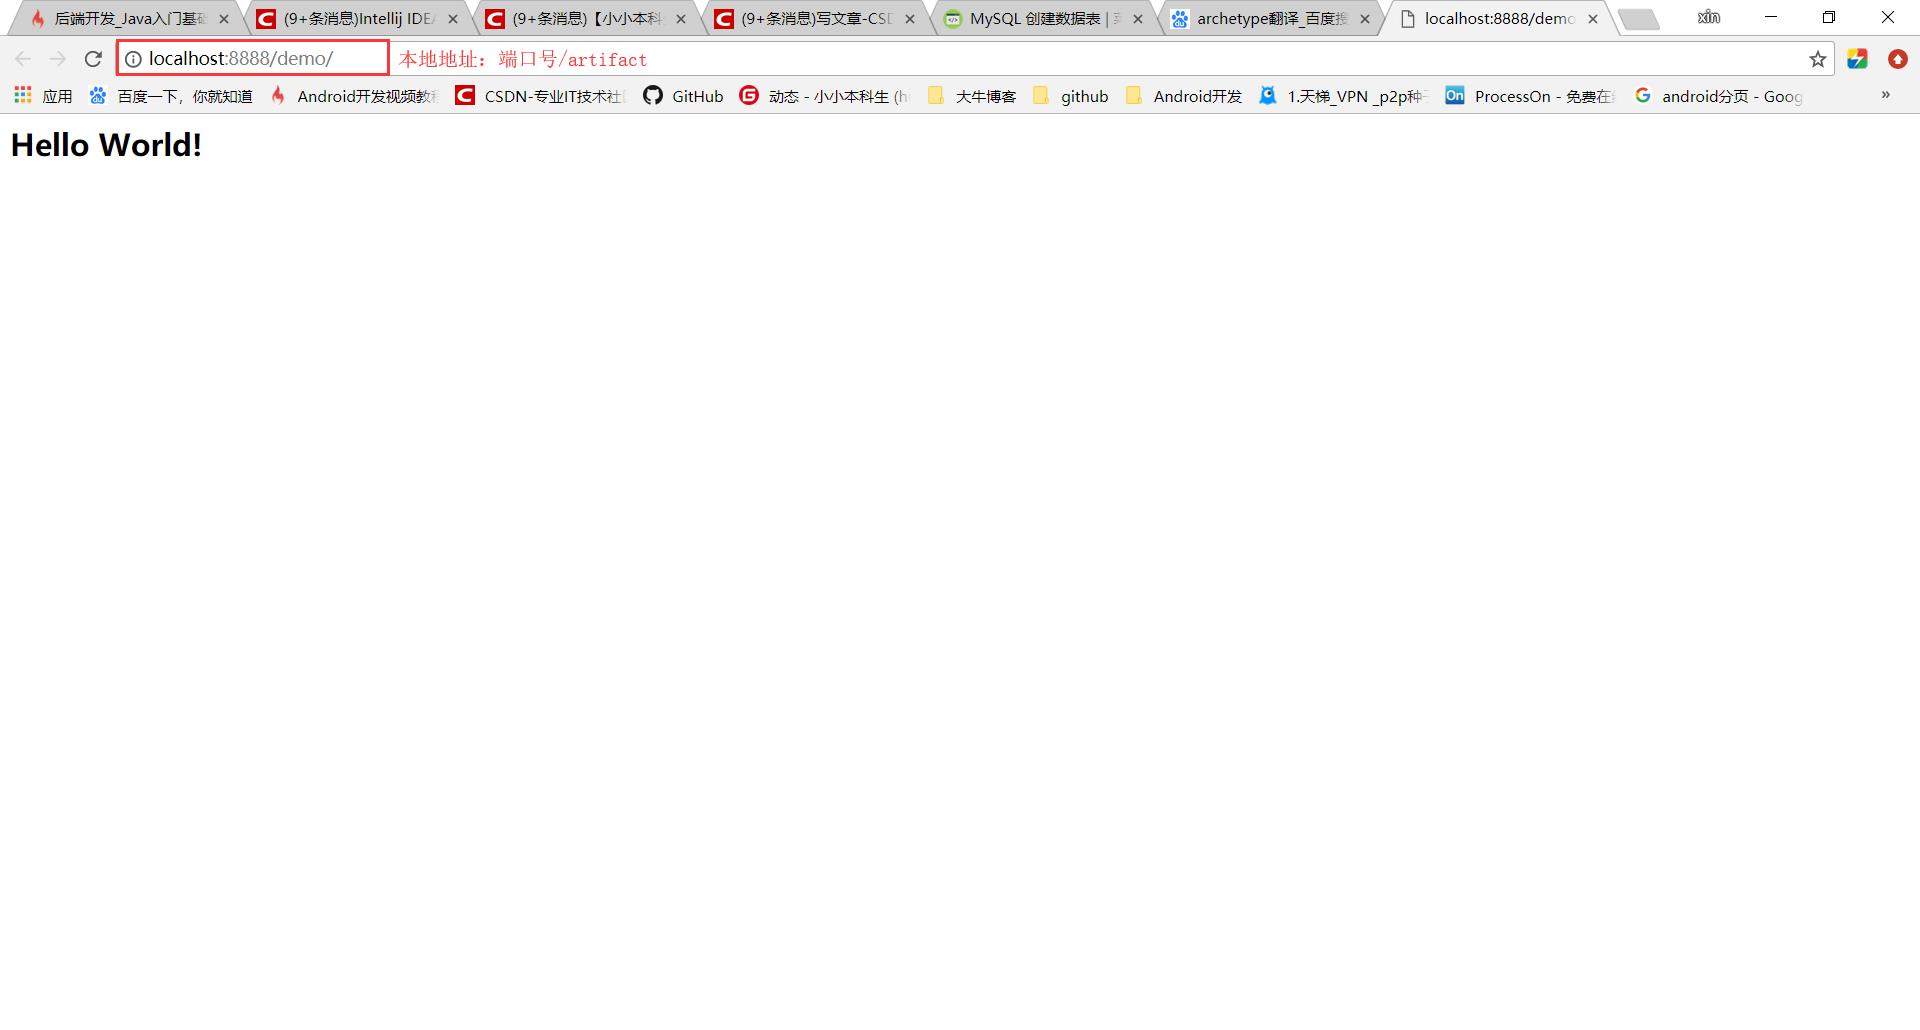
待服务器启动完成后会浏览器会自动打开如下界面,其实这就是IDEA自动生成的index.jsp中的内容
六、测试
写一个controller试试,配置是否成功。
HelloController.class
package com.bupt.controller;

import org.springframework.stereotype.Controller;
import org.springframework.web.bind.annotation.RequestMapping;
import org.springframework.web.bind.annotation.RequestMethod;

@Controller
public class HelloController

    @RequestMapping(value = "/hello", method = RequestMethod.GET)
    private String hello()
        return "hello";
在views目录下建立hello.html
<!DOCTYPE html>
<html lang="en">
<head>
    <meta charset="UTF-8">
    <title>Title</title>
    <link href="statics/css/hello.css" type="text/css" rel="stylesheet">
</head>
<body>
<h1 class="title">我自己的html页面</h1>
</body>
</html>
在css文件夹下建立hello.css
.title
    color: red;
    border: 1px solid red;
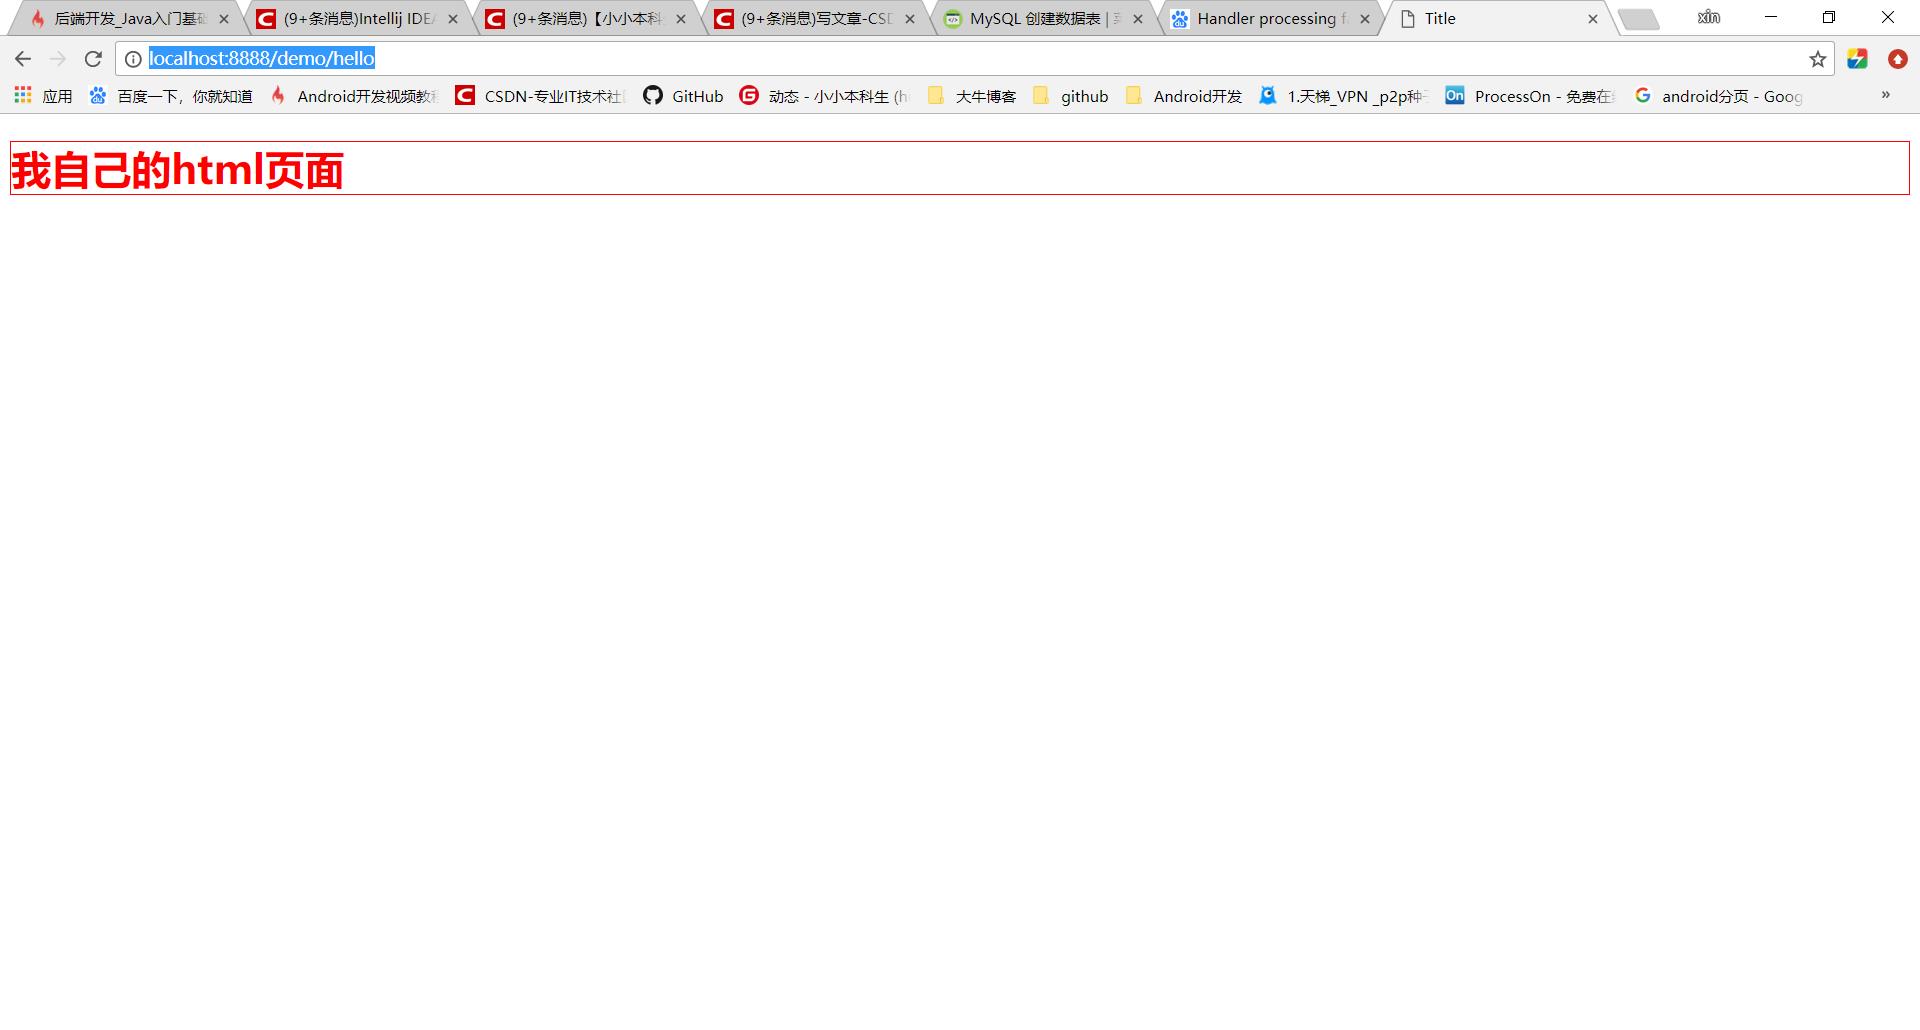
重启Tomcat服务器,访问http://localhost:8888/demo/hello。效果如下图所示
以上是关于IDEA创建基于maven的springMVC项目的主要内容,如果未能解决你的问题,请参考以下文章