VueVue3的系统性学习
Posted woodwhale
tags:
篇首语:本文由小常识网(cha138.com)小编为大家整理,主要介绍了VueVue3的系统性学习相关的知识,希望对你有一定的参考价值。
【Vue】Vue3的系统性学习
1、前言
之前在做一个springboot前后端分离项目的时候,前端使用的是Vue3。并不是说我会Vue3或者Vue2,而是Vue这东西是一个渐进式的框架,所有用啥可以学啥,随便学学就实现了一个功能了。但是在使用Vue3写前端的时候,遇到了非常多的麻烦,比如根本不会typescript,也不会使用最新的setup,同时语法还是使用老旧的Vue2,这就导致了虽然看起来我的前端功能完成了,但实际上其中的代码是一坨shit山的情况。
通过某个契机,准备进行Vue3的系统性学习。目前对于Vue的了解仅仅只有Vue2的一些语法格式,但是在本篇文章中,会进行Vue3的各种系统性学习。
2、Vue3介绍
由Vue2重构而来,使用MVVM架构编写。
- View
- ViewModel
- Model
系统的介绍就看看Vue的官方文档吧
对比Vue2,Vue3有何改进?
- 重写数据的双向绑定(Vue2使用
Object.defineProperty(),Vue3使用Proxy) - 优化了Vdom渲染
- 允许有多个根节点
- 智能导入,仅仅导入需要使用到的功能
3、开发环境
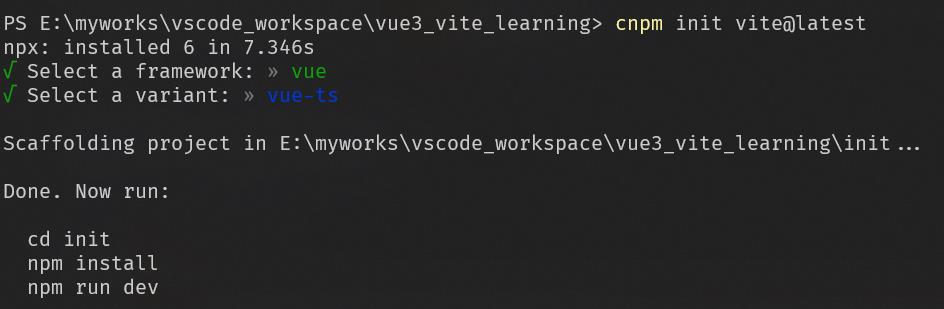
首先安装nodejs,前往官网下载,需求的版本 >= 12
再构建vite项目
为了快速访问npm中的资源,先安装一个cnpm或者给npm换源
npm install -g cnpm
到工作文件夹中输入如下代码进行构建
cnpm init vite@latest
选择构建vue项目

我这里选择的是vue-ts版本

构建成功如下:
进入到创建好的init文件夹,进行install

输入 cnpm run dev 进行启动项目
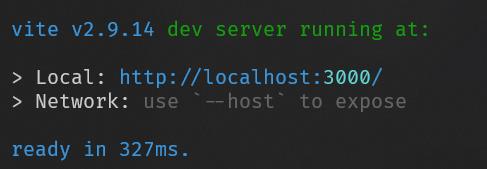
进入本地,构建成功

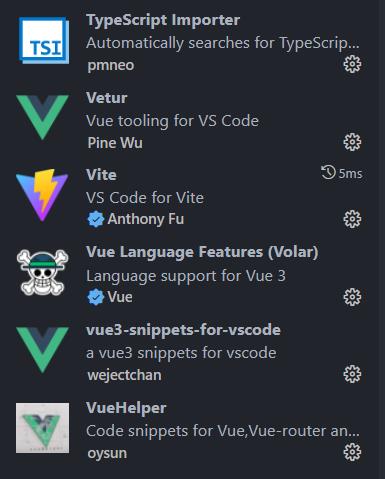
如果使用vscode进行开发,那么有很多的插件可以使用
4、认识文件 & 文件夹
-
public文件夹用于存放静态资源,例如图片 -
src中是会被编译的源文件assets虽然也是资源文件夹,但是其中的文件是会被编译的,例如图片可以编译成base64components是用于存放公共组件,例如 页头 页尾App.vue文件是应用于全局的vue文件main.ts文件也是公共全局的ts文件
-
index.html是首页文件,比较重要 -
package.json是依赖管理配置 -
tsconfig.json是typescript的配置文件 -
vite.config.ts是vite的配置文件
在一个vue文件中,由三部分组成template、script、style
template在一个vue文件中只能有一个,scripte如果是setup模式,也只能有一个
5、模板语法 & Vue指令
在Vue3中,模板语法是非常快速进行数据解析的一种方式,例如我在script中得到的变量需要渲染到dom中,使用 的方式就可以套入
<template>
    <div>
         msg
    </div>
</template>

<script setup lang='ts'>

let msg = "woodwhale"

</script>
同理,不仅仅支持字符串,还可以支持script语法,例如判断、api调用、计算等等
<template>
    <div>
         msg.split("oo")
    </div>
</template>

<script setup lang='ts'>

let msg = "woodwhale"

</script>
接下来就是Vue常用的指令,v- 开头的,都是vue的指令
- v-text(用来显示文本)
- v-html(用来显示富文本)
v-if(判断)v-else-ifv-else- v-show(用来控制元素的显示和隐藏)
v-on(简写是@,表示给元素添加事件绑定,例如@click)v-bind(简写是:,用来绑定元素的属性Attr)v-model(表示数据的双向绑定)v-for(遍历)
6、Ref全家桶
到这里就是Vue3的用处非常多的Ref的出现了,这里介绍其全家桶套餐,分别是:
- ref
- Ref
- isRef
- shallowRef
- triggerRef
- customRef
分别由什么用呢?我们都来看一下:
6.1 ref与Ref
首先是ref和Ref,ref是一个方法,而Ref是一个类型
ref,其用法就是将一个数据进行双向绑定,可以通过交互达到改变数据的作用
<template>
<div>
<el-button @click="changeMsg">change</el-button>
<div style="margin-top: 10px;"> msg </div>
</div>
</template>
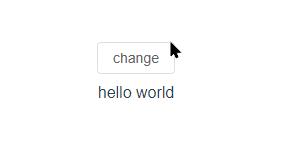
<script setup lang='ts'>
import Ref, ref from "vue"
let msg: Ref<string> = ref("hello world")
const changeMsg = () =>
msg.value = "changed msg"
</script>
<style>
</style>
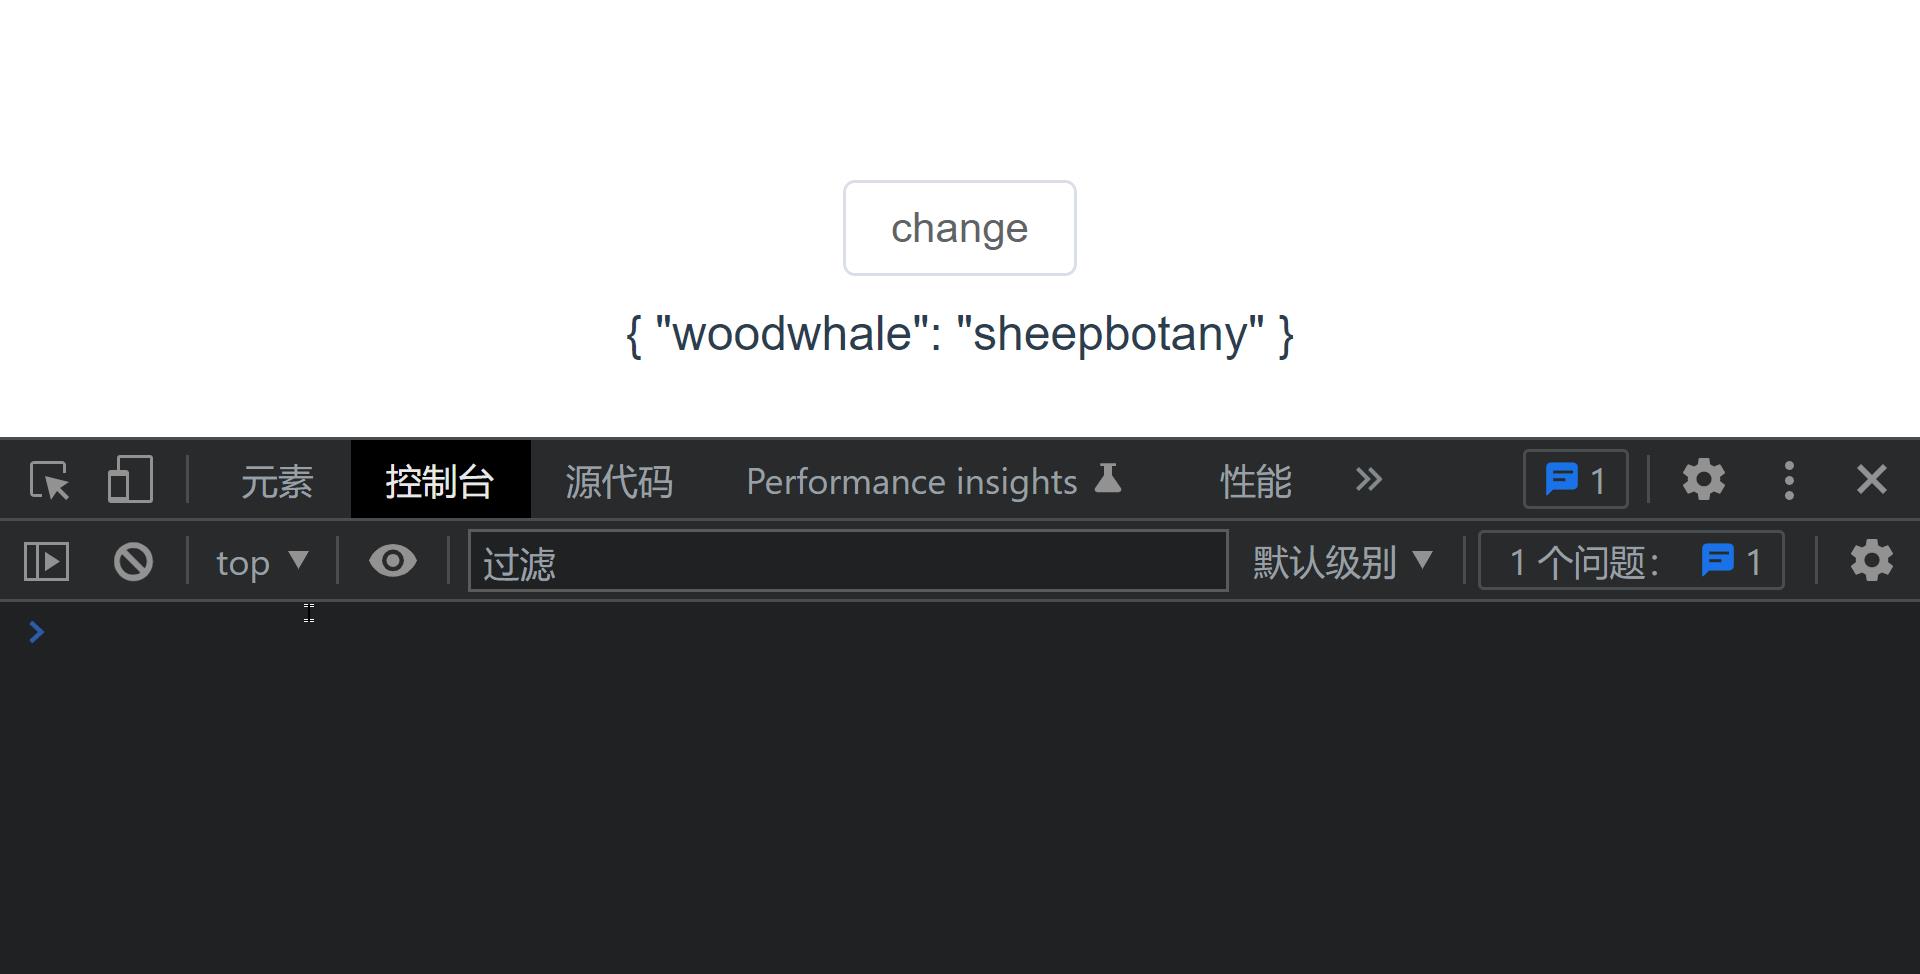
在如上的例子中,使用ref绑定一个msg的变量(数据类型是Ref类,同时绑定泛型为string),在绑定完之后,给一个button绑定一个点击方法,点击之后就会将msg.value进行改变,注意需要使用.value的属性对其数值进行改变
看效果:
6.2 isRef
从名字就看得出来,是一个判断方法,其实就是判断一个数据类型是否是Ref
<template>
   <div>
      <el-button @click="changeMsg">change</el-button>
      <div style="margin-top: 10px;"> msg </div>
   </div>
</template>

<script setup lang='ts'>
import  isRef, Ref, ref  from "vue"

let msg: Ref<string> = ref("hello world")

const changeMsg = () =>
   msg.value = "changed msg"
   console.log(isRef(msg))


</script>

<style>
</style>
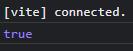
运行后会在浏览器控制行log出true
6.3 shallowRef
从名字看出来,shallo就是浅显的意思,也就是说,使用shalloRef是不会对深层属性进行双向绑定的
举个例子
<template>
   <div>
      <el-button @click="changeMsg">change</el-button>
      <div style="margin-top: 10px;"> msg </div>
   </div>
</template>

<script setup lang='ts'>
import  shallowRef  from "vue"

let msg = shallowRef( "woodwhale": "sheepbotany" )

const changeMsg = () =>
   console.log("尝试修改深层属性")
   msg.value.woodwhale = "another sheepbotany"


</script>

<style>
</style>
我们点击按钮时不会改变msg.value.woodwhale的
shalloRef只能对其value属性进行相应,所以上述代码可以改为
<script setup lang='ts'>
import  shallowRef  from "vue"

let msg = shallowRef( "woodwhale": "sheepbotany" )

const changeMsg = () =>
   console.log("尝试修改深层属性")
   msg.value =  "woodwhale": "another sheepbotany"

</script>
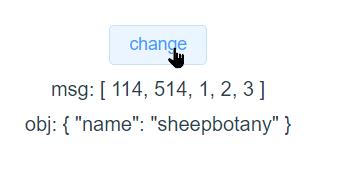
修改后运行效果如下:

6.4 triggerRef
从名字也可以看出,叫做触发,那么到底时什么意思呢?其实算一种强制刷新ref的绑定
例如在上述的shallowRef中,我们无法对msg.value.woodwhale这种深层属性进行修改,如果想要修改成功,就需要使用triggerRef来调用强制刷新
<script setup lang='ts'>
import  shallowRef, triggerRef  from "vue"

let msg = shallowRef( "woodwhale": "sheepbotany" )

const changeMsg = () =>
   console.log("尝试修改深层属性")
   msg.value.woodwhale = "another sheepbotany"
   triggerRef(msg)

</script>
这样的也能达到实现修改shalloRef深层属性的效果
6.5 customRef
customRef是一个可以自定义相应式的ref,用法如下。如下的写法其实就是ref的原理
<script setup lang='ts'>
import  customRef  from "vue"

function MyRef<T>(value:T)
   return customRef((trank,trigger) =>
      return
         get()
            trank()  // 跟踪获取数据
            return value
         ,
         set(newVal:T)
            value = newVal
            trigger()   // 更新,刷新新数据


   )


let msg = MyRef<string>("woodwhale")
const changeMsg = () =>
   msg.value = "sheepbotany"

</script>
7、Reactive全家桶
7.1 reactive
最基本的reactive和ref的性质类似,但是一般使用reactive来修饰非基本类型,例如:数组、类与对象
而ref一般是用来进行修饰基本数据类型的,当然,非基本数据类型也可以修饰,但是其背后的底层逻辑还是会判断是否是基本数据类型,如果非基本数据类型,其会调用toReactive的方法,将其转换为Reactive类型
看一个基本的使用例子:
<template>
   <div>
      <el-button @click="changeMsg">change</el-button>
      <div style="margin-top: 10px;">msg:  msg </div>
      <div style="margin-top: 10px;">obj:  obj </div>
   </div>
</template>

<script setup lang='ts'>
import  reactive  from 'vue';


let msg = reactive<number[]>([114,514])  // reactive只能传入非基本类型的数据,例如数组、object

let obj = reactive(
   name:"woodwhale"
)

const changeMsg = () =>
   msg.push(...[1,2,3])
   obj.name = "sheepbotany"


</script>

<style>
</style>
注意这里如果要给msg进行增删改,需要使用函数类型的增删改实现,例如push方法等,不能给其重新赋值
7.2 shallowReactive
和shallowRef类似,是浅层的数据绑定
在页面渲染完成之后,只能对浅层的数据进行修改
<template>
   <div>
      <el-button @click="changeMsg">change</el-button>
      <div style="margin-top: 10px;">msg:  msg </div>
   </div>
</template>

<script setup lang='ts'>
import  shallowReactive  from 'vue';

let msg = shallowReactive(
   name: "woodwhale",
   deep:
      deeper:
         name: "sheepbotany"


)

const changeMsg = () =>
   msg.deep.deeper.name = "new sheepbotany"

</script>
上述代码就无法在web端实时渲染,虽然值确实是改变了,但是web端的显示渲染没有进行改变

但是如果在改变浅层数据的时候,一并改变深层数据,两者都会进行web端的渲染更新
<script setup lang='ts'>
import  shallowReactive  from 'vue';

let msg = shallowReactive(
   name: "woodwhale",
   deep:
      deeper:
         name: "sheepbotany"


)

const changeMsg = () =>
   msg.name = "new woodwhale"
   msg.deep.deeper.name = "new sheepbotany"

</script>

7.4 readonly
调用readonly方法进行一次数据的拷贝,copy的数据是无法进行修改的,只能读
<script setup lang='ts'>
import  reactive, readonly  from 'vue';

let msg = reactive(
   count: 1
)

let copy = readonly(msg)

copy.count++   // readonly无法修改

</script>
8、to全家桶
分别对如下几种to的方法进行举例讲解
8.1 toRef
使用toRef可以将数据类型转为Ref类型
<template>
   <div>
      <el-button @click="changeMsg">change</el-button>
      <div style="margin-top: 10px;">state:  state </div>
   </div>
</template>

<script setup lang='ts'>
import  toRef  from 'vue';


const obj =
   name: "woodwhale",
   sex: "man"


const state = toRef(obj, "name")

const changeMsg = () =>
   state.value = "new woodwhale"

   console.log("原始对象 --> ", obj)
   console.log("to后对象 --> ", state)
   // 会对自身数据进行更新,也会对原始数据进行更新,但是页面的视图是不会变化的(因为原始obj不是相应式的,如果原始obj是相应式的就会变化)


</script>

<style>
</style>
8.2 toRefs
将一个数据中的多个属性转为ref
<template>
   <div>
      <el-button @click="changeMsg">change</el-button>
      <div style="margin-top: 10px;">obj:  obj </div>
   </div>
</template>

<script setup lang='ts'>
import  reactive, toRefs  from 'vue';


const obj = reactive(
   name: "woodwhale",
   sex: "man"
)

let name,sex = toRefs(obj)

const changeMsg = () =>
   name.value = "sheepbotany"
   sex.value = "woman"


</script>
8.3 toRaw
toRaw就是将相应式的数据转为原始的数据类型
<script setup lang='ts'>
import  reactive, toRaw, toRefs  from 'vue';


const obj = reactive(
   name: "woodwhale",
   sex: "man"
)

const raw = toRaw(obj)

console.log("相应式 --> ", obj)
console.log("非相应式 --> ", raw)

</script>

9、computed计算属性
所谓computed就是计算属性,也就是当依赖的属性发生变化的时候,才会触发其变更。如果依赖的值不发生改变,那么使用的就是缓存中的属性值。
<template>
   <div>
      <input v-model="first" type="text">
      <input v-model="second" type="text">
   </div>

   <div>name</div>
</template>

<script setup lang='ts'>
import  computed,ref  from 'vue';


let first = ref('woodwhale')
let second = ref('sheepbotany')

const name = computed(() =>
   return first.value + "----" + second.value
) // 只要first或者second进行了改变,name就会进行改变,这就是computed

</script>

<style>
</style>
我们尝试进行first和second的修改:

发现name也是一个相应式,只不过进行了ref的组合计算
当然computed的使用方法还可以是对象的方式,使用get和set方法:
<template>
   <div>
      <input v-model="first" type="text">
      <input v-model="second" type="text">
   </div>

   <div> name </div>
</template>

<script setup lang='ts'>
import  computed, ref  from 'vue';


let first = ref('woodwhale')
let second = ref('sheepbotany')

const name = computed(
   get()
      return first.value + "----" + second.value   // 3. 触发get方法,页面获取真实的name
   ,
   set(param)
      second.value = param   // 2. 触发set方法

)

setTimeout(() =>
   name.value = "new sheepbatany"
, 1000)  // 1. 三秒后给 name 赋值

</script>

<style>
</style>
10、watch监听器
watch是vue3中的一个方法,可以监听数据的改变
10.1 ref浅监听
watch默认是浅监听,也就是如果一个ref对象有深层属性,是无法通过浅层监听而监听到的
<template>
   <div>
      <input v-model="msg" type="text">
   </div>

   <div>msg -->  msg </div>
   <div>old -->  o </div>
   <div>new -->  n </div>
</template>

<script setup lang='ts'>
import  ref, watch  from 'vue';

let msg = ref('woodwhale')
let n = ref("")
let o = ref("")

// 监听器,监听msg
watch(msg, (newVal, oldVal) =>
   n.value = newVal
   o.value = oldVal
)

</script>

<style>
</style>
我们可以观察到,每次改变msg的值,都会调用watch中的方法
10.2 ref深监听
在watch方法的第三个参数中设置deep:true就可以进行深层监听,这样就可以监听ref对象中的深层属性
<template>
   <div>
      <input v-model="msg.d.dd.ddd" type="text">
   </div>

   <div>msg -->  msg.d.dd.ddd </div>
   <div>old -->  o </div>
   <div>new -->  n </div>
</template>

<script setup lang='ts'>
import  ref, watch  from 'vue';

let msg = ref(
   d:
      dd:
         ddd: "woodwhale"


)
let n = ref("")
let o = ref("")

// 监听器,监听msg,使用deep功能,进行深度监听
watch(msg, (newVal, oldVal) =>
   n.value = newVal.d.dd.ddd
   o.value = oldVal.d.dd.ddd
,  deep: true )

</script>

<style>
</style>
使用深层监听有一个缺点,那就是newVal和oldVal是一样的
10.3 默认执行
watch方法放在setup中是默认第一次不会执行的,也就是说,如果不改变监听的对象的属性,那么watch中的方法是不会进行调用的。
如果想让第一次执行就进行调用,那就需要使用到immediate:true了
<template>
   <div>
      <input v-model="msg.d.dd.ddd" type="text">
   </div>

   <div>msg -->  msg.d.dd.ddd </div>
   <div>old -->  o </div>
   <div>new -->  n </div>
</template>

<script setup lang='ts'>
import  ref, watch  from 'vue';

let msg = ref(
   d:
      dd:
         ddd: "woodwhale"


)
let n = ref()
let o = ref()

// 监听器,监听msg,使用deep功能,进行深度监听
watch(msg, (newVal, oldVal) =>
   n.value = newVal.d.dd.ddd
   if (oldVal === undefined)
      o.value = "页面加载会调用"
    else
      o.value = oldVal.d.dd.ddd

,
   deep: true,
   immediate: true
)

</script>

<style>
</style>
这里的watch中的方法就是页面已加载就进行调用了
10.4 reactive监听
对于reactive的watch监听,无论是否加入deep:true,它都是深层监听,因为reactive定义的对象本来就是面向属性层次的。
加入一个reactive对象中有多个属性,但是我们仅仅想监听其中的某一个属性,可以将watch的第一个参数写成函数的形式,然后返回reactive对象的属性
<template>
   <div>
      <input v-model="msg.name" type="text">
   </div>
   <div>
      <input v-model="msg.name2" type="text">
   </div>

   <div>msg -->  msg </div>
</template>

<script setup lang='ts'>
import  reactive, watch  from 'vue';

let msg = reactive(
   name: "woodwhale",
   name2: "sheepbotany"
)


// 监听器,监听msg,使用deep功能,进行深度监听
watch(() => msg.name, (newVal, oldVal) =>
   console.log("new", newVal)
   console.log("old", oldVal)
)

</script>

<style>
</style>
这里我只对name属性进行了监听,而没有对name2进行监听
11、watchEffect监听器
watchEffect就是可以监听多个属性改变的监听器,其中存在的属性都会被监听
11.1 基本方法
<template>
   <div>
      <input v-model="msg" type="text">
   </div>
   <div>
      <input v-model="msg2" type="text">
   </div>

   <div>msg -->  msg </div>
   <div>msg2 -->  msg2 </div>
</template>

<script setup lang='ts'>
import  ref, watchEffect  from 'vue';

let msg = ref<string>("msg1")

let msg2 = ref<string>("msg2")

// 首次一定会调用
watchEffect(() =>
   console.log("msg --> ", msg.value)
   console.log("msg2 --> ", msg2.value)
)

</script>

<style>
</style>
11.2 预处理
如果我们需要在监听之前进行预处理呢?在匿名方法中传入一个参数就行了
<template>
   <div>
      <input v-model="msg" type="text">
   </div>
   <div>
      <input v-model="msg2" type="text">
   </div>

   <div>msg -->  msg </div>
   <div>msg2 -->  msg2 </div>
</template>

<script setup lang='ts'>
import  ref, watchEffect  from 'vue';

let msg = ref<string>("msg1")

let msg2 = ref<string>("msg2")

// 首次一定会调用
watchEffect((beforeMethod) =>
   console.log("msg --> ", msg.value)
   console.log("msg2 --> ", msg2.value)

   // 在调用上面两个log之前会调用beforeMethod中的匿名函数,页面首次调用除外
   beforeMethod(() =>
      console.log("before done!")
   )
)

</script>

<style>
</style>
11.3 关闭监听
如果我们想要关闭watchEffect的监听呢,也很简单调用stop()方法就可以了
<template>
   <div>
      <input v-model="msg" type="text">
   </div>
   <div>
      <input v-model="msg2" type="text">
   </div>

   <div>msg -->  msg </div>
   <div>msg2 -->  msg2 </div>

   <el-button @click="stopWatch">stop</el-button>
</template>

<script setup lang='ts'>
import  ref, watchEffect  from 'vue';

let msg = ref<string>("msg1")

let msg2 = ref<string>("msg2")

// 首次一定会调用
const watchVal = watchEffect((beforeMethod) =>
   console.log("msg --> ", msg.value)
   console.log("msg2 --> ", msg2.value)

   // 在调用上面两个log之前会调用beforeMethod中的匿名函数,页面首次调用除外
   beforeMethod(() =>
      console.log("before done!")
   )
)

// 关闭监听
const stopWatch = () => watchVal()

</script>

<style>
</style>
12、Vue3生命周期
在介绍了上述这么多的Vue3的语法糖,可以引入vue的声明周期函数来进行讲解了。
vue3中有一个setup的状态,对应vue2中的beforeCreate和created
这里先介绍六种生命周期函数:
- onBeforeMount
- onMounted
- onBeforeUpdate
- onUpdated
- onBeforeUnmount
- onUnmounted
<template>
   <div @click="countUpdate"> count  《-- 点击改变</div>
</template>

<script setup lang='ts'>
import  onBeforeMount, onBeforeUnmount, onBeforeUpdate, onMounted, onUnmounted, onUpdated, ref  from 'vue';

const count = ref<number>(0)
const countUpdate = () =>
   count.value++


console.log("setup")

onBeforeMount(() =>
   console.log("创建之前 --> onBeforeMount")
)

onMounted(() =>
   console.log("创建完成 --> onMounted")
)

onBeforeUpdate(() =>
   console.log("更新之前 --> onBeforeUpdate")
)

onUpdated(() =>
   console.log("更新完成 --> onUpdated")
)

onBeforeUnmount(() =>
   console.log("卸载之前 --> onBeforeUnmount")
)

onUnmounted(() =>
   console.log("卸载完成 --> onUnmounted")
)

</script>

<style>
</style>
一张图看如上的生命周期
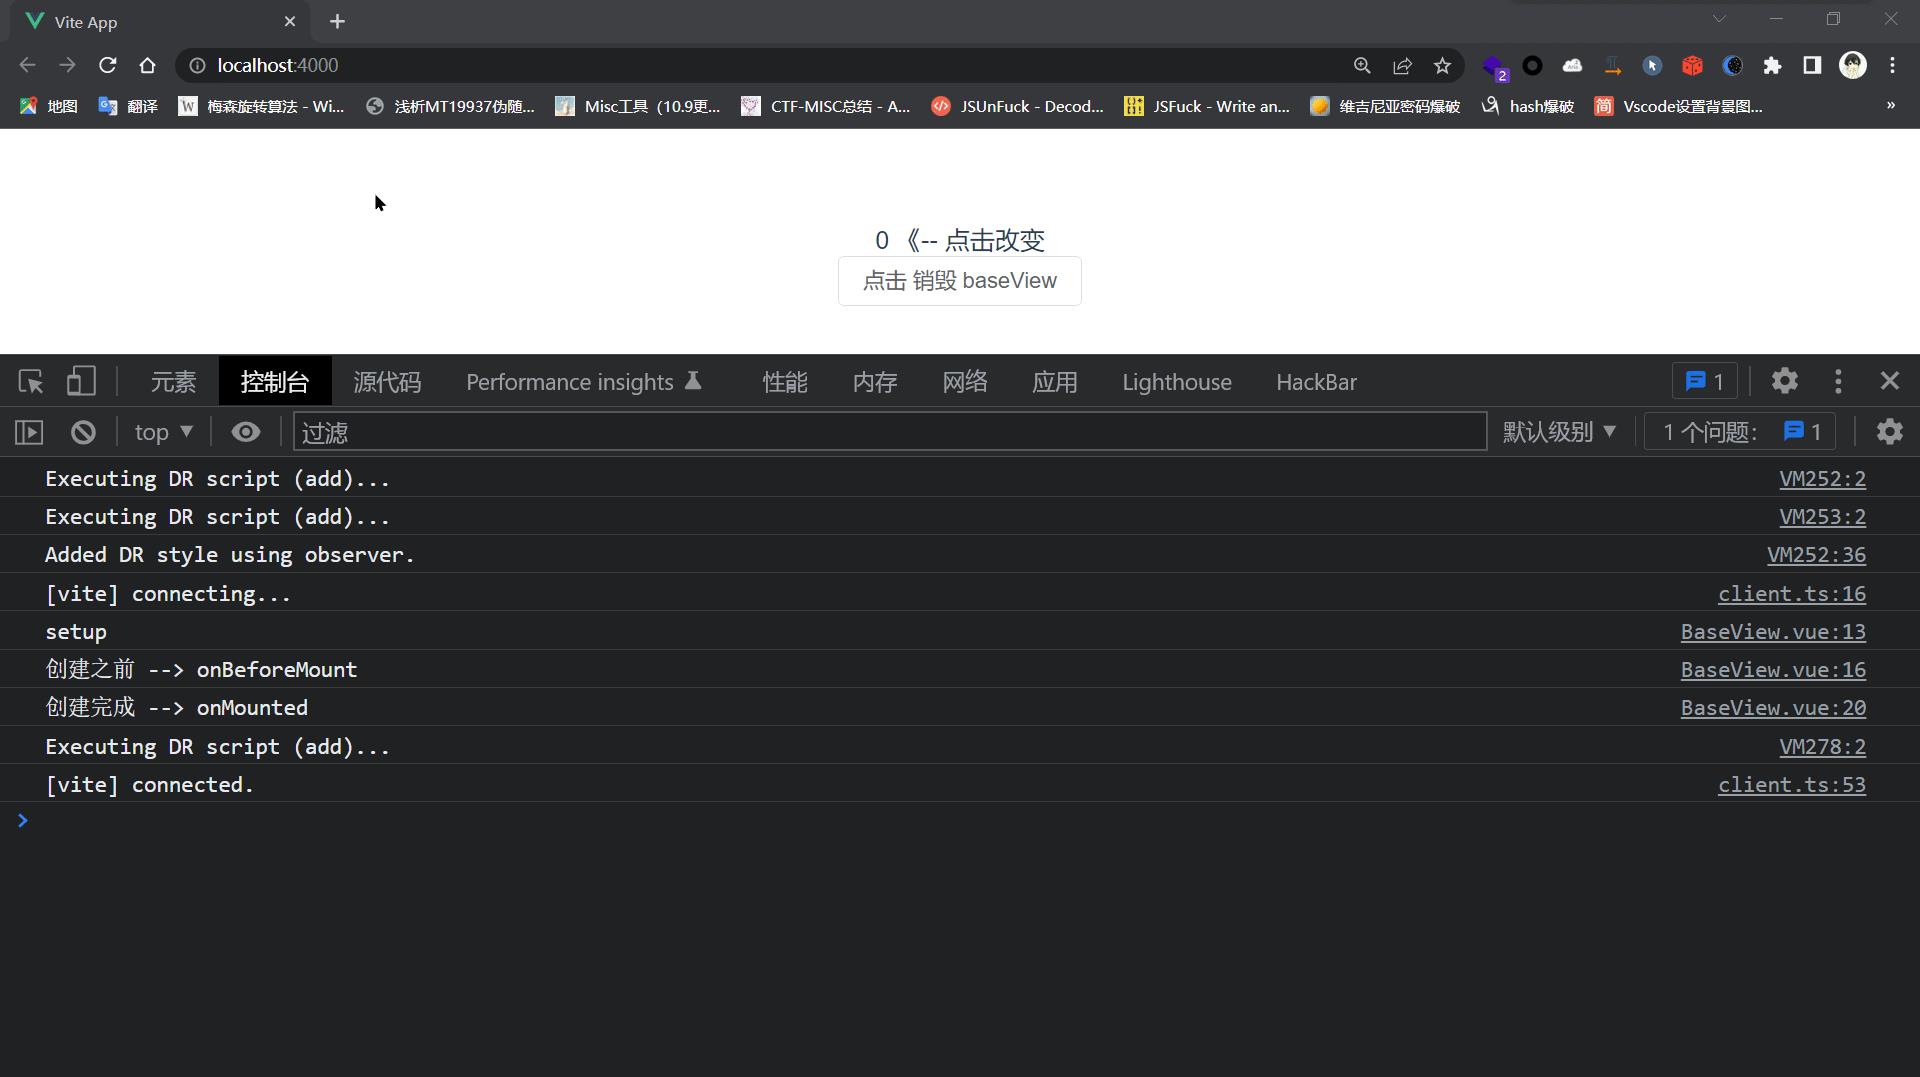
这里的卸载按钮写在App.vue中
<template>

  <BaseViewVue v-if="flag"></BaseViewVue>

  <el-button @click="des">点击  state  baseView</el-button>

</template>

<script setup lang="ts">
import  ref  from 'vue';
import BaseViewVue from './layout/BaseView.vue'

let flag = ref(true)
let state = ref("销毁")
const des = () =>
  if (flag.value)
    flag.value = false
    state.value = "挂载"
   else
    flag.value = true
    state.value = "销毁"


</script>
13、父子组件传递参数
首先先编写一个父子组件

BaseView中引入Content、Header、Menu三块内容,其代码如下
<template>
   <div class="layout">
      <div>
         <Menu></Menu>
      </div>
      <div>
         <Header></Header>
         <Content></Content>
      </div>
   </div>
</template>

<script setup lang='ts'>
import Content from './Content/index.vue'
import Header from './Header/index.vue'
import Menu from './Menu/index.vue'


</script>

<style lang="less" scoped>
.layout
   display: flex;

</style>
13.1 父传子
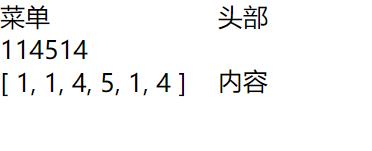
将父组件的内容传递给子组件也很简单,例如在BaseView给Menu传递
<Menu :menuList="[1,1,4,5,1,4]" menuStr="114514"></Menu>
其中menuStr是普通类型的字符串,menuList是数组类型,需要使用v-bind,简写成:的形式
我们在Menu中进行接收父组件传递的两个参数
<template>
    <div>菜单</div>

    <div> menuStr </div>

    <div> menuList </div>
</template>

<script setup lang='ts'>
// 从父控件里传来的参数
type props =
    menuStr: string
    menuList: number[]


defineProps<props>()
</script>

<style lang="less" scoped>
</style>
在setup和ts的情况下,使用defineProps接收传入的参数,应以一个type类型的props,其中存放的就是存入参数的申明
显示效果如下:
当然,如果我们在子组件中想定义可有可无的参数,如何实现呢?
其实只要在type中加一个?表示可以省略就行了
type props =
    menuStr?: string,
    menuList?: number[]
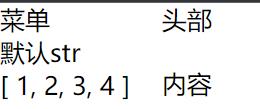
但是这样就没有默认值了,如果需要默认值,在ts的环境下,使用withDefaults方法就可以了
子组件Menu的代码
<template>
    <div>菜单</div>

    <div> menuStr </div>

    <div> menuList </div>

</template>

<script setup lang='ts'>
type props =
    menuStr?: string,
    menuList?: number[]

withDefaults(defineProps<props>(),
    menuStr: "默认str",
    menuList: () => [1, 2, 3, 4]
)

</script>

<style lang="less" scoped>
</style>
父组件BaseView的代码
<template>
   <div class="layout">
      <div>
         <Menu></Menu>
      </div>
      <div>
         <Header></Header>
         <Content></Content>
      </div>
   </div>
</template>

<script setup lang='ts'>

import Content from './Content/index.vue'
import Header from './Header/index.vue'
import Menu from './Menu/index.vue'


</script>

<style lang="less" scoped>
.layout
   display: flex;

</style>
13.2 子传父(事件)
使用defineEmits方法可以将子组件的事件传递给父组件
子组件Menu代码
<template>
    <div>菜单</div>

    <div> menuStr </div>

    <div> menuList </div>

    <div>
        <el-button @click="clickTap">派发</el-button>
    </div>
</template>

<script setup lang='ts'>
import  ref  from 'vue';

// 从父控件里传来的参数
type props =
    menuStr: string
    menuList: number[]


defineProps<props>()

const list = ref("my list")
const emits = defineEmits(["my-click"])
const clickTap = () =>
    emits("my-click",list)  // 派发 my-click方法


</script>

<style lang="less" scoped>
</style>
可以看到暴露了一个my-click的事件
在父组件中BaseView的代码
<template>
   <div class="layout">
      <div>
         <Menu @my-click="getList" :menuList="[1, 1, 4, 5, 1, 4]" menuStr="114514"></Menu>
      </div>
      <div>
         <Header></Header>
         <Content></Content>
      </div>
   </div>
</template>

<script setup lang='ts'>
import  Ref  from 'vue';
import Content from './Content/index.vue'
import Header from './Header/index.vue'
import Menu from './Menu/index.vue'

const getList = (list: Ref<string>) =>
   console.log("子组件传过来的ref --> " + list.value)


</script>

<style lang="less" scoped>
.layout
   display: flex;

</style>
在Menu标签里写入@my-click定义好的事件,就可以进行触发,而在之前是传入了list的Ref对象,那么在父组件中就可以接收这个对象

13.3 子传父(属性)
通过defineExpose方法可以将自己这个组件的属性给暴露出来
我们先在Menu子组件中暴露一些属性出来
<template>
    <div>菜单</div>

    <div> menuStr </div>

    <div> menuList </div>

</template>

<script setup lang='ts'>
import  ref  from 'vue';

let menuStr = ref("menuStr")
let menuList = ref(["item1", "item2"])
// 将自己的属性暴露出去
defineExpose(
    menuStr,
    menuList
)

</script>

<style lang="less" scoped>
</style>
然后在父组件BaseView中读取
<template>
   <div class="layout">
      <div>
         <Menu ref="menuRef"></Menu>
         <el-button @click="logMenu">读取Menu的ref对象</el-button>
      </div>
      <div>
         <Header></Header>
         <Content></Content>
      </div>
   </div>
</template>

<script setup lang='ts'>
import  ref  from 'vue';
import Content from './Content/index.vue'
import Header from './Header/index.vue'
import Menu from './Menu/index.vue'

let menuRef = ref(
   menuStr: "",
   menuList: []
)

const logMenu = () =>
   console.log(menuRef.value.menuStr)
   console.log(menuRef.value.menuList)


</script>

<style lang="less" scoped>
.layout
   display: flex;

</style>
注意这里需要给Menu标签注入一个ref,即**<Menu ref=“menuRef”></Menu>**
然后再ts中也要定义一个相对应的menuRef
14、动态组件
在vue3中,使用标签<component>来完成动态组件的使用
<template>
   <div class="layout">
      <div>
         <component :is="Menu" menu-str="1111" :menu-list="[1, 2, 3, 4, 4, 4, 4, 4]"></component>
         <!-- <Menu menu-str="1111" :menu-list="[1, 2, 3, 4, 4, 4, 4, 4]"></Menu> -->
      </div>
      <div>
         <Header></Header>
         <Content></Content>
      </div>
   </div>
</template>

<script setup lang='ts'>

import Content from './Content/index.vue'
import Header from './Header/index.vue'
import Menu from './Menu/index.vue'


</script>

<style lang="less" scoped>
.layout
   display: flex;

</style>
这里使用component的作用和直接使用<Menu>的效果是一样的,但是动态组件之所以叫动态组件,是因为可以改变is的属性,从而做到切换组件的作用
15、插槽
使用v-slot或者简写成#来使用
现在Menu中申明两个插槽,第一个有name,第二个没有
<template>
    <div>菜单</div>

    <div>
        <slot name="top"></slot>
    </div>

    <div>
        <slot></slot>
    </div>

</template>

<script setup lang='ts'>


</script>

<style lang="less" scoped>
</style>
然后再BaseView中的组件中插入插槽
<template>
   <div class="layout">
      <div>
         <component :is="Menu">
            <template #top>
               <div>上部的插槽</div>
            </template>

            <template #default>
               <div>下部的插槽</div>
            </template>
         </component>
      </div>
      <div>
         <Header></Header>
         <Content></Content>
      </div>
   </div>
</template>

<script setup lang='ts'>

import Content from './Content/index.vue'
import Header from './Header/index.vue'
import Menu from './Menu/index.vue'


</script>

<style lang="less" scoped>
.layout
   display: flex;

</style>
注意,默认插槽使用#default,有名字的插槽例如这里的#top。效果如下:

如果我想让申明插槽的子组件将一些属性传递给父组件,如何完成?使用v-bind即可
子组件代码,定义了:data="item"
<template>
    <div>菜单</div>

    <div>
        <div v-for="(item, index) in map" :key="index">
          <slot name="top" :data="item"></slot>
        </div>
    </div>

    <div>
        <slot></slot>
    </div>

</template>

<script setup lang='ts'>

type myMap =
    key: string,
    value: string


let map: myMap[] = [

        key: "name1",
        value: "woodwhale"
    ,

        key: "name2",
        value: "sheepbotany"

]

</script>

<style lang="less" scoped>
</style>
父组件接收,使用#top=" data "接收data
<template>
   <div class="layout">
      <div>
         <component :is="Menu">
            <template #top=" data ">
               <div> data </div>
            </template>

            <template #default>
               <div>下部的插槽</div>
            </template>
         </component>
      </div>
      <div>
         <Header></Header>
         <Content></Content>
      </div>
   </div>
</template>

如果我们想使用动态插槽呢?使用变量即可
<template>
   <div class="layout">
      <div>
         <component :is="Menu">
            <template #[slotVal.first]=" data ">
               <div> data </div>
            </template>

            <template #[slotVal.second]>
               <div>下部的插槽</div>
            </template>
         </component>
      </div>
      <div>
         <Header></Header>
         <Content></Content>
      </div>
   </div>
</template>

<script setup lang='ts'>
import Content from './Content/index.vue'
import Header from './Header/index.vue'
import Menu from './Menu/index.vue'

let slotVal =
   first: "top",
   second: "default"
使用#[slotVal.first]和#[slotVal.second]来动态的申明插槽
16、异步组件
为了模拟后端接口请求,先在public文件夹下创建一个data.json文件
[

    "name": "woodwhale"
  ,

    "name": "sheepbotany"

]
然后,在compontents文件夹下创建一个组件文件夹,我这里叫做AsyCom
在AsyCom中,创建一个index.vue和一个server.ts
在server.ts中,导出一个异步请求的方法axios
type NameList =
    name: string


export const axios = (url: string): Promise<NameList[]> =>
    return new Promise((resolve) =>
        let xhr = new XMLHttpRequest()

        xhr.open("GET", url)

        xhr.send(null)

        xhr.onreadystatechange = () =>
            if (xhr.status === 200 && xhr.readyState === 4)
                setTimeout(() =>
                    resolve(JSON.parse(xhr.responseText))   // 返回
                , 2000)


    )
这里模拟了2s的延迟
之后在index.vue中渲染json获取的name
<template>
    <div v-for="item in data">
         item.name
    </div>
</template>

<script setup lang='ts'>
import  axios  from './server';

const data = await axios("./data.json")

</script>

<style>
</style>
现在问题就是,如何引入这样的一个异步组件?
我们回到Menu组件中,通过defineAsyncComponent() + import()的方法引入异步组件
<script setup lang='ts'>
import  defineAsyncComponent  from "vue";

const AsyCom = defineAsyncComponent(() => import("../../components/AsyCom/index.vue"))

</script>
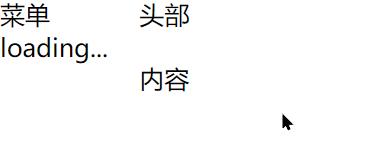
引入完了还需要进行渲染,需要使用到<Suspense>标签,其中有两个插槽
- default(接收到异步消息后渲染)
- fallback(请求消息中的loading)
所以Menu的代码为
<template>
    <div>菜单</div>

    <Suspense>
        <template #default>
            <AsyCom>

            </AsyCom>
        </template>
        <template #fallback>
            loading...
        </template>
    </Suspense>


</template>

<script setup lang='ts'>
import  defineAsyncComponent  from "vue";

const AsyCom = defineAsyncComponent(() => import("../../components/AsyCom/index.vue"))

</script>

<style lang="less" scoped>
</style>
最终的效果如下:
17、Teleport
Teleport是vue3的新特性,叫做传送组件
它的功能就是为了防止样式的冲突的情况下可以进行组件引入
我们随意在一个组件中进行插入,使用Teleport插入不需要担心css渲染问题
<template>
    <div>菜单</div>
    <Teleport to="body">
        <div class="insert">我被插入到body中了</div>
    </Teleport>
</template>

<script setup lang='ts'>
</script>

<style lang="less" scoped>
.insert
    font-size: 20px;

</style>
使用to="body",这样其中的内容就被插入到了body中

18、keep-active
keep-active组件是为了保存缓存而设置的
举个例子,假设我现在有login和register两个组件,需要通过点击一个button进行组件的切换
如果我们使用动态组件的形式,那么每一次输入的数据会被重新渲染(消失),所以为了保存缓存,需要使用keep-active
首先是login的代码
<template>
    <div style="margin:10px">
        用户名:<input v-model="form.username" type="text">
    </div>
    <div style="margin:10px">
        密码:<input v-model="form.password" type="password">
    </div>
    <el-button type="primary" @click="sub">提交登录</el-button>
</template>

<script setup lang='ts'>
import  reactive  from "vue"

type LoginForm =
    username: string
    password: string


let form = reactive<LoginForm>(
    username: "",
    password: ""
)

const sub = () =>
    console.log(form)


</script>

<style>
</style>
然后是register的代码
<template>
    <div style="margin:10px">
        用户名:<input v-model="form.username" type="text">
    </div>
    <div style="margin:10px">
        密码:<input v-model="form.password" type="password">
    </div>
    <div style="margin:10px">
        验证码:<input v-model="form.code" type="text">
    </div>
    <el-button type="primary" @click="sub">提交注册</el-button>
</template>

<script setup lang='ts'>
import  reactive  from "vue"

type RegForm =
    username: string
    password: string
    code:string


let form = reactive<RegForm>(
    username: "",
    password: "",
    code:""
)

const sub = () =>
    console.log(form)


</script>

<style>
</style>
最后在Menu组件上放置两个子组件
<template>
    <div>菜单</div>
    <el-button type="warning" @click="flag = !flag">切换</el-button>
    <keep-alive>
        <Login v-if="flag"></Login>
        <Register v-else></Register>
    </keep-alive>
</template>

<script setup lang='ts'>
import  Ref, ref  from "vue";
import Login from "../../components/Login/index.vue"
import Register from "../../components/Register/index.vue"

let flag: Ref<boolean> = ref(true)

</script>

<style lang="less" scoped>
</style>
效果如下:
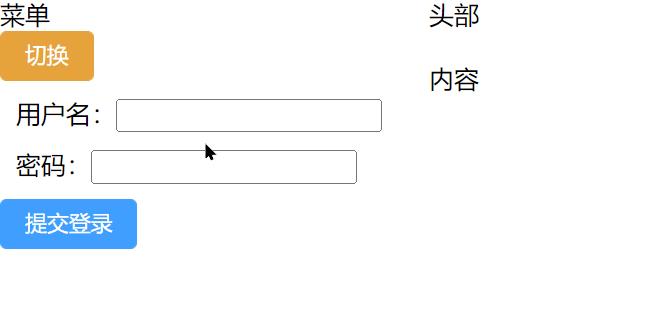
可以看到两个组件的状态被保存了
当然,keep-active是有参数的,比如include、exclude,就是包含或者不包含某个组件
例如我这里只需要保存Login组件的状态
首先需要去Login组件中申明一个name属性
<script lang="ts">
export default
    name: "Login"

</script>
然后在Menu中的keep-active设置include = "Login"
<template>
    <div>菜单</div>
    <el-button type="warning" @click="flag = !flag">切换</el-button>
    <keep-alive include="Login">
        <Login v-if="flag"></Login>
        <Register v-else></Register>
    </keep-alive>
</template>
当然exclude同理,这里就不演示了。
19、依赖注入
依赖注入这里值的是provide和inject
在深度嵌套的关系下,如果仅仅使用父子组件传参,是非常麻烦的。
这里引入的依赖注入技术就是为了解决这样的问题而实现的。
在父组件中提供provide就可以在任何子组件中使用inject获取
举个例子,首先在App.vue中引入A这个子组件
<template>
  <div class="root">
    我是root
    <A></A>
  </div>
</temp以上是关于VueVue3的系统性学习的主要内容,如果未能解决你的问题,请参考以下文章