手写一个SpringBoot-Starter
Posted 李某乐
tags:
篇首语:本文由小常识网(cha138.com)小编为大家整理,主要介绍了手写一个SpringBoot-Starter相关的知识,希望对你有一定的参考价值。
自定义SpringBoot Starter
什么是Starter
SpringBoot中的starter是一种非常重要的机制,能够抛弃以前繁杂的配置,将其统一集成进starter,应用者只需要在maven中引入starter依赖,SpringBoot就能自动扫描到要加载的信息并启动相应的默认配置。starter让我们摆脱了各种依赖库的处理,需要配置各种信息的困扰。SpringBoot会自动通过classpath路径下的类发现需要的Bean,并注册进IOC容器。SpringBoot提供了针对日常企业应用研发各种场景的spring-boot-starter依赖模块。所有这些依赖模块都遵循着约定成俗的默认配置,并允许我们调整这些配置,即遵循“约定大于配置”的理念。
为什么要自定义Starter
在我们的日常开发中,经常会有一些独立于业务之外的配置代码模块例如:数据源、日志、鉴权…等等,通常我们的做法就是将这些保存在一个特定的位置,有项目需要时将代码硬拷贝过去,重新集成一遍,麻烦至极。如果我们将这些可独立于业务代码之外的功配置模块封装成一个个starter,并在starter中给定一个默认值以减少重复配置,复用的时候只需要将其在pom中引用依赖即可,若需要修改参数则提供重写覆盖的方式将参数覆盖(例如数据库IP),这样每次其他项目需要也就是引一下依赖的事。
自定义Starter的场景
- 动态数据源
- 参数校验
- 接口加解密
- 日志记录
自定义Starter的命名规则
SpringBoot官方提供的Starter以spring-boot-starter-xxx的方式命名的。官方建议自定义的Starter使用xxx-spring-boot-starter命名规则,以区分SpringBoot生态提供的Starter。
自定义Starter的实现方法
…
引入相关依赖
<?xml version="1.0" encoding="UTF-8"?>
<project xmlns="http://maven.apache.org/POM/4.0.0" xmlns:xsi="http://www.w3.org/2001/XMLSchema-instance"
         xsi:schemaLocation="http://maven.apache.org/POM/4.0.0 https://maven.apache.org/xsd/maven-4.0.0.xsd">
    <modelVersion>4.0.0</modelVersion>
    <groupId>com.lijl.encrypy</groupId>
    <artifactId>encrypt-spring-boot-startter</artifactId>
    <version>0.0.1</version>
    <name>encrypt-spring-boot-startter</name>
    <description>加解密Starter</description>
    <properties>
        <java.version>1.8</java.version>
    </properties>
    <dependencies>
        <dependency>
            <groupId>org.springframework.boot</groupId>
            <artifactId>spring-boot-starter-web</artifactId>
            <version>2.4.0</version>
        </dependency>
        <dependency>
            <groupId>org.springframework.boot</groupId>
            <artifactId>spring-boot-configuration-processor</artifactId>
            <version>2.3.4.RELEASE</version>
            <optional>true</optional>
        </dependency>
    </dependencies>

    <build>
        <plugins>
            <plugin>
                <groupId>org.apache.maven.plugins</groupId>
                <artifactId>maven-compiler-plugin</artifactId>
                <configuration>
                    <source>8</source>
                    <target>8</target>
                </configuration>
            </plugin>
        </plugins>
    </build>
</project>
创建加解密工具类
依赖添加完成后,我们先来定义一个加密工具类备用,加密这块有多种方案可以选择,对称加密、非对称加密,其中对称加密又可以使用 AES、DES、3DES 等不同算法,这里我们使用 Java 自带的 Cipher 来实现对称加密,使用 AES、DES 算法:
public class AESUtils

    private static final String AES_ALGORITHM = "AES/ECB/PKCS5Padding";

    /**
     * @Author lijiale
     * @MethodName getCipher
     * @Description 获取 Cipher
     * @Date 9:20 2021/3/10
     * @Version 1.0
     * @param key
     * @param model
     * @return: javax.crypto.Cipher
    **/
    private static Cipher getCipher(byte[] key, int model) throws NoSuchPaddingException, NoSuchAlgorithmException, InvalidKeyException
        SecretKeySpec secretKeySpec = new SecretKeySpec(key,"AES");
        Cipher cipher = Cipher.getInstance(AES_ALGORITHM);
        cipher.init(model,secretKeySpec);
        return cipher;


    /**
     * @Author lijiale
     * @MethodName encrypy
     * @Description AES加密
     * @Date 9:22 2021/3/10
     * @Version 1.0
     * @param data
     * @param key
     * @return: java.lang.String
    **/
    public static String encrypy(byte[] data, byte[] key) throws NoSuchPaddingException, NoSuchAlgorithmException, InvalidKeyException, BadPaddingException, IllegalBlockSizeException
        Cipher cipher = getCipher(key, Cipher.ENCRYPT_MODE);
        return Base64.getEncoder().encodeToString(cipher.doFinal(data));


    /**
     * @Author lijiale
     * @MethodName decrypt
     * @Description AES解密
     * @Date 9:24 2021/3/10
     * @Version 1.0
     * @param data
     * @param key
     * @return: byte[]
    **/
    public static byte[] decrypt(byte[] data,byte[] key) throws NoSuchPaddingException, NoSuchAlgorithmException, InvalidKeyException, BadPaddingException, IllegalBlockSizeException
        Cipher cipher = getCipher(key, Cipher.DECRYPT_MODE);
        return cipher.doFinal(Base64.getDecoder().decode(data));


public class DesEncryptUtil

    private static SecureRandom sr;
    private static SecretKey securekey;

    public static Cipher getCipher(String key) throws NoSuchAlgorithmException, NoSuchPaddingException, InvalidKeyException, InvalidKeySpecException
        sr = new SecureRandom();
        // 从原始密匙数据创建一个DESKeySpec对象
        DESKeySpec dks = new DESKeySpec(key.getBytes());
        // 创建一个密匙工厂,然后用它把DESKeySpec对象转换成
        // 一个SecretKey对象
        SecretKeyFactory keyFactory = SecretKeyFactory.getInstance("DES");
        securekey = keyFactory.generateSecret(dks);
        // Cipher对象实际完成解密操作
        Cipher cipher = Cipher.getInstance("DES");
        return cipher;


    /**
     * @Author Lijl
     * @MethodName 解密
     * @Description TODO
     * @Date 14:07 2020/10/29
     * @Version 1.0
     * @param src
     * @return: byte[]
     **/
    public static byte[] decrypt(String key, String src) throws Exception
        Cipher cipher = getCipher(key);
        // 用密匙初始化Cipher对象
        cipher.init(Cipher.DECRYPT_MODE, securekey, sr);
        // 现在,获取数据并解密
        // 正式执行解密操作
        byte[] bytes = decryptBASE64(src);
        return cipher.doFinal(bytes);


    /**
     * @Author Lijl
     * @MethodName encrypt
     * @Description 数据加密
     * @Date 14:06 2020/10/29
     * @Version 1.0
     * @param src
     * @return: byte[]
     **/
    public static String encrypt(byte[] src,String key) throws Exception
        Cipher cipher = getCipher(key);
        // 用密匙初始化Cipher对象
        cipher.init(Cipher.ENCRYPT_MODE, securekey, sr);
        // 现在,获取数据并加密
        // 正式执行加密操作
        byte[] bytes = cipher.doFinal(src);
        //解决乱码
        return encryptBASE64(bytes);


    private static String encryptBASE64(byte[] key) throws Exception
        return (new BASE64Encoder()).encode(key);

    private static byte[] decryptBASE64(String key) throws Exception
        return (new BASE64Decoder()).decodeBuffer(key);
这个工具类比较简单,不需要多解释。需要说明的是,加密后的数据可能不具备可读性,因此我们一般需要对加密后的数据再使用 Base64 算法进行编码,获取可读字符串。换言之,上面的 AES 加密方法的返回值是一个 Base64 编码之后的字符串,AES 解密方法的参数也是一个 Base64 编码之后的字符串,先对该字符串进行解码,然后再解密。
接下来我们在创建一个响应工具类
public class RespBean

    private Integer status;

    private String msg;

    private Object obj;

    public static RespBean build()
        return new RespBean();


    public static RespBean ok(String msg)
        return new RespBean(200,msg,null);


    public static RespBean ok(String msg, Object obj)
        return new RespBean(200,msg,obj);


    public static RespBean error(String msg)
        return new RespBean(500,msg,null);


    public static RespBean error(String msg, Object obj)
        return new RespBean(500,msg,obj);


    public RespBean()


    public RespBean(Integer status, String msg, Object obj)
        this.status = status;
        this.msg = msg;
        this.obj = obj;


    public Integer getStatus()
        return status;


    public RespBean setStatus(Integer status)
        this.status = status;
        return this;


    public String getMsg()
        return msg;


    public RespBean setMsg(String msg)
        this.msg = msg;
        return this;


    public Object getObj()
        return obj;


    public RespBean setObj(Object obj)
        this.obj = obj;
        return this;
创建加解密注解
@Retention(RetentionPolicy.RUNTIME)
@Target(ElementType.METHOD)
public @interface Encrpty


@Retention(RetentionPolicy.RUNTIME)
@Target(ElementType.METHOD,ElementType.PARAMETER)
public @interface Decrpty
这两个注解就是两个标记,在以后使用的过程中,哪个接口方法添加了 @Encrypt 注解就对哪个接口的数据加密返回,哪个接口或参数添加了 @Decrypt 注解就对哪个接口或参数进行解密。
创建加密配置类
因为提供了两种加解密方式,并且用户也有可能自定义密钥,所以再来定义一个EncryptProperties 类来读取用户配置的密钥:
@ConfigurationProperties(prefix = "spring.encrypt")
public class EncryptProperties

    private final static String DEFAULT_KEY = "www.lijiaxxx.com";
    private final static String DEFAULT_TYPE = "AES";
    private String key = DEFAULT_KEY;
    private String type = DEFAULT_TYPE;

    public String getKey()
        return key;


    public void setKey(String key)
        this.key = key;


    public String getType()
        return type;


    public void setType(String type)
        this.type = type;
这里我设置了默认的加解密算法与密钥,如果想使用DES算法进行加解密,或者想自定义密钥的话。只需要在.properties/.yml中配置覆盖默认值即可。
spring.encrypt.key=www.lijiaxxx.com
spring.encrypt.type=DES

spring:
  encrypt:
    key: www.lijiaxxx.com
    type: DES
加密/解密
此篇的重点是Starter,所以就RequestBodyAdvice和ResponseBodyAdvice来做加解密做的过滤操作。写的比较简单,当然想要严谨灵活还是自己定义过滤器更合适,这次的重点不是这个就先用这两个工具类凑合下。
@EnableConfigurationProperties(EncryptProperties.class)
@ControllerAdvice
public class DecryptRequest extends RequestBodyAdviceAdapter

    EncryptProperties encryptProperties;

    @Autowired
    public void setEncryptProperties(EncryptProperties encryptProperties)
        this.encryptProperties = encryptProperties;


    @Override
    public boolean supports(MethodParameter methodParameter, Type type, Class<? extends HttpMessageConverter<?>> aClass)
        return methodParameter.hasMethodAnnotation(Decrpty.class) || methodParameter.hasParameterAnnotation(Decrpty.class);


    @Override
    public HttpInputMessage beforeBodyRead(final HttpInputMessage inputMessage, MethodParameter parameter, Type targetType, Class<? extends HttpMessageConverter<?>> converterType) throws IOException
        String type = encryptProperties.getType();
        byte[] body = new byte[inputMessage.getBody().available()];
        inputMessage.getBody().read(body);

        try
            byte[] decrypt = new byte[0];
            if ("AES".equals(type))
                decrypt = AESUtils.decrypt(body,encryptProperties.getKey().getBytes());
            else if ("DES".equals(type))
                String bodyStr = new String(body);
                decrypt = DesEncryptUtil.decrypt(encryptProperties.getKey(),bodyStr);

            if (decrypt!=null && decrypt.length>0)
                final ByteArrayInputStream bais = new ByteArrayInputStream(decrypt);
                return new HttpInputMessage()
                    @Override
                    public InputStream getBody()
                        return bais;


                    @Override
                    public HttpHeaders getHeaders()
                        return inputMessage.getHeaders();

                ;

         catch (Exception e)
            e.printStackTrace();

        return super.beforeBodyRead(inputMessage, parameter, targetType, converterType);
@EnableConfigurationProperties(EncryptProperties.class)
@ControllerAdvice
public class EncryptResponse implements ResponseBodyAdvice<RespBean>

    private final ObjectMapper om = new ObjectMapper();

    EncryptProperties encryptProperties;

    @Autowired
    public void setEncryptProperties(EncryptProperties encryptProperties)
        this.encryptProperties = encryptProperties;


    @Override
    public boolean supports(MethodParameter methodParameter, Class<? extends HttpMessageConverter<?>> aClass)
        return methodParameter.hasMethodAnnotation(Encrpty.class);


    @Override
    public RespBean beforeBodyWrite(RespBean respBean, MethodParameter methodParameter, MediaType mediaType, Class<? extends HttpMessageConverter<?>> aClass, ServerHttpRequest serverHttpRequest, ServerHttpResponse serverHttpResponse)
        byte[] keyBytes = encryptProperties.getKey().getBytes();
        String type = encryptProperties.getType();
        try
            if (respBean.getObj()!=null)
                if ("AES".equals(type))
                    respBean.setObj(AESUtils.encrypy(om.writeValueAsBytes(respBean.getObj()),keyBytes));
                else if ("DES".equals(type))
                    respBean.setObj(DesEncryptUtil.encrypt(om.writeValueAsBytes(respBean.getObj()),encryptProperties.getKey()));


            return respBean;
         catch (Exception e)
            e.printStackTrace();

        respBean.setStatus(500);
        respBean.setMsg("加密异常");
        respBean.setObj(null);
        return respBean;
创建自动化配置类
@Configuration
@ComponentScan("com.lijl.encrypy")
public class EncryptAutoConfiguration
这个没啥好说的,就是声明这个类是配置类,并声明要扫描的包路径
配置Spring Factories
这个简单说一下,在Spring Boot中有一种非常解耦的扩展机制:Spring Factories,没错我们就用Spring Factories来让程序启动后使封装在starter中的拦截器生效。这种扩展机制实际上是仿照Java中的SPI扩展机制来实现的,至于Java SPI是什么不了百度吧这里就不赘述了。在Spring中也有一种类似与Java SPI的加载机制。它在META-INF/spring.factories文件中配置接口的实现类名称,然后在程序中读取这些配置文件并实例化。这种自定义的SPI机制是Spring Boot Starter实现的基础。具体的实现原理可进入spring-core包下SpringFactoriesLoader类中查看。
org.springframework.boot.autoconfigure.EnableAutoConfiguration=com.lijl.encrypy.config.EncryptAutoConfiguration
应用
终于终于完事了,剩下的就是结合程序使用了
引入依赖
将Starter通过maven打包,并新建项目,将新打好的包引入到新创建中项目中
<dependency>
  <groupId>com.lijl.encrypy</groupId>
  <artifactId>encrypt-spring-boot-startter</artifactId>
  <version>0.0.1</version>
</dependency>
创建实体
public class User
    private String name;
    private int age;

    public String getName()
        return name;


    public void setName(String name)
        this.name = name;

    ...
创建测试接口
这里创建两个测试接口,一个用于加密一个用于测试解密
@RestController
public class TestController

    @GetMapping(value = "/getUser")
    @Encrpty
    public RespBean getUser()
        User user = new User();
        user.setName("李某某");
        user.setAge(18);
        return RespBean.ok("查询成功",user);


    @PutMapping(value = "/putUser")
    public RespBean putUser(@RequestBody @Decrpty User user)
        String name = user.getName();
        int age = user.getAge();
        System.out.println("名称:"+name+"\\n年龄:"+age);
        return RespBean.ok("成功");
测试
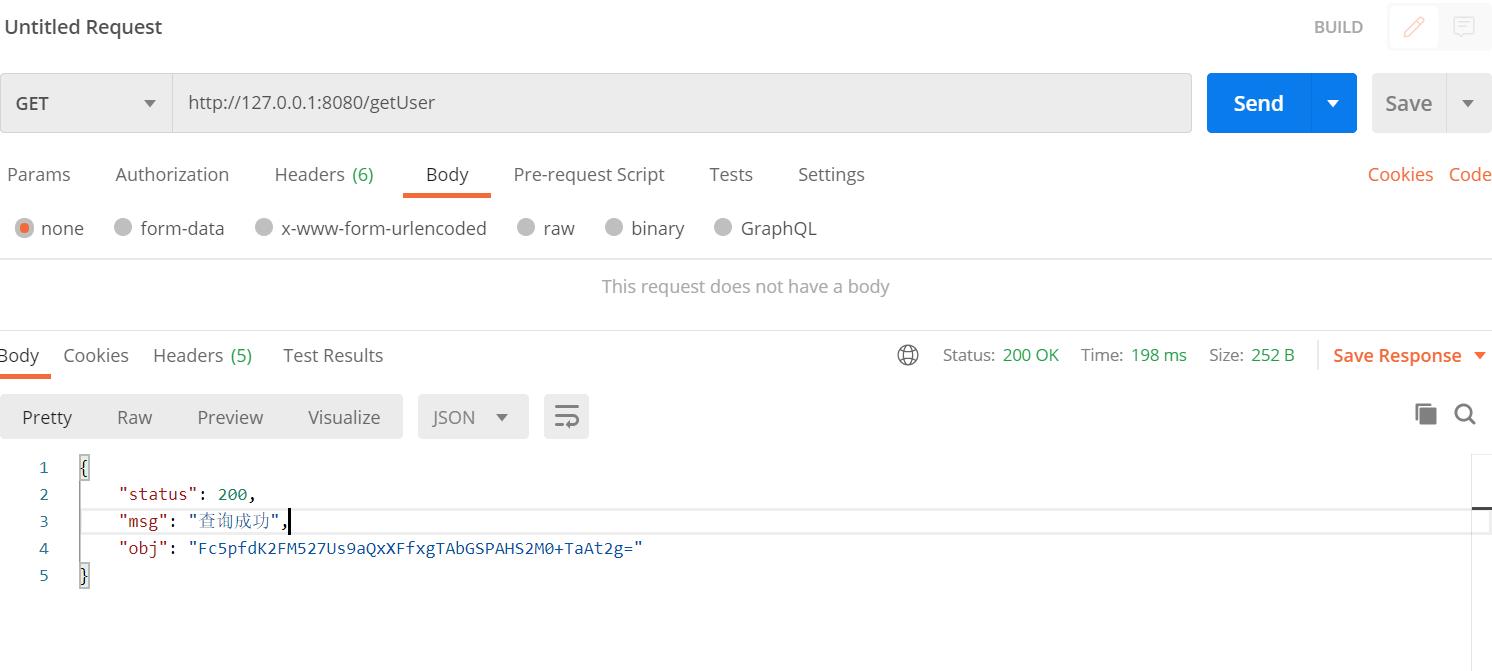
首先测试加密

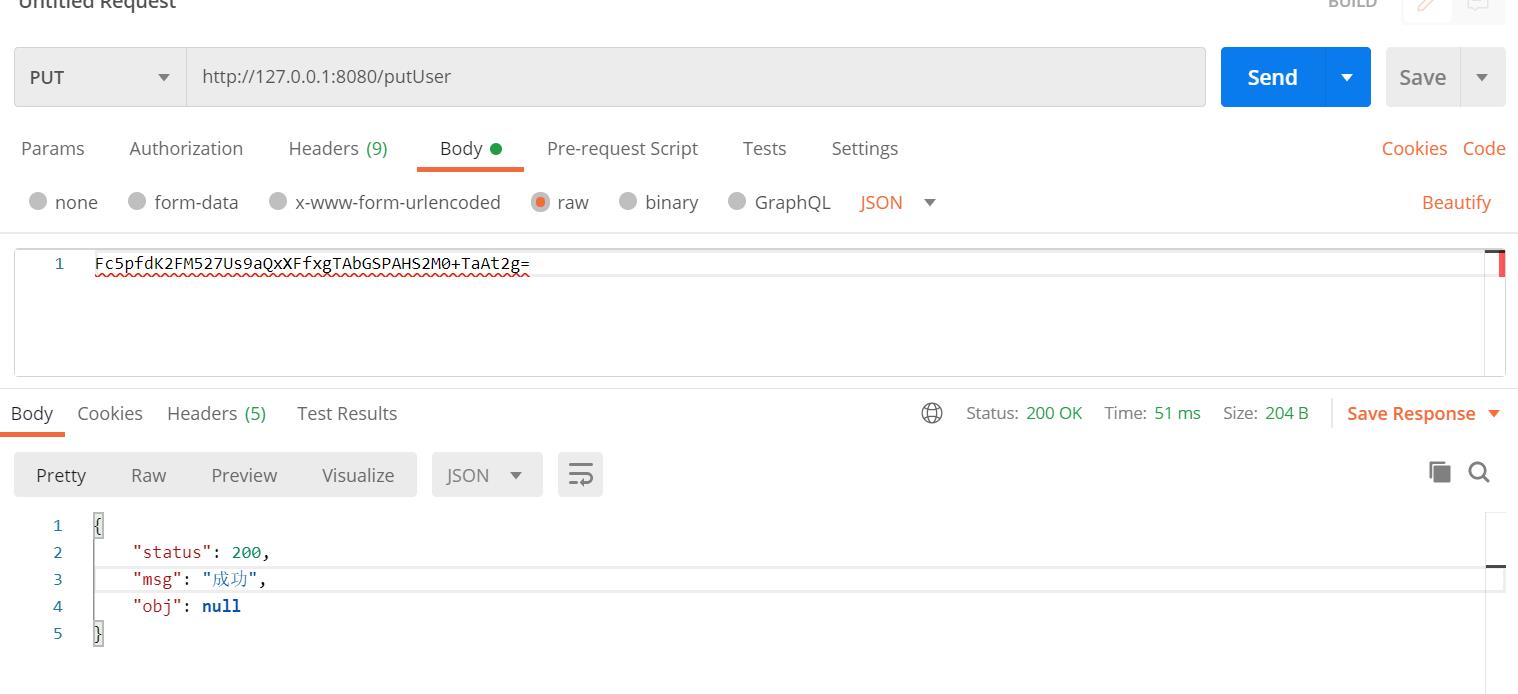
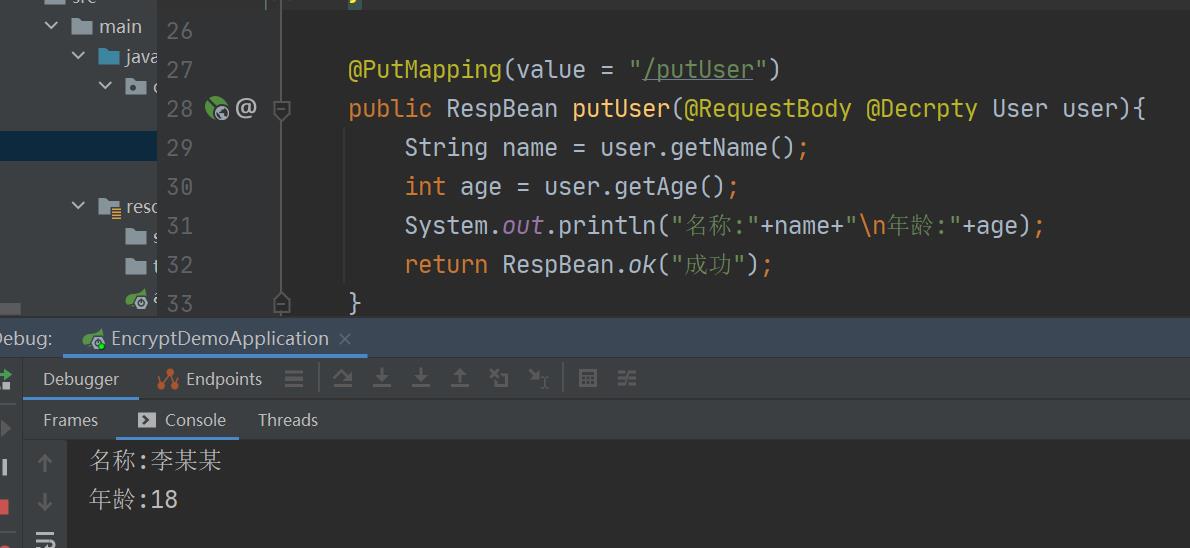
再则就是传入加密的参数解密

以上是关于手写一个SpringBoot-Starter的主要内容,如果未能解决你的问题,请参考以下文章
