在linux虚拟机下 配置 Web NginxTomcat
Posted GYTTking
tags:
篇首语:本文由小常识网(cha138.com)小编为大家整理,主要介绍了在linux虚拟机下 配置 Web NginxTomcat相关的知识,希望对你有一定的参考价值。
1、项目的运行环境
- linux版本
[root@localhost ~]# cat /proc/version
Linux version 2.6.32-358.el6.x86_64 (mockbuild@x86-022.build.eng.bos.redhat.com) (gcc version 4.4.7 20120313 (Red Hat 4.4.7-3) (GCC) ) #1 SMP Tue Jan 29 11:47:41 EST 2013
- jdk版本
[root@localhost ~]# java -version
openjdk version "1.8.0_171"
OpenJDK Runtime Environment (build 1.8.0_171-b10)
OpenJDK 64-Bit Server VM (build 25.171-b10, mixed mode)
- mysql数据库
- 根据linux系统下载相应的mysql版本
[root@localhost ~]# mysql --help | grep Distrib
mysql  Ver 14.14 Distrib 5.7.22, for Linux (x86_64) using  EditLine wrapper
nginx静态资源服务器
[root@localhost sbin]# nginx -v
nginx version: nginx/1.14.0
- tomcat动态资源服务器
[root@localhost nginx]# cat nginx.conf
user  root;
worker_processes 4;
error_log  /var/log/nginx/error.log warn;
pid        /var/run/nginx.pid;
events
    worker_connections  1024;

http
    include       /etc/nginx/mime.types;
    default_type  application/octet-stream;

    log_format  main  '$remote_addr - $remote_user [$time_local] "$request" '
                      '$status $body_bytes_sent "$http_referer" '
                      '"$http_user_agent" "$http_x_forwarded_for"';

    #access_log  /var/log/nginx/access.log  main;
    sendfile        on;
    #tcp_nopush     on;
    keepalive_timeout  65;
    #gzip  on;
    include /etc/nginx/conf.d/*.conf;  //加载conf.d目录下所有以.conf结尾的站点配置文件
- conf.d目录下各站点的配置
[root@localhost nginx]# cd conf.d/
[root@localhost conf.d]# ll
总用量 8
-rw-r--r-- 1 root root 726 5月  18 11:03 host-01.conf
-rw-r--r-- 1 root root 640 5月  18 10:52 host-02.conf
host-01.conf配置:
server
    listen       80;
    server_name  www.aaa.com;

    default_type 'text/html';
    charset utf-8;

    access_log  /root/logs-nginx/host-01-access.log  main;  //站点 www.aaa.com访问日志配置
    error_log  /root/logs-nginx/host-01-error.log warn;  //站点 www.aaa.com访问错误日志配置

    location ~ .*\\.(gif|jpg|jpeg|png)$   //静态资源访问配置
       root   /root/static1;  //静态资源访问的根目录
       index  index.html index.htm;

    location / //动态资源访问配置
        root   html;
        proxy_pass http://127.0.0.1:8080;   //配置的服务器地址,指向本地的tomcat服务器端口8080
        proxy_read_timeout 600s;
        proxy_set_header  X-Real-IP  $remote_addr;
        proxy_set_header Host $host:$server_port;
        proxy_set_header X-Forwarded-For $proxy_add_x_forwarded_for;


host-02.conf配置:
server
    listen       80;
    server_name  www.ccc.com;

    default_type 'text/html';
    charset utf-8;

    access_log  /root/logs-nginx/host-02-access.log  main;
    error_log  /root/logs-nginx/host-02-error.log warn;

    location ~ .*\\.(gif|jpg|jpeg|png|css|js)$
       root   /root/static;  //静态资源访问的根目录
       index  index.html index.htm;


    location /
        root   html;
        proxy_pass http://127.0.0.1:8080;
        proxy_read_timeout 600s;
        proxy_set_header  X-Real-IP  $remote_addr;
        proxy_set_header Host $host:$server_port;
        proxy_set_header X-Forwarded-For $proxy_add_x_forwarded_for;
-
从上不难看出两个站点配置同时指向同一个tomcat服务器,但是是静态资源的访问路径不一样,其中host-01.conf静态资源根目录root: /root/static1是不存在的,host-02.conf的静态文件配置是对的,下面演示下效果。
-
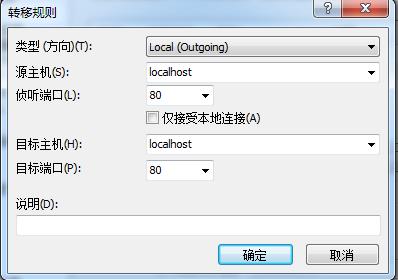
由于本项目部署在内网环境中,不能直接访问其数据库和服务,可以通过xshell通道到本地,由于本服务的站点域名是随意指定,无法找到,可以修改客户端的hosts文件进行访问,如下图所示:
-
xshell通道设置:


- 修改客户机的hosts文件(本机的host文件路径:C:\\WINDOWS\\system32\\drivers\\etc):
在host中添加以下配置:
127.0.0.1    www.aaa.com
127.0.0.1    www.bbb.com
127.0.0.1    www.ccc.com
127.0.0.1    www.ddd.com
- 下面对配置的两个站点进行访问
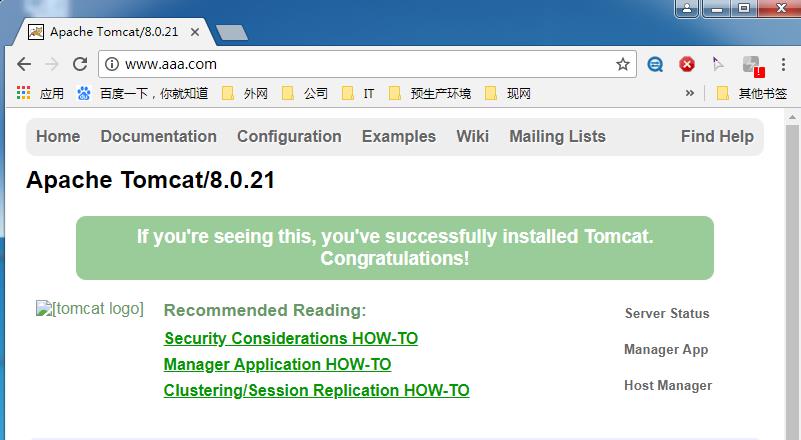
- 站点1:www.aaa.com


由于站点1的静态资源配置为:location ~ .*.(gif|jpg|jpeg|png),而配置的静态资源目录static1不存在,所以zt-logo.png图片无法显示。
下面演示下站点2:www.ccc.com,对比看看。

-
下面查看下nginx的日志:
-
站点1的访问日志

-
站点1的错误日志:

-
站在2的访问日志:

-
站在2的错误日志:无

-
对比站点1、2可以发现,域名为:www.aaa.com的访问日志和错误日志分别记录在host-01-access.log、host-01-error.log,而域名为:www.ccc.com的访问日志和错误日志分别记录在host-02-access.log、host-02-error.log中。
-
注意事项
-
启动tomcat时注意给tomcat启动脚本添加执行权限;
-
mysql数据库要根据系统的版本进行下载安装
-
nginx用户设置尽量和安装用户保持一致,以免权限不足无法启动nginx或修改默认的日志文件后造成无法记录日志的现象;
-
在linux系统安装mysql、jdk、nginx等可以先安装个yum或apt-get管理工具,使用插件安装方便快捷;
-
还有不懂的小伙伴可以添加作者的联系方式
-
QQ:1162798594
-
vx:tan1999nn
-
喜欢的小伙伴可以给作者我点点赞,点点关注哈~~~
以上是关于在linux虚拟机下 配置 Web NginxTomcat的主要内容,如果未能解决你的问题,请参考以下文章