STM32串口1改串口2
Posted 文某9
tags:
篇首语:本文由小常识网(cha138.com)小编为大家整理,主要介绍了STM32串口1改串口2相关的知识,希望对你有一定的参考价值。
文章目录
一、串口1源代码
void uart_init(u32 bound)
  //GPIO端口设置
  GPIO_InitTypeDef GPIO_InitStructure;
  USART_InitTypeDef USART_InitStructure;
  NVIC_InitTypeDef NVIC_InitStructure;

  RCC_APB2PeriphClockCmd(RCC_APB2Periph_USART1|RCC_APB2Periph_GPIOA, ENABLE);	//使能USART1,GPIOA时钟

	//USART1_TX   GPIOA.9
  GPIO_InitStructure.GPIO_Pin = GPIO_Pin_9; //PA.9
  GPIO_InitStructure.GPIO_Speed = GPIO_Speed_50MHz;
  GPIO_InitStructure.GPIO_Mode = GPIO_Mode_AF_PP;	//复用推挽输出
  GPIO_Init(GPIOA, &GPIO_InitStructure);//初始化GPIOA.9

  //USART1_RX	  GPIOA.10初始化
  GPIO_InitStructure.GPIO_Pin = GPIO_Pin_10;//PA10
  GPIO_InitStructure.GPIO_Mode = GPIO_Mode_IN_FLOATING;//浮空输入
  GPIO_Init(GPIOA, &GPIO_InitStructure);//初始化GPIOA.10

  //Usart1 NVIC 配置
  NVIC_InitStructure.NVIC_IRQChannel = USART1_IRQn;
  NVIC_InitStructure.NVIC_IRQChannelPreemptionPriority=3 ;//抢占优先级3
  NVIC_InitStructure.NVIC_IRQChannelSubPriority = 3;		//子优先级3
  NVIC_InitStructure.NVIC_IRQChannelCmd = ENABLE;			//IRQ通道使能
  NVIC_Init(&NVIC_InitStructure);	//根据指定的参数初始化VIC寄存器

   //USART 初始化设置

  USART_InitStructure.USART_BaudRate = bound;//串口波特率
  USART_InitStructure.USART_WordLength = USART_WordLength_8b;//字长为8位数据格式
  USART_InitStructure.USART_StopBits = USART_StopBits_1;//一个停止位
  USART_InitStructure.USART_Parity = USART_Parity_No;//无奇偶校验位
  USART_InitStructure.USART_HardwareFlowControl = USART_HardwareFlowControl_None;//无硬件数据流控制
  USART_InitStructure.USART_Mode = USART_Mode_Rx | USART_Mode_Tx;	//收发模式

  USART_Init(USART1, &USART_InitStructure); //初始化串口1
  USART_ITConfig(USART1, USART_IT_RXNE, ENABLE);//开启串口接受中断
  USART_Cmd(USART1, ENABLE);                    //使能串口1
二、串口2源代码
void uart_init(u32 bound)
  //GPIO端口设置
  GPIO_InitTypeDef GPIO_InitStructure;
  USART_InitTypeDef USART_InitStructure;
  NVIC_InitTypeDef NVIC_InitStructure;

  RCC_APB2PeriphClockCmd(RCC_APB2Periph_GPIOA|RCC_APB2Periph_AFIO, ENABLE);
  RCC_APB1PeriphClockCmd(RCC_APB1Periph_USART2|RCC_APB2Periph_AFIO, ENABLE);

	//USART1_TX
  GPIO_InitStructure.GPIO_Pin = GPIO_Pin_2; //PA.9
  GPIO_InitStructure.GPIO_Speed = GPIO_Speed_50MHz;
  GPIO_InitStructure.GPIO_Mode = GPIO_Mode_AF_PP;	//复用推挽输出
  GPIO_Init(GPIOA, &GPIO_InitStructure);//初始化GPIOA.9

  //USART1_RX
  GPIO_InitStructure.GPIO_Pin = GPIO_Pin_3;//PA10
  GPIO_InitStructure.GPIO_Mode = GPIO_Mode_IN_FLOATING;//浮空输入
  GPIO_Init(GPIOA, &GPIO_InitStructure);//初始化GPIOA.10

  //Usart1 NVIC 配置
  NVIC_InitStructure.NVIC_IRQChannel = USART2_IRQn;
  NVIC_InitStructure.NVIC_IRQChannelPreemptionPriority=3 ;//抢占优先级3
  NVIC_InitStructure.NVIC_IRQChannelSubPriority = 3;		//子优先级3
  NVIC_InitStructure.NVIC_IRQChannelCmd = ENABLE;			//IRQ通道使能
  NVIC_Init(&NVIC_InitStructure);	//根据指定的参数初始化VIC寄存器

   //USART 初始化设置

  USART_InitStructure.USART_BaudRate = bound;//串口波特率
  USART_InitStructure.USART_WordLength = USART_WordLength_8b;//字长为8位数据格式
  USART_InitStructure.USART_StopBits = USART_StopBits_1;//一个停止位
  USART_InitStructure.USART_Parity = USART_Parity_No;//无奇偶校验位
  USART_InitStructure.USART_HardwareFlowControl = USART_HardwareFlowControl_None;//无硬件数据流控制
  USART_InitStructure.USART_Mode = USART_Mode_Rx | USART_Mode_Tx;	//收发模式

  USART_Init(USART2, &USART_InitStructure); //初始化串口1
  USART_ITConfig(USART2, USART_IT_RXNE, ENABLE);//开启串口接受中断
  USART_Cmd(USART2, ENABLE);                    //使能串口1
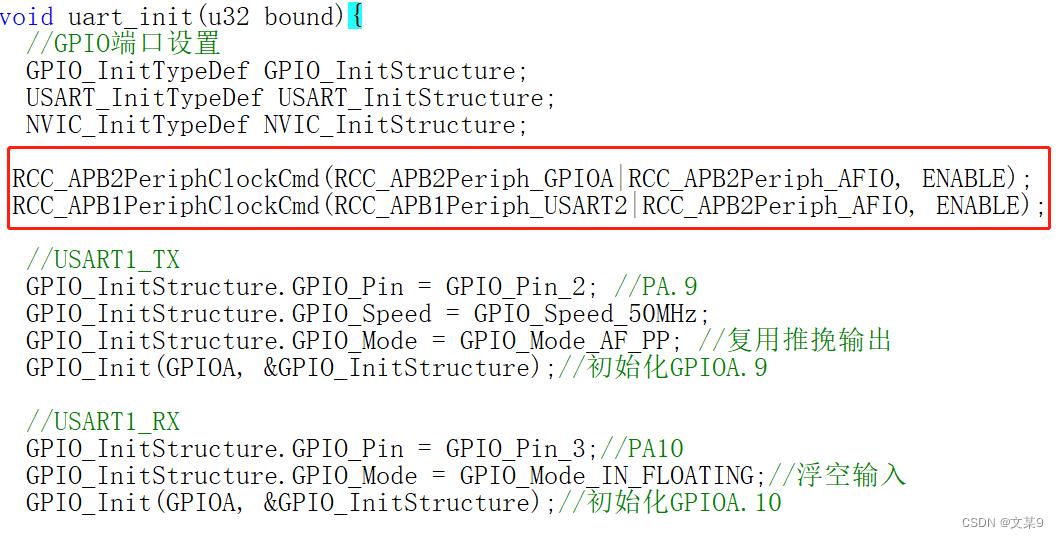
三、区别与注意事项
从下图中可以观察出,串口1配置开启了串口和IO口的时钟,而串口2则增加了一个AFIO复用时钟
也就是说如果改成串口2,3应该增加开启复用的时钟(3没试过,2实测成功)

关于不开启keil的Microlib模式使用printf的方法?
这个函数原子的代码是封装好了的,调用usart头文件直接可以使用,但是需要注意的是?
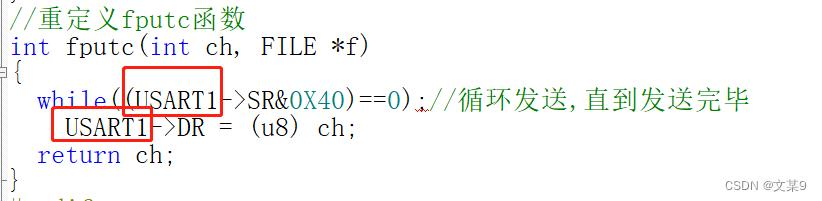
如上图,如果是想用串口2输出printf则需要把fputc里面的USART1换成USART2
函数可以直接拷贝,实测成功,如有错误换成指正一起进步!
以上是关于STM32串口1改串口2的主要内容,如果未能解决你的问题,请参考以下文章