[UE4] 使用 GUI 框架“Dear ImGui”
Posted u010019717
tags:
篇首语:本文由小常识网(cha138.com)小编为大家整理,主要介绍了[UE4] 使用 GUI 框架“Dear ImGui”相关的知识,希望对你有一定的参考价值。

创建C++版本项目,这里以项目名称 MyDemo为例。
你可以从这里获得UE下ImGui的源代码。
https://github.com/segross/UnrealImGui

在项目所在的文件夹中创建一个名为 MyDemo\\Plugins\\ImGui的文件夹,
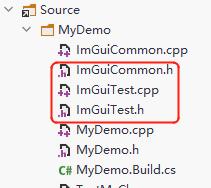
并将所有文件放在MyDemo项目的如下位置。

像往常一样添加文件后,运行 Generate VisualStudioProjectFiles 以更新 VisualStudio 项目。

启动 Visual Studio 项目时,可以看到插件代码:

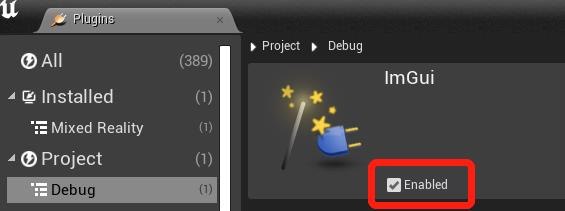
默认插件是启用的

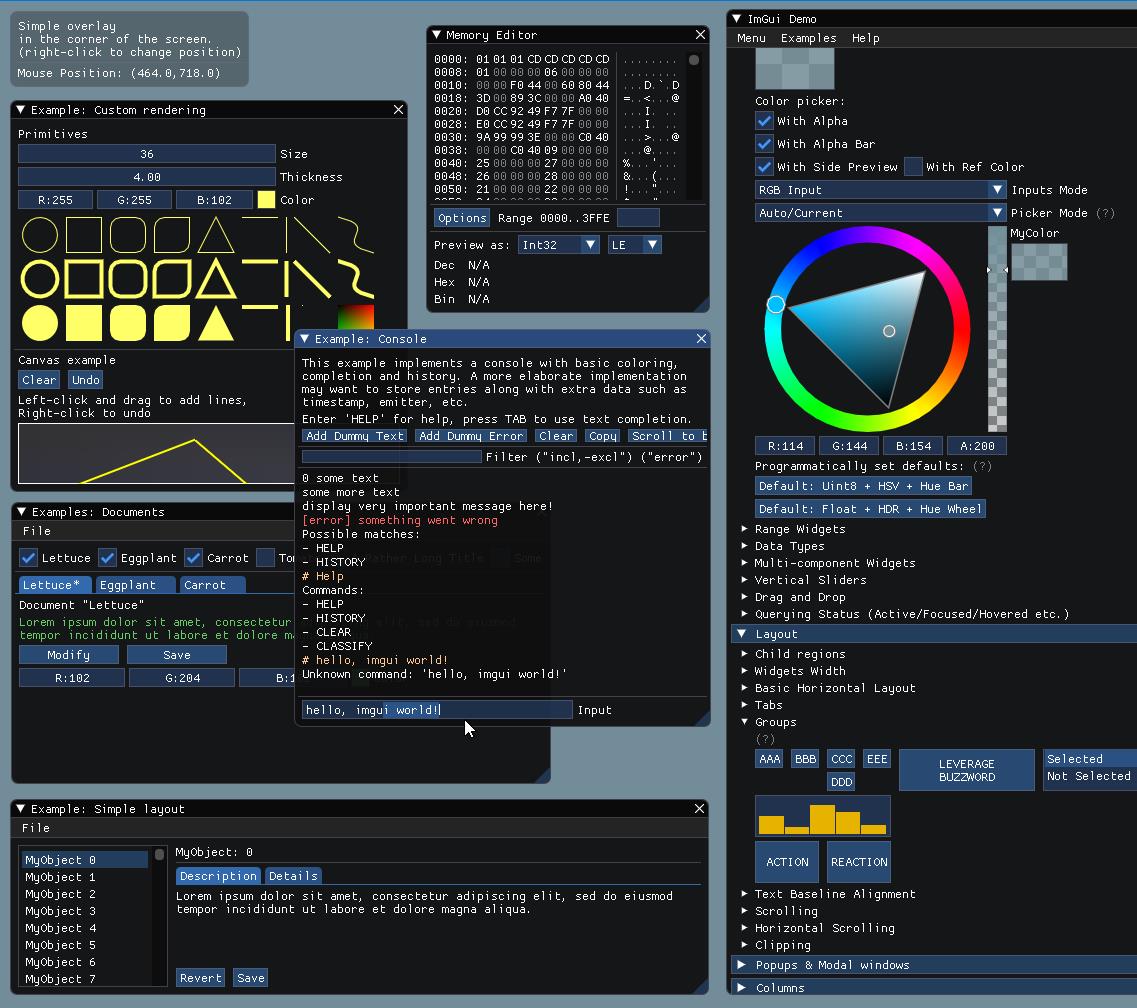
我可以在Play状态下,通过执行控制台命令 ImGui.ToggleDemo来打开一个窗口。
默认情况下,鼠标等输入不在ImGui上工作,因此运行控制台命令 ImGui.ToggleInput 将使鼠标正常工作。

输入 ImGui.ToggleInput麻烦怎么办?
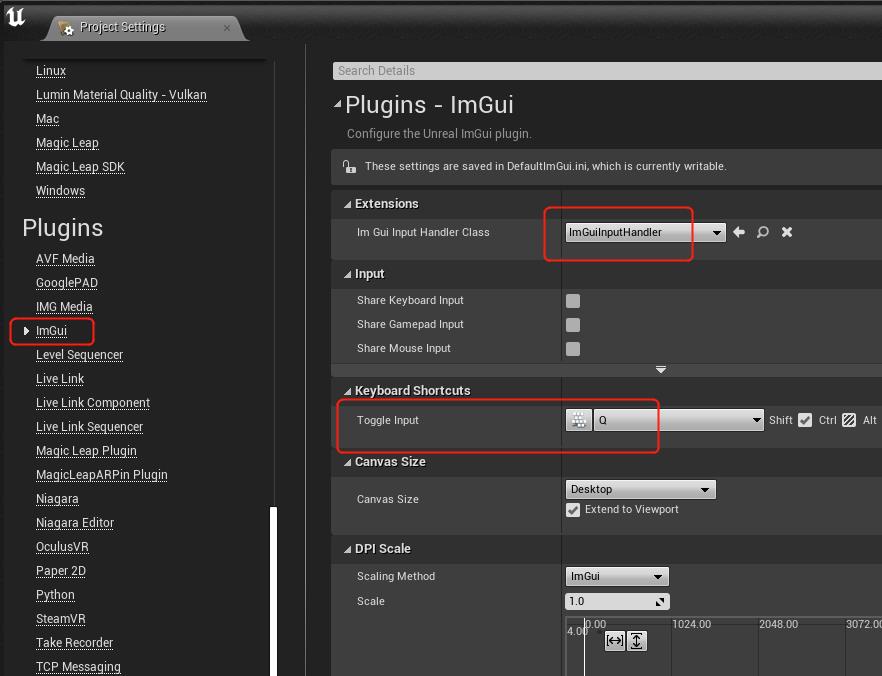
打开项目设置,为插件 ImGui > ToggleInput 分配适当的键盘快捷键
如果将 ImGui > ImGuiInputHandlerClass 设置为 ImGuiInputHandler,则不需要执行 ImGui.ToggleInput。

参考插件文档:https://github.com/segross/UnrealImGui/blob/master/README.md
尝试创建自己的窗口。
修改项目的 Build.cs 文件,添加 ImGui 模块。
MyDemo.Build.cs)
public class MyDemo : ModuleRules

	public MyDemo(ReadOnlyTargetRules Target) : base(Target)

		PCHUsage = PCHUsageMode.UseExplicitOrSharedPCHs;

		PublicDependencyModuleNames.AddRange(new string[]  "Core", "CoreUObject", "Engine", "InputCore"

		);

		PrivateDependencyModuleNames.AddRange(new string[]  "ImGui" );
创建文件 ImGuiCommon.h、ImGuiTest.h 和 ImGuiTest.cpp 文件并输入了以下代码。

ImGuiCommon.h)
#pragma once

#ifdef IMGUI_API
#define WITH_IMGUI 1
#else
#define WITH_IMGUI 0
#endif

#if WITH_IMGUI
#include <ImGuiModule.h>
#include <ImGuiDelegates.h>

#include <imgui.h>
#endif
ImGuiTest.h)
#pragma once

#include "CoreMinimal.h"
#include "GameFramework/Actor.h"
#include "ImGuiCommon.h"

#include "ImGuiTest.generated.h"

UCLASS()
class GUITEST_API AImGuiTest : public AActor

	GENERATED_BODY()

public:
	AImGuiTest();

	virtual void BeginPlay() override;
	virtual void EndPlay(const EEndPlayReason::Type EndPlayReason) override;
	virtual void Tick(float DeltaTime) override;

#if WITH_IMGUI
	void ImGuiTick();
#endif
;
ImGuiTest.cpp
#include "ImGuiTest.h"

AImGuiTest::AImGuiTest()

	PrimaryActorTick.bCanEverTick = true;


void AImGuiTest::BeginPlay()

	Super::BeginPlay();
#if WITH_IMGUI
	FImGuiDelegates::OnWorldDebug().AddUObject(this, &AImGuiTest::ImGuiTick);
#endif


void AImGuiTest::EndPlay(const EEndPlayReason::Type EndPlayReason)

	Super::EndPlay(EndPlayReason);
#if WITH_IMGUI
	FImGuiDelegates::OnWorldDebug().RemoveAll(this);
#endif


void AImGuiTest::Tick(float DeltaTime)

	Super::Tick(DeltaTime);
#if WITH_IMGUI
	ImGui::Begin("ImGui Debug Order Test");
	ImGui::Text("Actor Tick: Actor = '%ls', World = '%ls', CurrentWorld = '%ls'", *GetNameSafe(this), *GetNameSafe(GetWorld()), *GetNameSafe(GWorld));
	ImGui::End();
#endif


#if WITH_IMGUI
void AImGuiTest::ImGuiTick()

	ImGui::Begin("ImGui Debug Order Test");
	ImGui::Text("ImGui World Tick: Actor = '%ls', World = '%ls', CurrentWorld = '%ls'", *GetNameSafe(this), *GetNameSafe(GetWorld()), *GetNameSafe(GWorld));
	ImGui::End();

#endif
把 ImGuiTest Actor 的资产拖放到场景中。
Play一下,然后看到场景中显示了ImGui界面

ActorTick 与 ImGuiTick 的区别:
Tick 是一个熟悉的函数,因此无需解释,但 ImGui Tick 是通过注册ImGui 的 World Delegate来操作的。通过这样做,即使 Actor 的 Tick 频率由于暂停或 Slomo 发生变化,ImGuiTick 函数也可以每帧运行。
下图显示了实际操作。当您暂停时,Actor 的Tick暂停止,您可以看到 ImGui 窗口中显示的文本减少了。

显示贴图看看:
将以下内容添加到 h 中
#if WITH_IMGUI
	UTexture2D* Texture;
	void ImGuiTick();
#endif
将以下内容添加到 cpp中
void AImGuiTest::BeginPlay()

	Super::BeginPlay();
#if WITH_IMGUI
    // const ConstructorHelpers::FObjectFinder<UTexture2D> TextureLoader(TEXT("/Game/Template/Textures/T_RedPoint.T_RedPoint"));// 崩溃
    // Texture = TextureLoader.Object;
    Texture = Cast<UTexture2D>(StaticLoadObject(UTexture2D::StaticClass(), nullptr, TEXT("/Game/Template/Textures/T_RedPoint.T_RedPoint")));
    FImGuiModule::Get().RegisterTexture(FName(Texture->GetName()), Texture);
	FImGuiDelegates::OnWorldDebug().AddUObject(this, &AImGuiTest::ImGuiTick);
#endif


void AImGuiTest::EndPlay(const EEndPlayReason::Type EndPlayReason)

	Super::EndPlay(EndPlayReason);
#if WITH_IMGUI
    const FImGuiTextureHandle TextureHandle = FImGuiModule::Get().FindTextureHandle( FName(Texture->GetName()) );
    FImGuiModule::Get().ReleaseTexture(TextureHandle);
	FImGuiDelegates::OnWorldDebug().RemoveAll(this);
#endif


void AImGuiTest::Tick(float DeltaTime)

	Super::Tick(DeltaTime);
#if WITH_IMGUI
	ImGui::Begin("ImGui Debug Order Test");
	ImGui::Text("Actor Tick: Actor = '%ls', World = '%ls', CurrentWorld = '%ls'", *GetNameSafe(this), *GetNameSafe(GetWorld()), *GetNameSafe(GWorld));
    const FImGuiTextureHandle TextureHandle = FImGuiModule::Get().FindTextureHandle( FName(Texture->GetName()) );
    ImGui::Image(TextureHandle, ImVec2( 200 , 200 ));
	ImGui::End();
从上面的代码中看到,UE4和 ImGui 之间的图像数据交换是使用 FImGuiTextureHandle 完成的,它具有字符串(FName)和 ID 数据。因此,传递给 ImGui 端的字符串是相当重要的。由于它也需要是唯一的,我认为在很多情况下您传递资产名称。

更多测试代码可以参看 imgui_demo.cpp 。

可以通过适当地复制代码来创建这样一个窗口:
源代码来自 imgui_demo.cpp 。
ImGuiTest.h)
#pragma once

#include "CoreMinimal.h"
#include "GameFramework/Actor.h"
#include "ImGuiCommon.h"

#include "ImGuiTest.generated.h"

UCLASS()
class GUITEST_API AImGuiTest : public AActor

	GENERATED_BODY()

public:
	AImGuiTest();

	virtual void Tick(float DeltaTime) override;
;
ImGuiTest.cpp
#include "ImGuiTest.h"
AImGuiTest::AImGuiTest()
PrimaryActorTick.bCanEverTick = true;
void AImGuiTest::Tick(float DeltaTime)
Super::Tick(DeltaTime);
#if WITH_IMGUI
if (ImGui::TreeNode("Basic"))
static int clicked = 0;
if (ImGui::Button("Button"))
clicked++;
if (clicked & 1)
ImGui::SameLine();
ImGui::Text("Thanks for clicking me!");
static bool check = true;
ImGui::Checkbox("checkbox", &check);
static int e = 0;
ImGui::RadioButton("radio a", &e, 0); ImGui::SameLine();
ImGui::RadioButton("radio b", &e, 1); ImGui::SameLine();
ImGui::RadioButton("radio c", &e, 2);
// Color buttons, demonstrate using PushID() to add unique identifier in the ID stack, and changing style.
for (int i = 0; i < 7; i++)
if (i > 0)
ImGui::SameLine();
ImGui::PushID(i);
ImGui::PushStyleColor(ImGuiCol_Button, (ImVec4)ImColor::HSV(i/7.0f, 0.6f, 0.6f));
ImGui::PushStyleColor(ImGuiCol_ButtonHovered, (ImVec4)ImColor::HSV(i/7.0f, 0.7f, 0.7f));
ImGui::PushStyleColor(ImGuiCol_ButtonActive, (ImVec4)ImColor::HSV(i/7.0f, 0.8f, 0.8f));
ImGui::Button("Click");
ImGui::PopStyleColor(3);
ImGui::PopID();
// Use AlignTextToFramePadding() to align text baseline to the baseline of framed elements (otherwise a Text+SameLine+Button sequence will have the text a little too high by default)
ImGui::AlignTextToFramePadding();
ImGui::Text("Hold to repeat:");
ImGui::SameLine();
// Arrow buttons with Repeater
static int counter = 0;
float spacing = ImGui::GetStyle().ItemInnerSpacing.x;
ImGui::PushButtonRepeat(true);
if (ImGui::ArrowButton("##left", ImGuiDir_Left)) counter--;
ImGui::SameLine(0.0f, spacing);
if (ImGui::ArrowButton("##right", ImGuiDir_Right)) counter++;
ImGui::PopButtonRepeat();
ImGui::SameLine();
ImGui::Text("%d", counter);
ImGui::Text("Hover over me");
if (ImGui::IsItemHovered())
ImGui::SetTooltip("I am a tooltip");
ImGui::SameLine();
ImGui::Text("- or me");
if (ImGui::IsItemHovered())
ImGui::BeginTooltip();
ImGui::Text("I am a fancy tooltip");
static float arr[] = 0.6f, 0.1f, 1.0f, 0.5f, 0.92f, 0.1f, 0.2f ;
ImGui::PlotLines("Curve", arr, IM_ARRAYSIZE(arr));
ImGui::EndTooltip();
ImGui::Separator();
ImGui::LabelText("label", "Value");
// Using the _simplified_ one-liner Combo() api here
// See "Combo" section for examples of how to use the more complete BeginCombo()/EndCombo() api.
const char* items[] = "AAAA", "BBBB", "CCCC", "DDDD", "EEEE", "FFFF", "GGGG", "HHHH", "IIII", "JJJJ", "KKKK", "LLLLLLL", "MMMM", "OOOOOOO" ;
static int item_current = 0;
ImGui::Combo("combo", &item_current, items, IM_ARRAYSIZE(items));
ImGui::SameLine();
static char str0[128] = "Hello, world!";
ImGui::InputText("input text", str0, IM_ARRAYSIZE(str0));
ImGui::SameLine();
static char str1[128] = "";
ImGui::InputTextWithHint("input text (w/ hint)", "enter text here", str1, IM_ARRAYSIZE(str1));
static int i0 = 123;
ImGui::InputInt("input int", &i0);
ImGui::SameLine();
static float f0 = 0.001f;
ImGui::InputFloat("input float", &f0, 0.01f, 1.0f, "%.3f");
static double d0 = 999999.00000001;
ImGui::InputDouble("input double", &d0, 0.01f, 1.0f, "%.8f");
static float f1 = 1.e10f;
ImGui::InputFloat("input scientific", &f1, 0.0f, 0.0f, "%e");
ImGui::SameLine();
static float vec4a[4] = 0.10f, 0.20f, 0.30f, 0.44f ;
ImGui::InputFloat3("input float3", vec4a);
static int i1 = 50, i2 = 42;
ImGui::DragInt("drag int", &i1, 1);
ImGui::SameLine();
ImGui::DragInt("drag int 0..100", &i2, 1, 0, 100, "%d%%");
static float f1=1.00f, f2=0.0067f;
ImGui::DragFloat("drag float", &f1, 0.005f);
ImGui::DragFloat("drag small float", &f2, 0.0001f, 0.0f, 0.0f, "%.06f ns");
static int i1=0;
ImGui::SliderInt("slider int", &i1, -1, 3);
ImGui::SameLine();
static float f1=0.123f, f2=0.0f;
ImGui::SliderFloat("slider float", &f1, 0.0f, 1.0f, "ratio = %.3f");
ImGui::SliderFloat("slider float (curve)", &f2, -10.0f, 10.0f, "%.4f", 2.0f);
static float angle = 0.0f;
ImGui::SliderAngle("slider angle", &angle);
// Using the format string to display a name instead of an integer.
// Here we completely omit '%d' from the format string, so it'll only display a name.
// This technique can also be used with DragInt().
enum Element Element_Fire, Element_Earth, Element_Air, Element_Water, Element_COUNT ;
const char* element_names[Element_COUNT] = "Fire", "Earth", "Air", "Water" ;
static int current_element = Element_Fire;
const char* current_element_name = (current_element >= 0 && current_element < Element_COUNT) ? element_names[current_element] : "Unknown";
ImGui::SliderInt("slider enum", ¤t_element, 0, Element_COUNT - 1, current_element_name);
ImGui::SameLine();
static float col1[3] = 1.0f,0.0f,0.2f ;
static float col2[4] = 0.4f,0.7f,0.0f,0.5f ;
ImGui::ColorEdit3("color 1", col1);
ImGui::SameLine();
ImGui::ColorEdit4("color 2", col2);
// List box
const char* listbox_items[] = "Apple", "Banana", "Cherry", "Kiwi", "Mango", "Orange", "Pineapple", "Strawberry", "Watermelon" ;
static int listbox_item_current = 1;
ImGui::ListBox("listbox\\n(single select)", &listbox_item_current, listbox_items, IM_ARRAYSIZE(listbox_items), 4);
ImGui::TreePop();
#endif
imGui 非常方便。 现在为运行时调试提供了一种新的UI形式。
以上是关于[UE4] 使用 GUI 框架“Dear ImGui”的主要内容,如果未能解决你的问题,请参考以下文章