OpenHarmony应用开发实例
Posted Bruceoxl
tags:
篇首语:本文由小常识网(cha138.com)小编为大家整理,主要介绍了OpenHarmony应用开发实例相关的知识,希望对你有一定的参考价值。
开发环境:
开发系统:Ubuntu 20.04
开发板:Pegasus物联网开发板
MCU:Hi3861
OpenHarmony版本:3.0.1-LTS
4.1新建工程及配置
1.新建工程及源码
- 新建目录
$ mkdir hello
在applications/sample/myapp中新建src目录以及myapp.c文件,代码如下所示。
#include <stdio.h>
#include "ohos_init.h"
#include "ohos_types.h"

void app_task(void)

    printf("\\n");
    printf("Hello hi3861!\\n");
    printf("\\n");

SYS_RUN(app_task);
- 新建编译组织文件
新建applications/sample/myapp/BUILD.gn文件,内容如下所示:
static_library("myapp")
    sources = [
        "src/myapp.c"
    ]
    include_dirs = [
        "//utils/native/lite/include"
    ]
static_library中指定业务模块的编译结果,为静态库文件libmyapp.a,开发者根据实际情况完成填写。
sources中指定静态库.a所依赖的.c文件及其路径,若路径中包含"//“则表示绝对路径(此处为代码根路径),若不包含”//"则表示相对路径。
include_dirs中指定source所需要依赖的.h文件路径
新建的工程目录如下:
$ tree

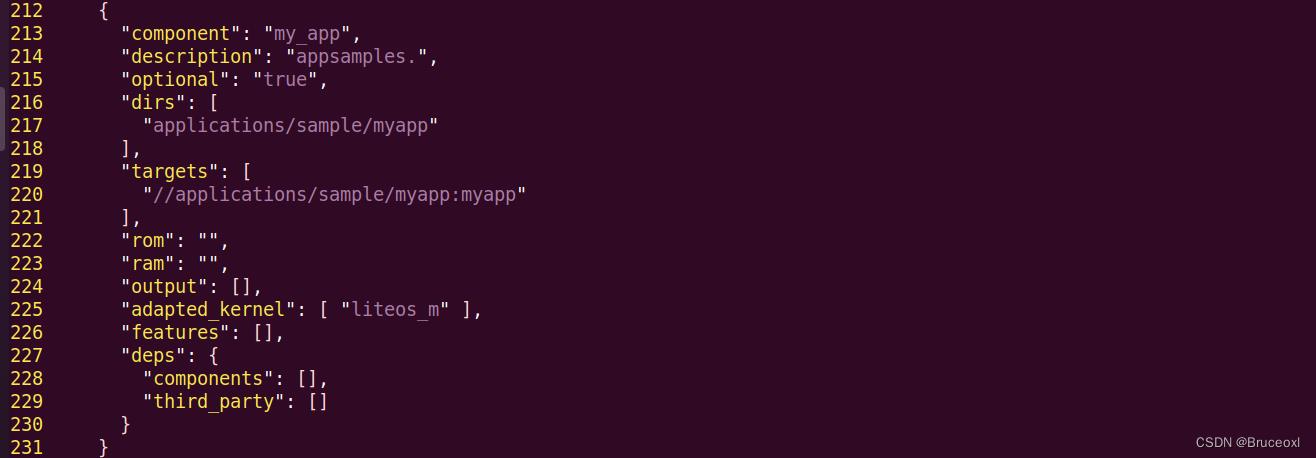
2.添加新组件
修改文件build/lite/components/applications.json,添加组件hello_world_app的配置。
      "component": "my_app",
      "description": "appsamples.",
      "optional": "true",
      "dirs": [
        "applications/sample/myapp"
      ],
      "targets": [
        "//applications/sample/myapp:myapp"
      ],
      "rom": "",
      "ram": "",
      "output": [],
      "adapted_kernel": [ "liteos_m" ],
      "features": [],
      "deps":
        "components": [],
        "third_party": []

    ,

3.修改单板配置文件
修改文件vendor/hisilicon/hispark_pegasus/config.json,新增my_app组件的条目。
     "subsystem": "applications",
      "components": [
 "component": "wifi_iot_sample_app ", "features":[]
        "component": "my_app", "features":[]
      ]
,

4.关闭xts测试子系统。
系统每次开机后都要跑xts认证程序,这里先删除该部分内容。

4.2编译下载验证
接下来就可以编译了。
$ hb set

全编译。
$ hb build -f

成功编译后,固件在out/hispark_pegasus/wifiiot_hispark_pegasus目录下。

Hi3861_wifiiot_app_allinone.bin就是需要烧写的固件。
然后把固件下载到板子中。

接下来就可以根据该实例开发自己的应用了。
4.3系统启动流程分析
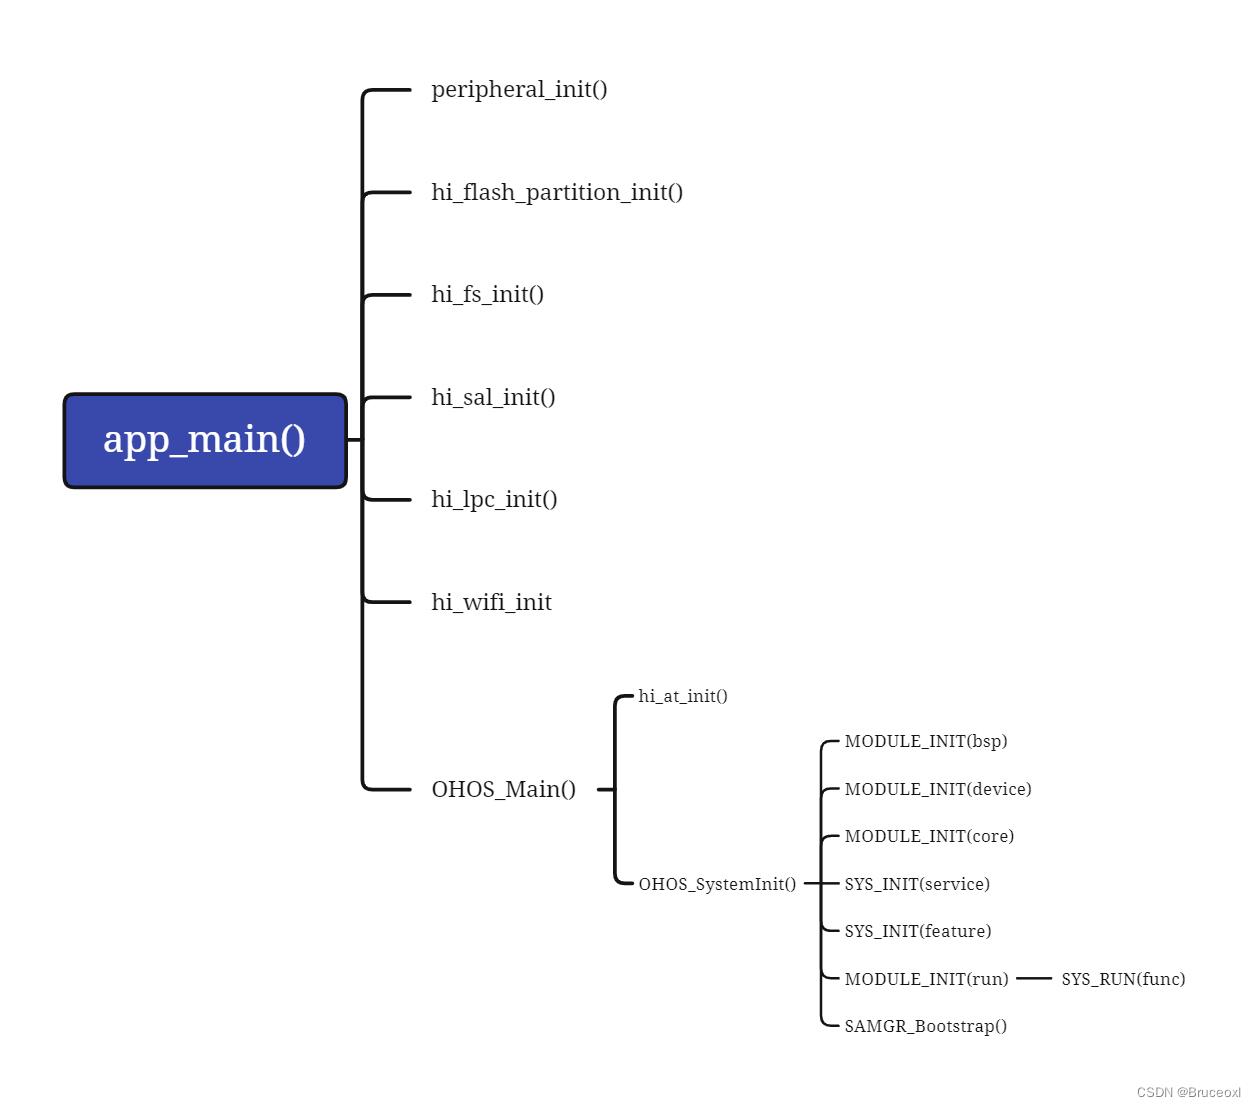
下面简单分析下系统的启动流程,系统的入口函数是app_main(),在device/hisilicon/hispark_pegasus/sdk_liteos/app/wifiiot_app/src/app_main.c文件中。
hi_void app_main(hi_void)

#ifdef CONFIG_FACTORY_TEST_MODE
        printf("factory test mode!\\r\\n");
#endif

    const hi_char* sdk_ver = hi_get_sdk_version();
    printf("sdk ver:%s\\r\\n", sdk_ver);

    hi_flash_partition_table *ptable = HI_NULL;

    peripheral_init();
    peripheral_init_no_sleep();

#ifndef CONFIG_FACTORY_TEST_MODE
    hi_lpc_register_wakeup_entry(peripheral_init);
#endif

    hi_u32 ret = hi_factory_nv_init(HI_FNV_DEFAULT_ADDR, HI_NV_DEFAULT_TOTAL_SIZE, HI_NV_DEFAULT_BLOCK_SIZE);
    if (ret != HI_ERR_SUCCESS)
        printf("factory nv init fail\\r\\n");


    /* partion table should init after factory nv init. */
    ret = hi_flash_partition_init();
    if (ret != HI_ERR_SUCCESS)
        printf("flash partition table init fail:0x%x \\r\\n", ret);

    ptable = hi_get_partition_table();

    ret = hi_nv_init(ptable->table[HI_FLASH_PARTITON_NORMAL_NV].addr, ptable->table[HI_FLASH_PARTITON_NORMAL_NV].size,
        HI_NV_DEFAULT_BLOCK_SIZE);
    if (ret != HI_ERR_SUCCESS)
        printf("nv init fail\\r\\n");


#ifndef CONFIG_FACTORY_TEST_MODE
    hi_upg_init();
#endif

    /* if not use file system, there is no need init it */
    hi_fs_init();

    (hi_void)hi_event_init(APP_INIT_EVENT_NUM, HI_NULL);
    hi_sal_init();
    /* 此处设为TRUE后中断中看门狗复位会显示复位时PC值,但有复位不完全风险,量产版本请务必设为FALSE */
    hi_syserr_watchdog_debug(HI_FALSE);
    /* 默认记录宕机信息到FLASH,根据应用场景,可不记录,避免频繁异常宕机情况损耗FLASH寿命 */
    hi_syserr_record_crash_info(HI_TRUE);

    hi_lpc_init();
    hi_lpc_register_hw_handler(config_before_sleep, config_after_sleep);

#if defined(CONFIG_AT_COMMAND) || defined(CONFIG_FACTORY_TEST_MODE)
    ret = hi_at_init();
    if (ret == HI_ERR_SUCCESS)
        hi_at_sys_cmd_register();

#endif

    /* 如果不需要使用Histudio查看WIFI驱动运行日志等,无需初始化diag */
    /* if not use histudio for diagnostic, diag initialization is unnecessary */
    /* Shell and Diag use the same uart port, only one of them can be selected */
#ifndef CONFIG_FACTORY_TEST_MODE

#ifndef ENABLE_SHELL_DEBUG
#ifdef CONFIG_DIAG_SUPPORT
    (hi_void)hi_diag_init();
#endif
#else
    (hi_void)hi_shell_init();
#endif

    tcpip_init(NULL, NULL);
#endif

    ret = hi_wifi_init(APP_INIT_VAP_NUM, APP_INIT_USR_NUM);
    if (ret != HISI_OK)
        printf("wifi init failed!\\n");
     else
        printf("wifi init success!\\n");

    app_demo_task_release_mem(); /* 释放系统栈内存所使用任务 */

#ifndef CONFIG_FACTORY_TEST_MODE
    app_demo_upg_init();
#ifdef CONFIG_HILINK
    ret = hilink_main();
    if (ret != HISI_OK)
        printf("hilink init failed!\\n");
     else
        printf("hilink init success!\\n");

#endif
#endif
    OHOS_Main();
该函数首先打印SDK的版本信息,然后挂载文件系统,初始化WiFi信息等等一系列初始化,接这就到OHOS_Main(),该函数就是OpenHarmony系统的初始化。OHOS_Main()函数在文件device/hisilicon/hispark_pegasus/sdk_liteos/app/wifiiot_app/src/ohos_main.c中。
void OHOS_Main()

#if defined(CONFIG_AT_COMMAND) || defined(CONFIG_FACTORY_TEST_MODE)
    hi_u32 ret;
    ret = hi_at_init();
    if (ret == HI_ERR_SUCCESS)
        hi_u32 ret2 = hi_at_register_cmd(G_OHOS_AT_FUNC_TBL, OHOS_AT_FUNC_NUM);
        if (ret2 != HI_ERR_SUCCESS)
            printf("Register ohos failed!\\n");


#endif
    OHOS_SystemInit();
值得注意的是OHOS_SystemInit()函数是一个弱函数,其定义如下:
void __attribute__((weak)) OHOS_SystemInit(void)

    return;
因此该函数主要是系统为应用开发者提供的。OHOS_SystemInit()函数在base/startup/bootstrap_lite/services/source/system_init.c文件中。
void OHOS_SystemInit(void)

    MODULE_INIT(bsp);
    MODULE_INIT(device);
    MODULE_INIT(core);
    SYS_INIT(service);
    SYS_INIT(feature);
    MODULE_INIT(run);
    SAMGR_Bootstrap();
到这里基本就完成了所得初始化,其中我们编写的应用就是MODULE_INIT(run)中完成的。
在base/startup/bootstrap_lite/services/source/core_main.h文件中,有如下定义:
MODULE_INIT定义如下:
#define MODULE_INIT(name)     \\
    do                       \\
        MODULE_CALL(name, 0); \\
     while (0)
MODULE_CALL定义如下:
#define MODULE_CALL(name, step)                                      \\
    do                                                              \\
        InitCall *initcall = (InitCall *)(MODULE_BEGIN(name, step)); \\
        InitCall *initend = (InitCall *)(MODULE_END(name, step));    \\
        for (; initcall < initend; initcall++)                      \\
            (*initcall)();                                           \\
                                                                    \\
     while (0)
模块的名字定义如下:
#define MODULE_NAME(name, step) “.zinitcall.” #name #step “.init”
而SYS_RUN在utils/native/lite/include/ohos_init.h中定义。
/**
 * @brief Identifies the entry for initializing and starting a system running phase by the
 * priority 2.
 *
 * This macro is used to identify the entry called at the priority 2 in the system startup
 * phase of the startup process. \\n
 *
 * @param func Indicates the entry function for initializing and starting a system running phase.
 * The type is void (*)(void).
 */
#define SYS_RUN(func) LAYER_INITCALL_DEF(func, run, "run")
而LAYER_INITCALL_DEF定义如下:
#define LAYER_INITCALL(func, layer, clayer, priority)                                     \\
    static __attribute__((constructor(CTOR_VALUE_##layer + LAYER_INIT_LEVEL_##priority))) \\
        void BOOT_##layer##priority##func() func();
#else
#define LAYER_INITCALL(func, layer, clayer, priority)            \\
    static const InitCall USED_ATTR __zinitcall_##layer##_##func \\
        __attribute__((section(".zinitcall." clayer #priority ".init"))) = func
#endif
// Default priority is 2, priority range is [0, 4]
#define LAYER_INITCALL_DEF(func, layer, clayer) \\
    LAYER_INITCALL(func, layer, clayer, 2)
可以看到最终SYS_RUN宏定义都是定义在.zinitcall中,因此SYS_RUN()宏设置的函数都会在MODULE_INIT(run)完成调用。
好了,最后看看应用启动的调用流程:

欢迎访问我的网站
BruceOu的哔哩哔哩
BruceOu的主页
BruceOu的博客
BruceOu的CSDN博客
BruceOu的简书
BruceOu的知乎
欢迎订阅我的微信公众号
关注公众号[嵌入式实验楼]]获取更多资讯
以上是关于OpenHarmony应用开发实例的主要内容,如果未能解决你的问题,请参考以下文章