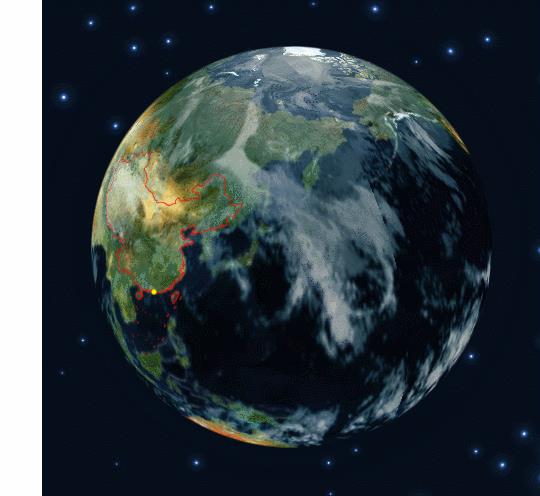
mapboxGL实现旋转的地球
Posted 牛老师讲GIS
tags:
篇首语:本文由小常识网(cha138.com)小编为大家整理,主要介绍了mapboxGL实现旋转的地球相关的知识,希望对你有一定的参考价值。
概述
许久未更新,这一篇是凑数的,用最新的mapboxGL2.10的版本实现一个旋转的地球的效果。
实现效果

实现
为效果好一点,添加了一个canvas的星空动画,实现代码如下:
  class Star
    constructor(canvas, gradientImage, maxStars = 100)
      this.ctx = canvas.getContext('2d')
      this.gradientImage = gradientImage
      //星星移动的半径
      this.orbitRadius = this.random(this.maxOrbit(canvas.width, canvas.height));
      //星星大小,半径越小,星星也越小,即外面的星星会比较大
      this.radius = this.random(60, this.orbitRadius) / 6;
      //所有星星都是以屏幕的中心为圆心
      this.orbitX = canvas.width / 2;
      this.orbitY = canvas.height / 2;
      //利用正弦余弦算出真正的x、y位置
      this.timePassed = this.random(0, maxStars);
      //星星移动速度
      this.speed = this.random(this.orbitRadius) / 80000;
      //星星图像的透明度
      this.alpha = this.random(2, 10) / 10;


    maxOrbit(x, y)
      const max = Math.max(x, y), diameter = Math.round(Math.sqrt(max * max + max * max));
      //星星移动范围,值越大范围越小,
      return diameter / 2;


    random(min, max)
      if(arguments.length < 2)
        max = min;
        min = 0;

      if(min > max)
        const hold = max;
        max = min;
        min = hold;

      //返回min和max之间的一个随机值
      return Math.floor(Math.random() * (max - min + 1)) + min;


    draw()
      const x = Math.sin(this.timePassed) * this.orbitRadius + this.orbitX,
        y = Math.cos(this.timePassed) * this.orbitRadius + this.orbitY,
        twinkle = this.random(10);
      if(twinkle === 1 && this.alpha > 0)
        this.alpha -= 0.05;
       else if(twinkle === 2 && this.alpha < 1)
        this.alpha += 0.05;

      this.globalAlpha = this.alpha;
      this.ctx.drawImage(this.gradientImage, x - this.radius / 2, y - this.radius / 2, this.radius, this.radius);
      this.timePassed += this.speed;


  class StarBackground
    constructor(pDom)
      this.pDom = pDom ? (typeof pDom === 'string' ? document.getElementById(pDom) : pDom) : document.body
      this._init()
      return Promise.resolve()

    _init()
      this.canvas = document.createElement('canvas')
      this.canvas.width = this.pDom.offsetWidth
      this.canvas.height = this.pDom.offsetHeight
      this.ctx = this.canvas.getContext('2d')
      this.pDom.appendChild(this.canvas)
      this.hue = 217 //色调色彩
      this.stars = [] //保存所有星星
      this.count = 0  //用于计算星星
      this.maxStars = 120; //星星数量
      this._creatGradientImage()
      //初始化所有星星
      for(let i = 0; i < this.maxStars; i++)
        this.stars.push(new Star(this.canvas, this.gradientImage, this.maxStars))

      this._animation()

    _animation ()
      this.ctx.globalCompositeOperation = 'source-over';
      this.ctx.globalAlpha = 0.5; //尾巴
      this.ctx.fillStyle = 'hsla(' + this.hue + ', 64%, 6%, 2)';
      this.ctx.fillRect(0, 0, this.canvas.width, this.canvas.height)
      this.ctx.globalCompositeOperation = 'lighter';
      for(let i = 1, l = this.stars.length; i < l; i++)
        this.stars[i].draw();

      window.requestAnimationFrame(() =>
        this._animation()
      );

    _creatGradientImage()
      this.gradientImage = document.createElement('canvas')
      const ctx = this.gradientImage.getContext('2d');
      this.gradientImage.width = 100;
      this.gradientImage.height = 100;
      const half = this.gradientImage.width / 2
      const gradient = ctx.createRadialGradient(half, half, 0, half, half, half);
      gradient.addColorStop(0.025, '#fff');
      gradient.addColorStop(0.1, 'hsl(' + this.hue + ', 61%, 33%)');
      gradient.addColorStop(0.25, 'hsl(' + this.hue + ', 64%, 6%)');
      gradient.addColorStop(1, 'transparent');
      ctx.fillStyle = gradient;
      ctx.beginPath();
      ctx.arc(half, half, half, 0, Math.PI * 2);
      ctx.fill();
旋转的地球的实现比较简单,只需要改变lon的值即可,实现代码如下:
new StarBackground('map').then(addMap)

  function addMap()
    const mapStyle =
      "version": 8,
      "name": "Dark",
      "sources":
        "earth-image":
          type: 'image',
          url: 'img/map1.png',
          coordinates: [
            [-180, 85.051128780],
            [180, 85.051128780],
            [180, -85.051128780],
            [-180, -85.051128780]
          ]
        ,
        "earth-cloud":
          type: 'image',
          url: 'img/map2.png',
          coordinates: [
            [-180, 85.051128780],
            [180, 85.051128780],
            [180, -85.051128780],
            [-180, -85.051128780]
          ]
        ,
        'province':
          type: 'geojson',
          data: 'assets/china.geojson'

      ,
      "layers": [
        'id': 'earth-image',
        'source': 'earth-image',
        'type': 'raster',
        'paint':
          'raster-opacity': 1,
          'raster-fade-duration': 0

      ,
        'id': 'earth-cloud',
        'source': 'earth-cloud',
        'type': 'raster',
        'paint':
          'raster-opacity': 0.65,
          'raster-fade-duration': 0

      ,
        'id': 'province-line',
        'source': 'province',
        "type": "line",
        "paint":
          "line-color": "#ff0000",
          'line-width': 1,
          'line-opacity': 0.8

      ]
    ;
    const zoom = 1.2
    let center = [116.4, 39.9]
    var map = new mapboxgl.Map(
      container: 'map',
      maxZoom: zoom,
      minZoom: zoom,
      zoom: zoom,
      center: center,
      style: mapStyle,
      attributionControl: false,
      interactive: false,
      projection: 'globe'
    );
    let play = true, playFlag = 0
    map.on('load', () =>
      const ele = document.createElement('div');
      ele.setAttribute('class', 'my-marker');
      const option =
        element: ele,
        anchor: 'center',
        offset: [0, 0]
      ;
      new mapboxgl.Marker(option)
        .setLngLat([114.0259737,	22.54605355])
        .addTo(map);
      const animate = () =>
        let [x, y] = center
        x -= 0.5
        if(x === -180) x = 180
        center = [x, y]
        map.setCenter(center)
        playFlag = requestAnimationFrame(animate)

      animate()
      document.getElementById('play').onclick = function ()
        play = !play
        play ?  animate() : cancelAnimationFrame(playFlag)
        this.src = play ? 'img/pause.png' : 'img/play.png'

    )
说明:
本文代码可移步mapboxgl-example获取。
以上是关于mapboxGL实现旋转的地球的主要内容,如果未能解决你的问题,请参考以下文章