如何在Kubernetes平台上搭建云IDE Theia
Posted 多鱼的夏天
tags:
篇首语:本文由小常识网(cha138.com)小编为大家整理,主要介绍了如何在Kubernetes平台上搭建云IDE Theia相关的知识,希望对你有一定的参考价值。
引言
随着开发人员的开发工具向云迁移,新的云IDE(集成开发环境)平台越来越多。
各种类型的设备都可以通过Web浏览器访问云IDE,它们为实时协作场景提供了许多便利。在云IDE中工作可以为你和你的团队提供统一的开发和测试环境,同时将平台不兼容性降至最低。因为它们本身就基于云技术,所以它们能够利用集群来完成任务,这远远超过了一台开发计算机的能力和可靠性。
Eclipse Theia 是一个可扩展的云IDE,运行在远程服务器上,可从Web浏览器访问。Theia 在外观和交互方面类似于 Microsoft Visual Studio Code,它支持多种编程语言,具有灵活的布局,并具有集成的终端。将Eclipse Theia与其他云IDE软件区别开来的是它的可扩展性 ,可以使用定制扩展对其进行修改,这允许你创建适合你需求的云IDE。
在本教程中,你将在 CSDN 开发云 上搭建最新版本的Eclipse Theia云IDE平台,并可以在公网上访问它,同时使用 Let’s Encrypt 证书来启动安全的 https 连接 ,并要求访问者进行身份验证。最后,你将通过 HTTPS 在你的Kubernetes集群上运行Eclipse Theia,并要求访问者登录。
先决条件
- 需要你对 Kubernetes 中的 Node、Pod、ReplicaSet、Deployment、Service、Ingress、ConfigMap 等一些核心基础概念有一定的了解。如果你没有接触过 k8s,也完全可以按照教程完成云 IDE部署,然后在通过学习k8s官方文档 了解 Kubernetes 的各个组件
- 有一个装有 k8s 的主机 。CSDN 开发云提供了k8s学习环境,按小时付费使用,每小时仅 0.07元。学习完毕后可以释放主机资源即会停止计费。 点这里一键拥有 k8s 环境
- 拥有一个已备案的域名,DNS 解析到装有k8s的主机 IP
实践操作整个教程大概用时 10 分钟 至 30 分钟。本文章的YAML配置文件下载地址 k8s-examples/php
步骤1 - 安装 Eclipse Theia
首先,你将在你的DigitalOcean Kubernetes集群中安装Eclipse Theia。然后,你将使用nginx Ingress在你想要的域中公开它
在本教程中,你将在本地计算机上将部署配置存储在一个名为eclipse-theia.yaml的文件中。使用以下命令创建它:
nano eclipse-theia.yaml
将以下内容添加到文件eclipse-theia.yaml中:
apiVersion: v1
kind: Namespace
metadata:
  name: theia
---
apiVersion: networking.k8s.io/v1
kind: Ingress
metadata:
  name: theia-next
  namespace: theia
spec:
  rules:
  - host: <your_domain>
    http:
      paths:
      - path: /
        pathType: Prefix
        backend:
          service:
            name: theia-next
            port:
              number: 80
---
apiVersion: v1
kind: Service
metadata:
 name: theia-next
 namespace: theia
spec:
 ports:
 - port: 80
   targetPort: 3000
 selector:
   app: theia-next
---
apiVersion: apps/v1
kind: Deployment
metadata:
  labels:
    app: theia-next
  name: theia-next
  namespace: theia
spec:
  selector:
    matchLabels:
      app: theia-next
  replicas: 1
  template:
    metadata:
      labels:
        app: theia-next
    spec:
      containers:
      - image: francoisvans/theia-docker-test
        imagePullPolicy: Always
        name: theia-next
        ports:
        - containerPort: 3000
此配置定义了命名空间、部署、服务和入口。命名空间称为theia,它包含与Eclipse Theia相关的所有Kubernetes对象。该部署由一个Theia Docker镜像实例组成,容器上暴露了端口3000。该服务查找部署,并将容器端口重新映射到常见的HTTP端口80,从而允许集群内访问Eclipse Theia。
Ingress 包含一个规则,用于在所需域的外部端口80为服务提供服务。
请将文件中your_domain替换为你指向集群负载均衡的所需域名,然后保存并退出编辑该文件。
然后,通过运行以下命令在Kubernetes中创建配置:
kubectl apply -f eclipse-theia.yaml
输出将如下所示:
namespace/theia created
ingress.networking.k8s.io/theia-next created
service/theia-next created
deployment.apps/theia-next created
你可以通过运行以下命令来查看Eclipse Theia Pod的创建过程:
kubectl get pods -w -n theia
-w 表示命令不退出,持续监视输出的变化
-n 指定命名空间
输出将如下所示:
NAME                          READY   STATUS    RESTARTS   AGE
theia-next-656dcc9797-ks7v4   1/1     Running   0          5m47s
一段时间后,状态会变为RUNNING,表示你已成功将Eclipse Theia安装到你的集群中。你可以使用 Ctrl+C中断命令。
在浏览器中导航到你的域。你将看到默认的Eclipse Theia编辑器图形用户界面:

以上是默认的Eclipse Theia编辑器图形用户界面
你已经将Eclipse Theia部署到你的 Kubernetes集群中,并使用Inress将其公开到你想要的域中。接下来,你将通过启用登录身份验证来保护对你的Eclipse Theia部署的访问。
步骤 2 - 使用Let’s Encrypt HTTPS证书
接下来,你将通过将 Let’s Encrypt 证书应用到你的 Ingress 来保护你的 Eclipse Theia 安装,Cert-Manager 将自动配置该证书。完成此步骤后,你的 Eclipse Theia 安装将可通过 HTTPS 访问。
安装证书管理器Cert-Manager ,执行以下命令安装Cert-Manager
kubectl apply -f https://github.com/cert-manager/cert-manager/releases/download/v1.8.2/cert-manager.yaml
命令执行输出如下
namespace/cert-manager created
customresourcedefinition.apiextensions.k8s.io/certificaterequests.cert-manager.io created
customresourcedefinition.apiextensions.k8s.io/certificates.cert-manager.io created
customresourcedefinition.apiextensions.k8s.io/challenges.acme.cert-manager.io created
customresourcedefinition.apiextensions.k8s.io/clusterissuers.cert-manager.io created
customresourcedefinition.apiextensions.k8s.io/issuers.cert-manager.io created
customresourcedefinition.apiextensions.k8s.io/orders.acme.cert-manager.io created
serviceaccount/cert-manager-cainjector created
serviceaccount/cert-manager created
serviceaccount/cert-manager-webhook created
configmap/cert-manager-webhook created
clusterrole.rbac.authorization.k8s.io/cert-manager-cainjector created
clusterrole.rbac.authorization.k8s.io/cert-manager-controller-issuers created
clusterrole.rbac.authorization.k8s.io/cert-manager-controller-clusterissuers created
clusterrole.rbac.authorization.k8s.io/cert-manager-controller-certificates created
clusterrole.rbac.authorization.k8s.io/cert-manager-controller-orders created
apiVersion: cert-manager.io/v1
clusterrole.rbac.authorization.k8s.io/cert-manager-controller-challenges created
clusterrole.rbac.authorization.k8s.io/cert-manager-controller-ingress-shim created
clusterrole.rbac.authorization.k8s.io/cert-manager-view created
clusterrole.rbac.authorization.k8s.io/cert-manager-edit created
clusterrole.rbac.authorization.k8s.io/cert-manager-controller-approve:cert-manager-io created
clusterrole.rbac.authorization.k8s.io/cert-manager-controller-certificatesigningrequests created
clusterrole.rbac.authorization.k8s.io/cert-manager-webhook:subjectaccessreviews created
clusterrolebinding.rbac.authorization.k8s.io/cert-manager-cainjector created
clusterrolebinding.rbac.authorization.k8s.io/cert-manager-controller-issuers created
clusterrolebinding.rbac.authorization.k8s.io/cert-manager-controller-clusterissuers created
clusterrolebinding.rbac.authorization.k8s.io/cert-manager-controller-certificates created
clusterrolebinding.rbac.authorization.k8s.io/cert-manager-controller-orders created
clusterrolebinding.rbac.authorization.k8s.io/cert-manager-controller-challenges created
clusterrolebinding.rbac.authorization.k8s.io/cert-manager-controller-ingress-shim created
clusterrolebinding.rbac.authorization.k8s.io/cert-manager-controller-approve:cert-manager-io created
clusterrolebinding.rbac.authorization.k8s.io/cert-manager-controller-certificatesigningrequests created
clusterrolebinding.rbac.authorization.k8s.io/cert-manager-webhook:subjectaccessreviews created
role.rbac.authorization.k8s.io/cert-manager-cainjector:leaderelection created
role.rbac.authorization.k8s.io/cert-manager:leaderelection created
role.rbac.authorization.k8s.io/cert-manager-webhook:dynamic-serving created
rolebinding.rbac.authorization.k8s.io/cert-manager-cainjector:leaderelection created
rolebinding.rbac.authorization.k8s.io/cert-manager:leaderelection created
rolebinding.rbac.authorization.k8s.io/cert-manager-webhook:dynamic-serving created
service/cert-manager created
service/cert-manager-webhook created
deployment.apps/cert-manager-cainjector created
deployment.apps/cert-manager created
deployment.apps/cert-manager-webhook created
mutatingwebhookconfiguration.admissionregistration.k8s.io/cert-manager-webhook created
validatingwebhookconfiguration.admissionregistration.k8s.io/cert-manager-webhook created
我们可以通过使用如下命令来等待安装何时完成
kubectl --namespace cert-manager get pods -w
命令输出如下
NAME                                       READY   STATUS              RESTARTS   AGE
cert-manager-cainjector-5987875fc7-dclv7   0/1     ContainerCreating   0          8s
cert-manager-6dd9658548-td7zx              0/1     ContainerCreating   0          8s
cert-manager-webhook-7b4c5f579b-bwr69      0/1     ContainerCreating   0          8s
直到所有 pod 都处于Running 状态,按Ctrl+C 退出
下面添加配置为使用 Let’s Encrypt 的颁发者可以让你为集群的服务动态获取新证书。
新建文件letsencrypt-issuer-staging.yaml :
nano letsencrypt-issuer-staging.yaml
内容如下,替换<your_email>为你的邮箱
apiVersion: cert-manager.io/v1
kind: ClusterIssuer
metadata:
  name: letsencrypt-staging
spec:
  acme:
    server: https://acme-staging-v02.api.letsencrypt.org/directory
    email: <your_email>
    privateKeySecretRef:
      name: letsencrypt-staging
    solvers:
    - http01:
        ingress:
          class: traefik
创建ClusterIssuer
kubectl apply -f letsencrypt-issuer-staging.yaml
我们可以使用如下命令查看ClusterIssuer的状态
kubectl get clusterissuer
输出如下,你看到ClusterIssuer的状态正常,下面我们使用ClusterIssuer来颁发证书
NAME                  READY   AGE
letsencrypt-staging   True    68s
打开eclipse-theia.yaml编辑:
nano eclipse-theia.yaml
添加以下内容到你的文件中,确保将<your_domain>替换为你自己的域名:
eclipse-theia.yaml
apiVersion: v1
kind: Namespace
metadata:
  name: theia
---
apiVersion: networking.k8s.io/v1
kind: Ingress
metadata:
  name: theia-next
  namespace: theia
  annotations:
    kubernetes.io/ingress.class: traefik
    cert-manager.io/cluster-issuer: letsencrypt-staging
spec:
  tls:
  - hosts:
    - <your_domain>
    secretName: theia-prod
  rules:
  - host: <your_domain>
    http:
...
首先,你将letsencrypt-staging 作为先决条件的一部分创建的 ClusterIssuer 指定为将用于为此 Ingress 提供证书的颁发者。然后,在该tls部分中,你指定应该保护的确切域,以及将持有这些证书的Secret的名称。
通过运行以下命令将更改应用到集群:
kubectl apply -f eclipse-theia.yaml
输出将如下所示:
Outputnamespace/theia unchanged
ingress.networking.k8s.io/theia-next configured
service/theia-next unchanged
deployment.apps/theia-next unchanged
配置和完全应用证书需要几分钟时间。你可以通过观察以下命令的输出来跟踪进度:
kubectl describe certificate theia-prod -n theia
完成后,输出的结尾将类似于以下内容:
Events:
  Type    Reason     Age   From                                       Message
  ----    ------     ----  ----                                       -------
  Normal  Issuing    17m   cert-manager-certificates-trigger          Issuing certificate as Secret does not exist
  Normal  Generated  17m   cert-manager-certificates-key-manager      Stored new private key in temporary Secret resource "theia-prod-4x886"
  Normal  Requested  17m   cert-manager-certificates-request-manager  Created new CertificateRequest resource "theia-prod-nq47r"
  Normal  Requested  14m   cert-manager-certificates-request-manager  Created new CertificateRequest resource "theia-prod-9z7c8"
  Normal  Issuing    14m   cert-manager-certificates-issuing          The certificate has been successfully issued
在浏览器中刷新你的域。你会在地址栏的最左侧看到一个绿色挂锁,表示连接是安全的。
你已将 Ingress 配置为使用 Let’s Encrypt 证书,从而使你的 Eclipse Theia 部署更加安全。
步骤 3 - 为域启用登录身份验证
在本步骤中,你将为你的Eclipse Theia部署启用用户名和密码身份验证。你将通过首先使用htpasswd实用程序管理有效的登录组合列表来实现这一点。然后,你将创建一个包含该列表的Kubernetes Secret,并配置Inress以根据它对访问者进行身份验证。最后,只有当访问者输入有效的用户名和密码组合时,你的域才能访问。这将防止访客和其他不受欢迎的访问者访问Eclipse Theia。
htpasswd实用程序来自Apache Web服务器,用于创建存储登录组合列表的文件。htpasswd文件的格式是每行一个用户名:哈希_密码组合,这是入口控制器期望列表遵循的格式。
首先,更新包管理器缓存:
sudo apt update
然后,通过运行以下命令在你的系统上安装htpasswd:
sudo apt install apache2-utils -y
你将把该用户名密码列表存储在一个名为auth的文件中。通过运行以下命令来创建它:
touch auth
This file needs to be named auth because the Nginx Ingress Controller expects the secret to contain a key called data.auth. If it’s missing, the controller will return HTTP 503 Service Unavailable status.
此文件需要命名为auth,因为Inress控制器希望该密钥包含一个名为data.auth的密钥。如果丢失,控制器会返回HTTP503服务不可用状态。
通过运行以下命令将用户名和密码组合添加到auth中:
htpasswd auth <username>
请记住将<username>替换为你想要的用户名。系统将要求你输入附带的密码,密码组合将被添加到auth文件中。你可以对需要添加的用户重复此命令。
例如你添加了一个用户名和密码都是test的条目,文件内容显示如下
#cat auth
test:$apr1$Z9L1riZh$MtI/Msrn2exkkVzM/W/Ua0
注意:如果你正在操作的系统没有安装
htpasswd,你可以使用Dockeralized版本。
You’ll need to have Docker installed on your machine. For instructions on how to do so, visit the official docs.
你需要在你的计算机上安装Docker。有关如何做到这一点的说明,请访问官方文档。
运行以下命令以运行停靠版本:
docker run --rm -it httpd htpasswd -n <username>
请记住将<username>替换为你要使用的用户名。系统会要求你输入密码。哈希登录密码会写在控制台上,你需要手动将其添加到auth文件的末尾。重复此过程,以添加任意数量的登录。
完成后,通过运行以下命令在Kubernetes中使用文件内容创建新密码:
kubectl create secret generic theia-basic-auth --from-file=auth -n theia
以上命令输出如下
secret/theia-basic-auth created
你可以通过以下方式查看 创建的secret:
kubectl get secret theia-basic-auth -o yaml -n theia
输出如下所示:
apiVersion: v1
data:
  auth: dGVzdDokYXByMSRaOUwxcmlaaCRNdEkvTXNybjJleGtrVnpNL1cvVWEwCg==
kind: Secret
metadata:
  creationTimestamp: "2022-07-13T06:01:34Z"
  name: theia-basic-auth
  namespace: theia
  resourceVersion: "6417"
  uid: 90404f7d-260f-4e2c-9504-98fb7351fc07
type: Opaque
接下来,你需要编辑Ingress使其使用该密码。打开展开配置以进行编辑:
nano eclipse-theia.yaml
将以下内容中的annotations部分添加到文件eclipse-theia.yaml中:
apiVersion: v1
kind: Namespace
metadata:
  name: theia
---
apiVersion: networking.k8s.io/v1
kind: Ingress
metadata:
  name: theia-next
  namespace: theia
  annotations:
    kubernetes.io/ingress.class: traefik
    ingress.kubernetes.io/auth-type: basic
    ingress.kubernetes.io/auth-secret: theia-basic-auth
    ingress.kubernetes.io/auth-realm: 'Authentication Required - Eclipse Theia'
spec:
  rules:
...
首先,在auth-type注释中,指定身份验证类型为basic。这意味着Ingress将要求用户输入用户名和密码。然后,在auth-secret中,指定包含有效验证列表的Secret为你刚刚创建的theia-base-auth。剩下的auth-realm注释指定了一条消息,该消息将显示给用户,解释为什么需要身份验证。你可以根据自己的喜好更改此字段中包含的消息。
保存并关闭该文件。要将更改应用到你的群集,请运行以下命令:
kubectl apply -f eclipse-theia.yaml
你将看到输出:
namespace/theia unchanged
ingress.networking.k8s.io/theia-next configured
service/theia-next unchanged
deployment.apps/theia-next unchanged
在浏览器中访问你的域名,现在将要求你登录。
你已经在Ingress上启用了基本登录身份验证,方法是将其配置为使用包含用户名和密码组合的screct。在下一步中,你将通过添加TLS证书进一步保护访问,以便你和你的Eclipse Theia部署之间的通信保持加密。
步骤 4 - 使用Eclipse Theia界面
在这一节中,你将尝试使用一些Eclipse Theia界面的功能
在IDE的左侧,有一排垂直的四个按钮,可以打开侧面板中最常用的功能。
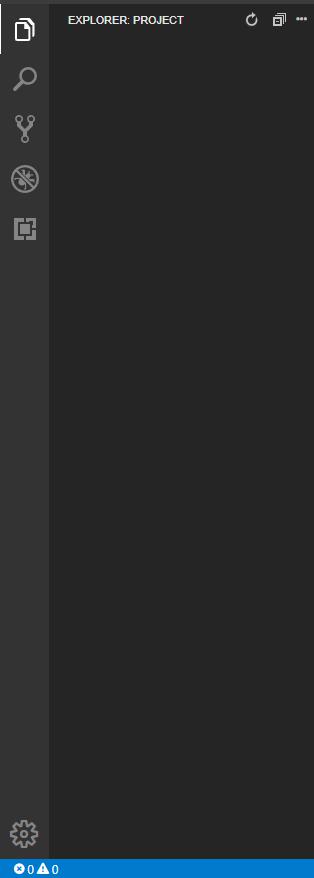
此栏是可自定义的,你可以将这些视图移动到不同的顺序或从栏中删除它们。默认情况下,第一个视图打开资源管理器面板,该面板提供项目结构的树状导航。你可以在此处管理你的文件夹和文件-根据需要创建、删除、移动和重命名它们。
通过文件菜单创建新文件后,你将在新选项卡中看到一个空文件打开。保存后,你可以在资源管理器侧面板中查看该文件的名称。要创建文件夹,请右击资源管理器侧边栏,然后单击新建文件夹。你可以通过单击文件夹名称以及将文件和文件夹拖放到层次结构的较高部分来展开文件夹,以将它们移动到新位置。

下一个选项提供对搜索和替换功能的访问。在此之后,下一个选项提供你可能正在使用的源代码控制系统的视图,例如Git。
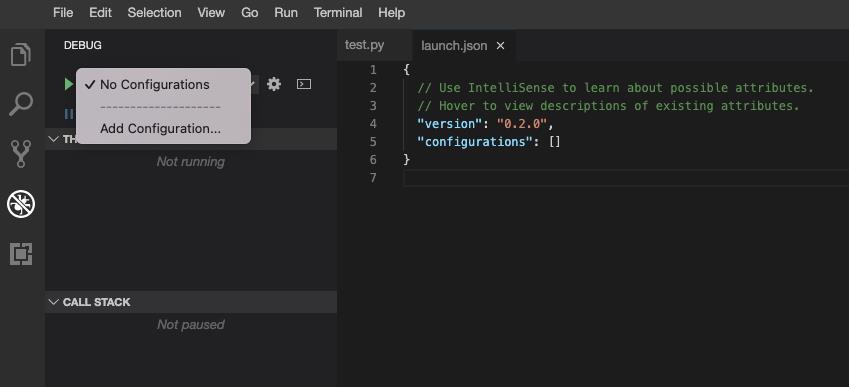
下一个视图是调试器选项,它提供了在面板中进行调试的所有常见操作。可以将调试配置保存在Launch.json文件中。
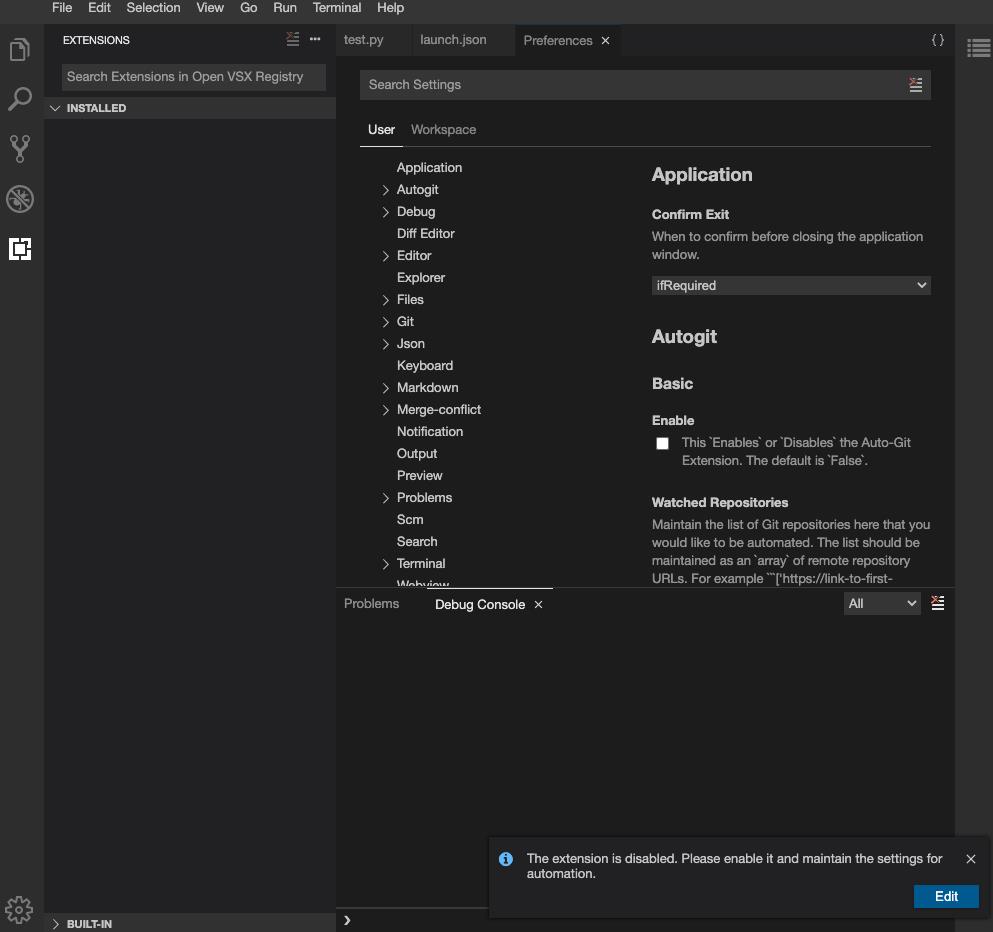
最后一个选项允许你查看和安装扩展
图形用户界面的中心部分是你的编辑器,你可以使用选项卡将其分开,以便进行代码编辑。你可以将编辑视图更改为网格系统或并排文件。与所有现代IDE一样,Eclipse Theia支持代码的语法突出显示。
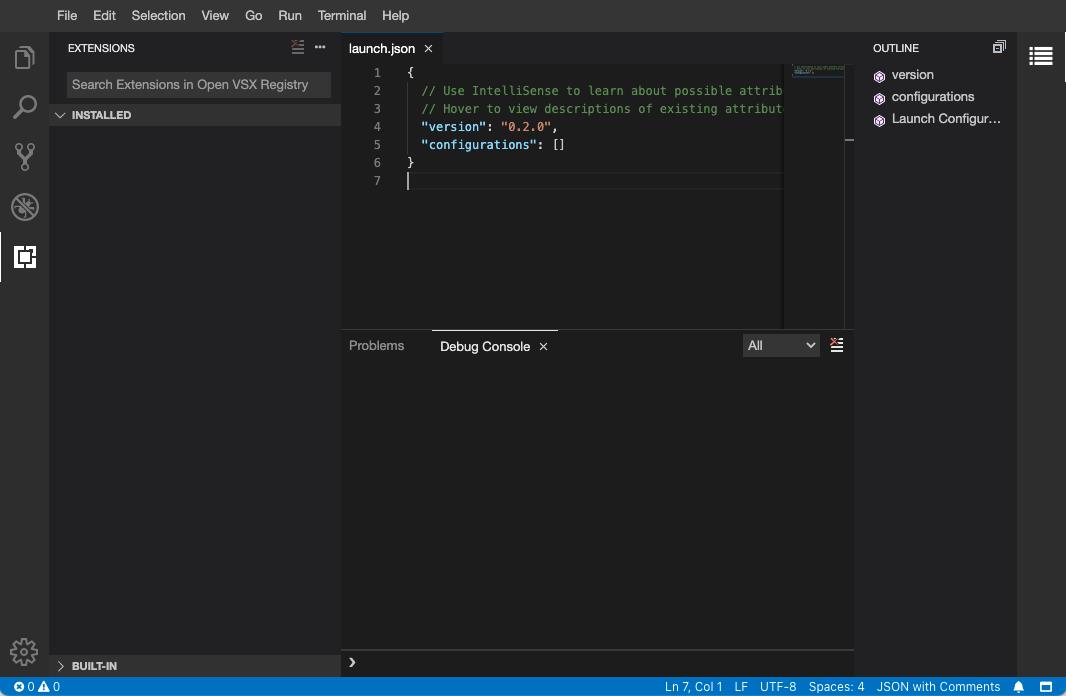
你可以通过键入 CTRL+SHIFT+` 或点击上部菜单中的终端并选择新建终端来访问终端。终端将在下面的面板中打开,其工作目录将设置为项目的工作区,其中包含资源管理器侧面板中显示的文件和文件夹。
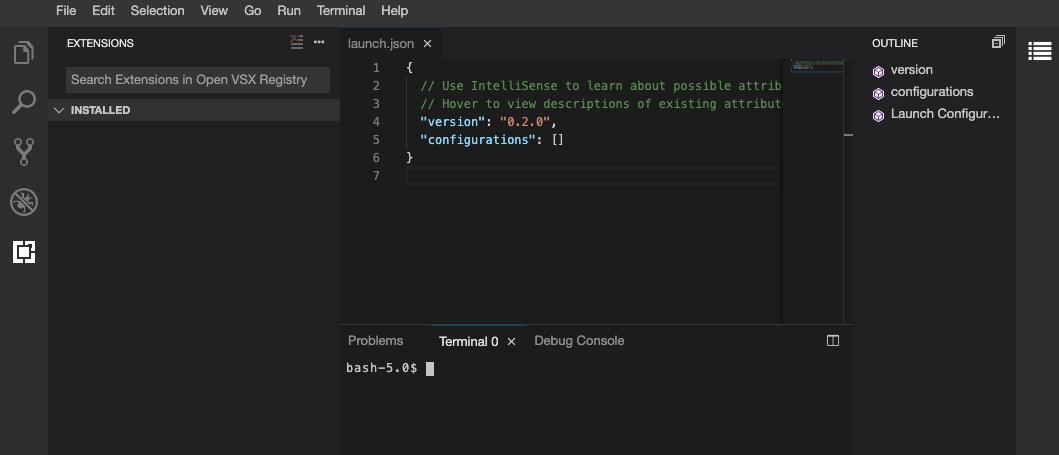
你已经了解了Eclipse Theia界面的一些最常用的特性。
如果你希望卸载集群上的Eclipse Theia部署,请运行以下命令:
kubectl delete -f eclipse-theia.yaml
结论
现在,你已经在DigitalOcean Kubernetes集群上安装了Eclipse Theia,这是一种多功能的云IDE。你已经用免费的TLS证书保护了它,让我们加密TLS证书,并设置实例以要求访问者登录。你可以单独处理源代码和文档,也可以与你的团队协作。如果你需要其他功能,也可以尝试构建你自己版本的Eclipse Theia。有关如何做到这一点的更多信息,请访问Theia文档。
本文根据How To Set Up the Eclipse Theia Cloud IDE Platform on DigitalOcean Kubernetes 改编
文章许可使用CC BY-NC-SA 4.0 协议
以上是关于如何在Kubernetes平台上搭建云IDE Theia的主要内容,如果未能解决你的问题,请参考以下文章
如何在Kubernetes上搭建code-server 云IDE平台
如何在Kubernetes上搭建code-server 云IDE平台