Yolov5s模型在全志V853平台上的部署方法和应用
Posted papaofdoudou
tags:
篇首语:本文由小常识网(cha138.com)小编为大家整理,主要介绍了Yolov5s模型在全志V853平台上的部署方法和应用相关的知识,希望对你有一定的参考价值。
AI部署这个词儿大家肯定不陌生,可能有些人还不是很清楚这个是干嘛的,但总归是听过了。近些年来,在深度学习算法已经足够卷之后,深度学习的另一个偏向于工程的方向–部署应用落地,才开始被谈论的多了起来。当然这也是大势所趋,毕竟AI算法那么多,如果用不着,只在学术圈搞研究的话没有意义。因此很多AI部署相关行业和AI芯片相关行业也在迅速发展,现在虽然已经2022年了,但我认为AI部署相关的行业还未到头,AI也远远没有普及,还有很多的场景未能落地。随着人工智能逐渐普及,使用神经网络处理各种任务的需求越来越多,如何在生产环境中快速、稳定、高效地运行模型,成为很多公司不得不考虑的问题。不论是通过提升模型速度降低latency提高用户的使用体验,还是加速模型训练降低训练成本,都是很有用的,很多公司也需要这样的人才。在经历了算法的神仙打架、诸神黄昏, 灰飞烟灭,再到现在的直接车毁人亡、人间地狱,唯有应用部署还能广大工程师留点活路。
最常见的场景,AI算法部署需要涉及三种不同的分工角色,包括算法提供者(算法商,开源算法社区,比如商汤,darknet, github上各类开源算法等等),算力平台提供者(SOC厂商,目的是提供算力平台),以及深度学习IP Vendor(比如算丰,比特大陆,芯原等等).它们的关系简单理解如下:

当然也会有些垂直类的厂商,比如RK,他既可以做神经网络加速器IP,同是也具备集成研发SOC以及部署工具开发的能力,这样的整合同时会加强它的竞争力。比较郁闷的是算法厂商,很难找到一条合适的盈利模式,纯做算法的算法尝试盈利模式单一,再加上各类AI应用场景的碎片化,这些年早已风光不再,生存比较艰难。
扯了这么多,主要是想说明AI部署是需要重视的专业技术方向,今天就以为全志V853部署YOLOV5模型为例,讲一点AI应用部署的干货,抛砖引玉。
V853 平台介绍
根据官网资料得到的数据如下:

YOLOV5S模型介绍
2020年2月,yolo之父Joseph Redmon宣布退出计算机视觉研究的时候,很多人认为目标检测器YOLO系列就此终结,没想到的是,2020年4月份曾经参与YOLO项目维护Alexey Bochkovskiy带着论文《Optimal Speed and Accuracy of Object Detection》和代码在Github上重磅开源,YOLOv4正式发布!令我们更没想到的是,2020年6月份,短短两个月,Ultralytics LLC 公司的创始人兼 CEO Glenn Jocher 在 GitHub 上发布了YOLOV5 的一个开源实现,标志着YOLOv5的到来!
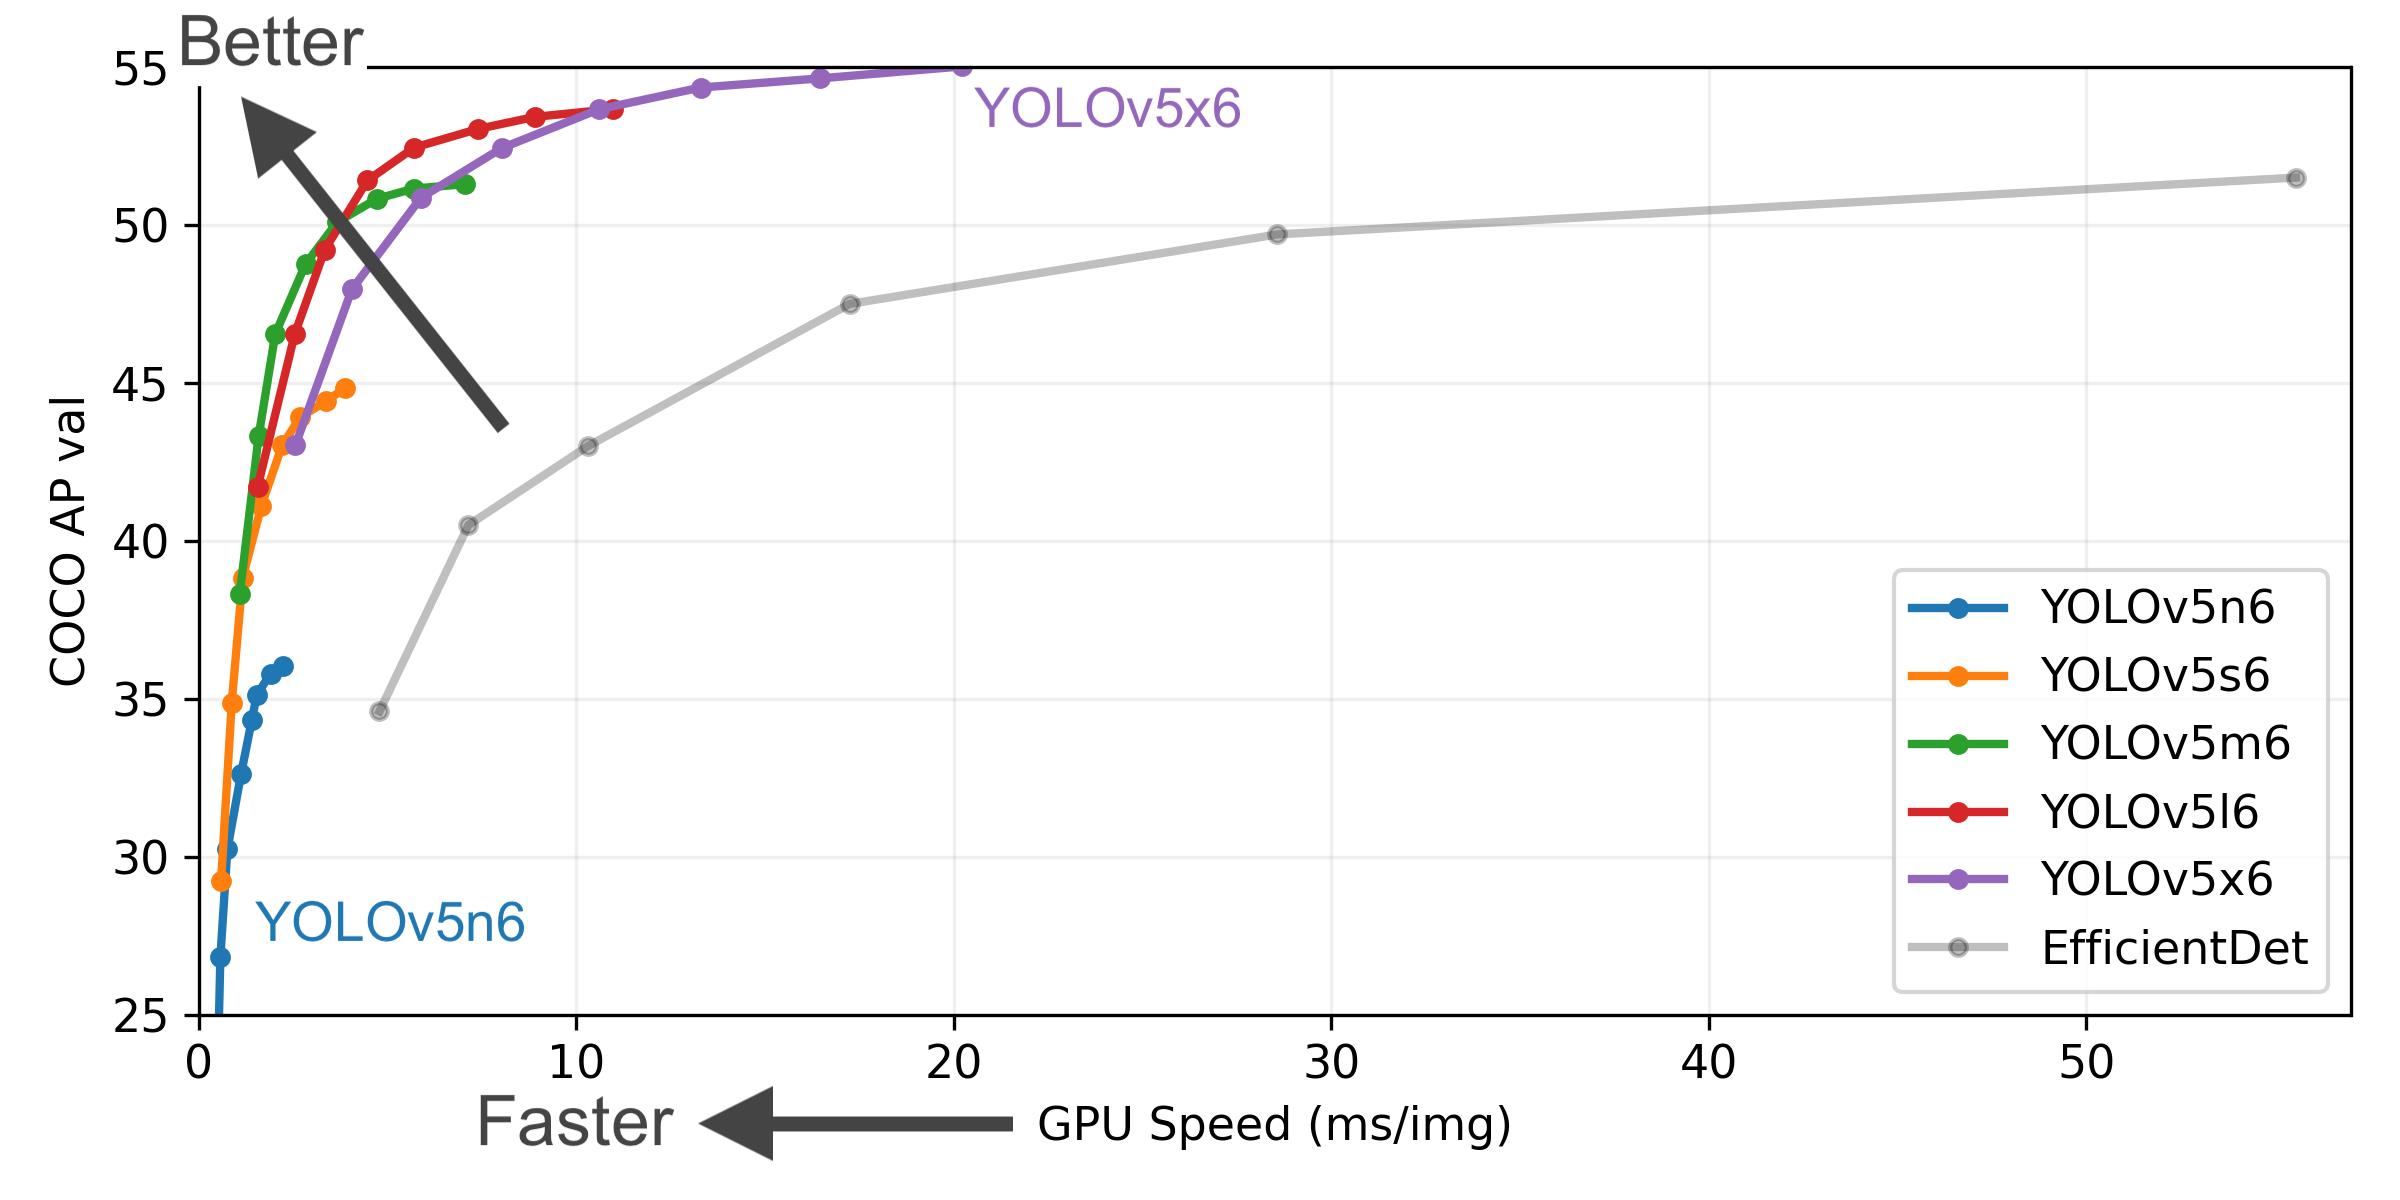
YOLOV5分为多个版本,它们详细的推理数据如下,数据来源于github:
https://github.com/ultralytics/yolov5/releases

这里根据对V853 1T算力的评估,我们部署其中的小模型版本,yolov5s-v6.1,也就是图中的第二行数据代表的模型。yolov5s-v6.1 mAP数据如下图所示,橙色的线就是YOLOV5Sd的数据,可以看到它的最高mAP可以达到45个点,根据mAP的计算方式,这个指标表示它能对数据集中的绝大部分目标进行有效检测了。

下面开始介绍具体的部署操作
部署逻辑
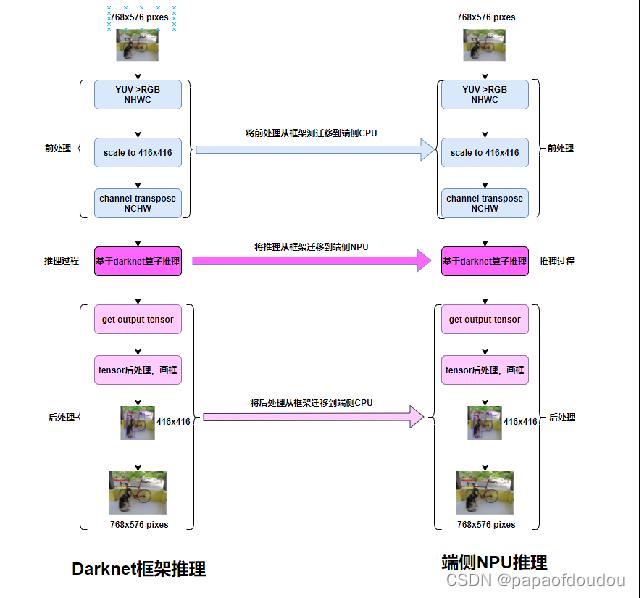
以darknet为例,端侧部署和板端部署的对应关系如下:

模型部署的流程如下图所示:
下面的操作我们会用到两个工具,分别是acuity进行模型编译,优化,而IDE则进行模型的仿真和性能,数据分析。

模型获取
模型的下载地址:
https://github.com/ultralytics/yolov5/releases
使用最新的6.1版本的yolov5s模型,默认是pytorch版。

下载下来后,由于V853部署工具对ONNX模型的支持比较友好,所有按照博客:
pytorch yolov5 推理和训练环境搭建_papaofdoudou的博客-CSDN博客_yolov5推理
中介绍的方式,将其转换为onnx模型,并用工具onnxsim对模型进行优化,得到最终的部署模型yolov5s-sim.onnx.

模型结构:


YOLOV5S是一个但输入,单输出的网络,但是我们可以修改其结构,将其变为多输出网络,这样做是有一定好处的,后文我们将会针对具体问题加以阐述。
模型部署
按照文档要求创建部署目录如下,由于我们的目的是在端侧进行推理部署,使用的是训练好的模型,这里放入dataset数据集的目的是为工具提供量化的依据,我这里只是为了演示,仅仅放置了两张图片,实际产品部署的时候,这里最好放足够多的图像,并且这些图像最好和算法实际部署场景的图像保持同样的像素分布为好。

浮点部署:
进行浮点部署的目的是获取golden tensor,验证原型模型的精度,由于浮点部署不需要经过量化,所以部署后的模型精度就是原始模型的精度(也就是说不会出现掉精度的情况). 依次执行如下命令,导入模型:
pegasus.py import onnx --model yolov5s-sim.onnx --output-data yolov5s-sim.data --output-model yolov5s-sim.jsonpegasus.py import onnx --model yolov5s-sim.onnx --output-data yolov5s-sim.data --output-model yolov5s-sim.json
pegasus.py generate inputmeta --model yolov5s-sim.json --input-meta-output yolov5s-sim-inputmeta.yml
pegasus.py generate postprocess-file --model yolov5s-sim.json --postprocess-file-output yolov5s-sim-postprocess-file.yml
pegasus.py inference --model yolov5s-sim.json --model-data yolov5s-sim.data --batch-size 1 --dtype float32  --device CPU --with-input-meta yolov5s-sim-inputmeta.yml --postprocess-file yolov5s-sim-postprocess-file.yml
pegasus.py export ovxlib --model yolov5s-sim.json --model-data yolov5s-sim.data --dtype float32 --batch-size 1 --save-fused-graph --target-ide-project 'linux64' --with-input-meta yolov5s-sim-inputmeta.yml --postprocess-file yolov5s-sim-postprocess-file.yml --output-path ovxlib/yolov5s/yolov5sprj --pack-nbg-unify --optimize "VIP9000PICO_PID0XEE" --viv-sdk $VIV_SDK
需要注意的是,需要在执行第三步结束后,将input yml scale参数设置为1/255=0.0039,为了和训练时保持一致。

这部操作专业的叫法叫做归一化,具体操作是减均值,除标准差,用公式表示就是:

具体原理可以看下面博客的分析,这里不在赘述。
imagenet数据集的归一化参数_papaofdoudou的博客-CSDN博客_imagenet归一化l
非对称UINT8量化版部署:
pegasus.py import onnx --model yolov5s-sim.onnx --output-data yolov5s-sim.data --output-model yolov5s-sim.jsonpegasus.py import onnx --model yolov5s-sim.onnx --output-data yolov5s-sim.data --output-model yolov5s-sim.json
pegasus.py generate inputmeta --model yolov5s-sim.json --input-meta-output yolov5s-sim-inputmeta.yml
pegasus.py generate postprocess-file --model yolov5s-sim.json --postprocess-file-output yolov5s-sim-postprocess-file.yml
pegasus.py quantize --model yolov5s-sim.json --model-data yolov5s-sim.data --batch-size 1 --device CPU --with-input-meta yolov5s-sim-inputmeta.yml --rebuild --model-quantize yolov5s-sim.quantize --quantizer asymmetric_affine --qtype uint8
pegasus.py inference --model yolov5s-sim.json --model-data yolov5s-sim.data --batch-size 1 --dtype quantized --model-quantize yolov5s-sim.quantize  --device CPU --with-input-meta yolov5s-sim-inputmeta.yml --postprocess-file yolov5s-sim-postprocess-file.yml
pegasus.py export ovxlib --model yolov5s-sim.json --model-data yolov5s-sim.data --dtype quantized --model-quantize yolov5s-sim.quantize --batch-size 1 --save-fused-graph --target-ide-project 'linux64' --with-input-meta yolov5s-sim-inputmeta.yml --postprocess-file yolov5s-sim-postprocess-file.yml --output-path ovxlib/yolov5s/yolov5sprj --pack-nbg-unify --optimize "VIP9000PICO_PID0XEE" --viv-sdk $VIV_SDK
部署结束后,对比输出tensor的相似度,发现量化后,最后一层的相似度精度下降很多:
$ python /home/caozilong/VeriSilicon/acuity-toolkit-whl-6.6.1/bin/tools/compute_tensor_similarity.py ./quant
quant_input.tensor    quanti_output.tensor
(vip) caozilong@AwExdroid-AI:~/Workspace/yolov5s-v6.1-deploy$ python /home/caozilong/VeriSilicon/acuity-toolkit-whl-6.6.1/bin/tools/compute_tensor_similarity.py ./quant
quant_input.tensor    quanti_output.tensor
(vip) caozilong@AwExdroid-AI:~/Workspace/yolov5s-v6.1-deploy$ python /home/caozilong/VeriSilicon/acuity-toolkit-whl-6.6.1/bin/tools/compute_tensor_similarity.py ./quanti_output.tensor ./iter_0_attach_Concat_Concat_255_out0_0_out0_1_25200_85.tensor
2022-07-02 15:46:43.269805: W tensorflow/stream_executor/platform/default/dso_loader.cc:59] Could not load dynamic library 'libcudart.so.10.1'; dlerror: libcudart.so.10.1: cannot open shared object file: No such file or directory
2022-07-02 15:46:43.269853: I tensorflow/stream_executor/cuda/cudart_stub.cc:29] Ignore above cudart dlerror if you do not have a GPU set up on your machine.
2022-07-02 15:47:09.426509: W tensorflow/stream_executor/platform/default/dso_loader.cc:59] Could not load dynamic library 'libcuda.so.1'; dlerror: libcuda.so.1: cannot open shared object file: No such file or directory
2022-07-02 15:47:09.426556: W tensorflow/stream_executor/cuda/cuda_driver.cc:312] failed call to cuInit: UNKNOWN ERROR (303)
2022-07-02 15:47:09.426580: I tensorflow/stream_executor/cuda/cuda_diagnostics.cc:156] kernel driver does not appear to be running on this host (AwExdroid-AI): /proc/driver/nvidia/version does not exist
2022-07-02 15:47:09.453345: I tensorflow/core/platform/profile_utils/cpu_utils.cc:104] CPU Frequency: 2393990000 Hz
2022-07-02 15:47:09.455335: I tensorflow/compiler/xla/service/service.cc:168] XLA service 0x5598fe9cc010 initialized for platform Host (this does not guarantee that XLA will be used). Devices:
2022-07-02 15:47:09.455375: I tensorflow/compiler/xla/service/service.cc:176]   StreamExecutor device (0): Host, Default Version
WARNING:tensorflow:From /home/caozilong/anaconda3/envs/vip/lib/python3.6/site-packages/tensorflow/python/util/dispatch.py:201: calling cosine_distance (from tensorflow.python.ops.losses.losses_impl) with dim is deprecated and will be removed in a future version.
Instructions for updating:
dim is deprecated, use axis instead
euclidean_distance 20061.037
cos_similarity 0.972248
余弦相似度只有97%,欧氏距离也很大,有问题,数据是有形状的,我们在仔细看一下这两笔tensor的分布情况:
量化输入:

浮点输入:
 可以看到两笔tensor的形状是非常相似的,这说明量化非常好的保留了输入数据的特征,那再看输出数据呢?
量化输出:
 浮点推理输出:

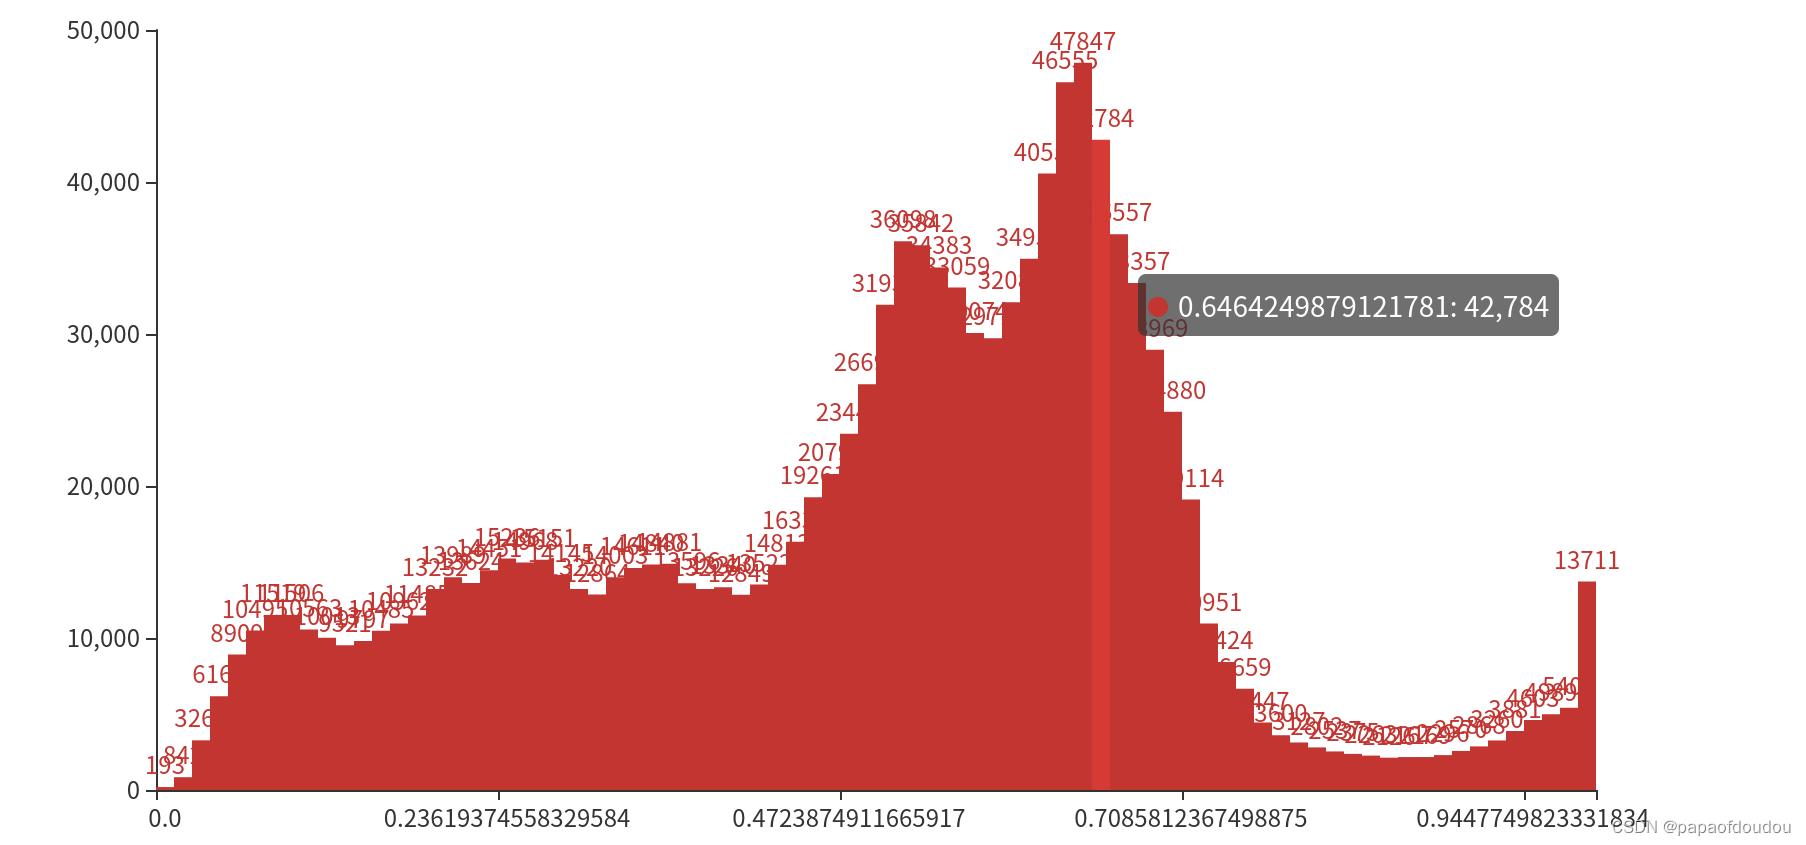
输出数据的特征非常明显,大部分的数值集中在0附近,但是也有个别极大的点分布在0-600之间。虽然量化也很好的保留了原始数据的分布形状,但是这种形态的输出是对量化非常不友好的,量化最prefer那种接近于正态分布的数据分布。针对这个模型来说,如果按照量化方式部署,最终造成的后果,可能就是模型的精度掉的太厉害,无法满足场景要求。
怎么解决这个问题呢?我们要找出症结所在,这个症结就在网络最后几层:

YOLOV5S网络特殊的地方在于,图中被红色框框住的部分,数据分布不适合做量化处理,通常被认为被框住的三个红色分支应属于后处理的部分,应该由CPU去做而不是NPU。所以正确的做法应该是从transpose输出头哪里将输出输出出来,从新定义输出节点,从图中可以看到,这里有三个输出头,就应该有三个输出节点。
之所以能这样做还有一个原因,就是模型部署工具是支持自定义输入层和数层的,你可以通过命令行指定的方式将任何一层定义为输出或者输入层。
指定输出层重新部署
通过命令行指定输出层--outputs "onnx::Sigmoid_339 onnx::Sigmoid_377 onnx::Sigmoid_415"
pegasus.py import onnx --model yolov5s-sim.onnx --output-data yolov5s-sim.data --output-model yolov5s-sim.json --outputs "onnx::Sigmoid_339 onnx::Sigmoid_377 onnx::Sigmoid_415"
pegasus.py generate inputmeta --model yolov5s-sim.json --input-meta-output yolov5s-sim-inputmeta.yml
pegasus.py generate postprocess-file --model yolov5s-sim.json --postprocess-file-output yolov5s-sim-postprocess-file.yml
pegasus.py quantize --model yolov5s-sim.json --model-data yolov5s-sim.data --batch-size 1 --device CPU --with-input-meta yolov5s-sim-inputmeta.yml --rebuild --model-quantize yolov5s-sim.quantize --quantizer asymmetric_affine --qtype uint8
pegasus.py inference --model yolov5s-sim.json --model-data yolov5s-sim.data --batch-size 1 --dtype quantized --model-quantize yolov5s-sim.quantize  --device CPU --with-input-meta yolov5s-sim-inputmeta.yml --postprocess-file yolov5s-sim-postprocess-file.yml --iterations 2
pegasus.py export ovxlib --model yolov5s-sim.json --model-data yolov5s-sim.data --dtype quantized --model-quantize yolov5s-sim.quantize --batch-size 1 --save-fused-graph --target-ide-project 'linux64' --with-input-meta yolov5s-sim-inputmeta.yml --postprocess-file yolov5s-sim-postprocess-file.yml --output-path ovxlib/yolov5s/yolov5sprj --pack-nbg-unify --optimize "VIP9000PICO_PID0XEE" --viv-sdk $VIV_SDK
得到推理阶段的tensor,由于是现在模型改成了三个输出,所以,data目录中的两张图像对应了六笔输出tensor.

更改输出层后的网络模型结构,可以看到之前需要后处理的那一坨不见了,转而成了三个独立的输出层:

后处理:
参考如下连接的代码,将后处理部分抠出来改成绿色小程序:
https://github.com/OAID/Tengine/blob/tengine-lite/examples/tm_yolov5s_timvx.cpp代码如下:
#include <iostream>
#include <stdio.h>
#include <vector>
#include <math.h>
#include <float.h>
#include <stdlib.h>
#include <string.h>
using namespace std;

enum Yolov5OutType

    p8_type     = 1,
	p16_type    = 2,
	p32_type    = 3,
;

typedef struct __Rect__
	float x, y, width, height;
 Rect;

struct Object

    Rect rect;
    int label;
    float prob;
;

static float overlap(float x1, float w1, float x2, float w2)

    float l1 = x1 - w1/2;
    float l2 = x2 - w2/2;
    float left = l1 > l2 ? l1 : l2;
    float r1 = x1 + w1/2;
    float r2 = x2 + w2/2;
    float right = r1 < r2 ? r1 : r2;
    return right - left;


float box_intersection(Rect a, Rect b)

    float w = overlap(a.x, a.width, b.x, b.width);
    float h = overlap(a.y, a.height, b.y, b.height);
    if(w < 0 || h < 0) return 0;
    float area = w*h;
    return area;


static inline float sigmoid(float x)

    return static_cast<float>(1.f / (1.f + exp(-x)));


static inline float intersection_area(const Object& a, const Object& b)

    return box_intersection(a.rect, b.rect);


static void qsort_descent_inplace(std::vector<Object>& faceobjects, int left, int right)

    int i = left;
    int j = right;
    float p = faceobjects[(left + right) / 2].prob;

    while (i <= j)

        while (faceobjects[i].prob > p)
            i++;

        while (faceobjects[j].prob < p)
            j--;

        if (i <= j)

            // swap
            std::swap(faceobjects[i], faceobjects[j]);

            i++;
            j--;


#pragma omp parallel sections

#pragma omp section

            if (left < j) qsort_descent_inplace(faceobjects, left, j);

#pragma omp section

            if (i < right) qsort_descent_inplace(faceobjects, i, right);


static void qsort_descent_inplace(std::vector<Object>& faceobjects)

    if (faceobjects.empty())
        return;

    qsort_descent_inplace(faceobjects, 0, faceobjects.size() - 1);


static void nms_sorted_bboxes(const std::vector<Object>& faceobjects, std::vector<int>& picked, float nms_threshold)

    picked.clear();

    const int n = faceobjects.size();

    std::vector<float> areas(n);
    for (int i = 0; i < n; i++)

        areas[i] = faceobjects[i].rect.width * faceobjects[i].rect.height;;


    for (int i = 0; i < n; i++)

        const Object& a = faceobjects[i];

        int keep = 1;
        for (int j = 0; j < (int)picked.size(); j++)

            const Object& b = faceobjects[picked[j]];

            // intersection over union
            float inter_area = intersection_area(a, b);
            float union_area = areas[i] + areas[picked[j]] - inter_area;
            if (inter_area / union_area > nms_threshold)
                keep = 0;


        if (keep)
            picked.push_back(i);


static void generate_proposals(int stride, const float* feat, float prob_threshold, std::vector<Object>& objects,
                               int letterbox_cols, int letterbox_rows)

    static float anchors[18] = 10, 13, 16, 30, 33, 23, 30, 61, 62, 45, 59, 119, 116, 90, 156, 198, 373, 326;

    int anchor_num = 3;
    int feat_w = letterbox_cols / stride;
    int feat_h = letterbox_rows / stride;
    int cls_num = 80;
    int anchor_group;
    if (stride == 8)
        anchor_group = 1;
    if (stride == 16)
        anchor_group = 2;
    if (stride == 32)
        anchor_group = 3;
    for (int h = 0; h <= feat_h - 1; h++)

        for (int w = 0; w <= feat_w - 1; w++)

            for (int a = 0; a <= anchor_num - 1; a++)

                //process cls score
                int class_index = 0;
                float class_score = -FLT_MAX;
                for (int s = 0; s <= cls_num - 1; s++)

                    float score = feat[a * feat_w * feat_h * (cls_num + 5) + h * feat_w * (cls_num + 5) + w * (cls_num + 5) + s + 5];
                    if (score > class_score)

                        class_index = s;
                        class_score = score;


                //process box score
                float box_score = feat[a * feat_w * feat_h * (cls_num + 5) + (h * feat_w) * (cls_num + 5) + w * (cls_num + 5) + 4];
                float final_score = sigmoid(box_score) * sigmoid(class_score);
                if (final_score >= prob_threshold)

                    int loc_idx = a * feat_h * feat_w * (cls_num + 5) + h * feat_w * (cls_num + 5) + w * (cls_num + 5);
                    float dx = sigmoid(feat[loc_idx + 0]);
                    float dy = sigmoid(feat[loc_idx + 1]);
                    float dw = sigmoid(feat[loc_idx + 2]);
                    float dh = sigmoid(feat[loc_idx + 3]);
                    float pred_cx = (dx * 2.0f - 0.5f + w) * stride;
                    float pred_cy = (dy * 2.0f - 0.5f + h) * stride;
                    float anchor_w = anchors[(anchor_group - 1) * 6 + a * 2 + 0];
                    float anchor_h = anchors[(anchor_group - 1) * 6 + a * 2 + 1];
                    float pred_w = dw * dw * 4.0f * anchor_w;
                    float pred_h = dh * dh * 4.0f * anchor_h;
                    float x0 = pred_cx - pred_w * 0.5f;
                    float y0 = pred_cy - pred_h * 0.5f;
                    float x1 = pred_cx + pred_w * 0.5f;
                    float y1 = pred_cy + pred_h * 0.5f;

                    Object obj;
                    obj.rect.x = x0;
                    obj.rect.y = y0;
                    obj.rect.width = x1 - x0;
                    obj.rect.height = y1 - y0;
                    obj.label = class_index;
                    obj.prob = final_score;
                    objects.push_back(obj);


static int detect_yolov5(std::vector<Object>& objects, float **output)

    int size0 = 1*3*80*80*85;
    int size1 = 1*3*40*40*85;
    int size2 = 1*3*20*50*85;
    std::vector<float> p8_data(output[0], &output[0][size0-1]);
    std::vector<float> p16_data(output[1], &output[1][size1-1]);
    std::vector<float> p32_data(output[2], &output[2][size2-1]);

    // set default letterbox size
    int letterbox_rows = 640;
    int letterbox_cols = 640;

    /* postprocess */
    const float prob_threshold = 0.4f;
    const float nms_threshold = 0.45f;

    std::vector<Object> proposals;
    std::vector<Object> objects8;
    std::vector<Object> objects16;
    std::vector<Object> objects32;
    //std::vector<Object> objects;

    generate_proposals(32, p32_data.data(), prob_threshold, objects32, letterbox_cols, letterbox_rows);
    proposals.insert(proposals.end(), objects32.begin(), objects32.end());
    generate_proposals(16, p16_data.data(), prob_threshold, objects16, letterbox_cols, letterbox_rows);
    proposals.insert(proposals.end(), objects16.begin(), objects16.end());
    generate_proposals(8, p8_data.data(), prob_threshold, objects8, letterbox_cols, letterbox_rows);
    proposals.insert(proposals.end(), objects8.begin(), objects8.end());

    qsort_descent_inplace(proposals);
    std::vector<int> picked;
    nms_sorted_bboxes(proposals, picked, nms_threshold);

    /* yolov5 draw the result */
    float scale_letterbox;
    int resize_rows;
    int resize_cols;
    if ((letterbox_rows * 1.0 / 640) < (letterbox_cols * 1.0 / 640))

        scale_letterbox = letterbox_rows * 1.0 / 640;

    else

        scale_letterbox = letterbox_cols * 1.0 / 640;

    resize_cols = int(scale_letterbox * 640);
    resize_rows = int(scale_letterbox * 640);

    int tmp_h = (letterbox_rows - resize_rows) / 2;
    int tmp_w = (letterbox_cols - resize_cols) / 2;

    float ratio_x = (float)640 / resize_rows;
    float ratio_y = (float)640 / resize_cols;

    int count = picked.size();
    fprintf(stderr, "detection num: %d\\n", count);

    objects.resize(count);
    for (int i = 0; i < count; i++)

        objects[i] = proposals[picked[i]];
        float x0 = (objects[i].rect.x);
        float y0 = (objects[i].rect.y);
        float x1 = (objects[i].rect.x + objects[i].rect.width);
        float y1 = (objects[i].rect.y + objects[i].rect.height);

        x0 = (x0 - tmp_w) * ratio_x;
        y0 = (y0 - tmp_h) * ratio_y;
        x1 = (x1 - tmp_w) * ratio_x;
        y1 = (y1 - tmp_h) * ratio_y;

        x0 = std::max(std::min(x0, (float)(640 - 1)), 0.f);
        y0 = std::max(std::min(y0, (float)(640 - 1)), 0.f);
        x1 = std::max(std::min(x1, (float)(640 - 1)), 0.f);
        y1 = std::max(std::min(y1, (float)(640 - 1)), 0.f);

        objects[i].rect.x = x0;
        objects[i].rect.y = y0;
        objects[i].rect.width = x1 - x0;
        objects[i].rect.height = y1 - y0;
        printf("%s line %d, x:%f, y %f, w: %f, h %f.\\n", __func__, __LINE__, objects[i].rect.x, objects[i].rect.y, objects[i].rect.width, objects[i].rect.height);


    return 0;


int yolov5s_postprocess(float **output)

	printf("yolov5s_postprocess.c run. \\n");

	std::vector<Object> objects;
	detect_yolov5(objects, output);

    return 0;


int get_tensor_data(string file_path, float **data)

    int len = 0;
    static float *memory = NULL;
    static int max_len = 10*1024*1024;

    if (memory == NULL)

       memory = (float *)malloc(max_len * sizeof(float));


    FILE *fp = NULL;
    if ((fp = fopen(file_path.c_str(), "r")) == NULL)

        cout << "open tensor file error ! file name : " << file_path << endl;
        exit(-1);


    int file_len = 0;
    while (!feof(fp))

        fscanf(fp, "%f ", &memory[len++]);


    *data = (float *)malloc(len * sizeof(float));
    memcpy(*data, memory, len * sizeof(float));
    fclose(fp);

    if (len == 0 || *data == NULL)

        cout << "read tensor error happened ! " << "len : " << len << " data address: " << *data << endl;
        exit(-1);


    return len;


int main(int argc, char **argv)

	float *tensor0;
	float *tensor1;
	float *tensor2;
	float *tensor[3];

    get_tensor_data(argv[1], &tensor0);
    get_tensor_data(argv[2], &tensor1);
    get_tensor_data(argv[3], &tensor2);

	tensor[0] = tensor0;
	tensor[1] = tensor1;
	tensor[2] = tensor2;

    yolov5s_postprocess(tensor);

    return 0;
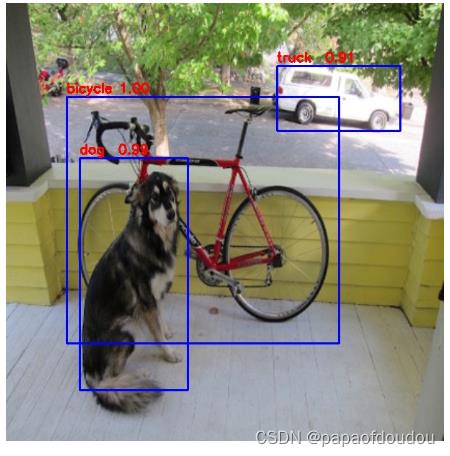
编译后,对输出的两张图像的tensor做后处理:

可以看到,针对图像1,检测出来了3个目标,坐标狂也被打印出来:

修改输出层后的输出数据分布情况
iter_0_attach_Transpose_Transpose_200_out0_0_out0_1_3_80_80_85.tensor:

iter_0_attach_Transpose_Transpose_219_out0_1_out0_1_3_40_40_85.tensor:

iter_0_attach_Transpose_Transpose_238_out0_2_out0_1_3_20_20_85.tensor:

iter_1_attach_Transpose_Transpose_200_out0_0_out0_1_3_80_80_85.tensor:

iter_1_attach_Transpose_Transpose_219_out0_1_out0_1_3_40_40_85.tensor:
 iter_1_attach_Transpose_Transpose_238_out0_2_out0_1_3_20_20_85.tensor:
 通过直方图可以看出,新定义的三个输出节点的分布形状很接近于正态分布,就像前文所讲,正态分布对量化是非常友好的。所以能够解决精度丢失的问题。
结束
以上是关于Yolov5s模型在全志V853平台上的部署方法和应用的主要内容,如果未能解决你的问题,请参考以下文章