Java使用Apache poi 操作Excel-基本概念与使用
Posted FserSuN
tags:
篇首语:本文由小常识网(cha138.com)小编为大家整理,主要介绍了Java使用Apache poi 操作Excel-基本概念与使用相关的知识,希望对你有一定的参考价值。
1.添加依赖
        <!-- https://mvnrepository.com/artifact/org.apache.poi/poi -->
        <dependency>
            <groupId>org.apache.poi</groupId>
            <artifactId>poi</artifactId>
            <version>3.14</version>
        </dependency>

        <!-- https://mvnrepository.com/artifact/org.apache.poi/poi-ooxml-schemas -->
        <dependency>
            <groupId>org.apache.poi</groupId>
            <artifactId>poi-ooxml</artifactId>
            <version>3.14</version>
        </dependency>
2.POI的核心类及与Excel的对应关系
本人在使用poi使用的版本是3.14,而我所翻译的教程中使用的是3.9因此下面所列出的接口的实现了以翻译的教程对应的版本为准。此外部分内容为本人总结添加。
操作Excel主要包括
- 创建 :创建Excel文件,电子表格,行,单元格。
- 数据操作 :从单元格读取及写入内容。
- 设置:属性,样式等,打印语言,超链接等设置。
POI的Excel部分为我们提供了相对应的类完成这些操作。
2.1POI处理Excel的核心类
Workbook
Workbook是所有用来创建或维护excel文件的类所要实现的接口,这个接口在
org.apache.poi.ss.usermodel下。实现这个接口的类包括。
- HSSFWorkbook:这个类包含了读取或写入.xls格式文件的方法。能处理的版本包括 97-2003.
- XSSFWorkbook:这个类包含了读取或写入.xlsx或.xls文件格式的方法,能够处理2007及以后版本的文档。
这两个类用来创建Excel文件,因此对应于Excel文件。
HSSFWorkbook
这个是org.apache.poi.hssf.usermodel包下的一个类,实现了Workbook接口,用来处理.xls格式的文件。HSSFWorkbook类包含许多方法,然而仅能处理xls格式的文档。
XSSFWorkbook
这个类即能处理低版本也能处理高版本Excel文件的格式。该类在org.apache.xssf.usemodel包下,并且实现了Workbook接口。
Sheet
Sheet是org.apache.poi.ss.usermodel包下的一个接口,该接口是所有用来创建指定名称电子表格的类所需要实现的接口。
两个实现类包括。
- XSSFSheet
- HSSFSheet
这两个类用来创建电子表格,当通过XSSFWorkbook创建好Excel文件后,需要使用XSSFSheet来创建电子表格,HSSFWorkbook创建的Excel文件则是通过HSSFSheet来创建电子表格。下面的行,单元格同理。
Row
这个接口在org.apache.poi.ss.usermodel包下,用来表示电子表单中的行,所有用来创建行对象的类都要实现这个接口。
实现类包括
- XSSFRow
- HSSFRow
Cell
这个接口在org.apache.poi.ss.usermodel包下。所以用来处理单元格的类都要实现该接口。单元格可以有不同的属性,如blank,numeric,date,error等。每个单元格都有一个编号。
实现类包括
- XSSFCell
- HSSFCell
上面这些接口及其实现是创建,读取Excel的核心接口与类。与Excel的对应关系如下图。
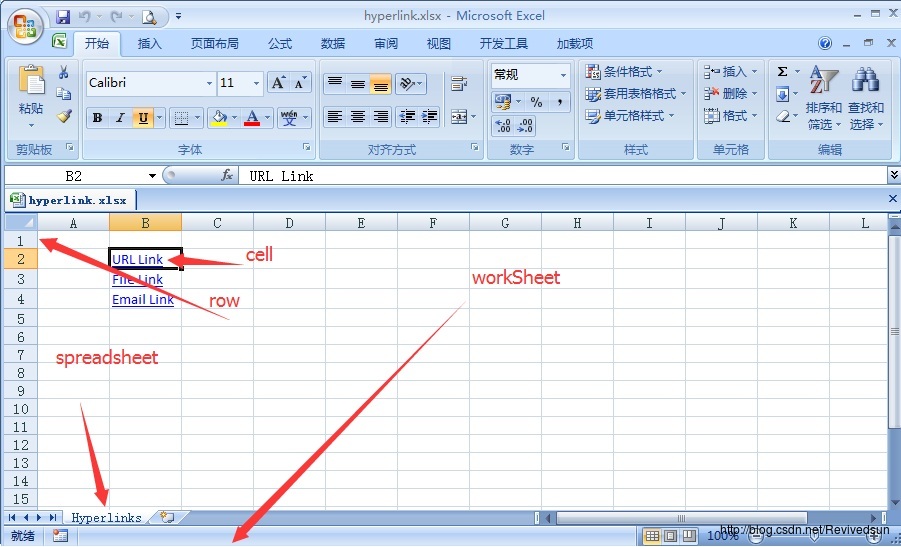
接下来的类主要是完成属性,样式等的设置。
XSSFCellStyle
这个类在org.apache.poi.xssf.usermodel包下,提供了电子表单中与单元格内容格式相关的信息。
HSSFColor
这个类在org.apache.poi.hssf.util包下。用来处理颜色。
XSSFColor
这个类在org.apache.poi.xssf.usermodel包下。用来描述XSSFWorkbook中单元格颜色。
XSSFFont
这个类在org.apache.poi.xssf.usermodel包下。实现了Font接口,用来处理字体。
XSSFHyperlink
这个类在org.apache.poi.xssf.usermodel包下。实现了Hyperlink接口,用来设置超链接。
XSSFPrintSetup
这个类在org.apache.poi.xsssf.usermodel包下。实现了PrintSetup接口。用来设置与打印相关的属性。
其它的不再赘述,使用时请查阅API文档即可。
3. workbook的创建与打开
这里workbook的含义是Excel文件。下面的代码创建了一个空的工作簿。
import java.io.*;
import org.apache.poi.xssf.usermodel.*;
public class CreateWorkBook

   public static void main(String[] args)throws Exception

      //Create Blank workbook
      XSSFWorkbook workbook = new XSSFWorkbook();
      //Create file system using specific name
      FileOutputStream out = new FileOutputStream(
      new File("D:\\\\createworkbook.xlsx"));
      //write operation workbook using file out object
      workbook.write(out);
      out.close();
      System.out.println("
      createworkbook.xlsx written successfully");


//执行后会在D:\\\\下创建Excel文件名为createworkbook

//打开已存在的工作簿
import java.io.*;
import org.apache.poi.xssf.usermodel.*;
public class OpenWorkBook

   public static void main(String args[])throws Exception

      File file = new File("D:\\\\workbook.xlsx");
      FileInputStream fIP = new FileInputStream(file);
      //Get the workbook instance for XLSX file
      XSSFWorkbook workbook = new XSSFWorkbook(fIP);
      if(file.isFile() && file.exists())

         System.out.println(
         "openworkbook.xlsx file open successfully.");

      else

         System.out.println(
         "Error to open workbook.xlsx file.");
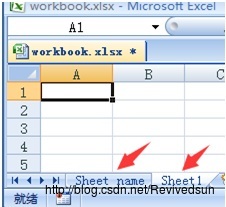
4.SpreadSheets(电子表格)的操作
本节将演示如何通过Java创建电子表格。电子表格是Excel文件中的一个页面,并包含行以及列。下图的excel文件中包含两个Spreadsheet,名字分别为Sheet name与Sheet1。
创建字典表格
//创建空的工作簿
XSSFWorkbook workbook = new XSSFWorkbook();
//创建空的电子表格
XSSFSheet spreadsheet = workbook.createSheet(“Sheet Name”);
电子表格中的行
电子表格采用的是网格布局。行与列是通过具体的名称来标识。列是通过字母标识行是通过数字标识。下面的代码在电子表单中创建了一行。
XSSFRow row = spreadsheet.createRow((short)1);
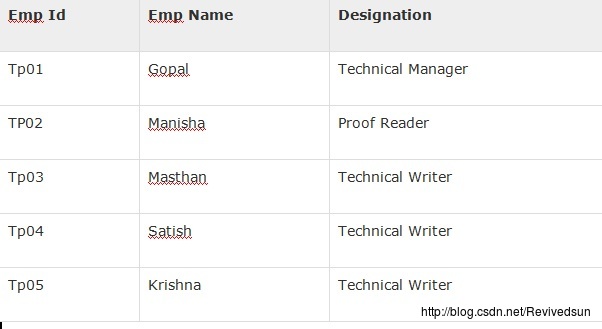
向电子表单中写入数据
现有一个表格,接下来将表格中的数据写入Excel中。
import java.io.File;
import java.io.FileOutputStream;
import java.util.Map;
import java.util.Set;
import java.util.TreeMap;
import org.apache.poi.ss.usermodel.Cell;
import org.apache.poi.xssf.usermodel.XSSFRow;
import org.apache.poi.xssf.usermodel.XSSFSheet;
import org.apache.poi.xssf.usermodel.XSSFWorkbook;
public class Writesheet

   public static void main(String[] args) throws Exception

      //Create blank workbook
      XSSFWorkbook workbook = new XSSFWorkbook();
      //Create a blank sheet
      XSSFSheet spreadsheet = workbook.createSheet(
      " Employee Info ");
      //Create row object
      XSSFRow row;
      //This data needs to be written (Object[])
      Map < String, Object[] > empinfo =
      new TreeMap < String, Object[] >();
      empinfo.put( "1", new Object[]
      "EMP ID", "EMP NAME", "DESIGNATION" );
      empinfo.put( "2", new Object[]
      "tp01", "Gopal", "Technical Manager" );
      empinfo.put( "3", new Object[]
      "tp02", "Manisha", "Proof Reader" );
      empinfo.put( "4", new Object[]
      "tp03", "Masthan", "Technical Writer" );
      empinfo.put( "5", new Object[]
      "tp04", "Satish", "Technical Writer" );
      empinfo.put( "6", new Object[]
      "tp05", "Krishna", "Technical Writer" );
      //Iterate over data and write to sheet
      Set < String > keyid = empinfo.keySet();
      int rowid = 0;
      for (String key : keyid)

         row = spreadsheet.createRow(rowid++);
         Object [] objectArr = empinfo.get(key);
         int cellid = 0;
         for (Object obj : objectArr)

            Cell cell = row.createCell(cellid++);
            cell.setCellValue((String)obj);


      //Write the workbook in file system
      FileOutputStream out = new FileOutputStream(
      new File("Writesheet.xlsx"));
      workbook.write(out);
      out.close();
      System.out.println(
      "Writesheet.xlsx written successfully" );
执行后的数据写入Excel文件中。
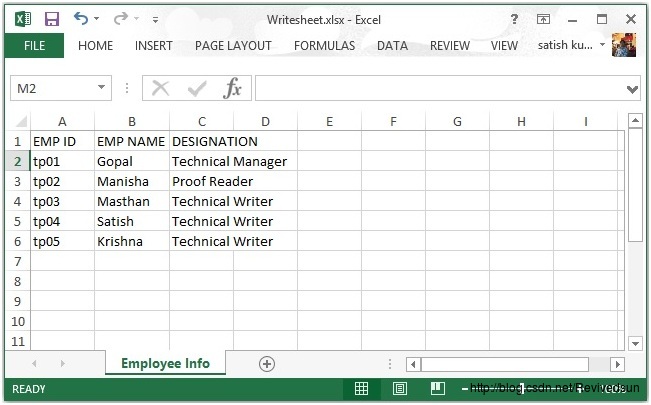
注:可以看到,数据写入Excel中就是创建Excel文件(WorkBook),行(Row),单元格(Cell),最后将数据写入单元格。而这些对象Excel文件(WorkBook),行(Row),单元格(Cell)构成一个父子关系(树形结构)。每个对象通过父对象创建。而workbook是根,通过new操作符来创建。
从电子表格中读取数据
import java.io.File;
import java.io.FileInputStream;
import java.util.Iterator;
import org.apache.poi.ss.usermodel.Cell;
import org.apache.poi.ss.usermodel.Row;
import org.apache.poi.xssf.usermodel.XSSFRow;
import org.apache.poi.xssf.usermodel.XSSFSheet;
import org.apache.poi.xssf.usermodel.XSSFWorkbook;
public class Readsheet

   static XSSFRow row;
   public static void main(String[] args) throws Exception

      FileInputStream fis = new FileInputStream(
      new File("WriteSheet.xlsx"));
      XSSFWorkbook workbook = new XSSFWorkbook(fis);
      XSSFSheet spreadsheet = workbook.getSheetAt(0);
      Iterator < Row > rowIterator = spreadsheet.iterator();
      while (rowIterator.hasNext())

         row = (XSSFRow) rowIterator.next();
         Iterator < Cell > cellIterator = row.cellIterator();
         while ( cellIterator.hasNext())

            Cell cell = cellIterator.next();
            switch (cell.getCellType())

               case Cell.CELL_TYPE_NUMERIC:
               System.out.print(
               cell.getNumericCellValue() + " \\t\\t " );
               break;
               case Cell.CELL_TYPE_STRING:
               System.out.print(
               cell.getStringCellValue() + " \\t\\t " );
               break;


         System.out.println();

      fis.close();
注:从Excel中读取数据,首先要打开Excel文件,然后获取对应的电子表格(可能有多个),遍历各个行,再从各个行的单元格中取出数据即可。
5.单元格的操作
数据在Excel中都是存储在单元格中的。通过行号与列号来定位到一个单元格。
下面是创建单元格。
//create new workbook
XSSFWorkbook workbook = new XSSFWorkbook();
//create spreadsheet with a name
XSSFSheet spreadsheet = workbook.createSheet("new sheet");
//create first row on a created spreadsheet
XSSFRow row = spreadsheet.createRow(0);
//create first cell on created row
XSSFCell cell = row.createCell(0);
单元格的类型
单元格的类型指定了一个单元格是否能够包含字符串,数字,或公式。字符串单元格不能存放数字,同理数字单元格也不能存放字符串。
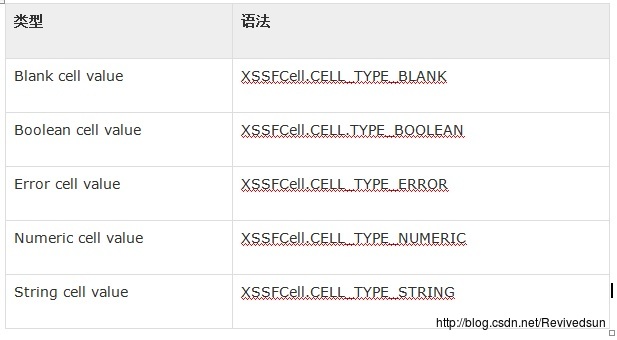
下面代码演示了在电子表格中创建不同类型的单元格。
import java.io.File;
import java.io.FileOutputStream;
import java.util.Date;
import org.apache.poi.xssf.usermodel.XSSFCell;
import org.apache.poi.xssf.usermodel.XSSFRow;
import org.apache.poi.xssf.usermodel.XSSFSheet;
import org.apache.poi.xssf.usermodel.XSSFWorkbook;
public class TypesofCells

   public static void main(String[] args)throws Exception

      XSSFWorkbook workbook = new XSSFWorkbook();
      XSSFSheet spreadsheet = workbook.createSheet("cell types");
      XSSFRow row = spreadsheet.createRow((short) 2);
      row.createCell(0).setCellValue("Type of Cell");
      row.createCell(1).setCellValue("cell value");
      row = spreadsheet.createRow((short) 3);
      row.createCell(0).setCellValue("set cell type BLANK");
      row.createCell(1);
      row = spreadsheet.createRow((short) 4);
      row.createCell(0).setCellValue("set cell type BOOLEAN");
      row.createCell(1).setCellValue(true);
      row = spreadsheet.createRow((short) 5);
      row.createCell(0).setCellValue("set cell type ERROR");
      row.createCell(1).setCellValue(XSSFCell.CELL_TYPE_ERROR );
      row = spreadsheet.createRow((short) 6);
      row.createCell(0).setCellValue("set cell type date");
      row.createCell(1).setCellValue(new Date());
      row = spreadsheet.createRow((short) 7);
      row.createCell(0).setCellValue("set cell type numeric" );
      row.createCell(1).setCellValue(20 );
      row = spreadsheet.createRow((short) 8);
      row.createCell(0).setCellValue("set cell type string");
      row.createCell(1).setCellValue("A String");
      FileOutputStream out = new FileOutputStream(
      new File("typesofcells.xlsx"));
      workbook.write(out);
      out.close();
      System.out.println(
      "typesofcells.xlsx written successfully");
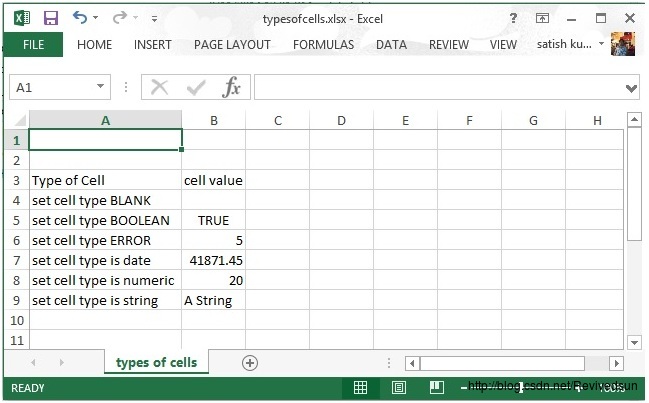
执行后生成的文件如下。
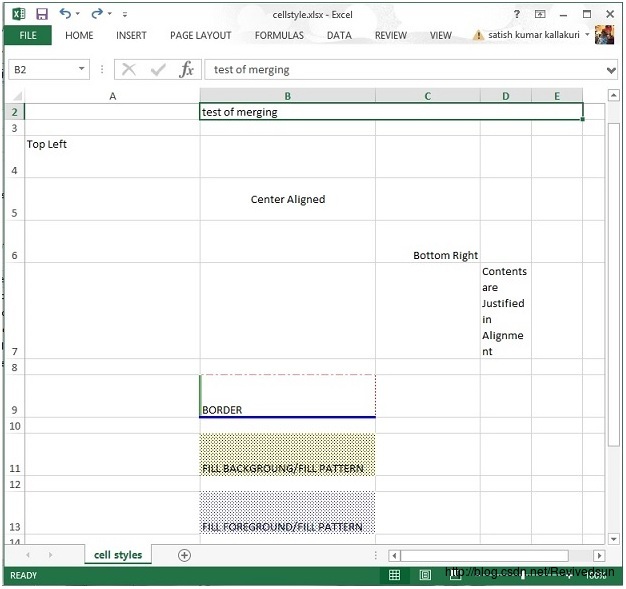
6.单元格样式设置
单元格样式处理包合并相邻单元格,添加边框,设置单元格对齐方式,颜色填充等。下面的代码演示了样式设置。
import java.io.File;
import java.io.FileOutputStream;

import org.apache.poi.hssf.util.HSSFColor;
import org.apache.poi.ss.usermodel.IndexedColors;
import org.apache.poi.ss.util.CellRangeAddress;
import org.apache.poi.xssf.usermodel.XSSFCell;
import org.apache.poi.xssf.usermodel.XSSFCellStyle;
import org.apache.poi.xssf.usermodel.XSSFRow;
import org.apache.poi.xssf.usermodel.XSSFSheet;
import org.apache.poi.xssf.usermodel.XSSFWorkbook;

public class CellStyle
       public static void main(String[] args)throws Exception

          XSSFWorkbook workbook = new XSSFWorkbook();
          XSSFSheet spreadsheet = workbook.createSheet("cellstyle");
          XSSFRow row = spreadsheet.createRow((short) 1);
          row.setHeight((short) 800);
          XSSFCell cell = (XSSFCell) row.createCell((short) 1);
          cell.setCellValue("test of merging");
          //MEARGING CELLS
          //this statement for merging cells
          spreadsheet.addMergedRegion(new CellRangeAddress(
          1, //first row (0-based)
          1, //last row (0-based)
          1, //first column (0-based)
          4 //last column (0-based)
          ));
          //CELL Alignment
          row = spreadsheet.createRow(5);
          cell = (XSSFCell) row.createCell(0);
          row.setHeight((short) 800);
          // Top Left alignment
          XSSFCellStyle style1 = workbook.createCellStyle();
          spreadsheet.setColumnWidth(0, 8000);
          style1.setAlignment(XSSFCellStyle.ALIGN_LEFT);
          style1.setVerticalAlignment(XSSFCellStyle.VERTICAL_TOP);
          cell.setCellValue("Top Left");
          cell.setCellStyle(style1);
          row = spreadsheet.createRow(6);
          cell = (XSSFCell) row.createCell(1);
          row.setHeight((short) 800);
          // Center Align Cell Contents
          XSSFCellStyle style2 = workbook.createCellStyle();
          style2.setAlignment(XSSFCellStyle.ALIGN_CENTER);
          style2.setVerticalAlignment(
          XSSFCellStyle.VERTICAL_CENTER);
          cell.setCellValue("Center Aligned");
          cell.setCellStyle(style2);
          row = spreadsheet.createRow(7);
          cell = (XSSFCell) row.createCell(2);
          row.setHeight((short) 800);
          // Bottom Right alignment
          XSSFCellStyle style3 = workbook.createCellStyle();
          style3.setAlignment(XSSFCellStyle.ALIGN_RIGHT);
          style3.setVerticalAlignment(
          XSSFCellStyle.VERTICAL_BOTTOM);
          cell.setCellValue("Bottom Right");
          cell.setCellStyle(style3);
          row = spreadsheet.createRow(8);
          cell = (XSSFCell) row.createCell(3);
          // Justified Alignment
          XSSFCellStyle style4 = workbook.createCellStyle();
          style4.setAlignment(XSSFCellStyle.ALIGN_JUSTIFY);
          style4.setVerticalAlignment(
          XSSFCellStyle.VERTICAL_JUSTIFY);
          cell.setCellValue("Contents are Justified in Alignment");
          cell.setCellStyle(style4);
          //CELL BORDER
          row = spreadsheet.createRow((short) 10);
          row.setHeight((short) 800);
          cell = (XSSFCell) row.createCell((short) 1);
          cell.setCellValue("BORDER");
          XSSFCellStyle style5 = workbook.createCellStyle();
          style5.setBorderBottom(XSSFCellStyle.BORDER_THICK);
          style5.setBottomBorderColor(
          IndexedColors.BLUE.getIndex());
          style5.setBorderLeft(XSSFCellStyle.BORDER_DOUBLE);
          style5.setLeftBorderColor(
          IndexedColors.GREEN.getIndex());
          style5.setBorderRight(XSSFCellStyle.BORDER_HAIR);
          style5.setRightBorderColor(
          IndexedColors.RED.getIndex());
          style5.setBorderTop(XSSFCellStyle.BIG_SPOTS);
          style5.setTopBorderColor(
          IndexedColors.CORAL.getIndex());
          cell.setCellStyle(style5);
          //Fill Colors
          //background color
          row = spreadsheet.createRow((short) 10 );
          cell = (XSSFCell) row.createCell((short) 1);
          XSSFCellStyle style6 = workbook.createCellStyle();
          style6.setFillBackgroundColor(
          HSSFColor.LEMON_CHIFFON.index );
          style6.setFillPattern(XSSFCellStyle.LESS_DOTS);
          style6.setAlignment(XSSFCellStyle.ALIGN_FILL);
          spreadsheet.setColumnWidth(1,8000);
          cell.setCellValue("FILL BACKGROUNG/FILL PATTERN");
          cell.setCellStyle(style6);
          //Foreground color
          row = spreadsheet.createRow((short) 12);
          cell = (XSSFCell) row.createCell((short) 1);
          XSSFCellStyle style7=workbook.createCellStyle();
          style7.setFillForegroundColor(HSSFColor.BLUE.index);
          style7.setFillPattern( XSSFCellStyle.LESS_DOTS);
          style7.setAlignment(XSSFCellStyle.ALIGN_FILL);
          cell.setCellValue("FILL FOREGROUND/FILL PATTERN");
          cell.setCellStyle(style7);
          FileOutputStream out = new FileOutputStream(
          new File("D:\\\\cellstyle.xlsx"));
          workbook.write(out);
          out.close();
          System.out.println("cellstyle.xlsx written successfully");
执行后效果如下。
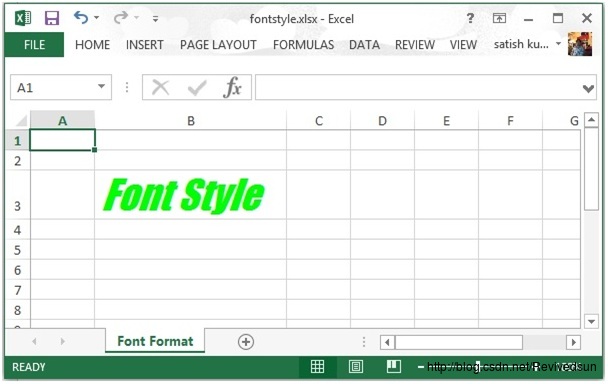
7.字体设置
import java.io.File;
import java.io.FileOutputStream;
import org.apache.poi.hssf.util.HSSFColor;
import org.apache.poi.xssf.usermodel.XSSFCell;
import org.apache.poi.xssf.usermodel.XSSFCellStyle;
import org.apache.poi.xssf.usermodel.XSSFFont;
import org.apache.poi.xssf.usermodel.XSSFRow;
import org.apache.poi.xssf.usermodel.XSSFSheet;
import org.apache.poi.xssf.usermodel.XSSFWorkbook;
public class FontStyle
       public static void main(String[] args)throws Exception

          XSSFWorkbook workbook = new XSSFWorkbook();
          XSSFSheet spreadsheet = workbook.createSheet("Fontstyle");
          XSSFRow row = spreadsheet.createRow(2);
          //Create a new font and alter it.
          XSSFFont font = workbook.createFont();
          font.setFontHeightInPoints((short) 30);
          font.setFontName("IMPACT");
          font.setItalic(true);
          font.setColor(HSSFColor.BRIGHT_GREEN.index);
          //Set font into style
          XSSFCellStyle style = workbook.createCellStyle();
          style.setFont(font);
          // Create a cell with a value and set style to it.
          XSSFCell cell = row.createCell(1);
          cell.setCellValue("Font Style");
          cell.setCellStyle(style);
          FileOutputStream out = new FileOutputStream(
          new File("D:\\\\fontstyle.xlsx"));
          workbook.write(out);
          out.close();
          System.out.println(
          "fontstyle.xlsx written successfully");
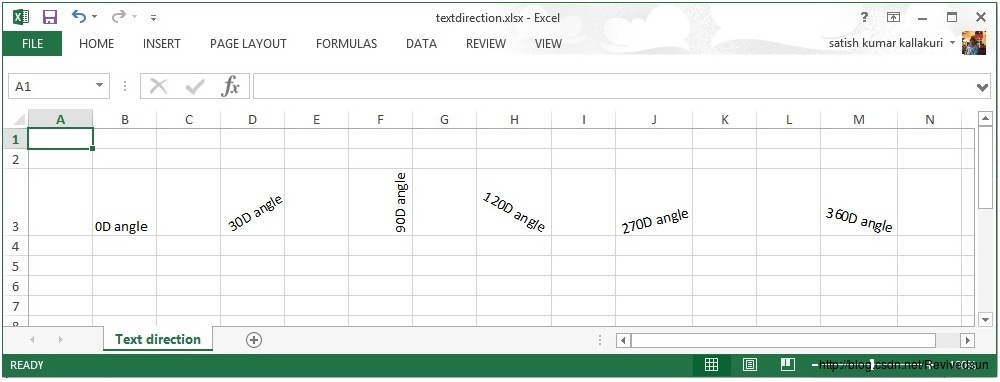
8.文本方向设置
单元格中的文本展示方向包括垂直,从左向右等。下面的代码展示了方向设置。
import java.io.File;
import java.io.FileOutputStream;
import org.apache.poi.xssf.usermodel.XSSFCell;
import org.apache.poi.xssf.usermodel.XSSFCellStyle;
import org.apache.poi.xssf.usermodel.XSSFRow;
import org.apache.poi.xssf.usermodel.XSSFSheet;
import org.apache.poi.xssf.usermodel.XSSFWorkbook;
public class TextDirection

   public static void main(String[] args)throws Exception

      XSSFWorkbook workbook = new XSSFWorkbook();
      XSSFSheet spreadsheet = workbook.createSheet(
      "Text direction");
      XSSFRow row = spreadsheet.createRow(2);
      XSSFCellStyle myStyle = workbook.createCellStyle();
      myStyle.setRotation((short) 0);
      XSSFCell cell = row.createCell(1);
      cell.setCellValue("0D angle");
      cell.setCellStyle(myStyle);
      //30 degrees
      myStyle=workbook.createCellStyle();
      myStyle.setRotation((short) 30);
      cell = row.createCell(3);
      cell.setCellValue("30D angle");
      cell.setCellStyle(myStyle);
      //90 degrees
      myStyle=workbook.createCellStyle();
      myStyle.setRotation((short) 90);
      cell = row.createCell(5);
      cell.setCellValue("90D angle");
      cell.setCellStyle(myStyle);
      //120 degrees
      myStyle=workbook.createCellStyle();
      myStyle.setRotation((short) 120);
      cell = row.createCell(7);
      cell.setCellValue("120D angle");
      cell.setCellStyle(myStyle);
      //270 degrees
      myStyle = workbook.createCellStyle();
      myStyle.setRotation((short) 270);
      cell = row.createCell(9);
      cell.setCellValue("270D angle");
      cell.setCellStyle(myStyle);
      //360 degrees
      myStyle=workbook.createCellStyle();
      myStyle.setRotation((short) 360);
      cell = row.createCell(12);
      cell.setCellValue("360D angle");
      cell.setCellStyle(myStyle);
      FileOutputStream out = new FileOutputStream(
      new File("textdirection.xlsx"));
      workbook.write(out);
      out.close();
      System.out.println(
      "textdirection.xlsx written successfully");
代码对文本展示方向进行了设置,效果如下。
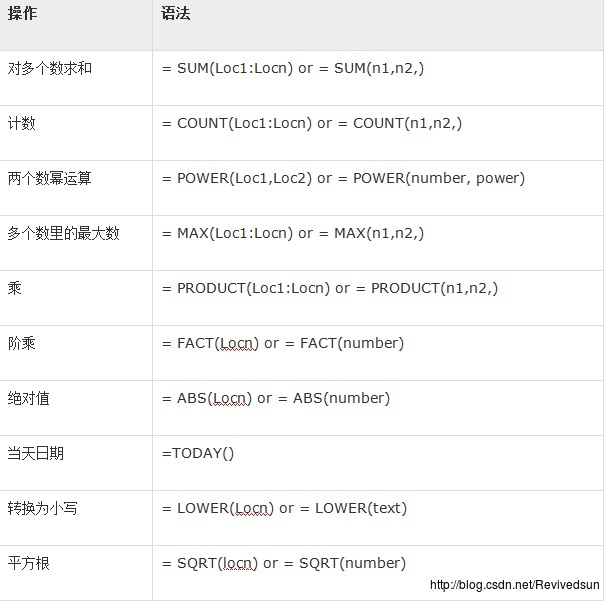
9. 公式设置
在一个公式中,我们会传递一个数值。在执行公式时,将会得到期望结果,下标列出了一些在Excel中常用的公式。
下面的代码将公式添加到单元格中,并执行公式。
import java.io.File;
import java.io.FileOutputStream;
import org.apache.poi.xssf.usermodel.XSSFCell;
import org.apache.poi.xssf.usermodel.XSSFRow;
import org.apache.poi.xssf.usermodel.XSSFSheet;
import org.apache.poi.xssf.usermodel.XSSFWorkbook;
public class Formula
public static void main(String[] args)throws Exception
XSSFWorkbook workbook = new XSSFWorkbook();
XSSFSheet spreadsheet = workbook.createSheet("formula");
XSSFRow row = spreadsheet.createRow(1);
XSSFCell cell = row.createCell(1);
cell.setCellValue("A =" );
cell = row.createCell(2);
cell.setCellValue(2);
row = spreadsheet.createRow(2);
cell = row.createCell(1);
cell.setCellValue("B =");
cell = row.createCell(2);
cell.setCellValue(4);
row = spreadsheet.createRow(3);
cell = row.createCell(1);
cell.setCellValue("Total =");
cell = row.createCell(2);
// Create SUM formula
cell.setCellType(XSSFCell.CELL_TYPE_FORMULA);
cell.setCellFormula("SUM(C2:C3)" );
cell = row.createCell(3);
cell.setCellValue(