Keras深度学习实战——使用数据增强提高神经网络性能
Posted 盼小辉丶
tags:
篇首语:本文由小常识网(cha138.com)小编为大家整理,主要介绍了Keras深度学习实战——使用数据增强提高神经网络性能相关的知识,希望对你有一定的参考价值。
Keras深度学习实战(8)——使用数据增强提高神经网络性能
0. 前言
根据经验,我们知道对于给定的图像,即使我们平移,旋转或缩放图像,图像的标签也将保持不变。数据增强是从给定的图像集中创建更多图像的一种方法,即通过旋转,平移或缩放它们并将它们映射到原始图像的标签,以扩充数据集,通过增加训练数据集的数据量能够提高神经网络的模型性能。
在我们的认知中:即使图像稍微旋转或图像中的人从图像的中间移至图像的最右侧,该图像的分类标签仍然不会改变。因此,我们能够通过旋转和平移原始图像来创建更多训练数据,而每个图像相对应的标签并不会改变。
1. 数据集与模型分析
1.1 数据集介绍
在本节中,我们将研究 CIFAR-10 数据集,CIFAR-10 数据集中的图片有 10 个类别,每张图片均为 32x32 的彩色图像,每个类别有 6000 个图像。因此,共有 50000 个训练图像和 10000 个测试图像。类别标签分别为 plane、car、bird、cat、deer、dog、frog、horse、ship 和 truck。
1.2 模型分析
我们首先分析用于实现 CIFAR-10 分类的卷积神经网络 (Convolutional Neural Networks, CNN) 模型,模型分类策略如下:
- 获取
CIFAR-10数据集 - 对数据集进行预处理:缩放输入值,并对类别标签进行独热编码
- 建立具有多个卷积和池化层的深度
CNN - 编译并拟合模型,以在测试数据集上测试其准确率
- 生成训练数据集中原始图像的随机变换图像(平移,旋转或缩放)
- 在生成的图像和原始图像上拟合所构建的神经网络体系架构
- 在测试数据集上检查模型的准确率
在本节中,我们将使用 keras.preprocessing.image 包中的 ImageDataGenerator 方法来实现数据增强。为了理解数据增强的优势,我们使用一个简单示例,在该示例中,分别计算具有数据增强和不具有数据增强的情况下使用同样的 CNN 架构分类 CIFAR-10 数据集的准确率。
2. 使用数据增强提高神经网络性能
2.1 不使用数据增强的模型准确率
在本节中,我们首先计算不增加数据集时模型的准确率。
首先,导入所需库和数据集:
from matplotlib import pyplot as plt
import numpy as np
from keras.utils import np_utils
from keras.models import Sequential
from keras.layers import Dense, Dropout, Activation, Flatten
from keras.layers import Conv2D, MaxPooling2D, BatchNormalization
from keras import regularizers
from keras.datasets import cifar10

(x_train, y_train), (x_test, y_test) = cifar10.load_data()
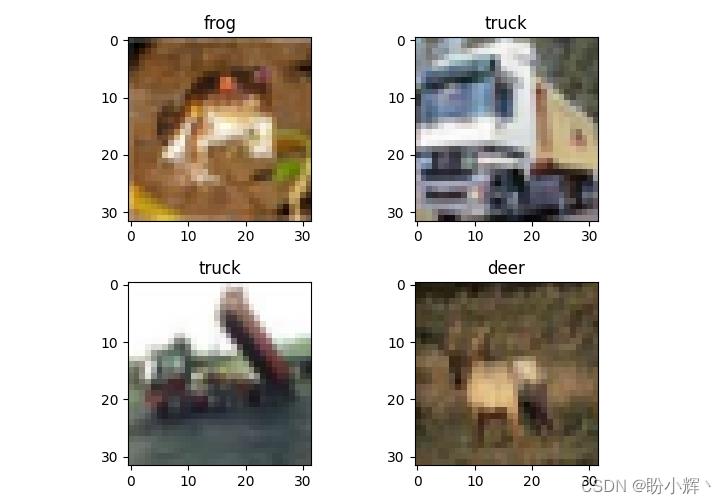
查看加载的图像样本及其相应的标签:
labels = ['plane', 'car', 'bird', 'cat', 'deer', 'dog', 'frog', 'horse', 'ship', 'truck']
plt.subplot(221)
plt.imshow(x_train[0])
plt.title(labels[y_train[0][0]])
plt.subplot(222)
plt.imshow(x_train[1])
plt.title(labels[y_train[1][0]])
plt.subplot(223)
plt.imshow(x_train[2])
plt.title(labels[y_train[2][0]])
plt.subplot(224)
plt.imshow(x_train[3])
plt.title(labels[y_train[3][0]])
plt.show()
对加载后的数据进行预处理:
x_train = x_train.astype('float32') / 255.
x_test = x_test.astype('float32') / 255.
n_classes = x_train.shape[0]
y_train = np_utils.to_categorical(y_train, n_classes)
y_test = np_utils.to_categorical(y_test, n_classes)
构建并编译模型,本节中,我们使用了较高的学习率,因此模型可以在更少的时间内更快地收敛,用于更快地比较不进行数据增强和使用数据增强方案的不同。正常情况下,我们一般令模型使用较小的学习率并训练更多的 epoch:
input_shape = x_train[0].shape

weight_delay = 0.0001
model = Sequential()
model.add(Conv2D(32, (3,3), padding='same', input_shape=input_shape, kernel_regularizer=regularizers.l2(weight_delay)))
model.add(Activation('relu'))
model.add(BatchNormalization())
model.add(Conv2D(32, (3,3), padding='same', kernel_regularizer=regularizers.l2(weight_delay)))
model.add(Activation('relu'))
model.add(BatchNormalization())
model.add(MaxPooling2D(pool_size=(2,2)))
model.add(Dropout(0.2))
model.add(Conv2D(64, (3,3), padding='same', kernel_regularizer=regularizers.l2(weight_delay)))
model.add(Activation('relu'))
model.add(BatchNormalization())
model.add(Conv2D(64, (3,3), padding='same', kernel_regularizer=regularizers.l2(weight_delay)))
model.add(Activation('relu'))
model.add(BatchNormalization())
model.add(MaxPooling2D(pool_size=(2,2)))
model.add(Dropout(0.2))
model.add(Conv2D(128, (3,3), padding='same', kernel_regularizer=regularizers.l2(weight_delay)))
model.add(Activation('relu'))
model.add(BatchNormalization())
model.add(Conv2D(128, (3,3), padding='same', kernel_regularizer=regularizers.l2(weight_delay)))
model.add(Activation('relu'))
model.add(BatchNormalization())
model.add(MaxPooling2D(pool_size=(2,2)))
model.add(Dropout(0.2))
model.add(Flatten())
model.add(Dense(n_classes, activation='softmax'))
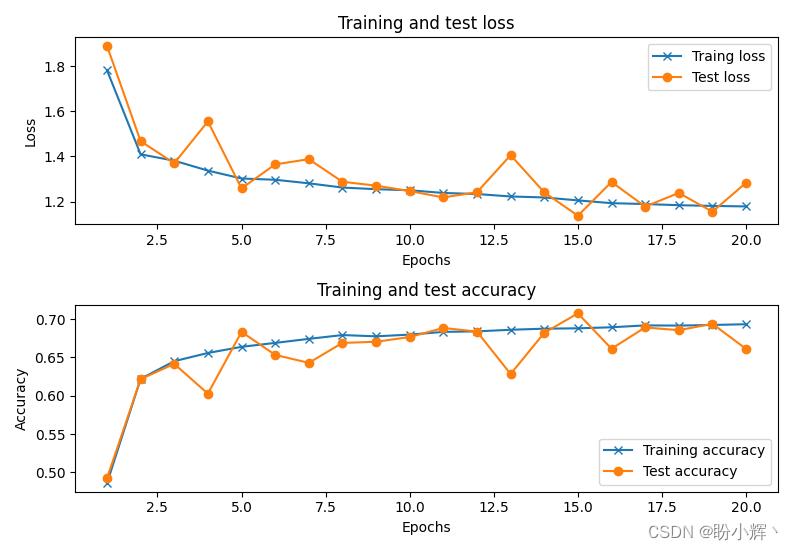
最后,拟合模型,训练完成后可以看到,该卷积神经网络的准确率约为 68%:
from keras.optimizers import Adam
adam = Adam(lr=0.01)
model.compile(loss='categorical_crossentropy', optimizer=adam, metrics=['acc'])

history = model.fit(x_train, y_train,
            batch_size=32,
            epochs=20,
            verbose=1,
            validation_data=(x_test,y_test))
2.2 通过数据增强来提高模型的准确率
接下来,我们使用数据增强,来增加训练数据集数量,然后训练与上节相同的模型。使用 keras.preprocessing.image 包中的 ImageDataGenerator 方法来扩充数据集:
from keras.preprocessing.image import ImageDataGenerator
data_gen = ImageDataGenerator(
    rotation_range=20,
    width_shift_range=0,
    height_shift_range=0,
    fill_mode='nearest')
data_gen.fit(x_train)
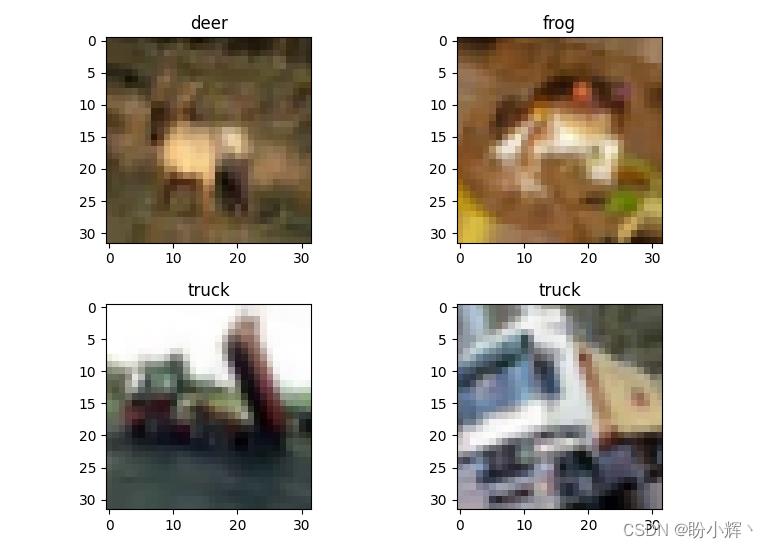
在上面的代码中,我们生成了新图像,新图像在 0 到 20 度之间随机旋转。通过数据生成器后的图像样本如下,与上一节未旋转的图像相比,图像会有略微的倾斜:
from keras.preprocessing.image import array_to_img
plt.subplot(221)
x = x_train[:4]
y = y_train[:4]
batch_img = data_gen.flow(x, y, batch_size=4)
print(batch_img[0][1][0][0])
plt.imshow(array_to_img(batch_img[0][0][0]))
plt.title(labels[batch_img[0][1][0][0]])
plt.subplot(222)
plt.imshow(array_to_img(batch_img[0][0][1]))
plt.title(labels[batch_img[0][1][1][0]])
plt.subplot(223)
plt.imshow(array_to_img(batch_img[0][0][2]))
plt.title(labels[batch_img[0][1][2][0]])
plt.subplot(224)
plt.imshow(array_to_img(batch_img[0][0][3]))
plt.title(labels[batch_img[0][1][3][0]])
plt.show()
接下来,通过数据生成器传递训练数据集,并训练与上一节架构与超参数完全相同的模型,但使用的训练数据集通过数据增强得以扩充:
input_shape = x_train[0].shape

weight_delay = 0.0001
model = Sequential()
model.add(Conv2D(32, (3,3), padding='same', input_shape=input_shape, kernel_regularizer=regularizers.l2(weight_delay)))
model.add(Activation('relu'))
model.add(BatchNormalization())
model.add(Conv2D(32, (3,3), padding='same', kernel_regularizer=regularizers.l2(weight_delay)))
model.add(Activation('relu'))
model.add(BatchNormalization())
model.add(MaxPooling2D(pool_size=(2,2)))
model.add(Dropout(0.2))
model.add(Conv2D(64, (3,3), padding='same', kernel_regularizer=regularizers.l2(weight_delay)))
model.add(Activation('relu'))
model.add(BatchNormalization())
model.add(Conv2D(64, (3,3), padding='same', kernel_regularizer=regularizers.l2(weight_delay)))
model.add(Activation('relu'))
model.add(BatchNormalization())
model.add(MaxPooling2D(pool_size=(2,2)))
model.add(Dropout(0.2))
model.add(Conv2D(128, (3,3), padding='same', kernel_regularizer=regularizers.l2(weight_delay)))
model.add(Activation('relu'))
model.add(BatchNormalization())
model.add(Conv2D(128, (3,3), padding='same', kernel_regularizer=regularizers.l2(weight_delay)))
model.add(Activation('relu'))
model.add(BatchNormalization())
model.add(MaxPooling2D(pool_size=(2,2)))
model.add(Dropout(0.2))
model.add(Flatten())
model.add(Dense(n_classes, activation='softmax'))

from keras.optimizers import Adam
adam = Adam(lr=0.01)
model.compile(loss='categorical_crossentropy', optimizer=adam, metrics=['acc'])
以上代码构建的模型与上一节中完全相同,以便比较使用数据增强和未使用数据增强场景下,模型性能的变化:
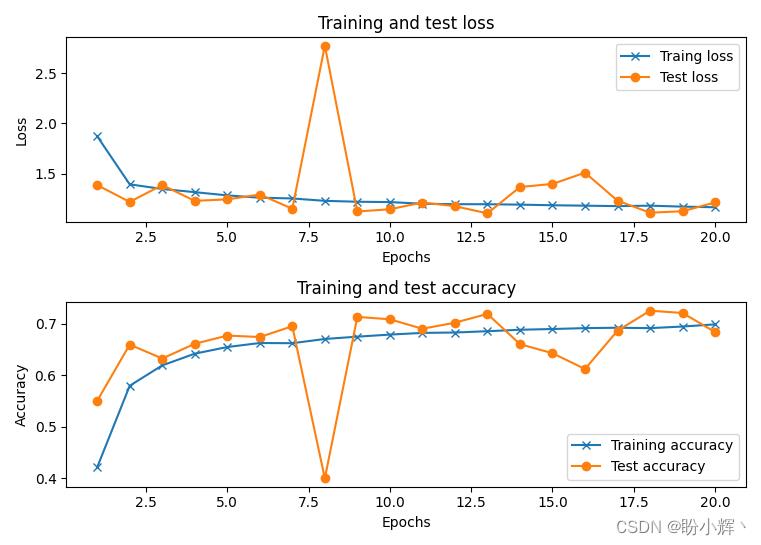
history = model.fit_generator(data_gen.flow(x_train, y_train, batch_size=32),
                    steps_per_epoch=x_train.shape[0] // 32,
                    epochs=20,
                    validation_data=(x_test,y_test))
在以上代码中,fit_generator 方法会在生成的新图像上拟合模型,datagen.flow 根据使用的数据增强策略,生成新的训练数据。同时,我们还指定了每个 epoch 中模型训练的步数,即数据集中数据总数与批大小的比值 steps_per_epoch=x_train.shape[0] // 32。看以看到,此模型的准确率约为 72%,比仅使用给定的数据集(不进行数据增强)的准确率更高:
小结
我们在《神经网络性能优化技术详解》中已经介绍了多种提升神经网络性能的技术,本节中,我们介绍了另一种称为数据增强的技术用于提高神经网络准确率。使用 CIFAR-10 数据集,对比不使用数据增强的模型,模型性能得到了极大的提升。
系列链接
Keras深度学习实战(1)——神经网络基础与模型训练过程详解
Keras深度学习实战(2)——使用Keras构建神经网络
Keras深度学习实战(3)——神经网络性能优化技术
Keras深度学习实战(4)——深度学习中常用激活函数和损失函数详解
Keras深度学习实战(5)——批归一化详解
Keras深度学习实战(6)——深度学习过拟合问题及解决方法
Keras深度学习实战(7)——卷积神经网络详解与实现
以上是关于Keras深度学习实战——使用数据增强提高神经网络性能的主要内容,如果未能解决你的问题,请参考以下文章