Shiro系列之Shiro+Spring MVC整合(Integration)
Posted 禹爸爸
tags:
篇首语:本文由小常识网(cha138.com)小编为大家整理,主要介绍了Shiro系列之Shiro+Spring MVC整合(Integration)相关的知识,希望对你有一定的参考价值。
Shiro系列之Shiro+Spring MVC整合
第一步,Shiro Filter
在web.xml文件中增加以下代码,确保Web项目中需要权限管理的URL都可以被Shiro拦截过滤。
<!-- Shiro Filter -->
    <filter>
        <filter-name>shiroFilter</filter-name>
        <filter-class>org.springframework.web.filter.DelegatingFilterProxy</filter-class>
        <init-param>
            <param-name>targetFilterLifecycle</param-name>
            <param-value>true</param-value>
        </init-param>
    </filter>
    <filter-mapping>
        <filter-name>shiroFilter</filter-name>
        <url-pattern>/*</url-pattern>
    </filter-mapping>
通常将这段代码中的filter-mapping放在所有filter-mapping之前,以达到shiro是第一个对web请求进行拦截过滤之目的。这里的fileter-name应该要和第二步中配置的java bean的id一致。
第二步,配置各种Java Bean
在root-context.xml文件中配置Shiro
<?xml version="1.0" encoding="UTF-8"?>
<beans xmlns="http://www.springframework.org/schema/beans"
	xmlns:xsi="http://www.w3.org/2001/XMLSchema-instance"
	xsi:schemaLocation="http://www.springframework.org/schema/beans http://www.springframework.org/schema/beans/spring-beans.xsd">

	<!-- Root Context: defines shared resources visible to all other web components -->

	<!-- dataSource -->
	<bean id="dataSource"
		class="org.springframework.jdbc.datasource.DriverManagerDataSource">
		<property name="driverClassName" value="com.mysql.jdbc.Driver" />
		<property name="url" value="jdbc:mysql://127.0.0.1:3306/etao_java" />
		<property name="username" value="root" />
		<property name="password" value="cope9020" />
	</bean>

	<bean id="lifecycleBeanPostProcessor" class="org.apache.shiro.spring.LifecycleBeanPostProcessor"></bean>

	<!-- 数据库保存的密码是使用MD5算法加密的,所以这里需要配置一个密码匹配对象 -->
	<bean id="credentialsMatcher" class="org.apache.shiro.authc.credential.Md5CredentialsMatcher"></bean>

	<!-- 缓存管理 -->
	<bean id="cacheManager" class="org.apache.shiro.cache.MemoryConstrainedCacheManager"></bean>

	<!--
	  使用Shiro自带的JdbcRealm类
      指定密码匹配所需要用到的加密对象
	  指定存储用户、角色、权限许可的数据源及相关查询语句
	 -->
	<bean id="jdbcRealm" class="org.apache.shiro.realm.jdbc.JdbcRealm">
        <property name="credentialsMatcher" ref="credentialsMatcher"></property>
		<property name="permissionsLookupEnabled" value="true"></property>
		<property name="dataSource" ref="dataSource"></property>
		<property name="authenticationQuery"
			value="SELECT password FROM sec_user WHERE user_name = ?"></property>
		<property name="userRolesQuery"
			value="SELECT role_name from sec_user_role left join sec_role using(role_id) left join sec_user using(user_id) WHERE user_name = ?"></property>
		<property name="permissionsQuery"
			value="SELECT permission_name FROM sec_role_permission left join sec_role using(role_id) left join sec_permission using(permission_id) WHERE role_name = ?"></property>
	</bean>

	<!-- Shiro安全管理器 -->
	<bean id="securityManager" class="org.apache.shiro.web.mgt.DefaultWebSecurityManager">
		<property name="realm" ref="jdbcRealm"></property>
		<property name="cacheManager" ref="cacheManager"></property>
	</bean>

	<!--
	   Shiro主过滤器本身功能十分强大,其强大之处就在于它支持任何基于URL路径表达式的、自定义的过滤器的执行
	   Web应用中,Shiro可控制的Web请求必须经过Shiro主过滤器的拦截,Shiro对基于Spring的Web应用提供了完美的支持
	-->
	<bean id="shiroFilter" class="org.apache.shiro.spring.web.ShiroFilterFactoryBean">
		<!-- Shiro的核心安全接口,这个属性是必须的 -->
		<property name="securityManager" ref="securityManager"></property>
		<!-- 要求登录时的链接(登录页面地址),非必须的属性,默认会自动寻找Web工程根目录下的"/login.jsp"页面 -->
		<property name="loginUrl" value="/security/login"></property>
		<!-- 登录成功后要跳转的连接(本例中此属性用不到,因为登录成功后的处理逻辑在LoginController里硬编码) -->
		<!-- <property name="successUrl" value="/" ></property> -->
		<!-- 用户访问未对其授权的资源时,所显示的连接 -->
		<property name="unauthorizedUrl" value="/"></property>
		<property name="filterChainDefinitions">
			<value>
				/security/*=anon
				/tag=authc
			</value>
		</property>
	</bean>

	<!--
	   开启Shiro的注解(如@RequiresRoles,@RequiresPermissions),需借助SpringAOP扫描使用Shiro注解的类,
	   并在必要时进行安全逻辑验证
	-->
	<!--
	<bean
		class="org.springframework.aop.framework.autoproxy.DefaultAdvisorAutoProxyCreator"></bean>
	<bean
		class="org.apache.shiro.spring.security.interceptor.AuthorizationAttributeSourceAdvisor">
		<property name="securityManager" ref="securityManager"></property>
	</bean>
	-->
</beans>
上述代码中已经对每个java bean的用途做了详细的注释说明,这里仅对FilterChain过滤链的定义详细阐述一下:
- 测试用例中对/security/*的访问是不需要认证控制的,这主要是用于用户登录和退出的
- 测试用例中对/tag的访问是需要认证控制的,就是说只有通过认证的用户才可以访问该资源。如果用户直接在地址栏中访问http://localhost:8880/learning/tag,系统会自动跳转至登录页面,要求用户先进行身份认证。
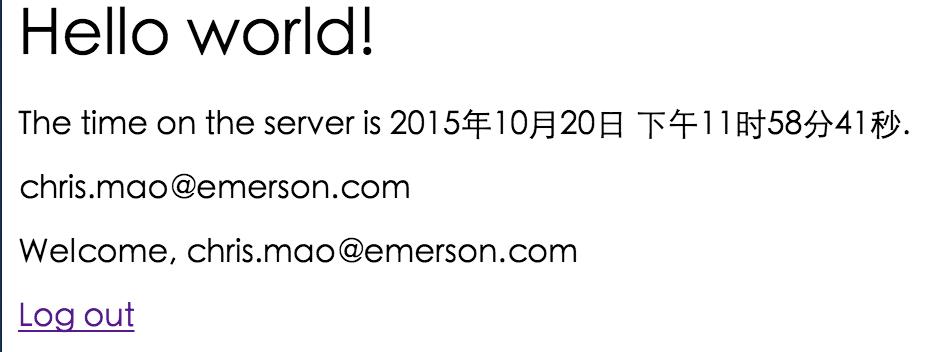
完成这两步之后,我们可以Run一下程序,如果可以看到以下页面,就表明我们的配置文件没有错误,Shiro和Spring MVC的整合已经完成了。后继的步骤可以视为是对整合后的框进行的一个测试。

第三步,编写登录页面和后台代码
<%@ page language="java" contentType="text/html; charset=UTF-8"
	pageEncoding="UTF-8"%>
<%@ taglib uri="http://java.sun.com/jsp/jstl/core" prefix="c"%>

<!DOCTYPE html PUBLIC "-//W3C//DTD HTML 4.01 Transitional//EN" "http://www.w3.org/TR/html4/loose.dtd">
<html>
<head>
<meta http-equiv="Content-Type" content="text/html; charset=UTF-8">
<title>Login Page</title>
</head>
<body>
	<h1>login page</h1>
	<form id="" action="dologin" method="post">
		<label>User Name</label> <input tyep="text" name="userName"
			maxLength="40" /> <label>Password</label><input type="password"
			name="password" /> <input type="submit" value="login" />
	</form>
	<%--用于输入后台返回的验证错误信息 --%>
	<P><c:out value="$message " /></P>
</body>
</html>
后台登录代码
	/**
	 * 实际的登录代码
	 * 如果登录成功,跳转至首页;登录失败,则将失败信息反馈对用户
	 *
	 * @param request
	 * @param model
	 * @return
	 */
	@RequestMapping(value = "/dologin")
	public String doLogin(HttpServletRequest request, Model model)
		String msg = "";
		String userName = request.getParameter("userName");
		String password = request.getParameter("password");
		System.out.println(userName);
		System.out.println(password);
		UsernamePasswordToken token = new UsernamePasswordToken(userName, password);
		token.setRememberMe(true);
		Subject subject = SecurityUtils.getSubject();
		try
			subject.login(token);
			if (subject.isAuthenticated())
				return "redirect:/";
			 else
				return "login";

		 catch (IncorrectCredentialsException e)
			msg = "登录密码错误. Password for account " + token.getPrincipal() + " was incorrect.";
			model.addAttribute("message", msg);
			System.out.println(msg);
		 catch (ExcessiveAttemptsException e)
			msg = "登录失败次数过多";
			model.addAttribute("message", msg);
			System.out.println(msg);
		 catch (LockedAccountException e)
			msg = "帐号已被锁定. The account for username " + token.getPrincipal() + " was locked.";
			model.addAttribute("message", msg);
			System.out.println(msg);
		 catch (DisabledAccountException e)
			msg = "帐号已被禁用. The account for username " + token.getPrincipal() + " was disabled.";
			model.addAttribute("message", msg);
			System.out.println(msg);
		 catch (ExpiredCredentialsException e)
			msg = "帐号已过期. the account for username " + token.getPrincipal() + "  was expired.";
			model.addAttribute("message", msg);
			System.out.println(msg);
		 catch (UnknownAccountException e)
			msg = "帐号不存在. There is no user with username of " + token.getPrincipal();
			model.addAttribute("message", msg);
			System.out.println(msg);
		 catch (UnauthorizedException e)
			msg = "您没有得到相应的授权!" + e.getMessage();
			model.addAttribute("message", msg);
			System.out.println(msg);

		return "login";
如果输入不存在的用户名或是错误的密码界面上会有相应的提示信息。

登录成功后,会转至首页,并显示出当前用户名。

以上是关于Shiro系列之Shiro+Spring MVC整合(Integration)的主要内容,如果未能解决你的问题,请参考以下文章