ExtJs基础知识总结:弹窗
Posted 风浪子
tags:
篇首语:本文由小常识网(cha138.com)小编为大家整理,主要介绍了ExtJs基础知识总结:弹窗相关的知识,希望对你有一定的参考价值。
概述
Extjs弹窗可以分为消息弹窗、对话框,这些弹窗的方式ExtJs自带的Ext.Msg.alert就已经可以满足简单消息提示,但是相对复杂的提示,比如如何将Ext.grid.Panel的控件显示嵌套到widget.window,然后随着widget.window的show方法展示到页面上哪?另外一个就是ExtJs中的Combobox下拉控件,如何做到手动输入,自动联想手动输入的内容进行查询?
一、针对自定义弹窗
通过window显示自定义弹窗,下面有几种方案思路
思路一、直接将gridpandel填充到widget.window对应的Items
代码如下:
    var InvoiceItemGrid = Ext.create(\'Ext.grid.Panel\', {
        forceFit: false,
        autoHeight: true,
        autoScroll: true,
        frame: true,
        split: false,
        layout: "fit",
        height:document.documentElement.clientHeight,
        margin: 0,
        store: PrecStore,
        loadMask: { msg: \'数据加载中...\' },
        columnLines: true,
        //dockedItems: [PTxtInfo],
        //selType: "checkboxmodel",
        selModel: {
            mode: "multi",//multi,simple,single;默认为多选multi
            checkOnly: false,//如果值为true,则只用点击checkbox列才能选中此条记录
            allowDeselect: true,//如果值true,并且mode值为单选(single)时,可以通过点击checkbox取消对其的选择
        },
        viewConfig: {
            stripeRows: true,//在表格中显示斑马线
            enableTextSelection: true //可以复制单元格文字 "GGXH", "XMSL", "XMDJ", "XMJE", "SL", "SE", "SPBM", "TaxItem"],
        },
        bbar: { xtype: "pagingtoolbar", inputItemWidth: 100, store: PrecStore, displayInfo: true },
        columns: [
           { text: "Id", width: 80, dataIndex: "Id", hidden: true },
           { text: "商品名称", width: 80, dataIndex: "XMMC" },
           { text: "单位", width: 80, dataIndex: "DW" },
           { text: "规格型号", width: 120, dataIndex: "GGXH" },
           { text: "数量", width: 80, dataIndex: "XMSL" },
           { text: "项目单价", width: 120, dataIndex: "XMDJ" },
           { text: "项目金额", width: 80, dataIndex: "XMJE" },
           { text: "税额", width: 80, dataIndex: "SE" },
           { text: "税率%", width: 80, dataIndex: "SL" },
           { text: "税目编码", width: 160, dataIndex: "SPBM" },
        ]
    });
    //主窗体
    var WindItem= Ext.create(\'widget.window\', {
        title: \'发票明细\',
        closable: true,
        closeAction: \'hide\',
        modal: true,
        frame: true,
        layout: \'fit\',
        width: 895,
        minWidth: 895,
        height: 430,
        layout: {
            type: \'border\',
            padding: 2
        },
        items: [InvoiceItemGrid]
    });
显示的结果截图如下:
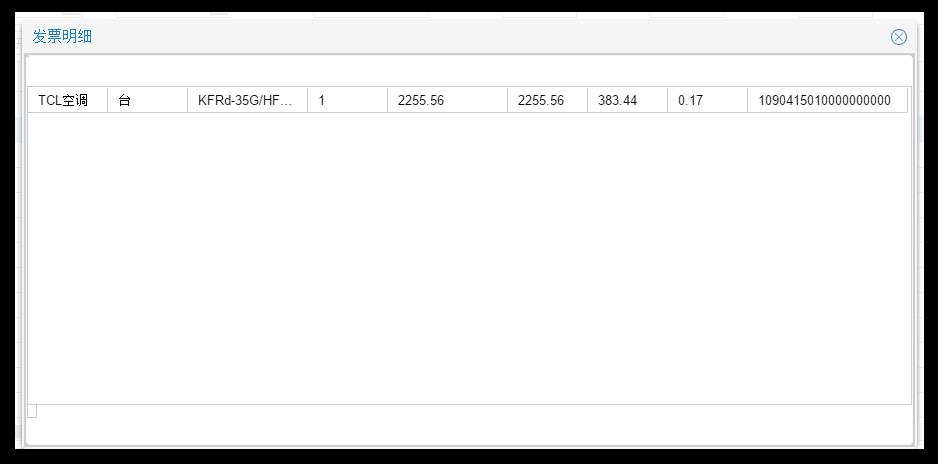
结果分析:grid的标题也没显示出来,而且随着窗体大小的拉伸,内容不会全部显示。
思路二、直接将gridpandel填充到tabpanel的Items中,然后tabpanel放到widget.window对应的Items
代码如下:
    var WindItem= Ext.create(\'widget.window\', {
        title: \'发票明细\',
        closable: true,
        closeAction: \'hide\',
        modal: true,
        frame: true,
        layout: \'fit\',
        width: 895,
        minWidth: 895,
        height: 430,
        layout: {
            type: \'border\',
            padding: 2
        },
        items: [{
            region: \'center\',
            xtype: \'tabpanel\',
            items: InvoiceItemGrid
        }]
    });
显示的结果截图如下:
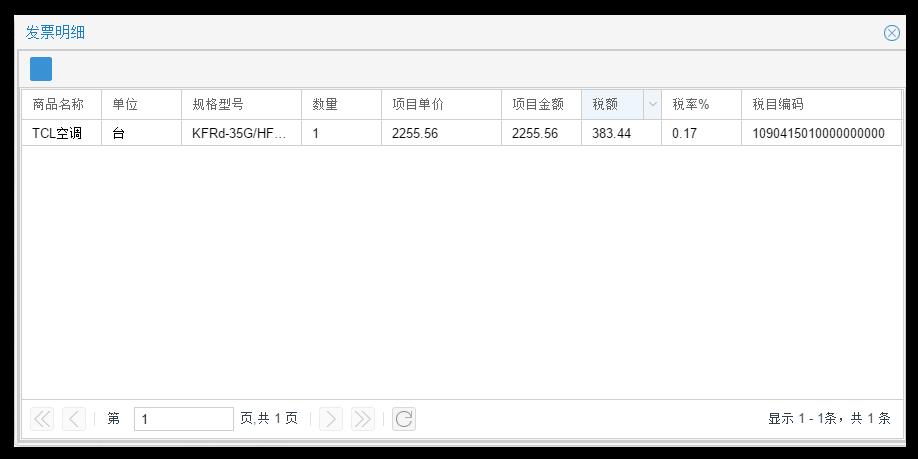
结果分析:grid上面的那个蓝色方块,是A标签。ExtJs中的tabpanel根据grid自动生成,显然也不是最理想结果;
思路三、直接将gridpandel填充到From的Items中,然后From放到tabpanel的Items中,然后tabpanel放到widget.window对应的Items
代码如下:
var DataFrom = Ext.create(\'Ext.form.Panel\', {
        hidden: true,
        bodyPadding: 0,
        width: 890,
        header: true,
        layout: \'fit\',
        defaults: {
            anchor: \'100%\'
        },
        defaultType: \'textfield\',
        items: [
            InvoiceItemGrid
             ],
        buttons: [{
            text: \'关闭\',
            handler: function () {
                WindItem.close();
            }
        }]
    });


    var WindItem= Ext.create(\'widget.window\', {
        title: \'发票明细\',
        closable: true,
        closeAction: \'hide\',
        modal: true,
        frame: true,
        layout: \'fit\',
        width: 895,
        minWidth: 895,
        height: 430,
        layout: {
            type: \'border\',
            padding: 2
        },
        items: [{
            region: \'center\',
            xtype: \'tabpanel\',
            items: DataFrom
        }]
    });
显示的结果截图如下:
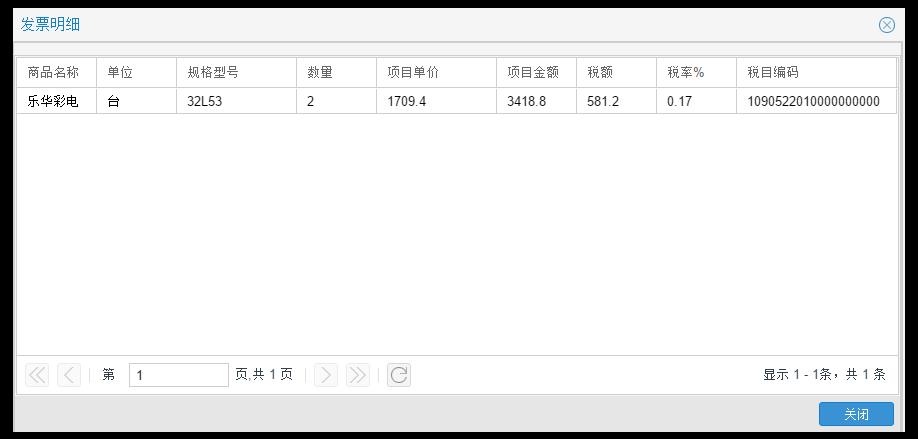
结果分析:显然这种方式相对更好点,思路3是根据思路2而来,思路2又是根据思路1而来,所以好的思路还是需要不断优化和总结。
二、Combobox手动输入联想加载
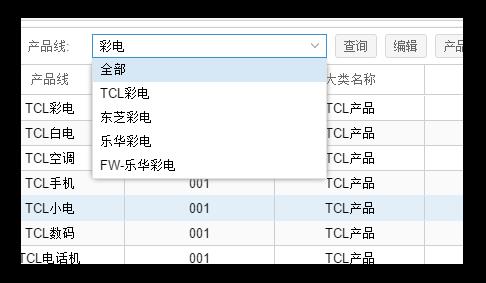
所谓自动联想加载是指Combobox允许手动输入,根据手动输入的内容系统自动加载和输入内容相关联的内容,Combobox设置为可编辑的时候,每次手动输入ExtJs自动回到后台请求数据,传递参数query作为查询内容,实现的效果如下:
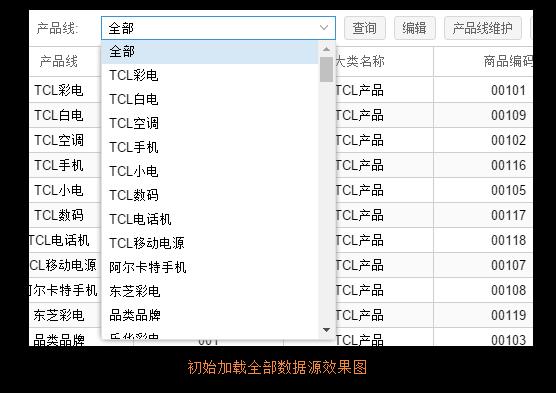
手动输入彩电,Combobox下来数据源变动如下
ExtJs代码如下
//定义的数据源
var ProductLine = new Ext.data.Store({
    fields: ["className", "classID"],
    autoLoad: true,
    proxy: {
        type: "ajax",
        actionMethods: { read: "POST" },
        url: \'/urlOrderCV/GetAllProductLine\',
        reader: {
            type: \'json\',
            rootProperty: \'Data\',
            totalProperty: \'TotalCount\'
        }
    }
});
///定义的下来列表Combobox
{
    xtype: "combobox",
    store: ProductLine,
    displayField: "className",   //显示出来的是name
    valueField: "classID",       //值是id
    fieldLabel: "科级名称",     //label
    editable: true,        //不可编辑
    minChars: 1,
    id: "classname",           //id
    labelWidth: 50,
    width: 160
}
后台Action的伪代码如下
public ActionResult GetAllProductLine (string query)
{

    if (string.IsNullOrEmpty(query))
    {
        //查询全部
    }
    else
    {

        //更加query查询部分
    }
}
以上是关于ExtJs基础知识总结:弹窗的主要内容,如果未能解决你的问题,请参考以下文章