[15]深入浅出工作开源框架Camunda:定时任务
Posted 朱清云的技术博客
tags:
篇首语:本文由小常识网(cha138.com)小编为大家整理,主要介绍了[15]深入浅出工作开源框架Camunda:定时任务相关的知识,希望对你有一定的参考价值。
1.引言
在BPMN中,可以通过改变“Timer Start Event” 启动节点的启动类型来自动启动流程实例。
其提供了下面三种定时自动触发流程实例的模式:
- 指定固定的时间点启动一个新的流程实例
- 指定相对延迟时间启动一个新的流程实例
- 周期性的启动一个新的流程实例
下面分别就上面的三种方式进行设计和实验~
三种使用方式,如下:
(1)Date:特定时间(例:2022-05-25T16:00:00)
其支持的是ISO 8601标准,需要注意是,如果最后带了“Z”,说明用的是带时区的时间。
比如下面的例子,
2019-10-01T12:00:00Z - UTC time
2019-10-02T08:09:40+02:00 - UTC plus two hours zone offset 相对UTC时区加了2个时区
2019-10-02T08:09:40+02:00[Europe/Berlin] - UTC plus two hours zone offset at Berlin
如果不加Z表示就是当地的时间。 比如这个2022-05-25T16:00:00设置,其意思就是流程部署后,会在应用部署的时区内2022-05-25 16:00的时候启动一次而且仅仅一次~

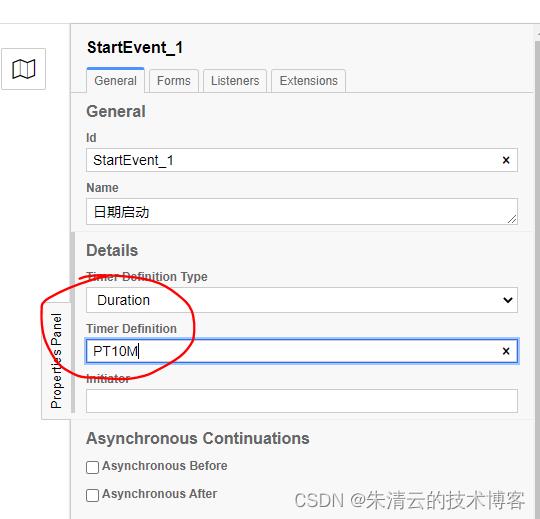
(2)Duration: 延迟时间(例:PT10M)
Duration的格式符合ISO_8601标准,其格式如下:
- P(n)Y(n)M(n)DT(n)H(n)M(n)S 其中n代表的具体的数值
- PnW
其具体说明如下:
- P is the duration designator (for period) placed at the start of the duration representation. 主要指周期
- Y is the year designator that follows the value for the number of years. 代表年
- M is the month designator that follows the value for the number of months. 代表月
- W is the week designator that follows the value for the number of weeks. 代表周的缩写
- D is the day designator that follows the value for the number of days. 代表天的缩写
- T is the time designator that precedes the time components of the representation. 代表前置时间
- H is the hour designator that follows the value for the number of hours. 代表小时
- M is the minute designator that follows the value for the number of minutes. 代表分钟
- S is the second designator that follows the value for the number of seconds. 代表秒
其中P, Y, M, W, D, T, H, M, and S 能被忽略但是不能被替换
比如:PT10M标识其在部署后,10分钟后启动流程~

再来看一些例子:
PT15S - 15 seconds 15秒后创建一个流程实例~
PT1H30M - 1 hour and 30 minutes 1个小时30分钟后创建一个流程实例~
P14D - 14 days 14天后创建流程~
P14DT1H30M - 14 days, 1 hour and 30 minutes 14天1小时30分钟后创建一个流程实例~
P3Y6M4DT12H30M5S - 3 years, 6 months, 4 days, 12 hours, 30 minutes and 5 seconds 3年6个月4天12个小时30分5秒后创建一个流程实例~
(3)Cycle:循环时间(例:RS3/2022-05-25T16:00:00/PT30S)
Cycle支持的标准是ISO_8601的重复间隔标准,
下面是具体的例子:
R5/PT10S: Every 10 seconds, up to five times 每10秒触发一次,最多5次
R/P1D: Every day, infinitely ; 每天触发一次,无限循环
当然其也支持Cron的正则表达式,
比如下面就代表其当前的流程实例每隔5分钟就会启动一次:
0 0/5 * * * ?
下面举一个例子,比如下面的2022-05-25T16:00:00,每间隔30s就会触发一次,总共触发3次;

格式解析
RS3/2022-05-25T16:00:00/PT30S
重复次数/开始时间/运行间隔
重复次数:R - 将永远重复;R3- 将重复3次。
开始时间 :2021年11月19日16点00分00秒开始
运行间隔 :30秒
例如: P1Y2M3DT2H10M30S 表示间隔1年2个月3天2小时10分钟30秒
PT2M 表示间隔2分钟(Per Time 2 minutes)
注意:T是时间和日期分的割标记,如果没有年月日"T"也不能省略
- 计时器启动事件可用特定时间或者循环时间
- 中间计时器事件可用特定时间或延迟时间。
- 周期时间用于计时器启动事件或附加的非中断计时器边界事件
2.Camunda的实现原理
通过观察Camunda的数据库的变化,我们可以推测出其实现的原理。下面一个一个的来看:
(1)Date:特定时间(例:2022-05-25T10:40:00)

<?xml version="1.0" encoding="UTF-8"?>
<bpmn:definitions xmlns:bpmn="http://www.omg.org/spec/BPMN/20100524/MODEL" xmlns:bpmndi="http://www.omg.org/spec/BPMN/20100524/DI" xmlns:dc="http://www.omg.org/spec/DD/20100524/DC" xmlns:xsi="http://www.w3.org/2001/XMLSchema-instance" xmlns:camunda="http://camunda.org/schema/1.0/bpmn" xmlns:di="http://www.omg.org/spec/DD/20100524/DI" xmlns:modeler="http://camunda.org/schema/modeler/1.0" id="Definitions_1mnxduk" targetNamespace="http://bpmn.io/schema/bpmn" exporter="Camunda Modeler" exporterVersion="4.11.1" modeler:executionPlatform="Camunda Platform" modeler:executionPlatformVersion="7.15.0">
  <bpmn:process id="Process_14pjj1v" name="请假流程" isExecutable="true">
    <bpmn:startEvent id="StartEvent_1" name="特定时间启动">
      <bpmn:outgoing>Flow_1ihjej0</bpmn:outgoing>
      <bpmn:timerEventDefinition id="TimerEventDefinition_0bshgz6">
        <bpmn:timeDate xsi:type="bpmn:tFormalExpression">2022-05-24T10:53:00</bpmn:timeDate>
      </bpmn:timerEventDefinition>
    </bpmn:startEvent>
    <bpmn:sequenceFlow id="Flow_1ihjej0" sourceRef="StartEvent_1" targetRef="Activity_1tiqpqb" />
    <bpmn:sequenceFlow id="Flow_0748tlu" sourceRef="Activity_1tiqpqb" targetRef="Activity_0jzwi5i" />
    <bpmn:endEvent id="Event_1yb23ri" name="结束">
      <bpmn:incoming>Flow_0a6rwts</bpmn:incoming>
    </bpmn:endEvent>
    <bpmn:sequenceFlow id="Flow_0a6rwts" sourceRef="Activity_0jzwi5i" targetRef="Event_1yb23ri" />
    <bpmn:userTask id="Activity_1tiqpqb" name="请假" camunda:assignee="demo">
      <bpmn:incoming>Flow_1ihjej0</bpmn:incoming>
      <bpmn:outgoing>Flow_0748tlu</bpmn:outgoing>
    </bpmn:userTask>
    <bpmn:userTask id="Activity_0jzwi5i" name="审批" camunda:assignee="demo">
      <bpmn:incoming>Flow_0748tlu</bpmn:incoming>
      <bpmn:outgoing>Flow_0a6rwts</bpmn:outgoing>
    </bpmn:userTask>
  </bpmn:process>
  <bpmndi:BPMNDiagram id="BPMNDiagram_1">
    <bpmndi:BPMNPlane id="BPMNPlane_1" bpmnElement="Process_14pjj1v">
      <bpmndi:BPMNEdge id="Flow_1ihjej0_di" bpmnElement="Flow_1ihjej0">
        <di:waypoint x="215" y="117" />
        <di:waypoint x="270" y="117" />
      </bpmndi:BPMNEdge>
      <bpmndi:BPMNEdge id="Flow_0748tlu_di" bpmnElement="Flow_0748tlu">
        <di:waypoint x="370" y="117" />
        <di:waypoint x="430" y="117" />
      </bpmndi:BPMNEdge>
      <bpmndi:BPMNEdge id="Flow_0a6rwts_di" bpmnElement="Flow_0a6rwts">
        <di:waypoint x="530" y="117" />
        <di:waypoint x="592" y="117" />
      </bpmndi:BPMNEdge>
      <bpmndi:BPMNShape id="Event_1xfvi9y_di" bpmnElement="StartEvent_1">
        <dc:Bounds x="179" y="99" width="36" height="36" />
        <bpmndi:BPMNLabel>
          <dc:Bounds x="165" y="142" width="65" height="14" />
        </bpmndi:BPMNLabel>
      </bpmndi:BPMNShape>
      <bpmndi:BPMNShape id="Event_1yb23ri_di" bpmnElement="Event_1yb23ri">
        <dc:Bounds x="592" y="99" width="36" height="36" />
        <bpmndi:BPMNLabel>
          <dc:Bounds x="599" y="142" width="22" height="14" />
        </bpmndi:BPMNLabel>
      </bpmndi:BPMNShape>
      <bpmndi:BPMNShape id="Activity_0sq8nj2_di" bpmnElement="Activity_1tiqpqb">
        <dc:Bounds x="270" y="77" width="100" height="80" />
      </bpmndi:BPMNShape>
      <bpmndi:BPMNShape id="Activity_0pt371x_di" bpmnElement="Activity_0jzwi5i">
        <dc:Bounds x="430" y="77" width="100" height="80" />
      </bpmndi:BPMNShape>
    </bpmndi:BPMNPlane>
  </bpmndi:BPMNDiagram>
</bpmn:definitions>
部署之后,查询 select * from ACT_RU_JOB,其里面添加了一条新的数据;
select * from ACT_RU_JOB
"select * from ACT_RU_JOB": [

		"ID_" : "225e7949-db0c-11ec-8676-005056c00008",
		"REV_" : 1,
		"TYPE_" : "timer",
		"LOCK_EXP_TIME_" : null,
		"LOCK_OWNER_" : null,
		"EXCLUSIVE_" : 1,
		"EXECUTION_ID_" : null,
		"PROCESS_INSTANCE_ID_" : null,
		"PROCESS_DEF_ID_" : "Process_14pjj1v:1:225d19b7-db0c-11ec-8676-005056c00008",
		"PROCESS_DEF_KEY_" : "Process_14pjj1v",
		"RETRIES_" : 3,
		"EXCEPTION_STACK_ID_" : null,
		"EXCEPTION_MSG_" : null,
		"FAILED_ACT_ID_" : null,
		"DUEDATE_" : "2022-05-24 10:53:00",
		"REPEAT_" : null,
		"REPEAT_OFFSET_" : 0,
		"HANDLER_TYPE_" : "timer-start-event",
		"HANDLER_CFG_" : "Process_14pjj1v",
		"DEPLOYMENT_ID_" : "22577465-db0c-11ec-8676-005056c00008",
		"SUSPENSION_STATE_" : 1,
		"JOB_DEF_ID_" : "225d19b8-db0c-11ec-8676-005056c00008",
		"PRIORITY_" : 0,
		"SEQUENCE_COUNTER_" : 1,
		"TENANT_ID_" : null,
		"CREATE_TIME_" : "2022-05-24 10:49:30"

]
Job的定义如下:
"select * from ACT_RU_JOBDEF": [

		"ID_" : "225d19b8-db0c-11ec-8676-005056c00008",
		"REV_" : 1,
		"PROC_DEF_ID_" : "Process_14pjj1v:1:225d19b7-db0c-11ec-8676-005056c00008",
		"PROC_DEF_KEY_" : "Process_14pjj1v",
		"ACT_ID_" : "StartEvent_1",
		"JOB_TYPE_" : "timer-start-event",
		"JOB_CONFIGURATION_" : "DATE: 2022-05-24T10:53:00",
		"SUSPENSION_STATE_" : 1,
		"JOB_PRIORITY_" : null,
		"TENANT_ID_" : null,
		"DEPLOYMENT_ID_" : null

]
同时执行查询 select * from ACT_RU_TASK, 其表是空的
这个时候,我们看到用户任务里面没有待审批的工作流,表ACT_RU_TASK和ACT_RU_EXECUTION
也查询不到数据。

等到2022-05-24T10:53的时候,我们可以看到任务出现在Demo用户下:

同时,表ACT_RU_JOB里面的响应记录被删除;表ACT_RU_TASK和ACT_RU_EXECUTION有执行记录。
"select * from ACT_RU_TASK": [

		"ID_" : "ad612c9e-db0c-11ec-8676-005056c00008",
		"REV_" : 1,
		"EXECUTION_ID_" : "ad60de7b-db0c-11ec-8676-005056c00008",
		"PROC_INST_ID_" : "ad60de7b-db0c-11ec-8676-005056c00008",
		"PROC_DEF_ID_" : "Process_14pjj1v:1:225d19b7-db0c-11ec-8676-005056c00008",
		"CASE_EXECUTION_ID_" : null,
		"CASE_INST_ID_" : null,
		"CASE_DEF_ID_" : null,
		"NAME_" : "请假",
		"PARENT_TASK_ID_" : null,
		"DESCRIPTION_" : null,
		"TASK_DEF_KEY_" : "Activity_1tiqpqb",
		"OWNER_" : null,
		"ASSIGNEE_" : "demo",
		"DELEGATION_" : null,
		"PRIORITY_" : 50,
		"CREATE_TIME_" : "2022-05-24 10:53:24",
		"DUE_DATE_" : null,
		"FOLLOW_UP_DATE_" : null,
		"SUSPENSION_STATE_" : 1,
		"TENANT_ID_" : null

]


"select * from ACT_RU_EXECUTION": [

		"ID_" : "ad60de7b-db0c-11ec-8676-005056c00008",
		"REV_" : 1,
		"ROOT_PROC_INST_ID_" : "ad60de7b-db0c-11ec-8676-005056c00008",
		"PROC_INST_ID_" : "ad60de7b-db0c-11ec-8676-005056c00008",
		"BUSINESS_KEY_" : null,
		"PARENT_ID_" : null,
		"PROC_DEF_ID_" : "Process_14pjj1v:1:225d19b7-db0c-11ec-8676-005056c00008",
		"SUPER_EXEC_" : null,
		"SUPER_CASE_EXEC_" : null,
		"CASE_INST_ID_" : null,
		"ACT_ID_" : "Activity_1tiqpqb",
		"ACT_INST_ID_" : "Activity_1tiqpqb:ad61058d-db0c-11ec-8676-005056c00008",
		"IS_ACTIVE_" : 1,
		"IS_CONCURRENT_" : 0,
		"IS_SCOPE_" : 1,
		"IS_EVENT_SCOPE_" : 0,
		"SUSPENSION_STATE_" : 1,
		"CACHED_ENT_STATE_" : 2,
		"SEQUENCE_COUNTER_" : 3,
		"TENANT_ID_" : null

]
(2)Duration: 延迟时间(例:PT3M,PT60S)
下面让当前的任务在部署后延迟3分钟后启动,流程如下:

<?xml version="1.0" encoding="UTF-8"?>
<bpmn:definitions xmlns:bpmn="http://www.omg.org/spec/BPMN/20100524/MODEL" xmlns:bpmndi="http://www.omg.org/spec/BPMN/20100524/DI" xmlns:dc="http://www.omg.org/spec/DD/20100524/DC" xmlns:xsi="http://www.w3.org/2001/XMLSchema-instance" xmlns:camunda="http://camunda.org/schema/1.0/bpmn" xmlns:di="http://www.omg.org/spec/DD/20100524/DI" xmlns:modeler="http://camunda.org/schema/modeler/1.0" id="Definitions_07guhgc" targetNamespace="http://bpmn.io/schema/bpmn" exporter="Camunda Modeler" exporterVersion="4.11.1" modeler:executionPlatform="Camunda Platform" modeler:executionPlatformVersion="7.15.0">
  <bpmn:process id="Process_1l8shll" name="定时启动流程" isExecutable="true">
    <bpmn:startEvent id="StartEvent_1"以上是关于[15]深入浅出工作开源框架Camunda:定时任务的主要内容,如果未能解决你的问题,请参考以下文章