从源码角度剖析Handler 机制
Posted JasonGaoH
tags:
篇首语:本文由小常识网(cha138.com)小编为大家整理,主要介绍了从源码角度剖析Handler 机制相关的知识,希望对你有一定的参考价值。
android中,在进行耗时操作更新UI用到最多的方法就是Handler了,一般在子线程中进行耗时操作(访问网络等),然后发送消息到UI线程(主线程),使得界面得以更新。
对于Handler的用法,相信大家都比较熟悉了,那么Handler机制的原理是什么呢?我们今天从源码角度来分析下Handler机制的原理。
Handler mHandler = new Handler()

        public void handleMessage(Message msg)
            //处理消息
        ;
    ;
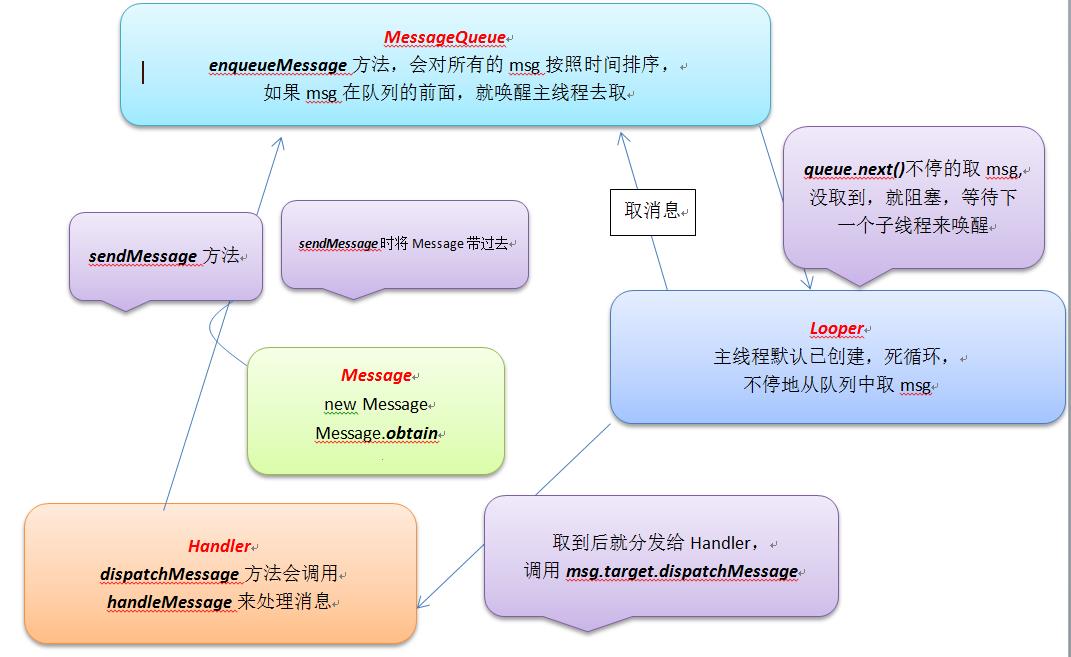
首先看两张关于Handler的图:
希望能帮助大家理解。
第一张书序图来自网络,第二张类是调用关系图。


A Handler allows you to send and process Message and Runnable
objects associated with a thread’s MessageQueue. Each Handler
instance is associated with a single thread and that thread’s message
queue. When you create a new Handler, it is bound to the thread /
message queue of the thread that is creating it – from that point on,
it will deliver messages and runnables to that message queue and execute
them as they come out of the message queue.
There are two main uses for a Handler: (1) to schedule messages and
runnables to be executed as some point in the future; and (2) to enqueue
an action to be performed on a different thread than your own.
接下来我们来看API中给的描述,一个Handler能够通过关联的线程的MessageQueue来发送和处理Message 和Runnable对象。每一个Handler实例化的时候会关联一个独立的线程和这个线程的消息队列。当 你创建一个新的Handler,它会绑定到创建它的的线程和消息队列上–从这个点上,当消息队列中 有消息来的时候,它会传递消息和Runnable对象到那个消息队列并且会执行这些消息。
Handler有两个用法:(1)能够使messages和runnables在即将到来的某个点一同执行;(2)能够协调一个操作在不同的线程中的执行
Handler 的构造方法
我们从Handler初始化开始,从构造方法入口,看看它实例化的时候做了什么操作。
 public Handler()
        this(null, false);
默认的构造方法会调用下面这个带两个参数的构造方法。
 public Handler(Callback callback, boolean async)
        if (FIND_POTENTIAL_LEAKS)
            final Class<? extends Handler> klass = getClass();
            if ((klass.isAnonymousClass() || klass.isMemberClass() || klass.isLocalClass()) &&
                    (klass.getModifiers() & Modifier.STATIC) == 0)
                Log.w(TAG, "The following Handler class should be static or leaks might occur: " +
                    klass.getCanonicalName());


        获取Looper
        mLooper = Looper.myLooper();
        ///
        if (mLooper == null)
            throw new RuntimeException(
                "Can't create handler inside thread that has not called Looper.prepare()");

        mQueue = mLooper.mQueue;
        mCallback = callback;
        mAsynchronous = async;
我们这里主要看***mLooper = Looper.myLooper();*** 这行代码,Looper是什么呢,有什么用呢?
我们追踪到Looper的myLooper方法:
  public static Looper myLooper()
        return sThreadLocal.get();
问题又来了,这个ThreadLoacal又是个什么东西呢?
ThreadLoacal即线程局部变量,ThreadLocal设计出来是为了避免在线程间共享变量,使用ThreadLoacal能够为各个线程提供各自的实例。
ThreadLocal的两个方法:
get和set用于获取ThreadLocal中存储的局部变量
/**
  Returns the value in the current thread's copy of this thread-local variable.
*/
public T get();

/**
  Sets the current thread's copy of this thread-local variable to the specified value.
*/
public void set(T value)
这里我们只做简单的介绍,关于ThreadLoacal这里不做详细介绍,有兴趣可以自己研究研究。
我们看下面的代码片段,ThreadLocal作为Looper的静态常量,一般在类加载的时候就会创建(静态成员变量和静态初始化块级别相同),接下来我们来看这个prepare方法,prepare方法中会将Looper放在ThreadLocal,确保每个线程取得Looper的时候是属于自己的那个Looper。
 //sThreadLocal的创建
 static final ThreadLocal<Looper> sThreadLocal = new ThreadLocal<Looper>();


private static void prepare(boolean quitAllowed)
    if (sThreadLocal.get() != null)
        throw new RuntimeException("Only one Looper may be created per thread");

    //创建Looper并将Looper保存到sThreadLocal中
    sThreadLocal.set(new Looper(quitAllowed));
看到这里,细心的你不由得会产生这样的疑问,Looper在调用myLooper方法获得ThreadLocal中存放的Looper的时候,如果prepare方法没有在这之前调用的话,那么肯定是取不到Looper的,但问题是平时我们在使用Handler的时候,并没有调用Looper中的prepare方法啊?
其实我们平时用Handler的时候,都是在Main线程中,在Main线程中,已经提前调用过这个prepare方法了。
public static void main(String[] args)

        ...............

        //
        ①主线程调用prepare方法,创建Looper
        Looper.prepareMainLooper();
        /

        ActivityThread thread = new ActivityThread();
        thread.attach(false);

        if (sMainThreadHandler == null)
            sMainThreadHandler = thread.getHandler();


        AsyncTask.init();

        if (false)
            Looper.myLooper().setMessageLogging(new
                    LogPrinter(Log.DEBUG, "ActivityThread"));

        //
        ②调用loop进行消息循环
        Looper.loop();
        //

        throw new RuntimeException("Main thread loop unexpectedly exited");
在ActivityThread的main方法中,①这里会调用来prepareMainLooper创建Looper,prepareMainLooper会转掉Looper中的prepare方法。ActivityThread的main方法其实是android一个应用程序的入口,每启动一个应用进程,都会创建ActivityThread与之对应的实例,是应用程序的UI线程。UI线程中会通过prepareMainLooper等方法来建立消息循环(即为Handler作相关的准备工作)。
另外,如果我们在自己定义的线程中使用Handler的话,则必须要自己调Looper.prepare()来创建Looper。
我们在来看main方法②处,会调用Looper中loop方法。
那么loop方法是干什么呢?
    public static void loop()
        final Looper me = myLooper();
        ....
        final MessageQueue queue = me.mQueue;

        ....
        ///
        ①死循环。需要不停的从MessageQueue去消息进行处理
        for (;;)
            Message msg = queue.next(); // might block
            if (msg == null)
                // No message indicates that the message queue is quitting.
                return;

        //

            //②分发消息
            msg.target.dispatchMessage(msg);

            msg.recycle();
这里在loop方法中,为了显得比较整洁,略去了一些不重要的代码,这里我们看两个地方,首先我们来看loop方法的①处,这里是个死循环,这里又引入了一个新类MessageQueue,那么MessageQueue是什么呢?
MessageQueue用于存放一个消息列表,其数据结构就是一个队列。上面的next方法会取出队列中需要马上处理的消息,取到消息后,执行loop方法中的②,msg是Message类型,那么Message的target是什么呢?继续看Message的代码。
 /*package*/ Handler target;

  public Message()
可以看到在Message中的target其实是Handler,上面②处,在取得需要处理的消息后,由消息的Handler来分发消息进行处理。
另外,Message中的Handler是在什么时候传递进去的呢?我们来看下Handler中的相关方法:
Handler发送消息,一般有两种构造消息的方式:
- 使用new 一个Message
这种方式,new Message的方式,其实Message构造方法其中没有做任何操作,关键还是在Handler这里sendMessage方法,sendMessage最终会调用enqueueMessage,在enqueueMessage中就设置了Message的target为this,即Handler - 使用Handler中obtain获取一个信息
当使用第二种方式obtainMessage来获得一个Message时,同样会将target置为Handler。
Handler发送消息的流程
public final boolean sendMessage(Message msg)

    return sendMessageDelayed(msg, 0);


public boolean sendMessageAtTime(Message msg, long uptimeMillis)
    MessageQueue queue = mQueue;
    if (queue == null)
        RuntimeException e = new RuntimeException(
                this + " sendMessageAtTime() called with no mQueue");
        Log.w("Looper", e.getMessage(), e);
        return false;

    return enqueueMessage(queue, msg, uptimeMillis);


private boolean enqueueMessage(MessageQueue queue, Message msg, long uptimeMillis)
    //将当前Message中target设置为自己,即Handler
    msg.target = this;
    if (mAsynchronous)
        msg.setAsynchronous(true);

    return queue.enqueueMessage(msg, uptimeMillis);
public final Message obtainMessage()

    return Message.obtain(this);


public static Message obtain(Handler h)
    Message m = obtain();
    m.target = h;

    return m;
由上面Handler发送消息的流程可知,Handler发送消息后MessageQueue中enqueueMessage来将消息入队,我么来看enqueueMessage方法:
 boolean enqueueMessage(Message msg, long when)
        .....

        boolean needWake;
        .........

            msg.when = when;
            Message p = mMessages;
            if (p == null || when == 0 || when < p.when)

                //① 当前发送的message需要马上被处理调,needWake唤醒状态置true

                // New head, wake up the event queue if blocked.
                msg.next = p;
                mMessages = msg;
                needWake = mBlocked;
             else

              // Inserted within the middle of the queue.  Usually we don't have to wake
                // up the event queue unless there is a barrier at the head of the queue
                // and the message is the earliest asynchronous message in the queue.
                needWake = mBlocked && p.target == null && msg.isAsynchronous();
                Message prev;

                // ② 当前发送的message被排队到其他message的后面,needWake唤醒状态置false

                for (;;)
                    prev = p;
                    p = p.next;
                    if (p == null || when < p.when)
                        break;

                    if (needWake && p.isAsynchronous())
                        needWake = false;


                msg.next = p; // invariant: p == prev.next
                prev.next = msg;


        //③  是否唤醒主线程
        if (needWake)
            nativeWake(mPtr);

        return true;
在MessageQueue中enqueueMessage方法中,我们主要关注三个地方:①②③,根据传进来消息Message中的时间和队列中最前面一个消息的时间进行比对,判断是不是需要及时处理,还是排到后面去。
在①处,当前发送的message需要马上被处理调,needWake唤醒状态置true。
在②处,当前发送的message被排队到其他message的后面,needWake唤醒状态置false。
在③处,needWake,来确定是否唤醒主线程来处理消息。
这样消息就能被存放到消息队列中,当需要及时处理,会通过nativeWake来唤醒主线程,nativeWake是一个native方法,用jni来实现,Handler机制用的是Linux下的一种通信方式,叫管道。管道(Pipe),是Linux中的一种进程间通信方式,使用了特殊的文件,有两个文件描述符(一个是读取,一个是写入)。关于管道有兴趣的可以自己研究看看,这里不做过多介绍。
在Looper.loop()方法中,没有消息处理,主线程就会阻塞,当主线程被子线程唤醒后,会继续执行,这样就会执行 msg.target.dispatchMessage(msg)方法
public static void loop()
        final Looper me = myLooper();
        ....
        final MessageQueue queue = me.mQueue;

        ....

        for (;;)
            Message msg = queue.next(); // might block
            if (msg == null)
                // No message indicates that the message queue is quitting.
                return;

            //分发消息
            msg.target.dispatchMessage(msg);


            msg.recycle();
dispatchMessage方法如下,会调用handleMessage,而handleMessage是个空方法,正是我们需要重写的地方,我们处理消息的逻辑就在这里,这样,这个Handler机制的流程就走通了。
public void dispatchMessage(Message msg)
        if (msg.callback != null)
            handleCallback(msg);
         else
            if (mCallback != null)
                if (mCallback.handleMessage(msg))
                    return;


            handleMessage(msg);


public void handleMessage(Message msg)
以上是关于从源码角度剖析Handler 机制的主要内容,如果未能解决你的问题,请参考以下文章