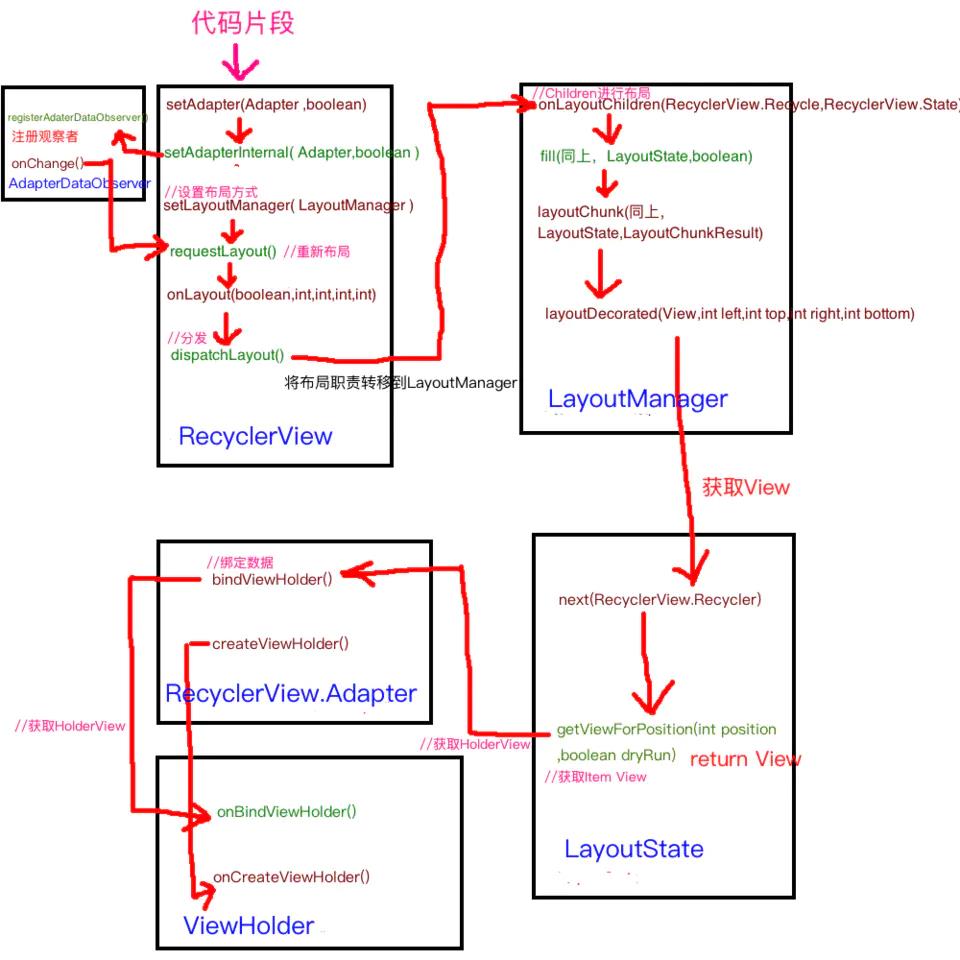
整体流程MeasureLayout 详解——RecyclerView源码详解
Posted 薛瑄
tags:
篇首语:本文由小常识网(cha138.com)小编为大家整理,主要介绍了整体流程MeasureLayout 详解——RecyclerView源码详解相关的知识,希望对你有一定的参考价值。
刚才有个朋友问我,博主发生什么事了,给我发了几张截图,我一看,哦,原来是有个大帅哔看了文章,说是,博主,我能白嫖你的文章,我说年轻人,点个赞再走,他说不点,我说点一个,他说不点,我说点一个,他说不点,我说我这文章对你有用,他不服气,说要先看看。我说可以,很快啊,看完后,就是一个复制,一个粘贴,一个网页关闭,我大意了啊,没有删除文章。按传统博客的有用为止,他说已经输了啊。 后来他说他是乱点的,这可不是乱点的啊,训练有素。我劝年轻人好好点赞,耗子尾汁,谢谢朋友们
前言
整体流程、measure、layout 详解 ——深入分析RecyclerView源码(一)
缓存 ——深入分析RecyclerView源码(二)
滑动和动画 ——深入分析RecyclerView源码(二)
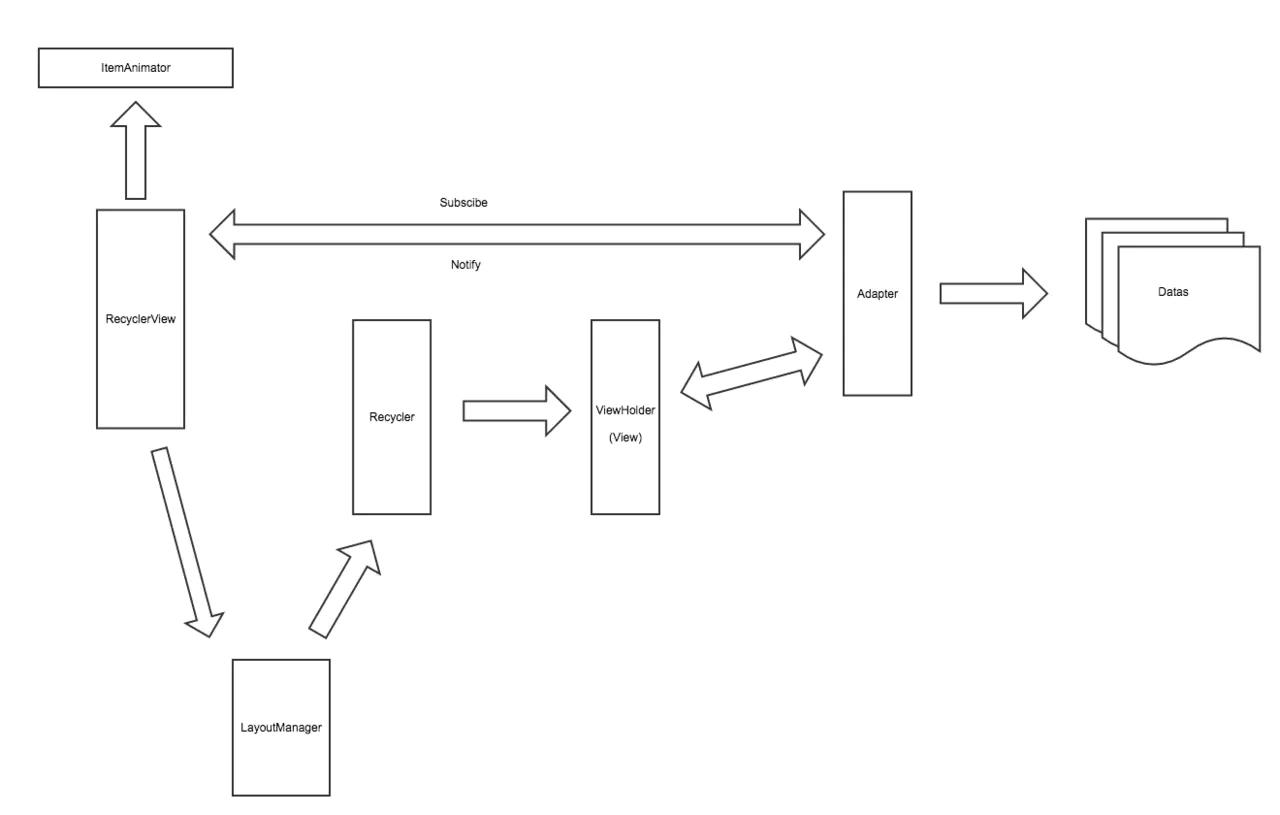
本篇文章分析主体流程,先来整体看一下RecycleView的 结构

- RecycleView 是一个ViewGroup,想要显示数据集Datas,需要通过适配器Adapter,把数据转为对应的View,这样就可以添加到RecycleView中了。(适配器模式)
- 由于屏幕能显示View的个数,往往是小于所有数据的个数。如果为每一个数据都创建一个View,效率肯定不够,所有使用Recycler来管理这些View,实现对View的创建,缓存,数据绑定(在代码实现中,缓存的是ViewHolder)
- 不同的业务场景,需要不同的布局样式,有线性、网格、瀑布等,这里抽象出LayoutManager 来方便拓展,例如LinearLayoutManager等(策略模式)
这篇文章认为此处是桥接模式,桥接模式的核心是为了解决 如果有多个变化维度,每个维度有多种实现,若抽象类使用继承实现每个维度的每种实现,会导致的类爆炸。应该使用组合,抽象类和维度接口的组合(抽象化和实现化之间使用组合/聚合关系而不是继承关系,从而使两者可以独立的变化)。桥接模式是一种结构型模式,不会在运行时改变。而策略模式,是一种行为模式,主要目的就是在运行时,可动态改变。这两种模式的类图很相似,但是要解决的问题完全不同。
- 每当数据集发生变化的时候,需要调用notifyDataSetChanged 等函数,通知RecycleView更新界面。所以需要在Adapter(被观察者)和RecycleView(观察者) 建立监听关系(观察者模式)
源码分析
文章的源码版本是androidx recycleView 1.0.0
先来看看RecyclerView的构造函数
代码一:
RecyclerView.java
   public RecyclerView(@NonNull Context context, @Nullable AttributeSet attrs, int defStyle)
        super(context, attrs, defStyle);
        //获取自定义属性值
        if (attrs != null)
            TypedArray a = context.obtainStyledAttributes(attrs, CLIP_TO_PADDING_ATTR, defStyle, 0);
            mClipToPadding = a.getBoolean(0, true);
            a.recycle();
         else
            mClipToPadding = true;

        //设置当前View 是否可以滑动
        setScrollContainer(true);
        setFocusableInTouchMode(true);

        final ViewConfiguration vc = ViewConfiguration.get(context);
        //获取最小滑动的阈值
        mTouchSlop = vc.getScaledTouchSlop();
        //获取横竖方向的 滑动缩放因子,用在手势操作中
        mScaledHorizontalScrollFactor =
                ViewConfigurationCompat.getScaledHorizontalScrollFactor(vc, context);
        mScaledVerticalScrollFactor =
                ViewConfigurationCompat.getScaledVerticalScrollFactor(vc, context);
        //获取最大最小 的滑动速率
        mMinFlingVelocity = vc.getScaledMinimumFlingVelocity();
        mMaxFlingVelocity = vc.getScaledMaximumFlingVelocity();
        //如果不可滑动,就不需要绘制自己了。如果设置了Item Decoration,就会设置为false
        setWillNotDraw(getOverScrollMode() == View.OVER_SCROLL_NEVER);

        mItemAnimator.setListener(mItemAnimatorListener);
        //初始化AdapterManager,用于处理Adapter的数据发生变化,例如新增、删除item等
        //之所以需要它,如果有多个连续这样的操作,把这些操作放入队列,逐一处理(类似于fragment的处理方式)
        initAdapterManager();
        //初始化ChildHelper,用于管理子View,添加、删除item的View等
        initChildrenHelper();
        initAutofill();
        // If not explicitly specified this view is important for accessibility.
        if (ViewCompat.getImportantForAccessibility(this)
                == ViewCompat.IMPORTANT_FOR_ACCESSIBILITY_AUTO)
            ViewCompat.setImportantForAccessibility(this,
                    ViewCompat.IMPORTANT_FOR_ACCESSIBILITY_YES);

        mAccessibilityManager = (AccessibilityManager) getContext()
                .getSystemService(Context.ACCESSIBILITY_SERVICE);
        setAccessibilityDelegateCompat(new RecyclerViewAccessibilityDelegate(this));
        // Create the layoutManager if specified.
		//默认是支持嵌套滑动的
        boolean nestedScrollingEnabled = true;
        //从xml中 获取属性值
        if (attrs != null)
            int defStyleRes = 0;
            TypedArray a = context.obtainStyledAttributes(attrs, R.styleable.RecyclerView,
                    defStyle, defStyleRes);
            String layoutManagerName = a.getString(R.styleable.RecyclerView_layoutManager);
            int descendantFocusability = a.getInt(
                    R.styleable.RecyclerView_android_descendantFocusability, -1);
            if (descendantFocusability == -1)
                setDescendantFocusability(ViewGroup.FOCUS_AFTER_DESCENDANTS);

            mEnableFastScroller = a.getBoolean(R.styleable.RecyclerView_fastScrollEnabled, false);
            if (mEnableFastScroller)
                StateListDrawable verticalThumbDrawable = (StateListDrawable) a
                        .getDrawable(R.styleable.RecyclerView_fastScrollVerticalThumbDrawable);
                Drawable verticalTrackDrawable = a
                        .getDrawable(R.styleable.RecyclerView_fastScrollVerticalTrackDrawable);
                StateListDrawable horizontalThumbDrawable = (StateListDrawable) a
                        .getDrawable(R.styleable.RecyclerView_fastScrollHorizontalThumbDrawable);
                Drawable horizontalTrackDrawable = a
                        .getDrawable(R.styleable.RecyclerView_fastScrollHorizontalTrackDrawable);
                initFastScroller(verticalThumbDrawable, verticalTrackDrawable,
                        horizontalThumbDrawable, horizontalTrackDrawable);

            a.recycle();
            //创建LayoutManager,如果在xml中设置了LayoutManager ,这里会通过反射成功创建对应的LayoutManager

            createLayoutManager(context, layoutManagerName, attrs, defStyle, defStyleRes);

            if (Build.VERSION.SDK_INT >= 21)
                a = context.obtainStyledAttributes(attrs, NESTED_SCROLLING_ATTRS,
                        defStyle, defStyleRes);
                nestedScrollingEnabled = a.getBoolean(0, true);
                a.recycle();

         else
            setDescendantFocusability(ViewGroup.FOCUS_AFTER_DESCENDANTS);

        //设置是否支持嵌套滑动
        // Re-set whether nested scrolling is enabled so that it is set on all API levels
        setNestedScrollingEnabled(nestedScrollingEnabled);
下面我们来到View绘制流程的,RecyclerView把子View的measure和layout的交给LayoutManager,这样就可以方便定制布局。
在measure阶段,可能会调用LayoutManager的dispatchLayoutStep1() dispatchLayoutStep2(),这事为了计算出wrap_content的recycleView的大小
在layout阶段 ,分三个步骤 dispatchLayoutStep1() dispatchLayoutStep2() dispatchLayoutStep3() 对应的状态 STEP_START、STEP_LAYOUT 、 STEP_ANIMATIONS
- STEP_START 即将开始布局,此时会调用dispatchLayoutStep1,完成后 ,布局状态变为STEP_LAYOUT
- STEP_LAYOUT 真正开始布局,此时会调用dispatchLayoutStep2,会调用到layoutManager 中的layout,完成后,状态变为STEP_ANIMATIONS
- STEP_ANIMATIONS 执行动画,此时会调用dispatchLayoutStep3,
这三个函数会在onLayout 的时候分析,下面先来看看onMeasure
onMeasure
代码二
    @Override
    protected void onMeasure(int widthSpec, int heightSpec)
        if (mLayout == null)
            defaultOnMeasure(widthSpec, heightSpec);
            return;

        //是否开启自动测量,如果true,就交给RecyclerView 去测量,如果false ,就由LayoutManager去测量。
        //现在自带的LayoutManager,都是返回true,例如 LinearLayoutManager
        if (mLayout.isAutoMeasureEnabled())
            final int widthMode = MeasureSpec.getMode(widthSpec);
            final int heightMode = MeasureSpec.getMode(heightSpec);

            /**
             * This specific call should be considered deprecated and replaced with
             * @link #defaultOnMeasure(int, int). It can't actually be replaced as it could
             * break existing third party code but all documentation directs developers to not
             * override @link LayoutManager#onMeasure(int, int) when
             * @link LayoutManager#isAutoMeasureEnabled() returns true.
             */
             //调用RecycleView 中的defaultOnMeasure,此处主要是设置measure的宽高模式,代码三分析
            mLayout.onMeasure(mRecycler, mState, widthSpec, heightSpec);
			//宽高的测量模式是否都是精确的
            final boolean measureSpecModeIsExactly =
                    widthMode == MeasureSpec.EXACTLY && heightMode == MeasureSpec.EXACTLY;
            if (measureSpecModeIsExactly || mAdapter == null)
                //如果宽高的测量模式都是精确的,宽高不受子View 的影响,所以就直接返回
                return;

            //代码执行到这里说明RecycleView的宽高 至少一个是wrap_content,
            //那么就需要measure、layout 子View后才能确定RecycleView的MeasureSpec
            //
            // 调用第一步layout,准备测量子View
            if (mState.mLayoutStep == State.STEP_START)
                dispatchLayoutStep1();

            // set dimensions in 2nd step. Pre-layout should happen with old dimensions for
            // consistency
            //子View的measure,layout 是在layoutManager中进行的,所以需要把RecycleView的MeasureSpec 传递过去
            //在最终完成测量布局后,layoutManager中保存的RecycleView 的测量规则值可能会失效(详见下面疑问1)
            mLayout.setMeasureSpecs(widthSpec, heightSpec);
            mState.mIsMeasuring = true;
            //调用第二步layout,测量子View
            dispatchLayoutStep2();
            //此时子View measure,layout完成,把可容纳这些View的宽高值 设置到RecycleView。代码四分析
            //这里有一个疑问,见下面的疑问2
            // now we can get the width and height from the children.
            mLayout.setMeasuredDimensionFromChildren(widthSpec, heightSpec);

            // if RecyclerView has non-exact width and height and if there is at least one child
            // which also has non-exact width & height, we have to re-measure.
            if (mLayout.shouldMeasureTwice())
                mLayout.setMeasureSpecs(
                        MeasureSpec.makeMeasureSpec(getMeasuredWidth(), MeasureSpec.EXACTLY),
                        MeasureSpec.makeMeasureSpec(getMeasuredHeight(), MeasureSpec.EXACTLY));
                mState.mIsMeasuring = true;
                dispatchLayoutStep2();
                // now we can get the width and height from the children.
                mLayout.setMeasuredDimensionFromChildren(widthSpec, heightSpec);

         else
看下代码 mLayout.onMeasure(mRecycler, mState, widthSpec, heightSpec); 做了些什么事情
代码三
   // 该函数是在LayoutManager 中
   //widthSpec、heightSpec 是RecyclerView的测量规格
   public void onMeasure(@NonNull Recycler recycler, @NonNull State state, int widthSpec,
                int heightSpec)
       mRecyclerView.defaultOnMeasure(widthSpec, heightSpec);

  // 该函数是在RecyclerView 中
  //根据测量规则计算 宽高值,并设置到RecyclerView的宽高中
   void defaultOnMeasure(int widthSpec, int heightSpec)
        // calling LayoutManager here is not pretty but that API is already public and it is better
        // than creating another method since this is internal.
        final int width = LayoutManager.chooseSize(widthSpec,
                getPaddingLeft() + getPaddingRight(),
                ViewCompat.getMinimumWidth(this));
        final int height = LayoutManager.chooseSize(heightSpec,
                getPaddingTop() + getPaddingBottom(),
                ViewCompat.getMinimumHeight(this));

        setMeasuredDimension(width, height);

   // 该函数是在LayoutManager 中
   //由上面的调用可知,desired 是padding值
   public static int chooseSize(int spec, int desired, int min)
         final int mode = View.MeasureSpec.getMode(spec);
         final int size = View.MeasureSpec.getSize(spec);
         switch (mode)
              case View.MeasureSpec.EXACTLY:
                    return size;
              case View.MeasureSpec.AT_MOST:
                    //注意,如果是AT_MOST,RecyclerView的还需要测量布局其子View,才能最终确定
                    //所以这里返回最小值,,并不能决定最终的RecyclerView的尺寸
                    return Math.min(size, Math.max(desired, min));
              case View.MeasureSpec.UNSPECIFIED:
              default:
                    return Math.max(desired, min);
继续来看一下onMeasure中调用的setMeasuredDimensionFromChildren
代码四
        void setMeasuredDimensionFromChildren(int widthSpec, int heightSpec)
            final int count = getChildCount();
            if (count == 0)
                //如果子View 测量完了,数量是0,设置RecyclerView的测量规格,就不用考虑子View的位置,使用测量规格
                mRecyclerView.defaultOnMeasure(widthSpec, heightSpec);
                return;

            //top,取最小值,bottom 取最大值
            //left 取最小值,right 取最大值
            //这样才能最大限度把所有子View都显示出来
            int minX = Integer.MAX_VALUE;
            int minY = Integer.MAX_VALUE;
            int maxX = Integer.MIN_VALUE;
            int maxY = Integer.MIN_VALUE;

            for (int i = 0; i < count; i++)
                View child = getChildAt(i);
                final Rect bounds = mRecyclerView.mTempRect;
                //需要考虑item 直接的装饰线
                getDecoratedBoundsWithMargins(child, bounds);
                if (bounds.left < minX)
                    minX = bounds.left;

                if (bounds.right > maxX)
                    maxX = bounds.right;

                if (bounds.top < minY)
                    minY = bounds.top;

                if (bounds.bottom > maxY)
                    maxY = bounds.bottom;


            //得到容纳当前所有子View的尺寸,也就是RecyclerView的最大尺寸
            mRecyclerView.mTempRect.set(minX, minY, maxX, maxY);
            setMeasuredDimension(mRecyclerView.mTempRect, widthSpec, heightSpec);


        public void setMeasuredDimension(Rect childrenBounds, int wSpec, int hSpec)
            int usedWidth = childrenBounds.width() + getPaddingLeft() + getPaddingRight();
            int usedHeight = childrenBounds.height() + getPaddingTop() + getPaddingBottom();
            //根据最大的尺寸和测量模式计算出 最终的测量规格,
            int width = chooseSize(wSpec, usedWidth, getMinimumWidth());
            int height = chooseSize(hSpec, usedHeight, getMinimumHeight());
            setMeasuredDimension(width, height);
疑问1:在dispatchLayoutStep2() 中measure,layout子View 的时候,会使用到RecycleView的MeasureSpec,而该值是在dispatchLayoutStep2()之前就已经传入layoutManager了,dispatchLayoutStep2() 之后又要重新设置RecycleView的MeasureSpec, 那么是不是对子View UI的确定 就会有问题呢?因为确定子View 的时候,可能使用了不正确的RecycleView的MeasureSpec
要理清这个问题,需要先知道,在此时的代码RecycleView的宽高至少有一个是wrap_content,也就是不确定的。假设这样的情况,屏幕上的布局RecycleView 最大可容纳10个item,此时只有2个item,RecycleView的高度设置wrap_content
分4步简单介绍一下
1、在执行到RecycleView的onMeasure(), 父View会给出尽可能大的size,
2、RecycleView 把子View measure,layout完成后,再去设置自己具体的宽高值,
3、父View(这里假设为RelativeLayout) 在根据具体的RecycleView宽高值,设置RecycleView的LayoutParams
4、到layout阶段,就根据RecycleView的LayoutParams,去设置top,bottom,left,right 的值
这个问题大概分析到这里,下面贴一下主要的代码
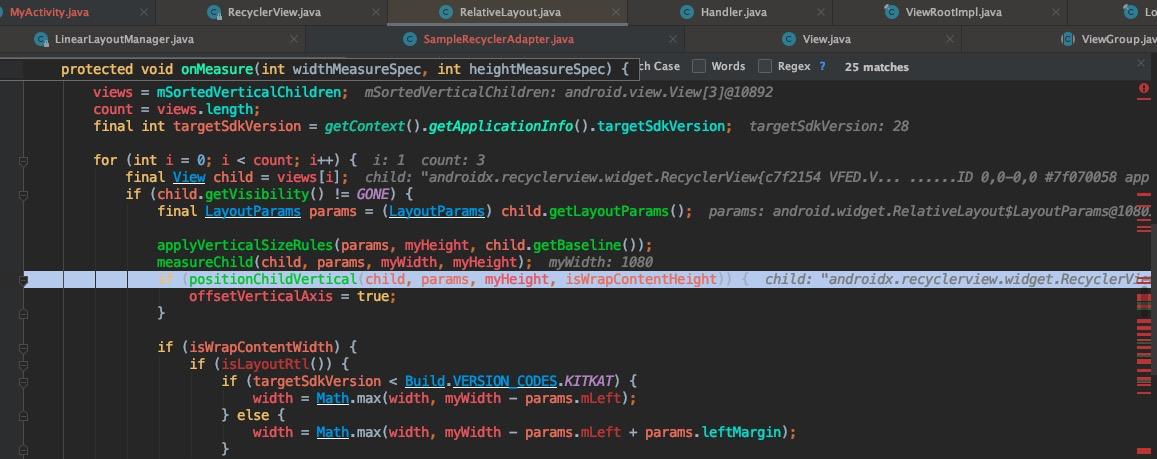
-
对应步骤1
下面是RelativeLayout的onMeasure 函数,其中调用了measureChild 会调用到RecycleView的onMeasure ()

-
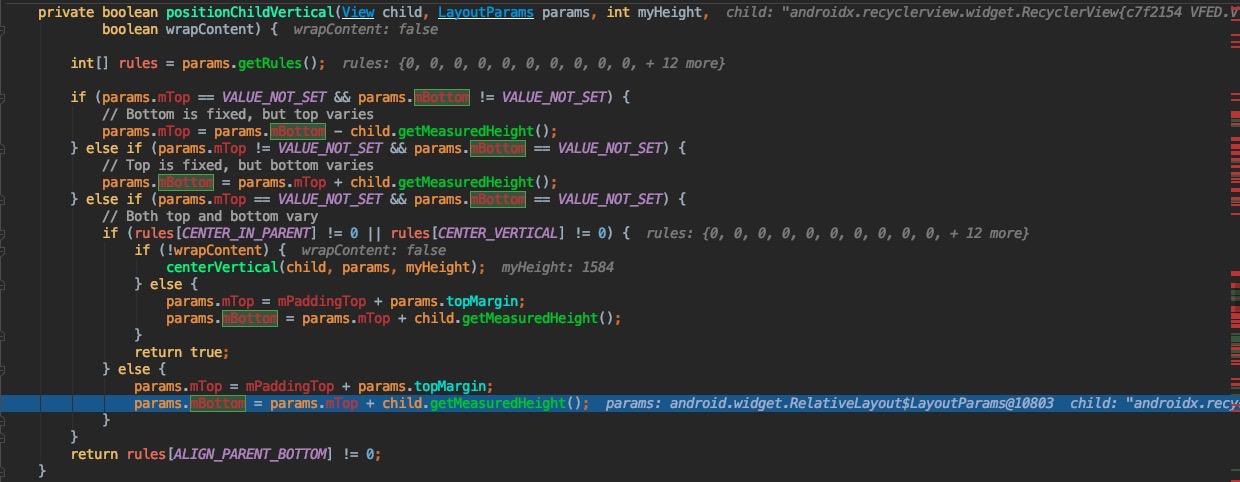
对应步骤3
进入到RelativeLayout的positionChildVertical 函数,把RecycleView的LayoutParams 进行调整,注意图中断点处的child.getMeasureHeight 获取到的是最新的RecycleView的尺寸(就是步骤2 执行完后,能容纳子View的宽高)

- 对应步骤4
这里执行到RelativeLayout的onLayout 函数,看到在设置RecycleView的top,bottom,left,right 的值,使用的是LayoutParams的值,也就是新得到的RecycleView尺寸

疑问2:为什么需要子View measure,layout都完成后,才能确定RecycleView的宽高呢?
想想网格布局和瀑布布局
注意,此时LayoutManager中的保存RecycleView的宽高值 和 当前RecycleView 的宽高值 ,就不一样了。这个很关键,正因为这两个值不一样,所以下面的dispatchLayout 阶段,需要重新执行一次dispatchLayoutStep2() 。下面来分析绘制流程的onLayout
onLayout
代码五
    @Override
    protected void onLayout(boolean changed, int l, int t, int r, int b)
        TraceCompat.beginSection(TRACE_ON_LAYOUT_TAG);
        dispatchLayout();
        TraceCompat.endSection();
        mFirstLayoutComplete = true;


    void dispatchLayout()
        .... 省略判空代码...
        mState.mIsMeasuring = false;
        if (mState.mLayoutStep == State.STEP_START)
            //STEP_START,需要从第一步layout 执行
            dispatchLayoutStep1();
            mLayout.setExactMeasureSpecsFrom(this);
            dispatchLayoutStep2();
         else if (mAdapterHelper.hasUpdates() || mLayout.getWidth() != getWidth()
                || mLayout.getHeight() != getHeight())
            // First 2 steps are done in onMeasure but looks like we have to run again due to
            // changed size.
            //如果是wrap_content 会进入到这个分支,
            //此时把LayoutManager中的保存RecycleView的测量模式设为精确,因为在LayoutManager布局的时候,无法改变RecycleView的大小

            mLayout.setExactMeasureSpecsFrom(this);
            dispatchLayoutStep2();
         else
            // always make sure we sync them (to ensure mode is exact)
            mLayout.setExactMeasureSpecsFrom(this);

        dispatchLayoutStep3();
在上面介绍过,Layout被分为三个阶段, dispatchLayoutStep1() dispatchLayoutStep2() dispatchLayoutStep3(),下面来逐一分析这几个函数
dispatchLayoutStep1()
代码六
    private void dispatchLayoutStep1()
        mState.assertLayoutStep(State.STEP_START);
        fillRemainingScrollValues(mState);
        mState.mIsMeasuring = false;
        //开启拦截 RequestLayout,避免多余的RequestLayout
        startInterceptRequestLayout();
        //记录View的布局前后状态,第三阶段根据状态变化,来最后执行动画。这里先清除
        mViewInfoStore.clear();
        onEnterLayoutOrScroll();
        //执行队列任务,notifyItemXXXXX 这系列函数,产生的任务。例如:增加了一个item等
        //mRunSimpleAnimations、mRunPredictiveAnimations 这两个值 也是由此计算出以上是关于整体流程MeasureLayout 详解——RecyclerView源码详解的主要内容,如果未能解决你的问题,请参考以下文章
