这篇文章,你参考一下。 How to shrink a default install LVM PV to create another partition
A default installation of Fedora will use all available free space to create two new partitions: a small /boot, and all the remaining space for a single LVM physical volume (PV). This sometimes poses problems for those who later wish to make room for more regular partitions, to install Another Operating System into, for example. The short solution: reinstall Fedora with custom sizes to leave free space; the long solution: this howto. Applicable to Fedora Versions
* All
Requirements
1. A default installation of Fedora using LVM (without LUKS encryption) 2. A desire to do things the hard way.
Doing the Work
Summary of steps below: Boot rescue and skip mounting, activate lvm (vgchange -ay), fsck root filesystem, shrink root filesystem (resize2fs), shrink root logical volume (lvresize), lvremove LogVol01 swap LV and add it back to allow pvresize to succeed, shrink PV (pvresize), shrink partition (parted), and finally create new partitions in the free space, now or later.
For the example below, assume we installed Fedora onto all of an 80GB drive, and now we want to squish Fedora down to 50GB to make room for a new 30GB partition <i>after it</i>.
1. Boot into rescue mode and on the last step make sure to SKIP mounting your filesystems under /mnt/sysimage 2. Activate LVM
lvm vgchange -a y
3. fsck your single, large root filesystem on LogVol00
fsck -fC /dev/VolGroup00/LogVol00
4. Shrink your (ext3) filesystem inside the LogVol00 container BEFORE shrinking its container
resize2fs -p /dev/VolGroup00/LogVol00 50G
5. Shrink the LogVol container to match
lvm lvresize /dev/VolGroup/LogVol00 --size 50G
6.
There is now enough free physical space available (lvm pvs) to shrink the physical volume by that much in order to make room for a new partition of that size or smaller. Unfortunately, the current implementation of "pvresize" is lacking - from the manpage: "pvresize will refuse to shrink PhysicalVolume if it has allocated extents after where its new end would be. In the future, it should relocate these elsewhere in the volume group if there is sufficient free space, like pvmove does."
Because of this limitation, it is necessary to temporarily remove your LogVol01 swap LV, which is still physically allocated at the very end of your PV, then add it back such that it's newly located immediately after the smaller LogVol00 nearer to the start of the PV (and partition).
You first must determine how large your current LogVol01 swap is so you can recreate it with the same size. Take note of the "LSize" column for LogVol01 from the output of:
Take note of the PV to be resized, and of PSize and PFree. You can now resize your /dev/sda2 PV down to a final size of anything between 9G and 80G. We want to shrink down to 50G in this example, leaving 30G free for later. And now for the pvresize:
If this step fails, it's probably because you're trying to shrink too small, and/or there are still allocated extents -- other than swap, which you moved in the step above -- after where the new tail end would be. A future version of pvresize will automatically move those to earlier free space as needed. (As an alternative, if you have lots of free space on another drive, you could pvcreate there, then pvmove temporarily, then pvresize, and pvmove back.) 8. FINALLY - Shrink the PARTITION containing the shrunk PV to match its new size. WARNING: This is the trickiest bit to get right due to unit conversion and conventions (GB vs GiB, rounding error, etc), so we'll be using the SECTOR unit (512bytes) as well as giving ourselves a margin of error. It also involves a tiny bit of critical advanced addition arithmetic.
Display the PV sizes in SECTORS and take note of the smaller PSize:
lvm pvs --units s
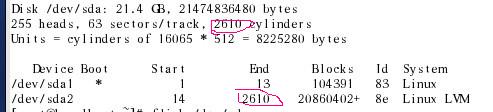
Display the partition Size in SECTORS using parted and take note of the Start sector and partition Number of the partition with "lvm" in the Flags column:
parted /dev/sda unit s print
POINT OF NO RETURN - HAVE BACKUPS
So now we need to nuke the old, large partition from the partition table, and immediately recreate it with the exact same Start sector, but with a newer, shorter End sector. To calculate the new End sector, ADD the partition Start sector to the PV PSize, and then add a safety margin of around 131072 sectors (64MB) to that.
Nuke it
parted /dev/sda rm 2
Recreate it smaller + safety margin. NOTE: remeber to append the letter "s" to your values to qualify them as sectors. (e.g. "123s")
parted /dev/sda mkpart primary 401625s 105390297s parted /dev/sda set 2 lvm on parted /dev/sda print fdisk -l /dev/sda
9. Almost done. OPTIONAL STEP: pvresize, lvresize, and resize2fs once more, in that order, but without an explicit size given, such that you can safely grow it back up into the small safety margin you used above. Skip it. 10. Verify you didn't make a major oops truncating something by running fsck again:
fsck -fC /dev/VolGroup00/LogVol00
11. All done. You now have some free unpartitioned space outside of LVM to play with.参考技术A0,用这个命令fdisk新建一个分区,分区类型是swap 1,用这个命令mkswap来创建一个交换空间,具体信息可查看手册 2,用这个命令swapon来挂载交换空间 4,用这个命令swapoff来缷载交换空间