如何使用prometheus监控docker
Posted
tags:
篇首语:本文由小常识网(cha138.com)小编为大家整理,主要介绍了如何使用prometheus监控docker相关的知识,希望对你有一定的参考价值。
Docker 软件包已经包括在默认的 CentOS-Extras 软件源里,需要配置好yum源,如下图安装docker命令如下: yum -y install docker,如图:
安装完成后,使用下面的命令来启动 docker 服务 如图示:
下载官方的 CentOS 镜像到本地 ,docker pull centos
搜索可用的docker镜像,下载成功如下图所示
在docker容器中安装新的程序,命令docker run -ubuntu
apt-get install -y ping
在容器中用命令ping,发现测试可以使用 参考技术A
Prometheus 最开始是由 SoundCloud 开发的开源监控告警系统,是 Google BorgMon 监控系统的开源版本。在 2016 年,Prometheus 加入 CNCF,成为继 Kubernetes 之后第二个被 CNCF 托管的项目。随着 Kubernetes 在容器编排领头羊地位的确立,Prometheus 也成为 Kubernetes 容器监控的标配。
监控系统的总体架构大多是类似的,都有数据采集、数据处理存储、告警动作触发和告警,以及对监控数据的展示。下面是 Prometheus 的架构:

Prometheus Server 负责定时从 Prometheus 采集端 Pull(拉) 监控数据。Prometheus 采集端可以是实现了 /metrics 接口的服务,可以是从第三方服务导出监控数据的 exporter,也可以是存放短生命周期服务监控数据的 Pushgateway。相比大多数采用 Push(推) 监控数据的方式,Pull 使得 Promethues Server 与被采集端的耦合度更低,Prometheus Server 更容易实现水平拓展。对于采集的监控数据,Prometheus Server 使用内置时序数据库 TSDB 进行存储。同时也会使用这些监控数据进行告警规则的计算,产生的告警将会通过 Prometheus 另一个独立的组件 Alertmanager 进行发送。Alertmanager 提供了十分灵活的告警方式,并且支持高可用部署。对于采集到的监控数据,可以通过 Prometheus 自身提供的 Web UI 进行查询,也可以使用 Grafana 进行展示。
部署Prometheus+Grafana监控Docker
文章目录
部署Prometheus+Grafana监控Docker
(1)实验环境
两台主机都需要桥接网卡!
| 系统 | 主机名 | ip | 安装软件 | 扮演角色 |
|---|---|---|---|---|
| Centos7.4 | Prometheus | 192.168.100.210 | prometheus+Grafana+exporter+cAdvisor+influxdb+docker | 监控端 |
| Centos7.4 | Docker | 192.168.100.208 | exporter+docker+cAdvisor | 被监控端 |
(2)实验步骤
1、先做基础配置
#监控端配置
[root@Centos7 ~]# hostnamectl set-hostname prometheus
[root@Centos7 ~]# su
[root@prometheus ~]# systemctl stop firewalld
[root@prometheus ~]# setenforce 0
setenforce: SELinux is disabled
[root@prometheus ~]# mount /dev/cdrom /mnt/
[root@prometheus ~]# yum -y install ntpdate
[root@prometheus ~]# ntpdate ntp1.aliyun.com
 5 Aug 09:58:03 ntpdate[1142]: step time server 120.25.115.20 offset -28802.931261 sec
#被监控端配置
[root@Centos7 ~]# hostnamectl set-hostname docker
[root@Centos7 ~]# su
[root@docker ~]# systemctl stop firewalld
[root@docker ~]# setenforce 0
setenforce: SELinux is disabled
[root@docker ~]# mount /dev/cdrom /mnt/
[root@docker ~]# yum -y install ntpdate
[root@docker ~]# ntpdate ntp1.aliyun.com
 5 Aug 09:58:23 ntpdate[1527]: step time server 120.25.115.20 offset -28801.336708 sec
2、在监控端安装服务
安装prometheus+Grafana+exporter+cAdvisor+influxdb
#以下操作全部都在监控端执行
#上传软件包
[root@prometheus ~]# ll
总用量 58216
-rw-------. 1 root root     1264 1月  12 2021 anaconda-ks.cfg
-rw-r--r--  1 root root 59608515 8月   5 09:59 prometheus-2.16.0.linux-amd64.tar.gz
[root@prometheus ~]# tar xf prometheus-2.16.0.linux-amd64.tar.gz
[root@prometheus ~]# mv prometheus-2.16.0.linux-amd64 /usr/local/prometheus
[root@prometheus ~]# cd /usr/local/prometheus/

#Promtheus作为一个时间序列数据库,其采集的数据会以文件的形似存储在本地中,默认的存储路径为data/,因此我们需要先手动创建该目录:
[root@prometheus prometheus]# mkdir data
[root@prometheus prometheus]# ll
总用量 140984
drwxr-xr-x 2 3434 3434       38 2月  14 2020 console_libraries
drwxr-xr-x 2 3434 3434      173 2月  14 2020 consoles
drwxr-xr-x 3 root root       51 8月   5 10:00 data
-rw-r--r-- 1 3434 3434    11357 2月  14 2020 LICENSE
-rw-r--r-- 1 3434 3434     3184 2月  14 2020 NOTICE
-rwxr-xr-x 1 3434 3434 82329106 2月  14 2020 prometheus
-rw-r--r-- 1 3434 3434      926 2月  14 2020 prometheus.yml
-rwxr-xr-x 1 3434 3434 48417809 2月  14 2020 promtool
-rwxr-xr-x 1 3434 3434 13595766 2月  14 2020 tsdb
[root@prometheus prometheus]# useradd -s /sbin/nologin prometheus
[root@prometheus prometheus]# chown -R prometheus:prometheus /usr/local/prometheus/
[root@prometheus prometheus]# cd /usr/lib/systemd/system
[root@prometheus system]# vim prometheus.service
[Unit]
Description=prometheus
After=network.target

[Service]
User=prometheus
Group=prometheus
WorkingDirectory=/usr/local/prometheus
ExecStart=/usr/local/prometheus/prometheus
[Install]
WantedBy=multi-user.target
#保存退出
[root@prometheus system]# systemctl start prometheus      #启动
[root@prometheus system]# netstat -napt | grep 9090       #查看监听端口
tcp        0      0 127.0.0.1:56274         127.0.0.1:9090          ESTABLISHED 1316/prometheus
tcp6       0      0 :::9090                 :::*                    LISTEN      1316/prometheus
tcp6       0      0 127.0.0.1:9090          127.0.0.1:56274         ESTABLISHED 1316/prometheus
使用浏览器进行访问http://192.168.100.210:9090

#安装influxdb数据库
#上传软件包进行安装
[root@prometheus system]# cd
[root@prometheus ~]# ll
总用量 108032
-rw-------. 1 root root     1264 1月  12 2021 anaconda-ks.cfg
-rw-r--r--  1 root root 51010897 8月   5 10:08 influxdb-1.7.8.x86_64.rpm
-rw-r--r--  1 root root 59608515 8月   5 09:59 prometheus-2.16.0.linux-amd64.tar.gz
[root@prometheus ~]# yum -y install influxdb-1.7.8.x86_64.rpm
[root@prometheus ~]# cp /etc/influxdb/influxdb.conf /etc/influxdb/influxdb.conf.default
[root@prometheus ~]# systemctl start influxdb
[root@prometheus ~]# systemctl enable influxdb
[root@prometheus ~]# influx   #进入数据库
Connected to http://localhost:8086 version 1.7.8
InfluxDB shell version: 1.7.8
> show databases;
name: databases
name
----
_internal
> create database prometheus ;   #创建prometheus库
> show databases;   #确认已经创建
name: databases
name
----
_internal
prometheus
> exit
#配置普罗米修斯集成influxdb数据库
[root@prometheus ~]# cd /usr/local/prometheus/
[root@prometheus prometheus]# cp prometheus.yml prometheus.yml.defalut
[root@prometheus prometheus]# vim prometheus.yml    #末尾直接添加
remote_write:
  - url: "http://localhost:8086/api/v1/prom/write?db=prometheus"

remote_read:
  - url: "http://localhost:8086/api/v1/prom/read?db=prometheus"
#保存退出
[root@prometheus prometheus]# systemctl restart prometheus
[root@prometheus prometheus]# systemctl status prometheus

#检测prometheus数据是否到了数据库中
[root@prometheus prometheus]# cd
[root@prometheus ~]# influx
Connected to http://localhost:8086 version 1.7.8
InfluxDB shell version: 1.7.8
> use prometheus;          #进入prometheus库
Using database prometheus
>  show MEASUREMENTS;      #查看当前库下的所有数据,有数据就可以了
> exit
#安装Grafana
[root@prometheus ~]# yum -y install fontconfig freetype* urw-fonts

#上传软件包
[root@prometheus ~]# ll
总用量 163076
-rw-------. 1 root root     1264 1月  12 2021 anaconda-ks.cfg
-rw-r--r--  1 root root 56363500 6月  17 16:40 grafana-6.1.4-1.x86_64.rpm
-rw-r--r--  1 root root 51010897 8月   5 10:08 influxdb-1.7.8.x86_64.rpm
-rw-r--r--  1 root root 59608515 8月   5 09:59 prometheus-2.16.0.linux-amd64.tar.gz
[root@prometheus ~]# yum -y install grafana-6.1.4-1.x86_64.rpm
[root@prometheus ~]# systemctl start grafana-server
[root@prometheus ~]# netstat -anpt | grep 3000
tcp6       0      0 :::3000                 :::*                    LISTEN      1509/grafana-server
使用浏览器进行测试


#安装exporter
#上传软件包
[root@prometheus ~]# ll
总用量 170972
-rw-------. 1 root root     1264 1月  12 2021 anaconda-ks.cfg
-rw-r--r--  1 root root 56363500 6月  17 16:40 grafana-6.1.4-1.x86_64.rpm
-rw-r--r--  1 root root 51010897 8月   5 10:08 influxdb-1.7.8.x86_64.rpm
-rw-r--r--  1 root root  8083296 7月  10 16:51 node_exporter-0.18.1.linux-amd64.tar.gz
-rw-r--r--  1 root root 59608515 8月   5 09:59 prometheus-2.16.0.linux-amd64.tar.gz
[root@prometheus ~]# tar xf node_exporter-0.18.1.linux-amd64.tar.gz
[root@prometheus ~]# mv node_exporter-0.18.1.linux-amd64 /usr/local/exporter
[root@prometheus ~]# cd /usr/lib/systemd/system
[root@prometheus system]#  vim node_exporter.service
[Unit]
Description=node_exporter
After=network.target

[Service]
User=prometheus
Group=prometheus
ExecStart=/usr/local/exporter/node_exporter --web.listen-address=:20001 --collector.systemd --collector.systemd.unit-whitelist=(sshd|nginx).service --collector.processes --collector.tcpstat
[Install]
WantedBy=multi-user.target
#保存退出
[root@prometheus system]# systemctl daemon-reload
[root@prometheus system]# systemctl start node_exporter
[root@prometheus system]# systemctl status node_exporter
[root@prometheus system]# netstat -anpt | grep 20001
tcp6       0      0 :::20001                :::*                    LISTEN      1553/node_exporter
[root@prometheus system]# systemctl enable node_exporter
使用浏览器进行访问


#安装docker
[root@prometheus system]# cd
[root@prometheus ~]# yum install -y yum-utils device-mapper-persistent-data lvm2
[root@prometheus ~]# ll
总用量 170976
-rw-------. 1 root root     1264 1月  12 2021 anaconda-ks.cfg
drwxr-xr-x  3 root root     4096 8月   5 10:38 docker
-rw-r--r--  1 root root 56363500 6月  17 16:40 grafana-6.1.4-1.x86_64.rpm
-rw-r--r--  1 root root 51010897 8月   5 10:08 influxdb-1.7.8.x86_64.rpm
-rw-r--r--  1 root root  8083296 7月  10 16:51 node_exporter-0.18.1.linux-amd64.tar.gz
-rw-r--r--  1 root root 59608515 8月   5 09:59 prometheus-2.16.0.linux-amd64.tar.gz
[root@prometheus ~]# vim /etc/yum.repos.d/centos.repo
[aaa]
name=aaa
baseurl=file:///mnt
enabled=1
gpgcheck=0

[docker]
name=docker
baseurl=file:///root/docker
enabled=1
gpgcheck=0
#保存退出
[root@prometheus ~]# yum -y install docker-ce
[root@prometheus ~]# mkdir -p /etc/docker
[root@prometheus ~]# vim /etc/docker/daemon.json

  "registry-mirrors": ["https://w4uieobw.mirror.aliyuncs.com"]

#保存退出
[root@prometheus ~]# systemctl start docker
[root@prometheus ~]# systemctl status docker
#使用docker下载cAdvisor的镜像
[root@prometheus ~]# docker pull google/cadvisor

#开启容器,映射端口18104
[root@prometheus ~]# docker run \\
  --volume=/:/rootfs:ro \\
  --volume=/var/run:/var/run:rw \\
  --volume=/sys:/sys:ro \\
  --volume=/var/lib/docker/:/var/lib/docker:ro \\
  --volume=/dev/disk/:/dev/disk:ro \\
  --publish=18104:8080\\
  --detach=true \\
  --name=cadvisor \\
  google/cadvisor:latest

#查看容器与镜像
[root@prometheus ~]# docker images
REPOSITORY          TAG                 IMAGE ID            CREATED             SIZE
google/cadvisor     latest              eb1210707573        2 years ago         69.6MB
[root@prometheus ~]# docker ps  #成功启动容器
CONTAINER ID        IMAGE                    COMMAND                  CREATED             STATUS              PORTS                     NAMES
1aab729a1d2d        google/cadvisor:latest   "/usr/bin/cadvisor -…"   3 minutes ago       Up 3 minutes        0.0.0.0:18104->8080/tcp   cadvisor
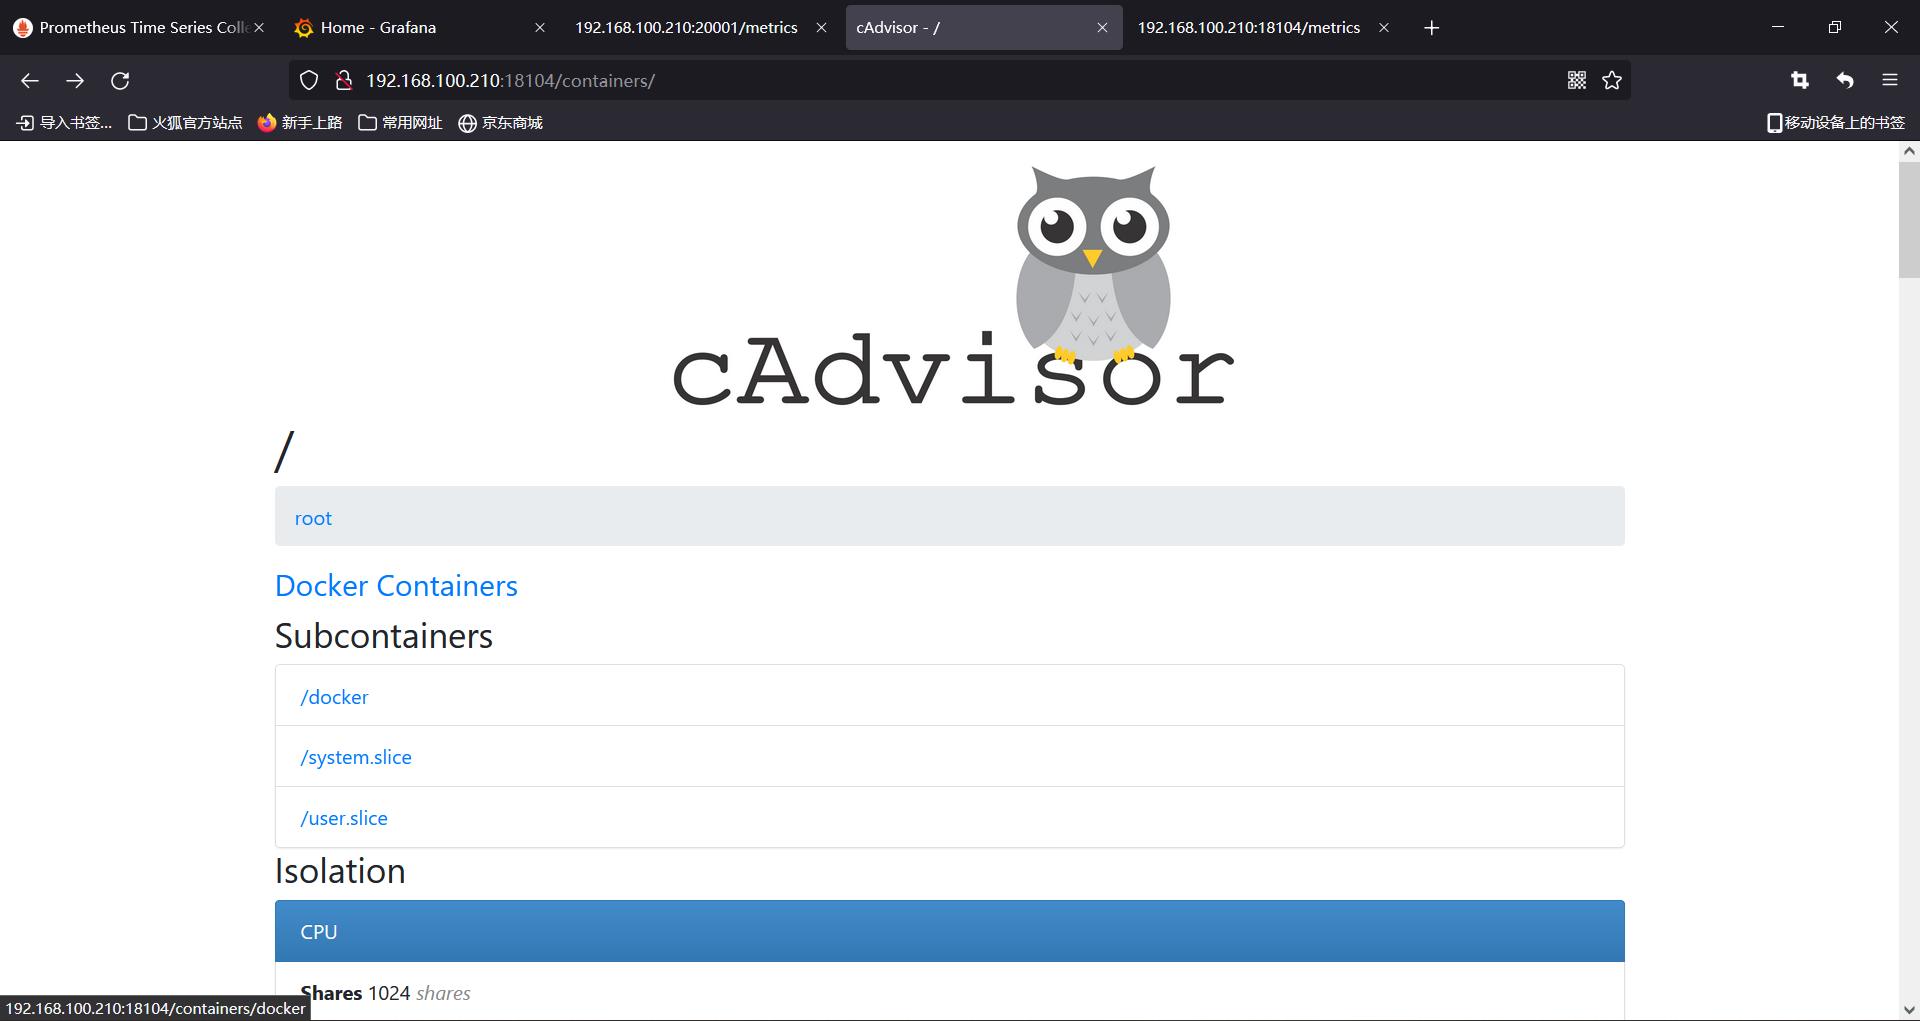
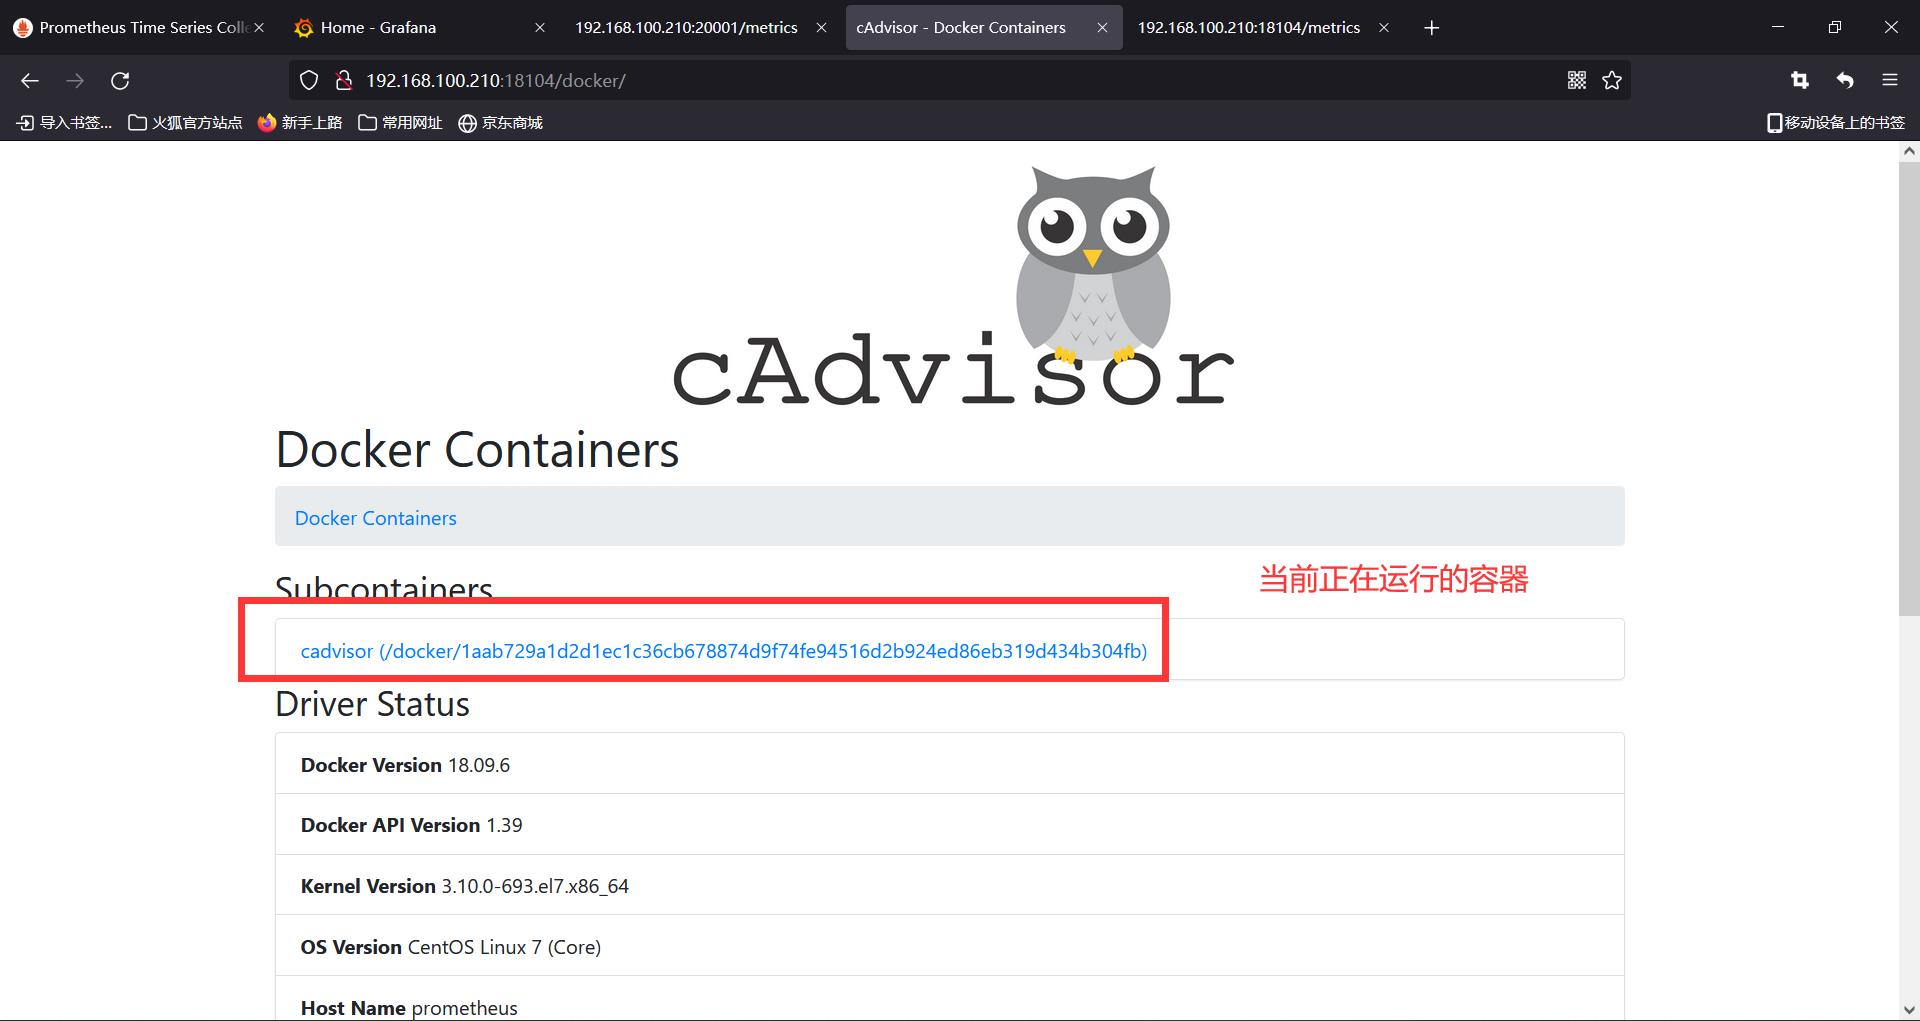
使用浏览器进行访问
访问http://192.168.100.210:18104/containers/进入cadvisor的web界面

访问http://192.168.100.210:18104/metrics可以看到cadvisor给prometheus暴露出来的信息

3、在被监控端安装
**安装 exporter+docker+cAdvisor **
#下面操作都是被监控端进行
[root@docker ~]# yum install -y yum-utils device-mapper-persistent-data lvm2

#上传yun仓库进行安装
[root@docker ~]# ll
总用量 8
-rw-------. 1 root root 1264 1月  12 2021 anaconda-ks.cfg
drwxr-xr-x  3 root root 4096 8月   5 10:21 docker
[root@docker ~]# vim /etc/yum.repos.d/centos.repo
[aaa]
name=aaa
baseurl=file:///mnt
enabled=1
gpgcheck=0

[docker]
name=docker
baseurl=file:///root/docker
enabled=1
gpgcheck=0
#保存退出
[root@docker ~]# yum -y install docker-ce
[root@docker ~]# mkdir -p /etc/docker/
[root@docker ~]# vim /etc/docker/daemon.json

  "registry-mirrors": ["https://w4uieobw.mirror.aliyuncs.com"]

#保存退出
[root@docker ~]# systemctl start docker
[root@docker ~]# systemctl status docker
#安装exporter
#上传软件包进行安装
[root@docker ~]# ll
总用量 7904
-rw-------. 1 root root    1264 1月  12 2021 anaconda-ks.cfg
drwxr-xr-x  3 root root    4096 8月   5 10:21 docker
-rw-r--r--  1 root root 8083296 7月  10 16:51 node_exporter-0.18.1.linux-amd64.tar.gz
[root@docker ~]# tar xf node_exporter-0.18.1.linux-amd64.tar.gz
[root@docker ~]# mv node_exporter-0.18.1.linux-amd64 /usr/local/exporter
[root@docker ~]# cd /usr/lib/systemd/system
[root@docker system]# vim node_exporter.service
[Unit]
Description=node_exporter
After=network.target

[Service]
User=prometheus
Group=prometheus
ExecStart=/usr/local/exporter/node_exporter --web.listen-address=:20001 --collector.systemd --collector.systemd.unit-whitelist=(sshd|nginx).service --collector.processes --collector.tcpstat
[Install]
WantedBy=multi-user.target
#保存退出
[root@docker system]# systemctl daemon-reload
[root@docker system]#  useradd prometheus
[root@docker system]# systemctl start node_exporter
[root@docker system]# systemctl status node_exporter
[root@docker system]# netstat -anpt | grep 20001
tcp6       0      0 :::20001                :::*                    LISTEN      16595/node_exporter
[root@docker system]# systemctl enable node_exporter
使用浏览器进行访问测试,


#安装cadvisor
[root@docker ~]# docker images   #同样下载cadvisor镜像
REPOSITORY          TAG                 IMAGE ID            CREATED             SIZE
google/cadvisor     latest              eb1210707573        2 years ago         69.6MB
[root@docker ~]# docker run \\
  --volume=/:/rootfs:ro \\
  --volume=/var/run:/var/run:rw \\
  --volume=/sys:/sys:ro \\
  --volume=/var/lib/docker/:/var/lib/docker:ro \\
  --volume=/dev/disk/:/dev/disk:ro \\
  --publish=18104:8080\\
  --detach=true \\
  --name=cadvisor \\
  google/cadvisor:latest
[root@docker ~]# docker ps
CONTAINER ID        IMAGE                    COMMAND                  CREATED             STATUS              PORTS                     NAMES
b0719f301f48        google/cadvisor:latest   "/usr/bin/cadvisor -…"   27 seconds ago      Up 26 seconds       0.0.0.0:18104->8080/tcp   cadvisor
使用浏览器进行访问测试


4、修改prometheus主配置文件
#在监控端修改配置文件
[root@prometheus ~]# cd /usr/local/prometheus/
[root@prometheus prometheus]# vim prometheus.yml
。。。。。。
 28     static_configs:
 29     - targets: ['localhost:9090']
 30   - job_name: 'node1'            #增加一个监控节点的job
 31     static_configs:
 32     - targets:
 33       - "192.168.100.208:20001"    #节点的端口是20001
 34   - job_name: 'docker'           #增加两个监控容器的job
 35     static_configs:
 36     - targets: ['192.168.100.210:18104','192.168.100.208:18104'] #容器的两个端口是18104,在上面启动容器时指定的
 37 remote_write:
 38   - url: "http://localhost:8086/api/v1/prom/write?db=prometheus"
 39
 40 remote_read:
 41   - url: "http://localhost:8086/api/v1/prom/read?db=prometheus"
#保存退出

#重启prometheus
[root@prometheus prometheus]# systemctl restart prometheus #重启
[root@prometheus prometheus]# systemctl status prometheus  #查看状态
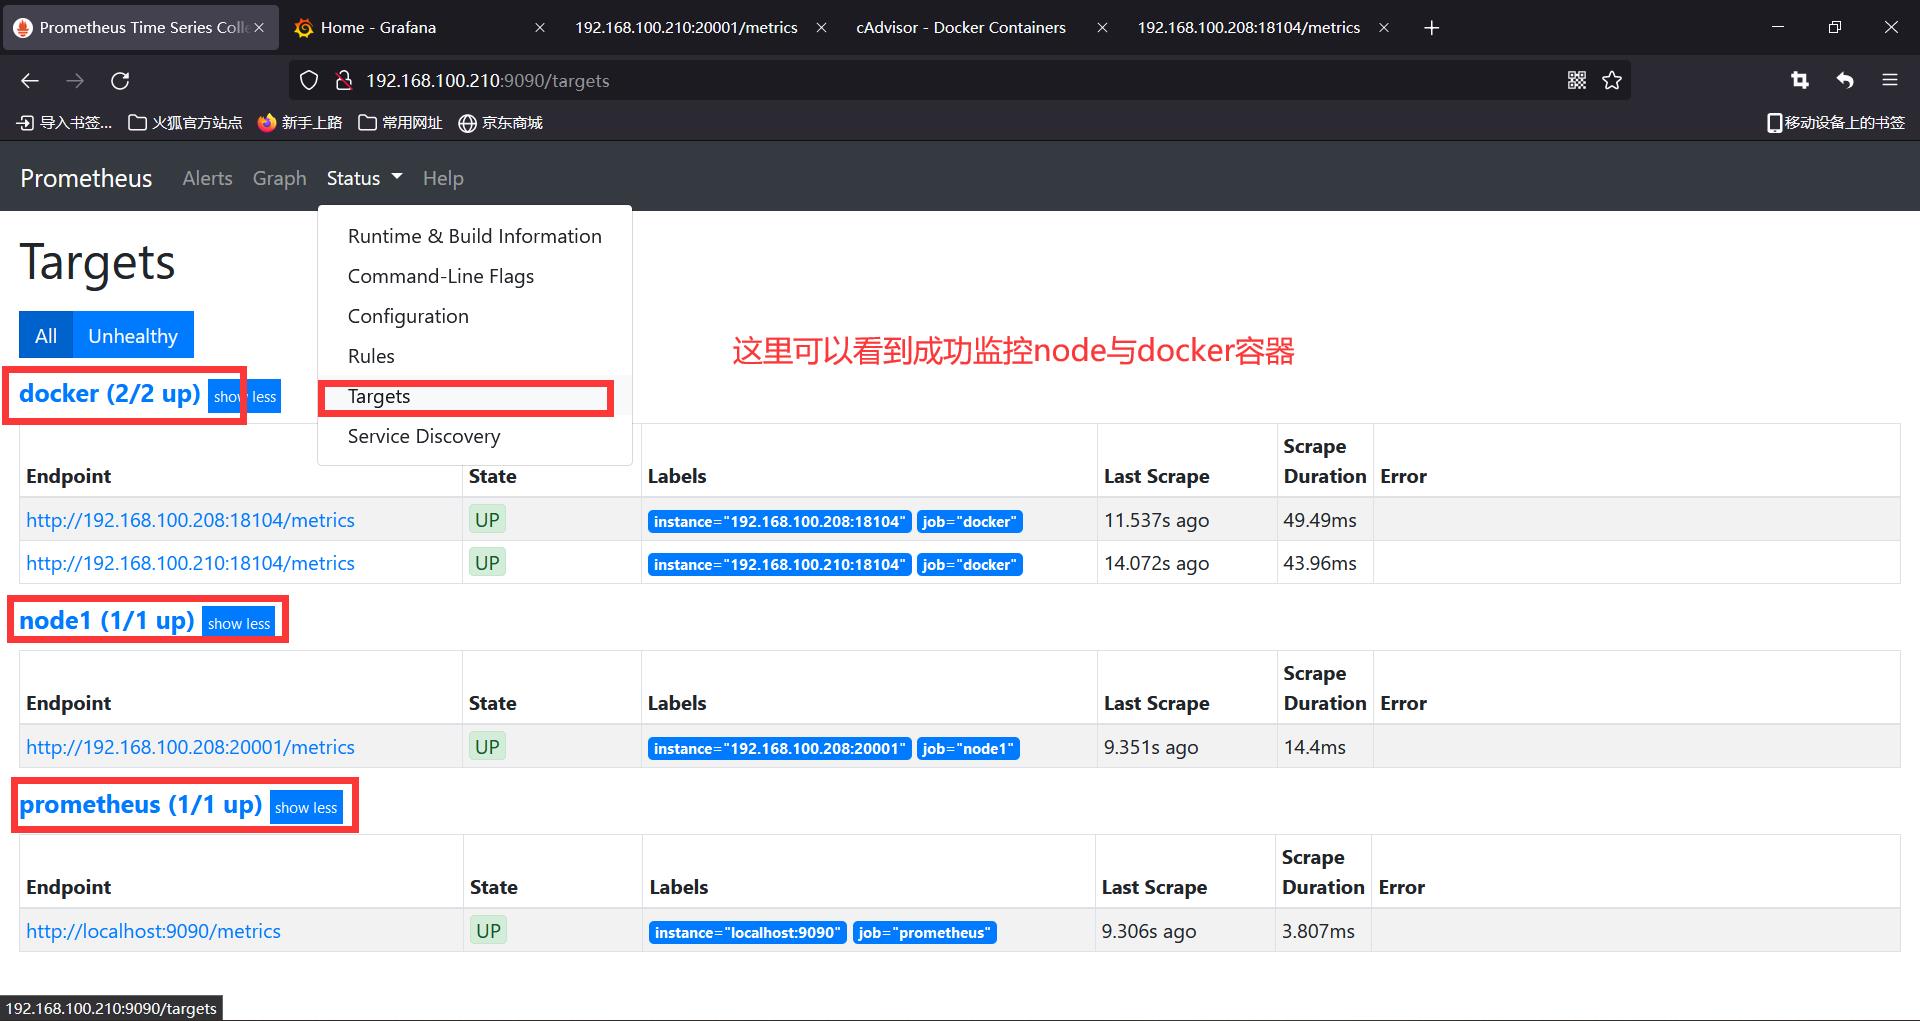
5、测试访问prometheus的web界面
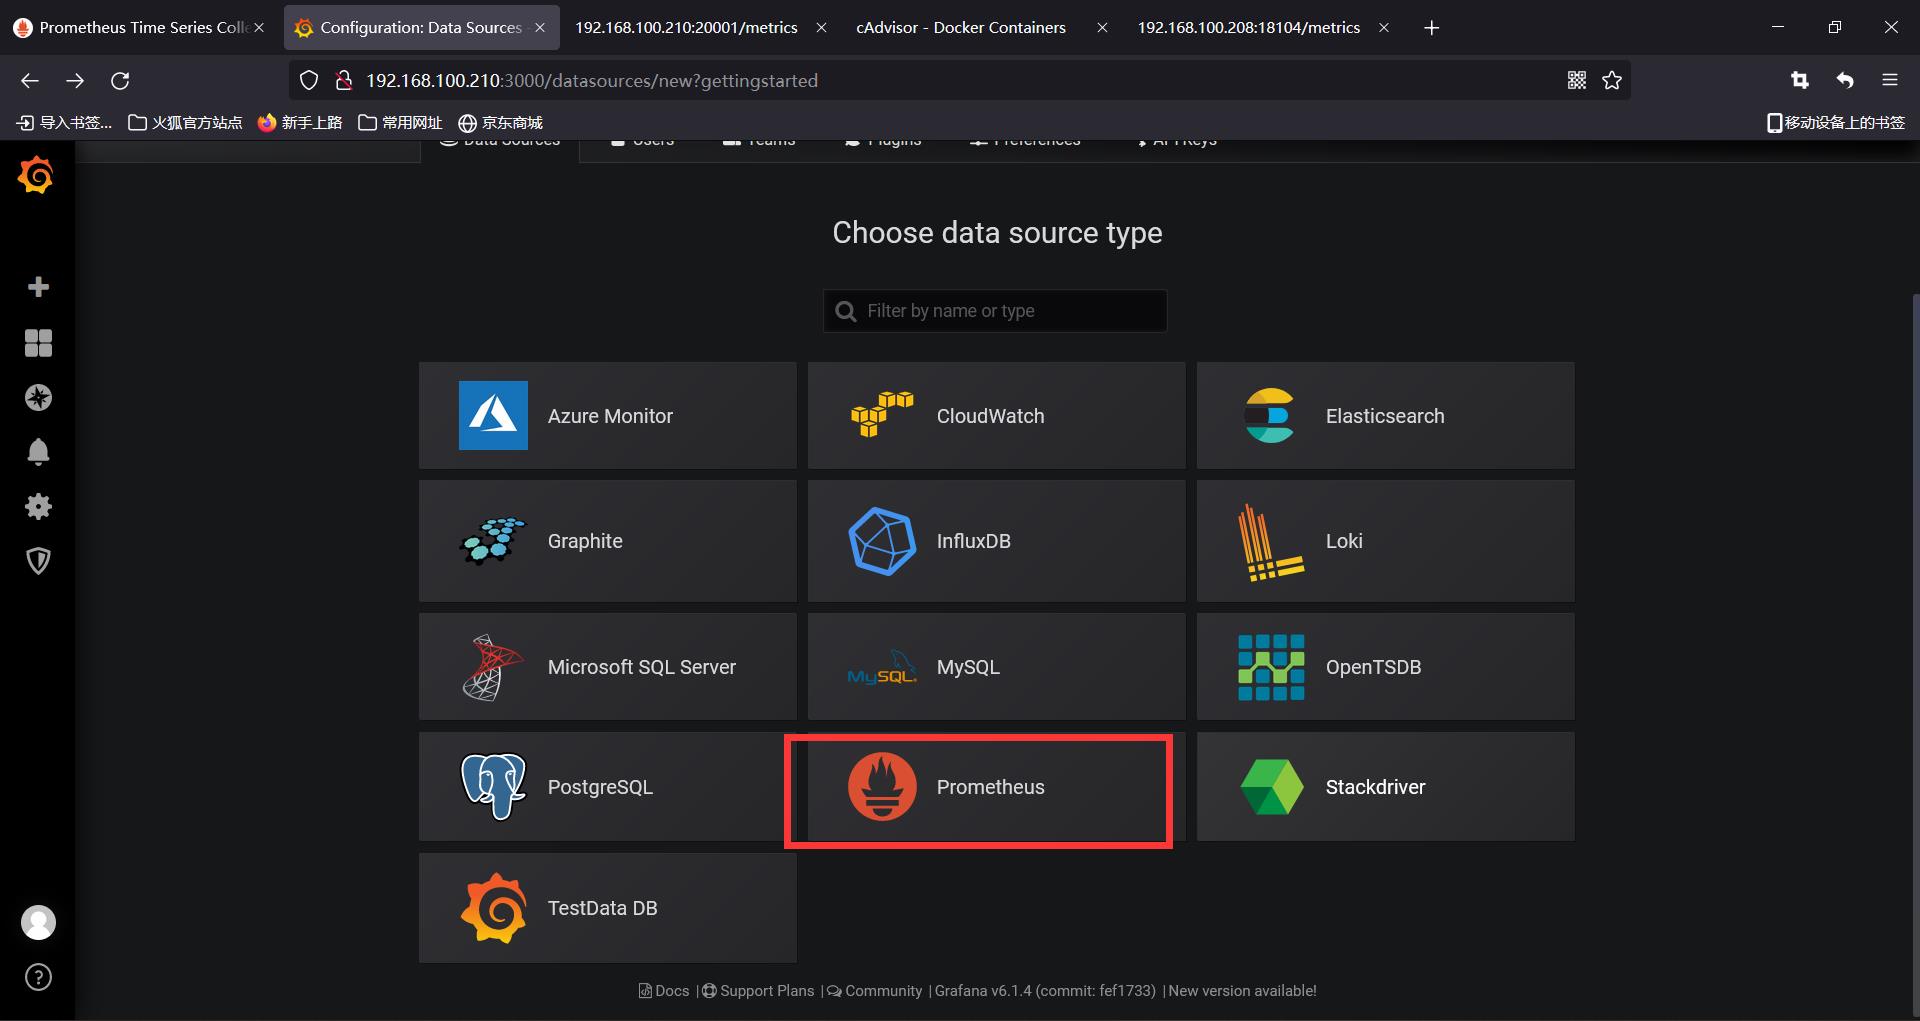
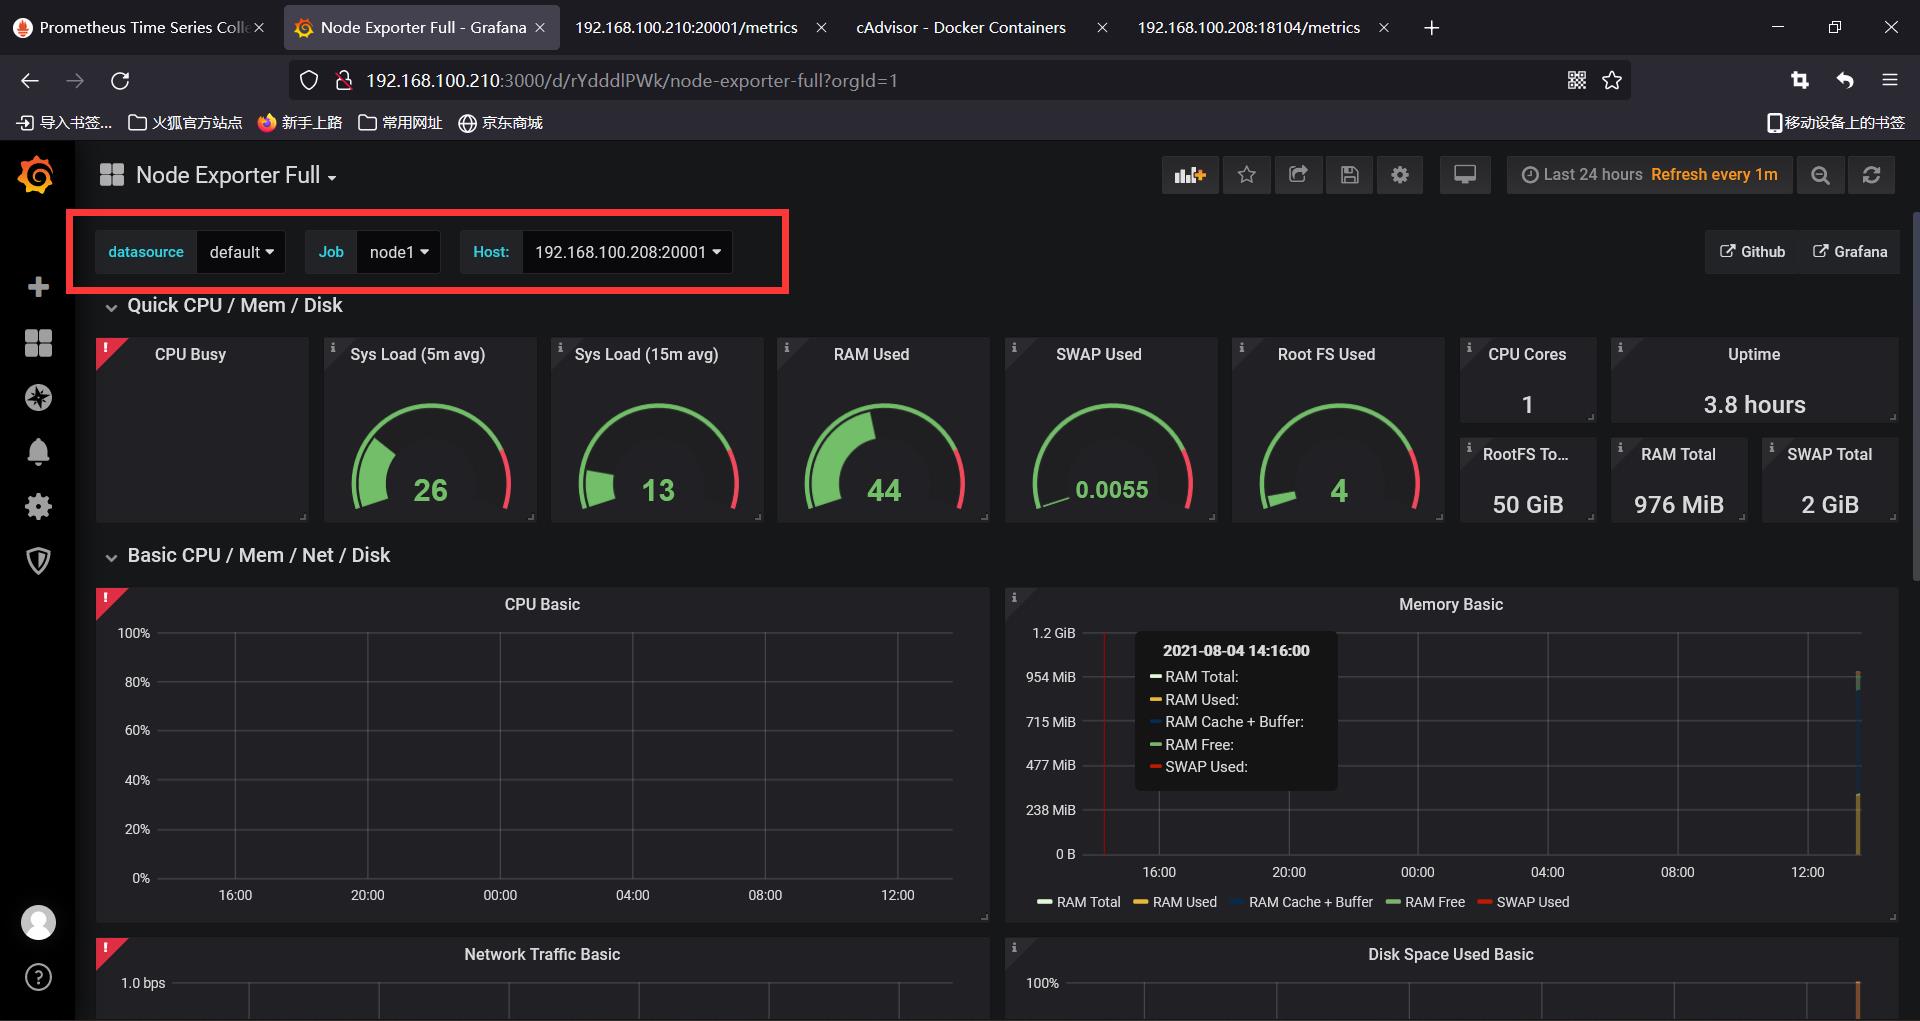
6、使用Grafana来进行监控


- 1860模板监控节点


监控节点的界面
- 893模板是监控容器的


监控容器的界面


以上是关于如何使用prometheus监控docker的主要内容,如果未能解决你的问题,请参考以下文章
如何使用 dockerized Prometheus(和 Grafana)监控 ASP.Net Core 应用程序?
如何快速部署 Prometheus?- 每天5分钟玩转 Docker 容器技术(85)
Docker下Prometheus和Grafana三部曲之三:自定义监控项开发和配置