用scrapy框架爬取某网站汽车的高清图片python爬虫入门进阶(21)
Posted 码农飞哥
tags:
篇首语:本文由小常识网(cha138.com)小编为大家整理,主要介绍了用scrapy框架爬取某网站汽车的高清图片python爬虫入门进阶(21)相关的知识,希望对你有一定的参考价值。
您好,我是码农飞哥,感谢您阅读本文,欢迎一键三连哦。
😁 1. 社区逛一逛,周周有福利,周周有惊喜。码农飞哥社区,飞跃计划
💪🏻 2. Python基础专栏,基础知识一网打尽,9.9元买不了吃亏,买不了上当。 Python从入门到精通
❤️ 3. Python爬虫专栏,系统性的学习爬虫的知识点。9.9元买不了吃亏,买不了上当,持续更新中 。python爬虫入门进阶
❤️ 4. Ceph实战,从原理到实战应有尽有。 Ceph实战
❤️ 5. Java高并发编程入门,打卡学习Java高并发。 Java高并发编程入门
文章目录
前言
本文将介绍如何使用scrapy框架来快速爬取某网站汽车的图片,并将爬取到的图片保存到本地。
创建scrapy项目
创建scrapy项目的命令在此不在赘述了,如果不清楚的小伙伴可以看下:Scrapy框架快速入门,以糗事百科为例进行说明【python爬虫入门进阶】(16)
通过如下命令创建了一个名为bba_img_demo的scrapy项目,并创建一个名为bba3的spider。
scrapy startproject bba_img_demo
cd bba_img_demo
scrapy genspider bba3 "car.com.cn"
爬取图片bba3Spider
这里还是采用xpath来爬取页面元素。在bba3Spider中爬取页面元素得到imgDemoItem,并返回给Pipelines。
class bba3Spider(scrapy.Spider):
    name = 'bba3'
    allowed_domains = ['car.com.cn']
    start_urls = ['https://car.com.cn/pic/series/66.html#pvareaid=2042214']

    def parse(self, response):
        # 获取所有类别
        uiboxs = response.xpath("//div[@class='uibox']")[1:]
        for uibox in uiboxs:
            # 获取某个类别的名称
            category = uibox.xpath(".//div[@class='uibox-title']/a/text()").get()
            # 获取图片链接
            org_urls = uibox.xpath(".//ul/li/a/img/@src").getall()
            urls = []
            for url in org_urls:
                # 将图片地址拼接上域名
                url = response.urljoin(url)
                urls.append(url)
            imgDemoItem = bbaImgDemoItem(category=category, urls=urls)
            yield imgDemoItem
这里需要说明的是org_urls获取到的结果是:
['//car2.cn/cardfs/product/g27/M0B/8C/16/480x360_0_q95_c42_autohomecar__ChxkmWGegTyACi-kAC3FbBHMbU0705.jpg', '//car3.cn/cardfs/product/g28/M04/89/E4/480x360_0_q95_c42_autohomecar__ChxkmmGegTuAMP6mABxWnAoC-D4144.jpg', '//car3.cn/cardfs/product/g28/M03/89/E4/480x360_0_q95_c42_autohomecar__ChxkmmGegTmAcgvzABhIjSB7-9g758.jpg', '//car3.cn/cardfs/product/g28/M00/89/E4/480x360_0_q95_c42_autohomecar__ChxkmmGegTmAERL1ACm2BVXLZ6Y692.jpg', '//car3.cn/cardfs/product/g27/M04/8C/16/480x360_0_q95_c42_autohomecar__ChxkmWGegTiAXmudADZcJBeHRXE488.jpg', '//car3.cn/cardfs/product/g27/M0A/AE/14/480x360_0_q95_c42_autohomecar__ChwFkWGegTeAU296ACGsSse0_UY335.jpg', '//car3.cn/cardfs/product/g27/M01/8C/16/480x360_0_q95_c42_autohomecar__ChxkmWGegTaAJjHFACpeMVzBTpk896.jpg', '//car2.cn/cardfs/product/g27/M01/AE/14/480x360_0_q95_c42_autohomecar__ChwFkWGegTWAGp1RACY4LcxwCrk373.jpg']
所以需要在爬取的图片地址前面拼接:https: ,这里既可以使用 url='https:'+url ,也可以使用response.urljoin(url)。
保存图片bbaImgDemoPipeline
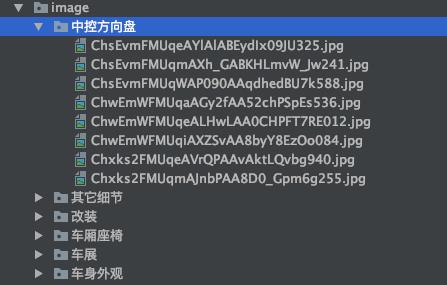
在bbaImgDemoPipeline中通过接收bba3Spider返回的imgDemoItem。并将图片保存到 bba_img_demo项目的images目录下。并且在images目录下以类别来保存各个类别下的图片数据。
import os
from urllib import request
import ssl
from urllib.request import HTTPSHandler

context = ssl._create_unverified_context()
https_handler = HTTPSHandler(context=context)
opener = request.build_opener(https_handler)
request.install_opener(opener)

class bbaImgDemoPipeline:
    def __init__(self):
        self.path = os.path.join(os.path.dirname(os.path.dirname(__file__)), 'image')
        if not os.path.exists(self.path):
            os.mkdir(self.path)

    def process_item(self, item, spider):
        category = item['category']
        urls = item['urls']
        category_path = os.path.join(self.path, category)
        if not os.path.exists(category_path):
            os.mkdir(category_path)
        for url in urls:
            # 通过__来分割得到文件名
            image_name = url.split('__')[-1]
            request.urlretrieve(url, os.path.join(category_path, image_name))
        return item
运行后的结果是:

这个方法可以实现我们想要的效果。但是,还不够优雅,没有用到多线程,不够简洁。
scrapy为下载item包含的文件(比如在爬取到产品时,同时也想保存对应的图片)提供了一个可重用的item pipelines。这些pipeline有共同的方法和结构(我们称之为media pipelines)。一般来说你会使用Files Pipeline或者Images Pipeline
使用scrapy内置的下载文件的方法有如下好处:
- 避免重新下载最近已经下载过的数据
- 可以方便的指定文件存储的路径。
- 可以将下载的图片转换成通用的格式,比如png或jpg。
- 可以方便的生成缩略图。
- 可以方便的检测图片的宽和高,确保他们满足最小限制。
- 异步下载,效率非常高。
Files Pipeline的使用步骤:
- 定义好一个Item,然后在这个item中定义两个属性,分别为file_url以及files。file_urls 是用来存储需要下载的文件的url链接的,需要的是一个列表。
- 当文件下载完成后,会把文件下载的相关信息存储到items中的files属性中,比如下载路径,下载的url和文件的校验码等。
- 在配置文件settings.py中配置
FILES_STORE,这个配置是用来设置文件下载下来的路径。 - 启动pipeline:在ITEM_PIPLINES中设置
'scrapy.pipelines.files.FilePipeline':1。
Images Pipeline的使用步骤:
当使用Image Pipeline下载文件的时候,按照以下步骤来完成:
- 定义好一个
Item,然后在这个item中定义两个属性,分别为image_urls以及images。image_url是用来存储需要下载的图片的url链接,需要给一个列表。 - 当图片下载完成之后,会把图片下载的相关信息存储到
item的imags属性中,比如下载路径,下载的url和图片的校验码等。 - 当配置文件
settings.py中配置IMAGES_STORE,这个配置是用来设置图片下载下来的路径的。 - 启动pipeline:在ITEM_PIPELINES中设置
'scrapy.pipelines.images.ImagesPipeline':1。
下面我们就使用Image Pipeline来实现下这个功能,详细的步骤如下:
1. 修改bbaImgDemoItem类
class bbaImgDemoItem(scrapy.Item):
    category = scrapy.Field()
    image_urls = scrapy.Field()
    images = scrapy.Field()
在bbaImgDemoItem类中定义image_urls和images两个属性。
2. 修改bba3Spider类,将下载的图片路径放到image_urls中。
class bba3Spider(scrapy.Spider):
    name = 'bba3'
    allowed_domains = ['car.com.cn']
    start_urls = ['https://car.com.cn/pic/series/66.html#pvareaid=2042214']

    def parse(self, response):
        # 获取所有类别
        uiboxs = response.xpath("//div[@class='uibox']")[1:]
        for uibox in uiboxs:
            # 获取某个类别的名称
            category = uibox.xpath(".//div[@class='uibox-title']/a/text()").get()
            # 获取图片链接
            org_urls = uibox.xpath(".//ul/li/a/img/@src").getall()
            urls = list(map(lambda url: response.urljoin(url), org_urls))
            imgDemoItem = bbaImgDemoItem(category=category, image_urls=urls)
            yield imgDemoItem
3. 修改settings.py
在settings.py文件配置IMAGES_STORE。指定图片的保存路径。
import os
IMAGES_STORE= os.path.join(os.path.dirname(os.path.dirname(__file__)), 'images')
4. 指定启动的pipeline
将启动的pipeline指定为scrapy.pipelines.images.ImagesPipeline
ITEM_PIPELINES =
   # 'bba_img_demo.pipelines.bbaImgDemoPipeline': 300,
    'scrapy.pipelines.images.ImagesPipeline':1
这样设置之后,原先的bbaImgDemoPipeline则不会被启动。因为只有一个pipeline,所以优先级可以随意设置。
经过这四步设置基本上差不多了。但是,如果此时你直接运行的话,大概率得不到想要的效果。这是因为ImagesPipeline类在初始化时需要引入PIL包。如果没有安装的话则会直接报错。

5. 安装Pillow库
pip install Pillow
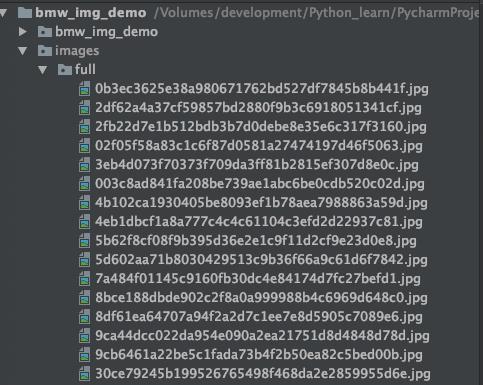
经过上面五步之后就可以正确的运行了。运行之后的结果是:

可以看出所有的图片都被保存到了images目录下的full文件夹下了。这显然也不是我们期望的结果。所以我们还是需要继承 ImagesPipeline类,然后,重写其保存逻辑。查看ImagesPipeline源代码可以得知将图片保存到full文件夹的方法是file_path。所以我们只需要重写这个方法返回我们想要的路径即可。
指定我们需要保存的路径
在pipelines.py 文件中自定义一个名为bbaImagesPipeline的类,让该类继承自ImagesPipeline。
- 重写get_media_requests方法
get_media_requests方法在发送下载请求之前调用,该方法主要的作用是拿到image_urls中的图片链接,并拼接成下载请求。
ImagesPipeline类的get_media_requests方法,可以看出返回的是一个Request对象的列表。
    def get_media_requests(self, item, info):
        urls = ItemAdapter(item).get(self.images_urls_field, [])
        return [Request(u) for u in urls]
重写后的get_media_requests方法。首先调用父类的image_urls方法,然后将item设置到request_obj中。
 def get_media_requests(self, item, info):
        request_objs = super(bbaImagesPipeline, self).get_media_requests(item, info)
        for request_obj in request_objs:
            request_obj.item = item
        return request_objs
- 重写file_path方法
父类的file_path方法主要就两步,第一步是将图片链接的地址做hash运算得到图片的名称,接着返回图片存储的相对路径full/image_guid.jpg。
    def file_path(self, request, response=None, info=None, *, item=None):
        image_guid = hashlib.sha1(to_bytes(request.url)).hexdigest()
        return f'full/image_guid.jpg'
所以重写file_path方法只需要将返回的相对路径替换成我们期望的相对路径。
    def file_path(self, request, response=None, info=None, *, item=None):
        path = super(bbaImagesPipeline, self).file_path(request, response, info)
        category = request.item.get('category')
        img_name = path.replace('full/', '')
        image_path = os.path.join(category, img_name)
        return image_path
调用父类的file_path方法得到返回的full/image_guid.jpg。接着获取item中的category属性。
然后就是将full/ 替换掉就得到了图片名称。最后就是将分类和图片名称拼接成一个相对路径返回。
爬取高清图片(多个网页同时爬取)
1. 分析链接特点
- 车身外观的地址: https://car.com.cn/pic/series/66-1-p2.html
- 中控方向盘的地址:https://car.com.cn/pic/series/66-10.html#pvareaid=2042223
简单分析下可以得出链接中 https://car.com.cn/pic/series/66 这部分是完全一样的,后面的部分的可以匹配任意字符。
所以匹配链接地址的正则表达式是https://car.com.cn/pic/series/66.+。
2. 编写爬虫代码
这里自定义了一个名为bba3Spider类,该类继承自CrawlSpider。
   # 定义好爬取策略
    rules = (
        Rule(LinkExtractor(allow=r"https://car.com.cn/pic/series/66.+"), callback="parse_page", follow=True),
    )
callback指定调用的回调函数是parse_page方法。当点击下一页时则继续往下走。
回调方法parse_page,该方法爬取分类和图片的地址。
  def parse_page(self, response):
        category = response.xpath("//div[@class='uibox']/div/text()").get()
        srcs = response.xpath('//div[contains(@class,"uibox-con")]/ul/li/a/img/@src').getall()
        urls = list(map(lambda x: response.urljoin(x), srcs))
        yield bbaImgDemoItem(category=category, image_urls=urls)
总结
本文通过以某网站为例说明了如何利用scrapy框架来高效的爬取网站中的图片。
粉丝专属福利
软考资料:实用软考资料
面试题:5G 的Java面试题
学习资料:50G的各类学习资料
脱单秘籍:回复【脱单】
并发编程:回复【并发编程】
👇🏻 验证码 可通过搜索下方 公众号 获取👇🏻
以上是关于用scrapy框架爬取某网站汽车的高清图片python爬虫入门进阶(21)的主要内容,如果未能解决你的问题,请参考以下文章