Activity setContentView背后的一系列源码分析
Posted 安卓开发-顺
tags:
篇首语:本文由小常识网(cha138.com)小编为大家整理,主要介绍了Activity setContentView背后的一系列源码分析相关的知识,希望对你有一定的参考价值。
本文将涉及到Activity、PhoneWindow、DecorView、LayoutInflater的相关源码分析。
下面从Activity onCreate 中的 setContentView开始
    @Override
    protected void onCreate(@Nullable Bundle savedInstanceState)
        super.onCreate(savedInstanceState);
        setContentView(R.layout.activity_main);
进入Activity的setContentView方法
    /**
     * Set the activity content from a layout resource.  The resource will be
     * inflated, adding all top-level views to the activity.
     *
     * @param layoutResID Resource ID to be inflated.
     *
     * @see #setContentView(android.view.View)
     * @see #setContentView(android.view.View, android.view.ViewGroup.LayoutParams)
     */
    public void setContentView(@LayoutRes int layoutResID)
        getWindow().setContentView(layoutResID);
        initWindowDecorActionBar();
如果你的Activity继承自AppCompatActivity,则是这样
    @Override
    public void setContentView(@LayoutRes int layoutResID)
        initViewTreeOwners();
        getDelegate().setContentView(layoutResID);
二者虽然源码看起来不一样,但核心流程是一样的,都是先把DecorView准备好,在把我们的布局给加载进来,所以这里只以Activity为例进行分析。
我们跟进到getWindow().setContentView(layoutResID) 里面,getWindow得到的是Window的子类PhoneWindow,所以具体实现要看PhoneWindow里面的setContentView方法
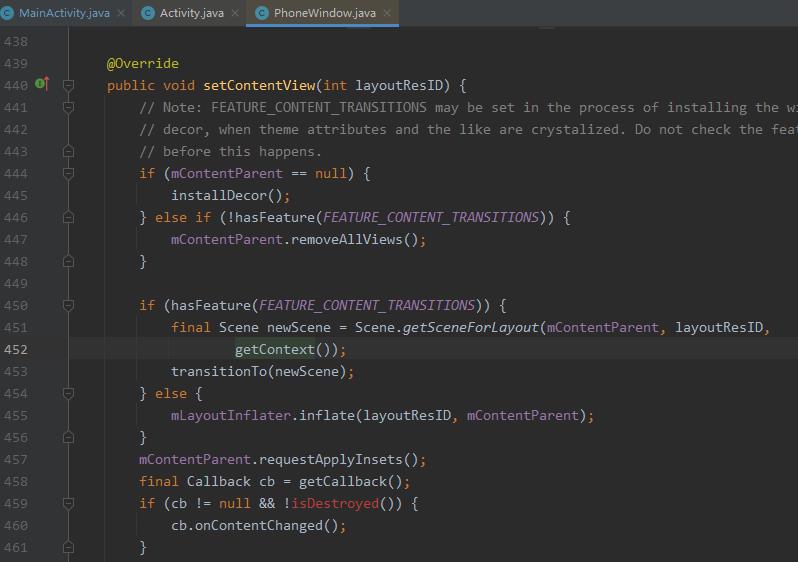
444行 的mContentParent就是用来承载我们写的布局的view,mContentParent的父布局则是DecorView,这里先上一张图把层次结构先明确一下
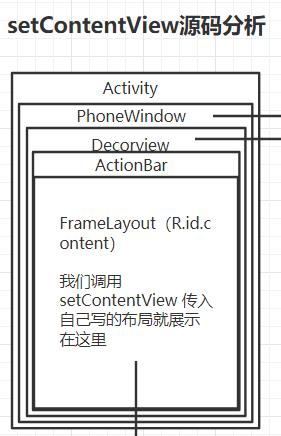
图中的FrameLayout(R.id.content) 就是这里的mContentParent,整个页面首次展现时mContentParent必然是空的,所以会执行445行 installDecor(),通过方法名就可以知道,这是要把DecorView给准备好。
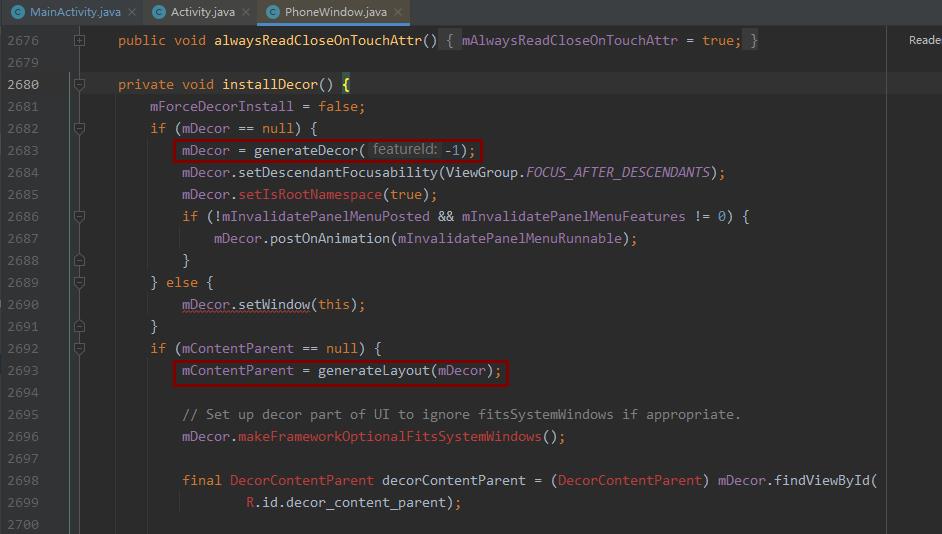
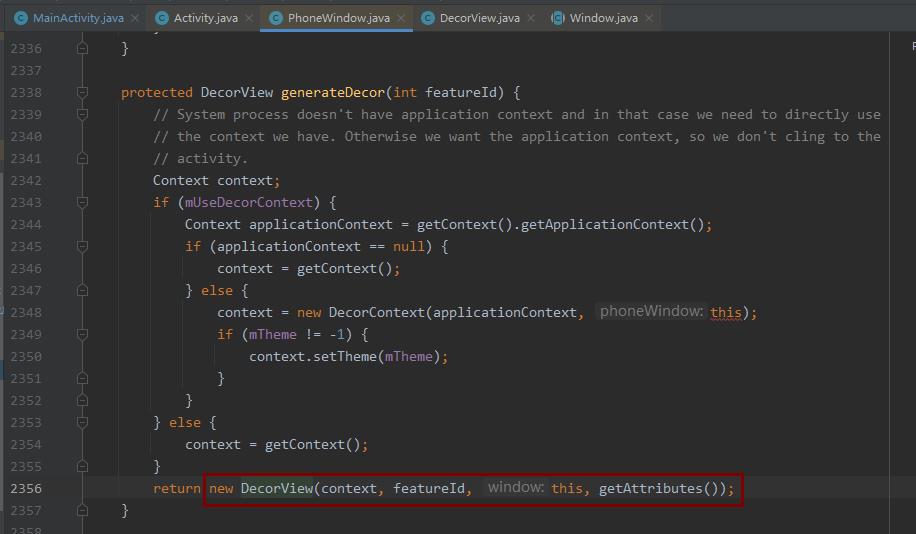
2683行只是把DecorView给new出来
DecorView继承自FrameLayout
 DecorView具体长什么样子,还要继续看PhoneWindow的2693行
mContentParent = generateLayout(mDecor); 进入到generateLayout方法
protected ViewGroup generateLayout(DecorView decor)
        // Apply data from current theme.

        //...省略一堆window样式判断、悬浮、透明、actionbar等等

        // 下面是关键代码,为DecorView挑选合适的布局layoutResource的最终赋值就决定了DecorView长什么样子

        int layoutResource;
        int features = getLocalFeatures();
        // System.out.println("Features: 0x" + Integer.toHexString(features));
        if ((features & ((1 << FEATURE_LEFT_ICON) | (1 << FEATURE_RIGHT_ICON))) != 0)
            if (mIsFloating)
                TypedValue res = new TypedValue();
                getContext().getTheme().resolveAttribute(
                        R.attr.dialogTitleIconsDecorLayout, res, true);
                layoutResource = res.resourceId;
             else
                layoutResource = R.layout.screen_title_icons;

            // XXX Remove this once action bar supports these features.
            removeFeature(FEATURE_ACTION_BAR);
            // System.out.println("Title Icons!");
         else if ((features & ((1 << FEATURE_PROGRESS) | (1 << FEATURE_INDETERMINATE_PROGRESS))) != 0
                && (features & (1 << FEATURE_ACTION_BAR)) == 0)
            // Special case for a window with only a progress bar (and title).
            // XXX Need to have a no-title version of embedded windows.
            layoutResource = R.layout.screen_progress;
            // System.out.println("Progress!");
         else if ((features & (1 << FEATURE_CUSTOM_TITLE)) != 0)
            // Special case for a window with a custom title.
            // If the window is floating, we need a dialog layout
            if (mIsFloating)
                TypedValue res = new TypedValue();
                getContext().getTheme().resolveAttribute(
                        R.attr.dialogCustomTitleDecorLayout, res, true);
                layoutResource = res.resourceId;
             else
                layoutResource = R.layout.screen_custom_title;

            // XXX Remove this once action bar supports these features.
            removeFeature(FEATURE_ACTION_BAR);
         else if ((features & (1 << FEATURE_NO_TITLE)) == 0)
            // If no other features and not embedded, only need a title.
            // If the window is floating, we need a dialog layout
            if (mIsFloating)
                TypedValue res = new TypedValue();
                getContext().getTheme().resolveAttribute(
                        R.attr.dialogTitleDecorLayout, res, true);
                layoutResource = res.resourceId;
             else if ((features & (1 << FEATURE_ACTION_BAR)) != 0)
                layoutResource = a.getResourceId(
                        R.styleable.Window_windowActionBarFullscreenDecorLayout,
                        R.layout.screen_action_bar);
             else
                layoutResource = R.layout.screen_title;

            // System.out.println("Title!");
         else if ((features & (1 << FEATURE_ACTION_MODE_OVERLAY)) != 0)
            layoutResource = R.layout.screen_simple_overlay_action_mode;
         else
            // Embedded, so no decoration is needed.
            layoutResource = R.layout.screen_simple;
            // System.out.println("Simple!");


        mDecor.startChanging();
        //选中以后就把这个布局通过LayoutInflater 加载给DecorView
        mDecor.onResourcesLoaded(mLayoutInflater, layoutResource);

        //这个 ID_ANDROID_CONTENT就是R.id.content,
        //这个id在哪个布局文件里定义的呢?就在layoutResource对应的布局里面,我们可以随便打开一个布局看下,比如screen_simple.xml,(上面提到的这些布局在android.jar --- res ---layout 中可以找到以screen_开头)
        //通过findViewById 得到的contentParent 就是上面的mContentParent啊, 看到了吧它就是DecorView布局中的一部分。
        ViewGroup contentParent = (ViewGroup)findViewById(ID_ANDROID_CONTENT);
        if (contentParent == null)
            throw new RuntimeException("Window couldn't find content container view");


        mDecor.finishChanging();
        //返回此布局
        return contentParent;
此方法干了两件事:
(1)为DecorView找到一个合适的布局
这些布局文件在android.jar --- res ---layout里面,在AS中和android.jar并列的res文件夹下就可以看到布局源码,我们随便看一个screen_simple.xml

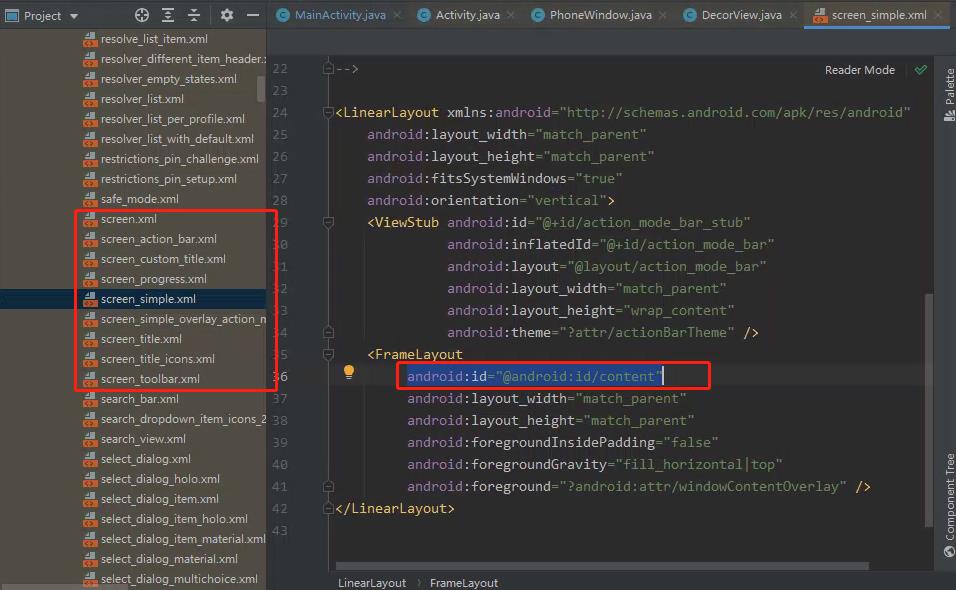
这些screen_开头的布局都是DecorView对应的布局,系统会根据各种样式、相关设置来选择对应的布局,每一个布局里面都会有一个FrameLayout,其id是@android:id/cotent,
(2)从DecorView对应的布局文件中通过findViewById找出mContentParent

到这里DecorView就准备好了,接下来该把我们写的布局加载进来了

456行稍微说明一下,这个是针对设置了场景转换属性去做的一些动画效果,最终还是会用过LayoutInflater的inflate方法来加载布局,这里不跟进去了,我们下面进入到LayoutInflater部分的分析,进入inflate方法:
    /**
     * Inflate a new view hierarchy from the specified xml resource. Throws
     * @link InflateException if there is an error.
     *
     * @param resource ID for an XML layout resource to load (e.g.,
     *        <code>R.layout.main_page</code>)
     * @param root Optional view to be the parent of the generated hierarchy.
     * @return The root View of the inflated hierarchy. If root was supplied,
     *         this is the root View; otherwise it is the root of the inflated
     *         XML file.
     */
    public View inflate(@LayoutRes int resource, @Nullable ViewGroup root)
        return inflate(resource, root, root != null);
调用了 inflate(resource, root, root != null);方法
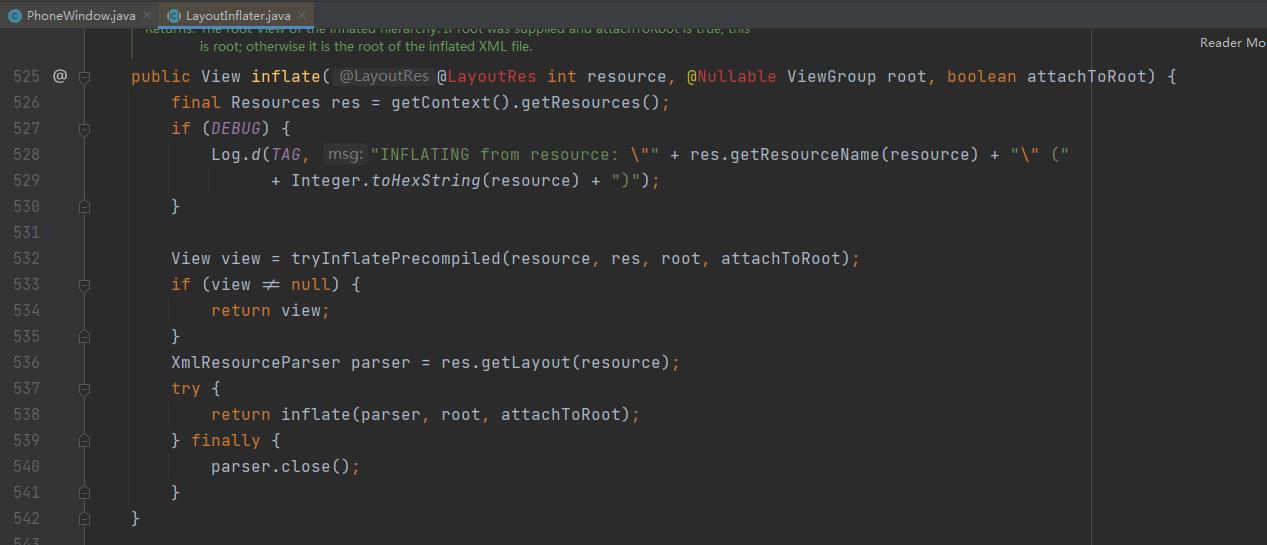
532行是系统做的优化,预编译,最终还是通过XmlPull解析来解析,这个解析布局文件的过程不是本文分析的重点,这里不展开去看。
下面来重点说下此方法的三个参数和返回值:resource、root、attachToRoot
第一个参数:resource是我们传入的布局文件,这个没啥好说的
第二个参数root和第三个参数attachToRoot,这两个参数要配合来使用,有这几种情况
(1)root == null : 此时无论attachToRoot是否为true都不在重要,这种情况会把resource解析成view并返回,不给view设置任何LayoutParams(这意味着我们在根布局设置的一系列宽、高、padding、margin等等属性都是无效的,压根不会用)
(2)root !=null 并且 attachToRoot 是 true
这种场景正是我们setContentView使用的场景,这种场景多是系统内部在使用,此时会给解析出来的View设置LayouParams并且把view添加到root中,最后返回root。
(3)root != null 并且 attachToRoot 是 false
这种场景会给解析出来的View设置LayouParams并且不把view添加到root中,最后返回该view。
以上就是三种情况的分析,所以如果我们如果仅仅想把布局加载成view的话,不传root即可,但是还想要跟布局上设置的属性的话就传root,把attachToRoot设置为false即可。
下面从源码中去找到这三种情况:
先进入到538行 return inflate(parser, root, attachToRoot);
public View inflate(XmlPullParser parser, @Nullable ViewGroup root, boolean attachToRoot)
        synchronized (mConstructorArgs)
            //...省略若干

            //得到xml转换后的attrs
            final AttributeSet attrs = Xml.asAttributeSet(parser);

            // 返回结果result 默认是root
            View result = root;

            try
                //...省略若干

                if (TAG_MERGE.equals(name))
                    //...处理merge的情况
                 else
                    //这个temp就是根据我们的布局创建出来的view
                    final View temp = createViewFromTag(root, name, inflaterContext, attrs);

                    ViewGroup.LayoutParams params = null;

                    if (root != null)

                        // 为temp创建 params 条件是root != null
                        params = root.generateLayoutParams(attrs);
                        if (!attachToRoot)
                            //这里就是第三中情况 root!=null 并且 attachToRoot为false
                            temp.setLayoutParams(params);


                    // Inflate all children under temp against its context.
                    rInflateChildren(parser, temp, attrs, true);

                    //这是第二种情况 就是我们setContentView要执行的代码
                    if (root != null && attachToRoot)
                        root.addView(temp, params);


                    //这种情况就返回temp 就是view自身
                    //第一种情况 属于这种
                    if (root == null || !attachToRoot)
                        result = temp;


             catch (XmlPullParserException e)
                //...省略若干
             catch (Exception e)
                //...省略若干
             finally
               //...省略若干


            return result;
三种情况都写在上面源码的注释里了。
最后总结下整个分析流程:
Activity:setContentView --- >
PhoneWindow:setContentView --- >
PhoneWindow:installDecor --- > 准备DecorView
PhoneWindow:installDecor:generateDecor --- > new 出DecorView
PhoneWindow:installDecor:generateLayout --- > 为DecorView准备布局,然后通过findViewById从对应布局中找出 mContentParent
PhoneWindow:setContentView:461行进行inflate --- >
LayoutInflater:inflate(int resuource,ViewGroup root) --- >
LayoutInflater:inflate(int resuource,ViewGroup root,boolean attachToRoot) --- > 加载布局的过程
彩蛋:
布局加载完后会通过getCallback得到一个cb,然后回调其onContentChanged()方法,这个callback就是我们写的Activity
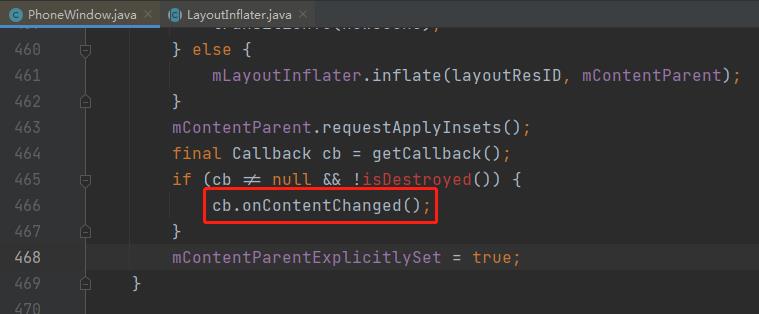
 在Activity源码中的attach方法中会调用phoneWindow的setCallBack方法,传入this
关于Activity的attach是什么时候执行的,那就是一个新篇章了。。。请看我的这篇文章
以上是关于Activity setContentView背后的一系列源码分析的主要内容,如果未能解决你的问题,请参考以下文章