CentOS7安装Fail2Ban防止SSH被暴力破解
Posted
tags:
篇首语:本文由小常识网(cha138.com)小编为大家整理,主要介绍了CentOS7安装Fail2Ban防止SSH被暴力破解相关的知识,希望对你有一定的参考价值。
参考技术A1、检查 Firewalld 防火墙是否启用
2、启用 Firewalld 后默认 --remove-port 禁止所有端口,需手动开放,以下是开放 SSH 端口( 22 )示例:
1、编辑
2、配置
意思是如果在1小时内,同一IP登陆失败3次,则将其封禁24小时,具体根据实际情况修改。
1、执行命令
2、显示内容
1、编辑 (Debian系:/etc/s-nail.rc;RedHat系:/etc/mail.rc)
2、在文件末尾增加配置
3、测试
多个收件人用 , 分隔,刚刚发送的邮件在 收件箱 或 垃圾箱 中。
1、编辑
2、配置
1、编辑
2、配置
以 nginx 为例,使用 fail2ban 来监视 nginx 日志,匹配短时间内频繁请求的 IP ,并使用 firewalld 将其 IP 屏蔽,达到 CC 防护的作用。
1、编辑
2、配置
1、编辑
2、配置
意思是如果在60秒内,同一IP达到120次请求,则将其封禁2小时,具体根据实际情况修改。
1、执行命令
2、显示内容
1、使用正则规则检测
2、使用规则文件检测
Centos7使用DenyHosts防止ssh暴力破解
| DenyHosts是用python2.3编写的一个程序,会分析/var/log/secure等文件,当发现同一个ip进行多次ssh登录失败时会将其写入/etc/hosts.dengy文件,达到屏蔽该ip的目的。 |

下载DenyHosts包
[root@localhost ~]# wget http://jaist.dl.sourceforge.net/project/denyhosts/denyhosts/2.6/DenyHosts-2.6.tar.gz
安装DenyHosts
[root@localhost ~]# tar xf DenyHosts-2.6.tar.gz
[root@localhost ~]# cd DenyHosts-2.6
[root@localhost DenyHosts-2.6]# python setup.py install
制作配置文件
[root@localhost DenyHosts-2.6]# cp denyhosts.cfg-dist /etc/denyhosts.cfg
[root@localhost DenyHosts-2.6]# cp daemon-control-dist daemon-control
[root@localhost DenyHosts-2.6]# chown root daemon-control
[root@localhost DenyHosts-2.6]# chmod 700 daemon-control
修改配置文件
将daemon-control中的#DENYHOSTS_CFG = "/usr/share/denyhosts/denyhosts.cfg"改为 DENYHOSTS_CFG = "/etc/denyhosts.cfg"
启动
[root@localhost DenyHosts-2.6]# ./daemon-control start(注意相对路径)
测试另外一台服务器远程连接172.16.1.16
默认允许五次,测试发现登陆失败五次之后不允许登陆
[root@localhost ~]# ssh abc@172.16.1.16
abc@172.16.1.16's password:
Permission denied, please try again.
abc@172.16.1.16's password:
Permission denied, please try again.
abc@172.16.1.16's password:
Permission denied (publickey,gssapi-keyex,gssapi-with-mic,password).
[root@localhost ~]#
[root@localhost ~]# ssh abc@172.16.1.16
abc@172.16.1.16's password:
Permission denied, please try again.
abc@172.16.1.16's password:
Permission denied, please try again.
abc@172.16.1.16's password:
Permission denied (publickey,gssapi-keyex,gssapi-with-mic,password).
[root@localhost ~]# ssh abc@172.16.1.16
abc@172.16.1.16's password:
Permission denied, please try again.
abc@172.16.1.16's password:
Permission denied, please try again.
abc@172.16.1.16's password:
Permission denied (publickey,gssapi-keyex,gssapi-with-mic,password).
[root@localhost ~]# ssh abc@172.16.1.16
abc@172.16.1.16's password:
Permission denied, please try again.
abc@172.16.1.16's password:
Permission denied, please try again.
abc@172.16.1.16's password:
Permission denied (publickey,gssapi-keyex,gssapi-with-mic,password).
[root@localhost ~]# ssh abc@172.16.1.16
ssh_exchange_identification: read: Connection reset by peer
查看hosts.deny文件
登陆连续失败之后就会把ip地址写在hosts.deny文件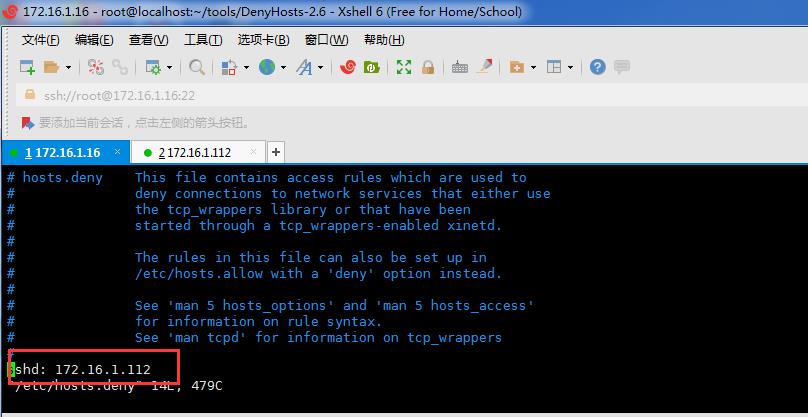
如果要使DenyHosts每次重起后自动启动还需做如下设置:
# ln -sf /usr/share/denyhosts/daemon-control /etc/init.d/denyhosts
# chkconfig --add denyhosts
# chkconfig --level 2345 denyhosts on
或者执行下面的命令加入开机启动,将会修改/etc/rc.local文件:
# echo "/usr/share/denyhosts/daemon-control start" >> /etc/rc.local
DenyHosts配置文件/usr/share/denyhosts/denyhosts.cfg说明:
SECURE_LOG = /var/log/secure
#sshd日志文件,它是根据这个文件来判断的,不同的操作系统,文件名稍有不同。
HOSTS_DENY = /etc/hosts.deny
以上是关于CentOS7安装Fail2Ban防止SSH被暴力破解的主要内容,如果未能解决你的问题,请参考以下文章