使用React Context进行状态管理(五)Provider与Consumer匹配
Posted
tags:
篇首语:本文由小常识网(cha138.com)小编为大家整理,主要介绍了使用React Context进行状态管理(五)Provider与Consumer匹配相关的知识,希望对你有一定的参考价值。
参考技术A 首先创建一个Context,这个Context用来提供颜色变量供子组件使用,然后创建一个Button组件,使用Context提供的颜色变量来设置它的颜色。我们看到一共渲染了4个Button,只有第一个Button没有使用Provider,会出错吗?不会。那第一个Button的className是什么?如下图所示,undefined。
怎么解决?React.createContext函数是可以传入默认值的。
在没有使用Provider的地方就使用默认值。但如果我们想让使用组件的人必须用Provider提供一个值呢,不提供就报错!
现在这个程序会报错,因为第一个button没有使用Provider,想让它正常运行的话,要么删了第一个button,要么就给它加上Provider。
下一次我们继续完善我们之前的Message应用。
React入门之Context-API的使用案例
前言
上文我们说到,可以使用redux来管理数据,这篇文章则使用Context来管理数据
Context 提供了一个无需为每层组件手动添加 props,就能在组件树间进行数据传递的方法。
Context 设计目的是为了共享那些对于一个组件树而言是“全局”的数据,例如当前认证的用户、主题或首选语言
Context使用顶层共享组件来存储和提供数据,该组件嵌套的子组件均可以使用与更新共享组件的数据,因此子组件也被称为消费组件
Context 主要应用场景在于很多不同层级的组件需要访问同样一些的数据。请谨慎使用,因为这会使得组件的复用性变差
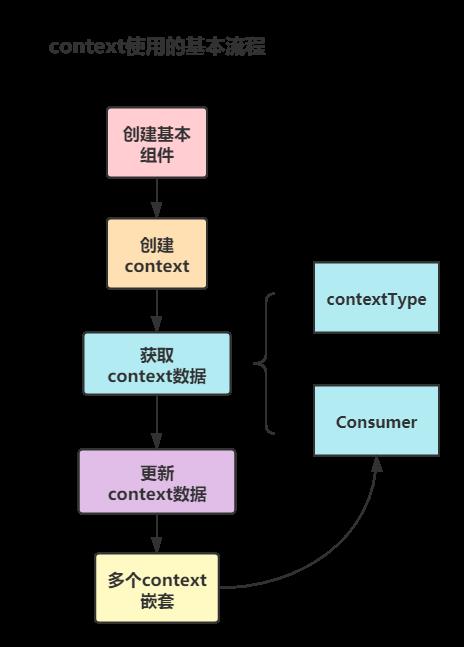
基本搭建
新建Navbar和SongList组件,添加相应样式,然后在App.js中使用,效果是这样的:
创建Context
- 创建Context对象,定义一个浅色 vs 深色主题的样式,作用到Navbar和SongList组件上
- 取isLightTheme为标识,当值为true时,代表子组件选择使用浅色主题;
- 当值为false时,代表子组件选择使用深色主题
import React, { Component, createContext } from 'react';
// 创建context对象
export const ThemeContext = createContext();
// 数据定义
class ThemeContextProvider extends Component {
    state = {
        isLightTheme:true,
        light:{
            ui:'#ddd',
            font:'#555',
            bg:'#eee'
        },
        dark:{
            ui:'#333',
            font:'#ddd',
            bg:'#555'
        }
    }

    render(){
    	// 返回一个 Provider React 组件,它允许消费组件订阅 context 的变化
    	// 将数据传递给子组件
        return (
            <ThemeContext.Provider value={{...this.state}}>
                {this.props.children}
            </ThemeContext.Provider>
        )
    }
}
export default ThemeContextProvider;
在App.js中引入ThemeContextProveder组件;
包裹住需要设置主题的组件:Navbar和SongList
import Navbar from "./components/Navbar";
import SongList from "./components/SongList";
import ThemeContextProvider from "./contexts/ThemeContext";

function App() {
  return (
    <div className="App">
      <ThemeContextProvider>
        <Navbar />
        <SongList />
      </ThemeContextProvider>

    </div>
  );
}

export default App;
这样我们就能在Navbar和SongList里使用共享的数据了
获取数据的方式有两种,一种是通过contextType获取,另一种是通过consumer获取
使用contextType获得数据
Navbar.js
import React, { Component } from 'react'
import { ThemeContext } from '../contexts/ThemeContext';
class Navbar extends Component {
static contextType = ThemeContext; // 使用contextType获取共享的数据
render() {
const { isLightTheme, light, dark } = this.context; // 解构变量
const theme = isLightTheme ? light : dark; // 当isLightTheme为true时,用浅色主题
// 返回带有主题样式的JSX模板内容
return (
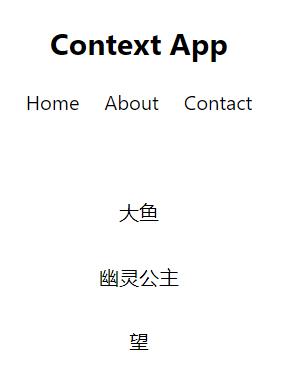
<nav style={{background:theme.bg, color:theme.font}}>
<h1>Context App</h1>
<ul>
<li>Home</li>
<li>About</li>
<li>Contact</li>
</ul>
</nav>
)
}
}
export default Navbar;
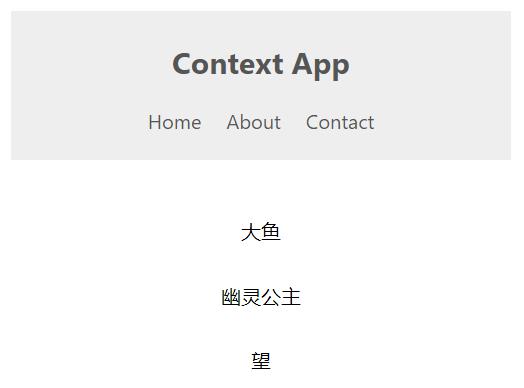
效果:浅色主题的导航栏
SongList.js
import React, {Component} from 'react'
import { ThemeContext } from '../contexts/ThemeContext';

class SongList extends Component {
    static contextType = ThemeContext;
    render(){
        const { isLightTheme, light, dark } = this.context;
        const theme = isLightTheme ? light : dark;
        return (
            <div className='song-list' style={{background:theme.bg, color:theme.font}}>
                <ul>
                    <li style={{background:theme.ui}}>大鱼</li>
                    <li style={{background:theme.ui}}>幽灵公主</li>
                    <li style={{background:theme.ui}}>望</li>
                </ul>
            </div>
        )
    }
}

export default SongList;
效果:浅色主题的导航栏和主体部分
使用consumer获取共享数据
Navbar.js
import React, { Component } from 'react'
import { ThemeContext } from '../contexts/ThemeContext';

class Navbar extends Component {

    render() {
		// 调用Consumer方法,其child只能有一个,且为function
        return (
            <ThemeContext.Consumer>
                {
                    (context) => {
                        const { isLightTheme, light, dark } = context;
                        const theme = isLightTheme ? light : dark;
                        return (
                            <nav style={{ background: theme.bg, color: theme.font }}>
                                <h1>Context App</h1>
                                <ul>
                                    <li>Home</li>
                                    <li>About</li>
                                    <li>Contact</li>
                                </ul>
                            </nav>
                        )
                    }
                }

            </ThemeContext.Consumer>
        )
    }
}

export default Navbar;
SongList.js
import React, { Component } from 'react'
import { ThemeContext } from '../contexts/ThemeContext';

class SongList extends Component {
    render() {

        return (
            <ThemeContext.Consumer>
                {
                    (context) => {
                        const { isLightTheme, light, dark } = context;
                        const theme = isLightTheme ? light : dark;
                        return (
                            <div className='song-list' style={{ background: theme.bg, color: theme.font }}>
                                <ul>
                                    <li style={{ background: theme.ui }}>大鱼</li>
                                    <li style={{ background: theme.ui }}>幽灵公主</li>
                                    <li style={{ background: theme.ui }}>望</li>
                                </ul>
                            </div>
                        )
                    }
                }
            </ThemeContext.Consumer>

        )
    }
}

export default SongList;
效果同上
更新共享数据
- 数据是存储在ThemeContext里的,props也可以传递函数,
- 因此,我们可以在ThemeContext里定义更新数据的函数,并传递给消费组件,
- 消费组件返回要更新的信号,ThemeContext就开始更新
    // 更换主题
    toggleTheme = () => {
        this.setState({
            isLightTheme: !this.state.isLightTheme
        })
    }
	// 在原来传递state数据的基础上,加上更换主题的函数
    render() {
        return (
            <ThemeContext.Provider value={{ ...this.state, toggleTheme: this.toggleTheme }}>
                {this.props.children}
            </ThemeContext.Provider>
        )
    }
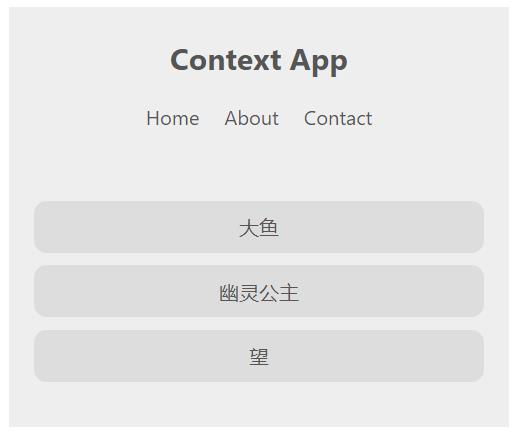
SongList组件接收该函数并给出回应
增加一个”切换主题“的按钮,点击一下就调用toggleTheme,切换主题样式
<ThemeContext.Consumer>
{
(context) => {
const { isLightTheme, light, dark, toggleTheme } = context; // 添加“切换主题”函数的解构
const theme = isLightTheme ? light : dark;
return (
<div className='song-list' style={{ background: theme.bg, color: theme.font }}>
<ul>
<li style={{ background: theme.ui }}>大鱼</li>
<li style={{ background: theme.ui }}>幽灵公主</li>
<li style={{ background: theme.ui }}>望</li>
</ul>
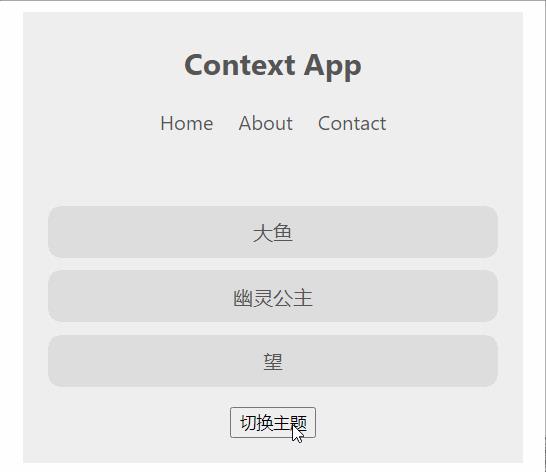
<button onClick={toggleTheme}>切换主题</button>
{/* 点击按钮时触发toggleTheme函数 */}
</div>
)
}
}
</ThemeContext.Consumer>
效果:
创建多个context
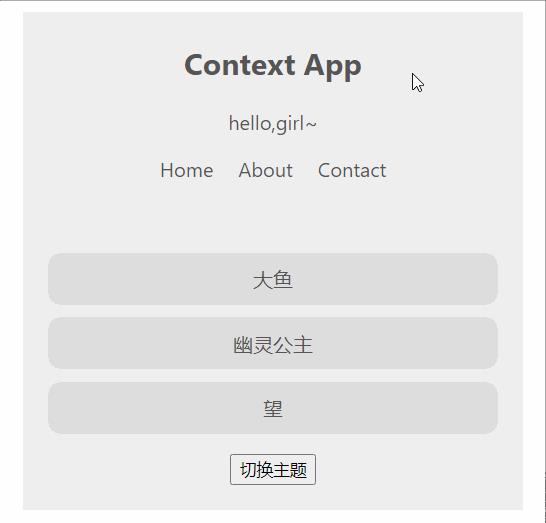
首先是创建新的context,功能比较简单,就是打招呼,hello~
- 定义了一个布尔变量isAGirl,默认为true
- 定义一个问候语的切换函数toggleGreeting
- 把state和函数都传递给消费组件
import React, { Component, createContext } from 'react';

export const GreetingContext = createContext();

class GreetingContextProvider extends Component {
    state = {
        isAGirl: true
    }
    // 更换问候语
    toggleGreeting = () => {
        this.setState({
            isAGirl: !this.state.isAGirl
        })
    }

    render() {
        return (
            <GreetingContext.Provider value={{ ...this.state, toggleGreeting: this.toggleGreeting }}>
                {this.props.children}
            </GreetingContext.Provider>
        )
    }
}
export default GreetingContextProvider;
然后是在App.js中引入,用GreetingContextProvider包裹消费组件(其他库和包的引入省略)
import GreetingContextProvider from "./contexts/GreetingContext";

function App() {
  return (
    <div className="App">
      <GreetingContextProvider>
        <ThemeContextProvider>
          <Navbar />
          <SongList />
        </ThemeContextProvider>
      </GreetingContextProvider>
    </div>
  );
}
最后是在Navbar组件中使用
使用contextType和consumer的区别之一是:
- contextType只能接收一个context的数据,且是距离该消费组件最近的context
- consumer可以接收多个context的数据
因此,创建多个context的案例,我们用consumer来获取多个context的数据
render() {

    return (
    // 使用GreetingContext.Consumer再包裹一层,解构该context中的数据和函数
    // 当isAGirl为true时,显示'hello,girl~',否则显示'hello,boy~'
    // 点击该文本,切换问候语
        <GreetingContext.Consumer>
            {
                (greetingContext) => {
                    const { isAGirl, toggleGreeting } = greetingContext;
                    return (
                        <ThemeContext.Consumer>
                            {
                                (themeContext) => {
                                    const { isLightTheme, light, dark } = themeContext;
                                    const theme = isLightTheme ? light : dark;
                                    return (
                                        <nav style={{ background: theme.bg, color: theme.font }}>
                                            <h1>Context App</h1>
                                            <div onClick={toggleGreeting}>
                                                { isAGirl ? 'hello,girl~' : 'hello,boy~'}
                                            </div>
                                            <ul>
                                                <li>Home</li>
                                                <li>About</li>
                                                <li>Contact</li>
                                            </ul>
                                        </nav>
                                    )
                                }
                            }

                        </ThemeContext.Consumer>
                    )

                }
            }
        </GreetingContext.Consumer>

    )
}
总体效果:
以上是关于使用React Context进行状态管理(五)Provider与Consumer匹配的主要内容,如果未能解决你的问题,请参考以下文章
[React 进阶系列] React Context 案例学习:子组件内更新父组件的状态