实际开发搞搞起来!!!!
rem适配方案
媒体查询+rem+less
基础知识铺垫
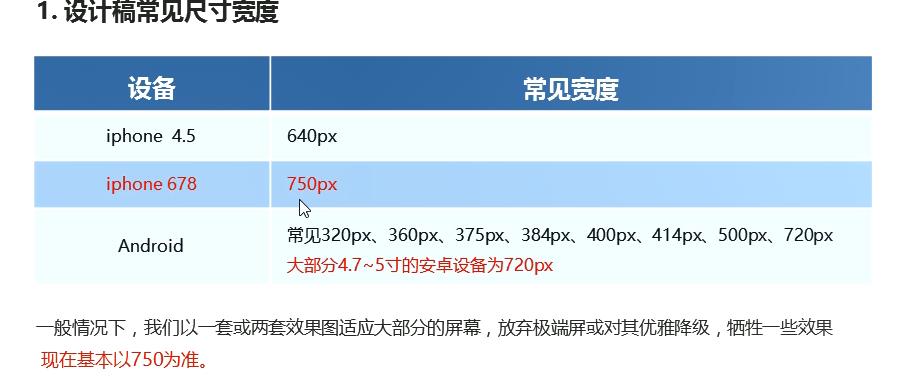
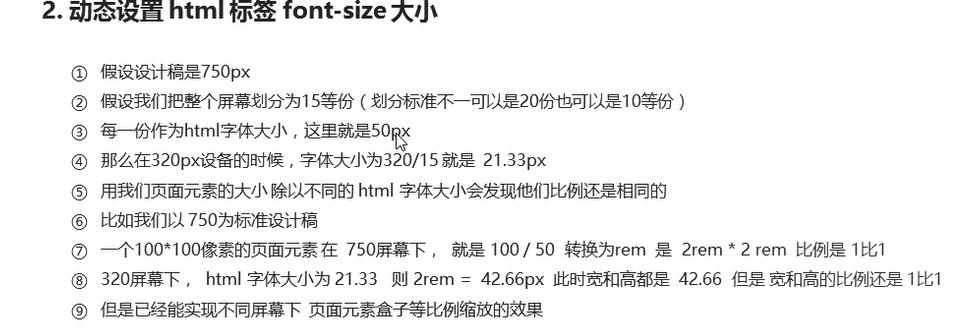
- 第一步,我们需要拿到设计稿,安装设计稿的要求来设置一个合适的html字体大小。
- 第二步,计算元素大小的取值 页面rem = 页面元素值(设计稿) / (屏幕的宽度/划分的份数)
- (屏幕的宽度/划分的份数) = html大小
- 这个算法你也不需要太纠结,按照这个来就是
最后终结一下:
- 首先我们选一套标准尺寸 750为准
- 我们用屏幕尺寸 除以 我们划分的份数 得到了 html 里面的文字大小 但是我们知道不同屏幕下得到的文字大小是不一样的 */
- 页面元素的rem值 = 页面元素在 750像素的下px值 / html 里面的文字大小 */
代码实例:
<!DOCTYPE html>
<html lang="en">

<head>
    <meta charset="UTF-8">
    <meta name="viewport" content="width=device-width, initial-scale=1.0">
    <meta http-equiv="X-UA-Compatible" content="ie=edge">
    <title>Document</title>
    <style>
        @media screen and (min-width: 320px) {
            html {
                font-size: 21.33px;
            }
        }

        @media screen and (min-width: 750px) {
            html {
                font-size: 50px;
            }
        }

        div {
            width: 2rem;
            height: 2rem;
            background-color: pink;
        }
        /* 1. 首先我们选一套标准尺寸 750为准
        2. 我们用屏幕尺寸 除以 我们划分的份数 得到了 html 里面的文字大小 但是我们知道不同屏幕下得到的文字大小是不一样的 */
        /* 3. 页面元素的rem值 =  页面元素在 750像素的下px值 / html 里面的文字大小 */

        @media screen and (min-width:320px) {
            html {
                font-size: 21.33px;
            }
        }

        @media screen and (min-width:750px) {
            html {
                font-size: 21.33px;
            }
        }

        div {
            width: 2rem;
            height: 2rem;
        }
    </style>
</head>

<body>
    <div></div>
</body>

</html>
仿苏宁首页
方案是单独写页面,技术是 rem+媒体查询+less,设计稿是750的
以下是部分的核心代码,
关于样式的初始化,我就不多强调了,设置视口标签,引入normalize.css ,设置 body样式,链接高亮等。注意一下细节问题,一个less中可以引入另一个less,这种使用方法在后期的node开发很重要---(@import "common";)
+++
// common.lss设置公共的样式,给站点里的所有页面都设置一个方便很多了
// 设置常见的屏幕尺寸 修改里面的html文字大小

//设置相关的不同的媒体适配html大小,根据不同的屏幕尺寸

/*强调以下,由于不同的屏幕下字体的大小不一样,为了保证可以达到等比例的缩放,我们需要给屏幕划分相同的份数*/
a {
    text-decoration: none;
}
// 一定要写到最上面,代码执行从上到下,你要写在上面
// 在pc端上打开的时候限定50px
html {
    font-size: 50px;
}
// 我们此次定义的划分的份数 为 15
@no: 15;
// 320
@media screen and (min-width: 320px) {
    html {
        font-size: 320px / @no;
    }
}
// 360
@media screen and (min-width: 360px) {
    html {
        font-size: 360px / @no;
    }
}

body {
    min-width: 320px;
    width: 15rem;
    margin: 0 auto;
    line-height: 1.5;
    font-family: Arial,Helvetica;
    background: #F2F2F2;
}
+++
index.less
// 页面元素rem计算公 = (页面元素的px) / (html 字体大小 50)
// 小提问等你来回到,为什么这里是是50?50哪儿蹦出来的,我们只是知道设计稿的宽度是750
// search-content
@baseFont: 50;
.search-content {
    display: flex;
    /*我们也还是使用了flex布局*/
    position: fixed;
    top: 0;
    left: 50%;
    /*注意一下这里的居中对齐,固定定位的盒子,最好使用translateX来实现居中*/
    transform: translateX(-50%);
    width: 15rem;
    height: 88rem / @baseFont;
    background-color:#FFC001;
    .classify {
        width: 44rem / @baseFont;
        height: 70rem / @baseFont;
        margin: 11rem / @baseFont 25rem / @baseFont 7rem / @baseFont 24rem / @baseFont;
        background: url(../images/classify.png) no-repeat;
        // 背景缩放,你也要掌握清楚
        background-size: 44rem / @baseFont 70rem / @baseFont;
    }
    .search {
        flex: 1;
        input {
            // 注意一下这里的outline,这个是设置去掉蓝色边框
            outline: none;
            width: 100%;
            border: 0;
            height: 66rem / @baseFont;
            border-radius: 33rem / @baseFont;
            background-color:#FFF2CC;
            margin-top: 12rem / @baseFont;
            font-size: 25rem / @baseFont;
            padding-left: 55rem / @baseFont;
            color: #757575;
        }
    }
    .login {
        width: 75rem / @baseFont;
        height: 70rem / @baseFont;
        line-height: 70rem / @baseFont;
        margin: 10rem / @baseFont;
        font-size: 25rem / @baseFont;
        text-align: center;
        color: #fff;

    }
}
+++
.banner {
    width: 750rem / @baseFont;
    height: 368rem / @baseFont;
    // 注意一下盒子里面的图片也跟着变化
    img {
        width: 100%;
        height: 100%;
    }
}
+++
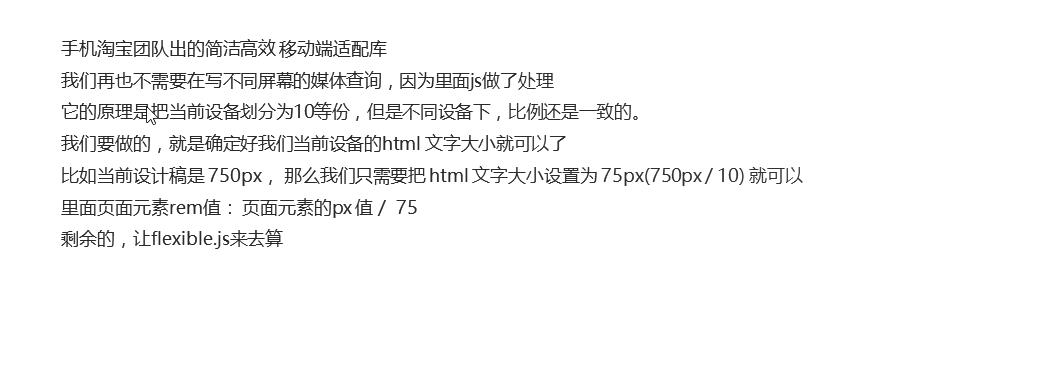
flexible+rem+less
这个是手机淘宝 团队写的一个适配库 ,我们不在需要写媒体查询了。
注意一下这里我们省去了less,我们直接写css。我们使用了一个vs上的一个插件,cssrem快速的转化我们的单位代码,注意一下修改它的配置,这个的好处就是我们不需要再用less除来除去咯
以下是部分的核心代码,完整的项目请在github上链接我,别忘了给我 ” 小星星“哦
@media screen and (min-width: 750px) {
    html {
        font-size: 75px!important;
        /* width: 75px; */
    }
}


/* search-content */

.search-content {
    display: flex;
    position: fixed;
    top: 0;
    left: 50%;
    transform: translateX(-50%);
    width: 10rem;
    height: 1.173333rem;
    background-color: #FFC001;
}


