Linux下的can 设备测试
Posted 疯狂的蕉尼基
tags:
篇首语:本文由小常识网(cha138.com)小编为大家整理,主要介绍了Linux下的can 设备测试相关的知识,希望对你有一定的参考价值。
Linux下的can 设备测试
在Linux系统中,CAN总线接口设备作为网络设备被系统进行统一管理。在控制台下, CAN总线的配置和以太网的配置使用相同的命令。
can设备查看
# ifconfig –a

root@master:~# ifconfig -a
can0: flags=128<NOARP>  mtu 16
        unspec 00-00-00-00-00-00-00-00-00-00-00-00-00-00-00-00  txqueuelen 10  (UNSPEC)
        RX packets 0  bytes 0 (0.0 B)
        RX errors 0  dropped 0  overruns 0  frame 0
        TX packets 0  bytes 0 (0.0 B)
        TX errors 0  dropped 0 overruns 0  carrier 0  collisions 0

can1: flags=128<NOARP>  mtu 16
        unspec 00-00-00-00-00-00-00-00-00-00-00-00-00-00-00-00  txqueuelen 10  (UNSPEC)
        RX packets 0  bytes 0 (0.0 B)
        RX errors 0  dropped 0  overruns 0  frame 0
        TX packets 0  bytes 0 (0.0 B)
        TX errors 0  dropped 0 overruns 0  carrier 0  collisions 0
设置can设备的波特率
ifconfig can0 down
link set can0 up type can bitrate 500000
查看can设备状态
ip -details link show can0
发送can消息(cansend)
cansend can0 123#000102030405060708
接收can消息 (candump)
candump can0
其他
#查到当前can网络 can0 can1,包括收发包数量、是否有错误等等
#ifconfig -a
#关闭can设备;或使用ifconfig canX down
#ip link set canX down
#开启can设备;或使用ifconfig canX up
#ip link set canX up
#显示can设备详细信息;
#ip -details link show canX
#设置can波特率
#ip link set canX up type can bitrate 250000
#回环测试;
#canconfig canX ctrlmode loopback on
# 重启can设备;
#canconfig canX restart
#停止can设备;
#canconfig canX stop
#查看can设备总线状态;
#canecho canX
#接收can总线发来的数据;
#candump canX
#发送数据;
#cansend canX --identifier=ID+数据
//使用滤波器接收ID匹配的数据
#candump canX --filter=ID:mask
Linux 下can 编程 (语言)
由于系统将 CAN 设备作为网络设备进行管理,因此在 CAN 总线应用开发方面, Linux 提供了SocketCAN 接口,使得 CAN 总线通信近似于和以太网的通信,应用程序开发接口 更加通用,也更加灵活。使用socketCAN就像使用TCP/IP一样。
步骤一:使用socket函数,创建一个CAN套接字
CAN套接字需要使用到一个新的协议族,所以调任用socket(2)这个系统函数的时候需要将 PF_CAN 作为第一个参数。当前有两个 CAN 的协议可以选择,一个是原始套接字协议( raw socket protocol),另一个是广播管理协议 BCM(broadcast manager)。你可以这样来打开一个套接字:
s = socket(PF_CAN, SOCK_RAW, CAN_RAW);//或者
s = socket(PF_CAN, SOCK_DGRAM, CAN_BCM);
步骤二:将CAN套接字绑定某个CAN接口
在成功创建套接字之后,调用ioctl来指定can设备,然后使用 bind(2)函数将套接字绑定在某个 CAN 设备接口上。
步骤三:CAN数据的收发
在绑定 (CAN_RAW)或连接(CAN_BCM) 套接字之后,你可以在套接字上使用 read(2)/write(2) ,也可以使用send(2)/sendto(2)/sendmsg(2)和对应的 recvfrom操作。当然也会有 CAN 特有的套接字选项。CAN 帧结构体和套接字地址结构体定义在 include/linux/can.h中。
每一次通信都采用 can_ frame 结构体将数据封装成帧。
struct can_frame
	canid_t can_id;/* 32 bit CAN_ID + EFF/RTR/ERR flags */
	__u8 can_dlc; / data length code: 0 … 8 */
	__u8 data[8] attribute((aligned(8)));
;
- can_id:0~28bit为扩展ID(11位基本ID+18位扩展ID)+29bit错误帧标志(0=data frame,1=error frame)+30bit为远程帧请求标志(1=rtr frame)+31bit帧格式标志(0 = standard, 1 = extended)。
- can_dlc:CAN报文数据长度,0~8范围。
- data: data[]数组,它的字节对齐是 64bit 的。所以,用户通过定义自己的结构体和共同体,可以轻松的访问 CAN 数据载荷。
CAN过滤器的使用
在绑定原始套接字的时候将会默认的filter将会接收所有的数据,修改该特性,必须包含<linux/can/raw.h>。过滤规则(过滤器)的定义在 include/linux/can.h 中:
struct can_filter
	canid_t can_id;canid_t can_mask;
;
代码参考 ©
过滤器匹配规则:<received_can_id> & mask == can_id & mask
/* 1. 报文发送程序 */
#include <stdio.h>
#include <stdlib.h>
#include <string.h>
#include <unistd.h>
#include <net/if.h>
#include <sys/ioctl.h>
#include <sys/socket.h>
#include <linux/can.h>
#include <linux/can/raw.h>

int main()

    int s, nbytes;
    struct sockaddr_can addr;
    struct ifreq ifr;
    struct can_frame frame[2] = 0;
    s = socket(PF_CAN, SOCK_RAW, CAN_RAW);//创建套接字
    strcpy(ifr.ifr_name, "can0" );
    ioctl(s, SIOCGIFINDEX, &ifr); //指定 can0 设备
    addr.can_family = AF_CAN;
    addr.can_ifindex = ifr.ifr_ifindex;
    bind(s, (struct sockaddr *)&addr, sizeof(addr));//将套接字与 can0 绑定
    //禁用过滤规则,本进程不接收报文,只负责发送
    setsockopt(s, SOL_CAN_RAW, CAN_RAW_FILTER, NULL, 0);
    //生成两个报文
    frame[0].can_id = 0x11;
    frame[0]. can_dlc = 1;
    frame[0].data[0] = 'Y';
    frame[1].can_id = 0x22;
    frame[1]. can_dlc = 1;
    frame[1].data[0] = 'N';
    //循环发送两个报文
    while(1)

        nbytes = write(s, &frame[0], sizeof(frame[0])); //发送 frame[0]
        if(nbytes != sizeof(frame[0]))

            printf("Send Error frame[0]\\n!");
            break; //发送错误,退出

        sleep(1);
        nbytes = write(s, &frame[1], sizeof(frame[1])); //发送 frame[1]
        if(nbytes != sizeof(frame[0]))

            printf("Send Error frame[1]\\n!");
            break;

        sleep(1);

    close(s);
    return 0;
/* 2. 报文过滤接收程序 */
#include <stdio.h>
#include <stdlib.h>
#include <string.h>
#include <unistd.h>
#include <net/if.h>
#include <sys/ioctl.h>
#include <sys/socket.h>
#include <linux/can.h>
#include <linux/can/raw.h>

int main()

    int s, nbytes;
    struct sockaddr_can addr;
    struct ifreq ifr;
    struct can_frame frame;
    struct can_filter rfilter[1];
    s = socket(PF_CAN, SOCK_RAW, CAN_RAW); //创建套接字
    strcpy(ifr.ifr_name, "can0" );
    ioctl(s, SIOCGIFINDEX, &ifr); //指定 can0 设备
    addr.can_family = AF_CAN;
    addr.can_ifindex = ifr.ifr_ifindex;
    bind(s, (struct sockaddr *)&addr, sizeof(addr)); //将套接字与 can0 绑定
    //定义接收规则,只接收表示符等于 0x11 的报文
    rfilter[0].can_id = 0x11;
    rfilter[0].can_mask = CAN_SFF_MASK;
    //设置过滤规则
    setsockopt(s, SOL_CAN_RAW, CAN_RAW_FILTER, &rfilter, sizeof(rfilter));
    while(1)

        nbytes = read(s, &frame, sizeof(frame)); //接收报文
        //显示报文
        if(nbytes > 0)

            printf(“ID=0x%X DLC=%d data[0]=0x%X\\n”, frame.can_id,
                frame.can_dlc, frame.data[0]);


    close(s);
    return 0;
linux 下can编程(python)
安装can 包
pip install python-can
can 配置
- in code
import can
can.rc['interface'] = 'socketcan'
can.rc['channel'] = 'vcan0'
can.rc['bitrate'] = 500000
from can.interface import Bus

bus = Bus()
或者
import can

bus = can.interface.Bus(bustype='socketcan', channel='vcan0', bitrate=500000)
- Configuration File
在Linux下的配置文件中进行配置,可能在以下路径。
~/can.conf

/etc/can.conf

$HOME/.can

$HOME/.canrc
library lib
[点击查看详情]
- Bus
- Message
- Reading and Writing Messages
- Asyncio support
- Broadcast Manager
- Error Handling
- Bit Timing Configuration
- Utilities
- Internal AP
代码参考
#!/usr/local/bin/python3
import os
import can
import time
from threading import Thread
from datetime import datetime


can_id=0x666
is_extend_id=True
can_data=b'\\x11\\x22\\x33\\x44\\x55\\x66\\x77\\x88'
can_msg=can.Message(arbitration_id=can_id, is_extended_id=is_extend_id, data=can_data)


def sendcantest(canbus):
    while True:
        canbus.send(can_msg)
        time.sleep(0.2)

def recvcantestv(canbus1, canbus2):
    while True:
        canbus2.send(can_msg)
        canmsg = canbus1.recv(timeout=0.2)
        if canmsg:
            if canmsg.arbitration_id != can_msg.arbitration_id or canmsg.data != can_msg.data:
                print(f"datetime.now().strftime('%Y-%m-%d %H:%M:%S.%f')[:-3] can2->can1 canmsg==========error=============")
            else:
                print(f"can2->can1 success")
        else:
            print(f"datetime.now().strftime('%Y-%m-%d %H:%M:%S.%f')[:-3]canmsg==========error=============")
        time.sleep(0.01)
        canbus1.send(can_msg)
        canmsg = canbus2.recv(timeout=0.2)
        if canmsg:
            if canmsg.arbitration_id != can_msg.arbitration_id or canmsg.data != can_msg.data:
                print(f"datetime.now().strftime('%Y-%m-%d %H:%M:%S.%f')[:-3] can1->can2 canmsg==========error=============")
            else:
                print(f"can1->can2 success")
        else:
            print(f"datetime.now().strftime('%Y-%m-%d %H:%M:%S.%f')[:-3]canmsg==========error=============")
        time.sleep(0.01)

def main():
    #重启can设备进行复位
    can_command = f'ifconfig can0 down >/dev/null; ifconfig can0 up >/dev/null;'
    os.system(can_command)
    can_command = f'ifconfig can1 down >/dev/null; ifconfig can1 up >/dev/null;'
    os.system(can_command)

    #。can配置
    can1 = can.interface.Bus(bustype='socketcan', channel='can1', bitrate=500000)
    can2 = can.interface.Bus(bustype='socketcan', channel='can0', bitrate=500000)

    # can 接收线程
    #ts=Thread(target=sendcantest,args=(can1,))
    #ts.start()
    # can 发送线程
    tr=Thread(target=recvcantestv,args=(can2, can1))
    tr.start()


if __name__ == '__main__':
    main()
    while True:
        pass
        time.sleep(120)
参考链接
迅为-IMX6开发板设备树-Linux内核配置两路can
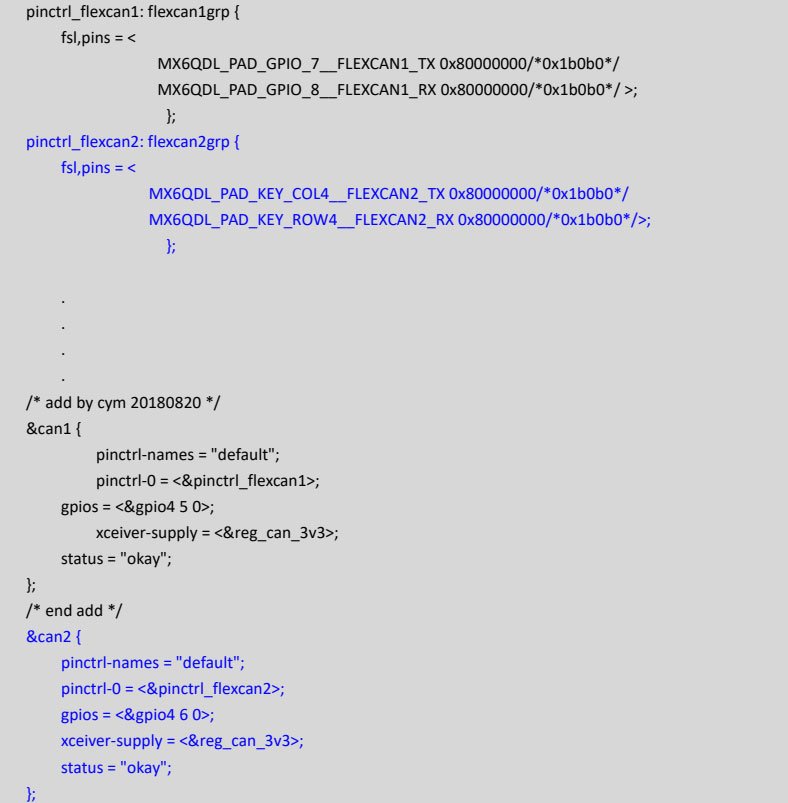
1、修改Android6 源码的设备树文件imx6qdl-sabresd.dtsi,添加如下图所示的can2节点,蓝色字体是添加的内容。


2、修改完后,保存退出。然后重新编译 Linux 内核,参考第 17.4 章节编译 Linux 内核,编译完成会生成kernel 镜 像 是 “ kernel_imx/arch/arm/boot ” 目 录 下 的 “ zImage”, 生 成 的 设 备 树 镜 像 是“kernel_imx/arch/arm/boot/dts ”目录 下的 “topeet_10.1inch.dtb” 、“topeet_7inch.dtb”和“topeet_9.7inch.dtb”
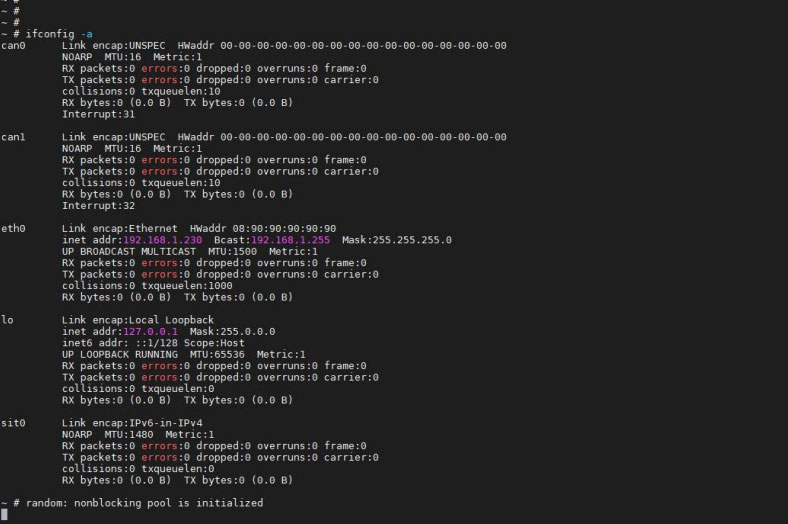
3、重新烧写设备树和内核镜像 zImage,系统启动以后,输入 ifconfig -a,发现 can1 节点出现了。
以上是关于Linux下的can 设备测试的主要内容,如果未能解决你的问题,请参考以下文章