Spring
Posted &panpan
tags:
篇首语:本文由小常识网(cha138.com)小编为大家整理,主要介绍了Spring相关的知识,希望对你有一定的参考价值。
1.导读
1)为什么要学习javaee
高效简单易用,学会后:针对博客系统
a)框架升级Servlet -->SSM
b)密码 明文/MD5 --->手工加盐算法
c)Session 持久升级 --->mysql/Redis[分布式服务]
a主机上登录功能无法在b上访问,a关机服务关闭,后续无法访问网站
d)功能升级(分页功能)
e)登录功能的验证升级(拦截器)
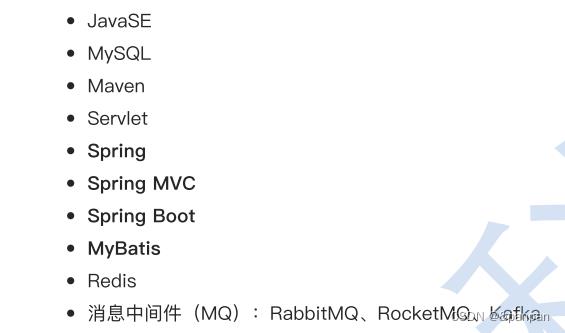
2)学什么:
3)之前项目流程:(servlet时代)
a)创建一个maven项目
b)添加servlet依赖(依照tomcat版本,选择合适版本)内置tomcat,自动springboot自动识别版本号
c)配置web.xml
d)编写代码(一个类对应一个url) 一个类可以有多个url,方法
e)运行项目(按装smart tomcat) ,下载一个tomcat在本地 直接运行
f)部署:linux上下载运行外置的tomcat,将jar放在tomcat/webapp下,重启tomcat 打包即可
2.Spring核心思想
Spring是什么:
Spring 是包含了众多⼯具⽅法的 IoC 容器。 (控制反转)对象的生命周期
什么是loc先看看案例:
//底盘
public class Bottom
    private Tire tire;
    public Bottom(int size,String color)
        tire=new Tire(size,color);

    public void init()
        System.out.println("执行了bottom init方法");
        tire.init();


public class App
    public static void main(String[] args)
        Car car=new Car(30,"bule");
        car.init();


public class Car
    private Framework framework;

    public Car(int size,String color)
        framework = new Framework(size,color);


    public void init()
        System.out.println("执行了car init方法");
        framework.init();


//车身
public class Framework
    private Bottom bottom;

    public Framework(int size,String color)
        bottom=new Bottom(size,color);

    public void init()
        System.out.println("执行了framework init方法");
        bottom.init();


//轮胎
public class Tire
    private int size;
    private String color;
    public Tire(int size,String color)
        this.size=size;

    public void init()
        System.out.println("执行了轮胎初始化方法,size: "+this.size);
一旦底层的逻辑变化,整个调用链跟着变化
修改前执行顺序:Car -> Framework -> Bottom -> Tire
改进后代码:
使用控制反转(依赖注入)
package old;

//轮胎
public class Tire
    private int size;
    private String color;

    public Tire(int size,String color)
        this.size=size;
        this.color=color;

    public void init()
        System.out.println("执行了轮胎初始化方法,size: "+this.size);


package old;

//底盘
public class Bottom
    private Tire tire;

    public Bottom(Tire tire)
       this.tire=tire;


    public void init()
        System.out.println("执行了bottom init方法");
        tire.init();


package old;

//车身
public class Framework
    private Bottom bottom;

    public Framework(Bottom bottom)
        this.bottom=bottom;

    public void init()
        System.out.println("执行了framework init方法");
        bottom.init();


package old;

public class Car
    private Framework framework;

    public Car(Framework framework)
        this.framework=framework;


    public void init()
        System.out.println("执行了car init方法");
        framework.init();


package old;

public class App
    public static void main(String[] args)
        Tire tire=new Tire(10,"蓝色");
        Bottom bottom=new Bottom(tire);
        Framework framework=new Framework(bottom);
        Car car=new Car(framework);
        car.init();
改进后执行顺序:Tire -> Bottom -> Framework -> Car
低耦合:Tire修改之后,整个调用链不用发生变化
对比:
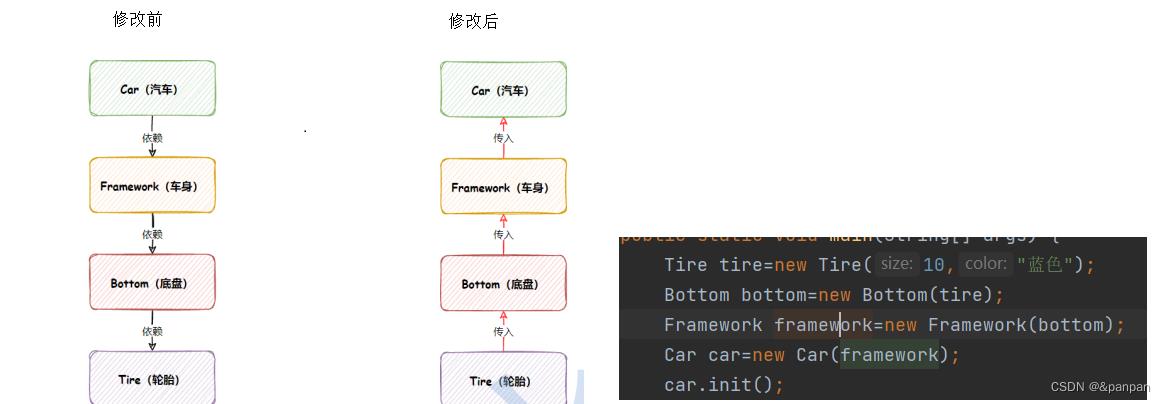
控制反转控制的是对象的生命周期,将对象交给别人来控制而不是程序员
Spring的创建和读取:
Spring创建:
1. 创建⼀个普通 Maven 项⽬。
2. 添加 Spring 框架⽀持(spring-context、spring-beans)。
 <dependency>
            <groupId>org.springframework</groupId>
            <artifactId>spring-context</artifactId>
            <version>5.2.3.RELEASE</version>
        </dependency>
        <dependency>
            <groupId>org.springframework</groupId>
            <artifactId>spring-beans</artifactId>
            <version>5.2.3.RELEASE</version>
        </dependency>
3. 添加启动类。
Bean对象存储
1.先创建bean对象
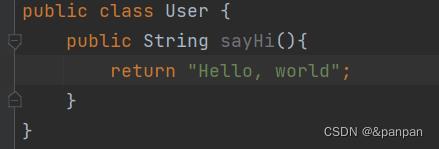
所谓的 Bean 就是 Java 语⾔中的⼀个普通对象,
2.将Bean对象存储到Spring中
a)在resources下创建一个spring配置文件
外部资源:resoucers非java代码就是外部资源
<?xml version="1.0" encoding="UTF-8"?>
<beans xmlns="http://www.springframework.org/schema/beans"
       xmlns:xsi="http://www.w3.org/2001/XMLSchema-instance"
       xmlns:content="http://www.springframework.org/schema/context"
       xsi:schemaLocation="http://www.springframework.org/schema/beans http://www.springframework.org/schema/beans/spring-beans.xsd http://www.springframework.org/schema/context https://www.springframework.org/schema/context/spring-context.xsd">
       <bean id="user" class="User"> </bean>
</beans>
b)将bean对象配置到spring配置文件中
id就是对象名称(不能重复),class表示对象本身填写包名+类名,存储对象的位置,id和class类似于域名和ip的区别
c)从Spring中读取到bean对象
1)得到Spring对象
2)从Spring对象中取出bean对象
3)使用bean对象
public class App
    public static void main(String[] args)
        //先得到Spring对象
        ApplicationContext context=new ClassPathXmlApplicationContext("Spring-config.xml");
        //从spring中取出bean对象
        User user=(User) context.getBean("user");
        //使用bean(可选)
        System.out.println(user.sayHi());
Applicationcontext是一个接口,需要调用接口从指定的xml中读取beadn对象
context.getbean返回object对象
总结:
1.如何理解Spring?
Spring 是包含了众多⼯具⽅法的 IoC 容器,什么是loc(控制反转),a类引入b类,b引入c类,之前的写法是a new b ,b new c,有一个缺陷当c变化时,整个调用链都会发生变化,当有一天传入当前对象时,不再new时,当c变化时,整个调用链还是之前的调用链,但是代码层不会发生变化,这就是依赖注入(控制反转的体现),减少了代码的耦合性。我们不需要关注具体是怎么调用的,而是在需要的时候,取出对象,对象的实现细节交给Spring来处理,这样对象的生命周期就从程序员控制转到Spirng控制了。
2.IoC 和 DI 是啥?有什么区别?
loc(控制反转),生命周期的托管,Spring就是一个简单的loc容器,传统意义上的读和取new对象,loc就是提前将对象引入到loc容器中,必要时候取,降耦,这个过程生命周期发生了变化
DI依赖注入,在程序运行期间动态的将某个对象引入到当前类的行为是具体的实现细节,
从广义上讲loc==di,从不同维度来描述一个问题
从狭义上讲loc是设计思想,di是具体的实现
3.Spring 最核⼼的功能是啥?
将对象存到容器中
从容器中取出对象
Spring--Spring入门
Spring的概述-什么是Spring
- ·Spring 是一个开源框架
- ·Spring 为简化企业级应用开发而生.使用Spring可以使简单的
- JavaBean 实现以前只有EJB才能实现的功能
- ·Spring 是JavaSE/EE的一站式框架
- ·方便解耦,简化开发
- -Spring就是一个大工厂,可以将所有对象创建和依赖关系维护,交给Spring管理
- ·AOP编程的支持
- -Spring提供面向切面编程,可以方便的实现对程序进行权限拦截、运行监控等功能
- ·声明式事务的支持
- -只需要通过配置就可以完成对事务的管理,而无需手动编程
Spring的概述-Spring的优点
- ·方便程序的测试
- -Spring对Junit4支持,可以通过注解方便的测试Spring程序
- ·方便集成各种优秀框架
- -Spring不排斥各种优秀的开源框架,其内部提供了对各种优秀框架(如:Struts、Hibernate、MyBatis等)的直接支持
- ·降低JavaEEAPI的使用难度
- -Spring 对JavaEE开发中非常难用的一些API(JDBC、JavaMail、远程调用等),都提供了封装,使这些API应用难度大大降低
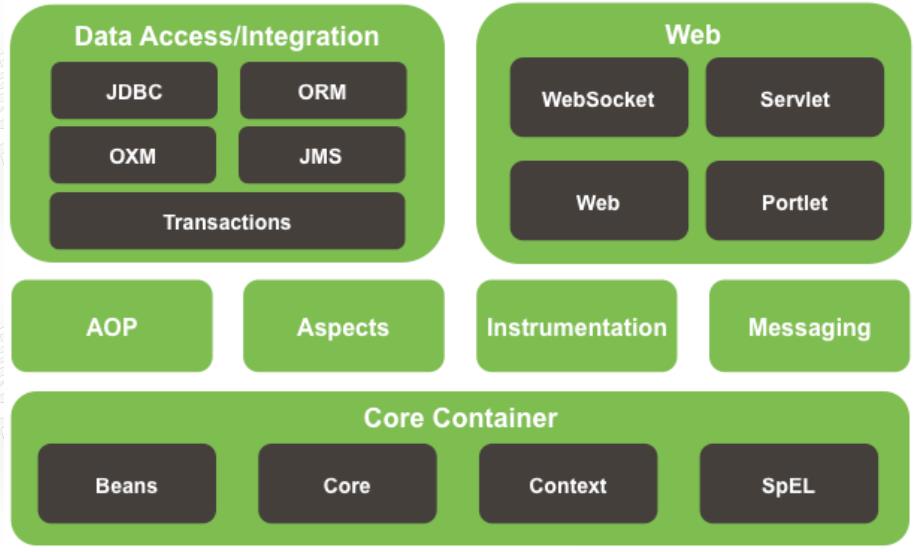
Spring的概述-Spring的模块
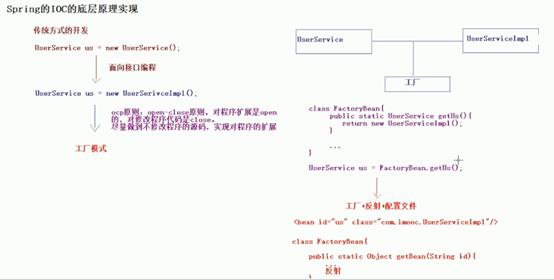
Spring的Ioc的底层实现
Spring的Ioc的入门案例
- 使用idea创建新的maven项目
- 在pom.xml中添加依赖
<dependencies>
  <dependency>
    <groupId>junit</groupId>
    <artifactId>junit</artifactId>
    <version>4.11</version>
    <scope>test</scope>
  </dependency>
  <dependency>
    <groupId>org.springframework</groupId>
    <artifactId>spring-core</artifactId>
    <version>4.3.7.RELEASE</version>
  </dependency>
  <dependency>
    <groupId>org.springframework</groupId>
    <artifactId>spring-context</artifactId>
    <version>4.3.7.RELEASE</version>
  </dependency>
  <dependency>
    <groupId>org.springframework</groupId>
    <artifactId>spring-beans</artifactId>
      <version>4.3.7.RELEASE</version>
  </dependency>
    <dependency>
        <groupId>org.springframework</groupId>
        <artifactId>spring-expression</artifactId>
      <version>4.3.7.RELEASE</version>
    </dependency>
  <dependency>
    <groupId>commons-logging</groupId>
    <artifactId>commons-logging</artifactId>
    <version>1.2</version>
  </dependency>
  <dependency>
    <groupId>log4j</groupId>
    <artifactId>log4j</artifactId>
    <version>1.2.17</version>
  </dependency>
</dependencies>
- 建包
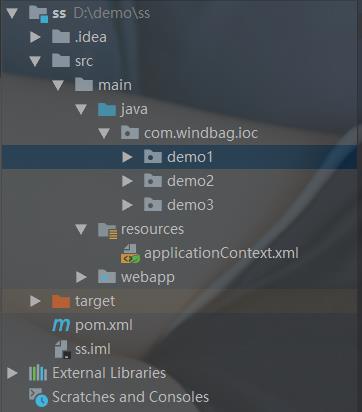
UserService
public interface UserService {

    public void sayHello();
}
UserServiceImpl
public class UserServiceImpl implements  UserService{
    public String getName() {
        return name;
    }

    public void setName(String name) {
        this.name = name;
    }

    //添加属性
    private String name;
    @Override
    public void sayHello() {
        System.out.print("hello spring" + name);
    }
}
SpringDemo1
public class SpringDemo1 {
    @Test
    /**
     * 传统方式开发
     */
    public void demo1(){
        //UserService userService = new UserServiceImpl();
        UserServiceImpl userService = new UserServiceImpl();
        //设置属性 传统方法要改代码 就不好了
        userService.setName("张三");
        userService.sayHello();
    }

    @Test
    /**
     * 使用Spring 的方式
     */
    public void demo2(){
        //创建Spring的工厂
        ApplicationContext applicationContext = new ClassPathXmlApplicationContext("applicationContext.xml");
        //通过工厂获得类
        UserService userService = (UserService) applicationContext.getBean("userService");

        userService.sayHello();
    }
}
applicationContext.xml

<?xml version="1.0" encoding="UTF-8"?>
<beans xmlns="http://www.springframework.org/schema/beans"
       xmlns:xsi="http://www.w3.org/2001/XMLSchema-instance"
       xsi:schemaLocation="http://www.springframework.org/schema/beans http://www.springframework.org/schema/beans/spring-beans.xsd">

    <!-- UserService的创建权交给了Spring-->
    <bean id="userService" class="com.windbag.ioc.demo1.UserServiceImpl">

        <!-- 设置属性-->
        <property name="name" value="李四"></property>
    </bean>

</beans>
- 测试
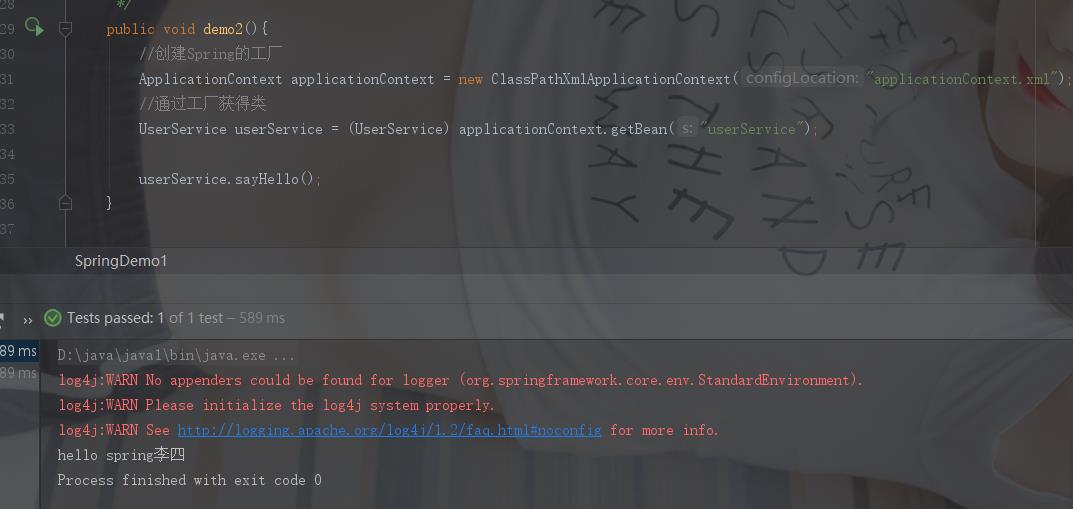
Spring IOC的快速入门案例
- ·IOC Inverse of Control 反转控制的概念,就是将原本在程序中手动创建UserService对象的控制权,交由Spring框架管理
- ·简单说,就是创建UserService对象控制权被反转到了Spring框架
- ·DI Dependency Injection 依赖注入的概念,就是在Spring创建这个对象的过程中,将这个对象所依赖的属性注入进去。(name)
以上是关于Spring的主要内容,如果未能解决你的问题,请参考以下文章