ffmpeg录制H265格式的桌面视频

Posted tusong86

tags:

篇首语:本文由小常识网(cha138.com)小编为大家整理,主要介绍了ffmpeg录制H265格式的桌面视频相关的知识,希望对你有一定的参考价值。

ffmpeg本身不支持H265,如果需要支持,需要事先编译出libx265,读者可以到libx265的官方网站https://www.videolan.org/developers/x265.html上找到下载地址,本人下载的是x265_3.5.tar.gz。

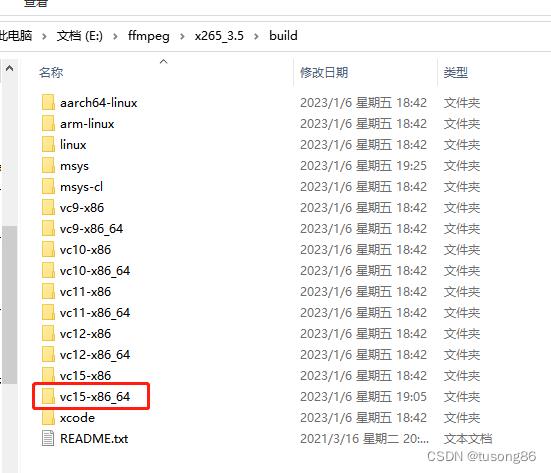
编译libx265时,定位到其目录下,有个build文件夹,如下所示,支持的编译方式挺多

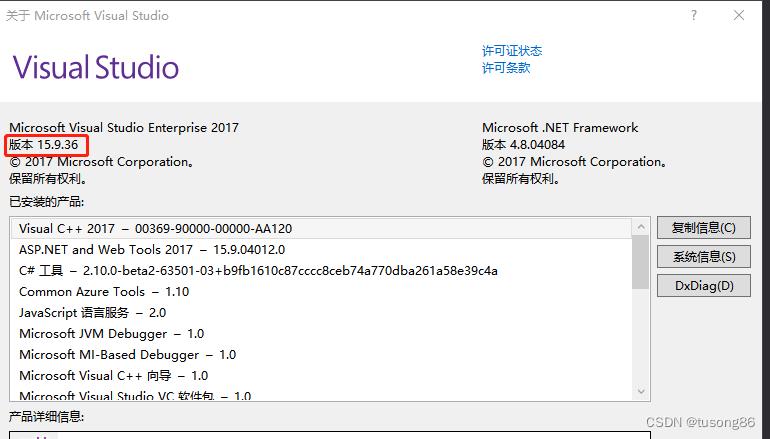
本人用的是vs2017编译,选择的是vc15-x86_64,注意vc15代表的不是vs2015,如下所示,本人vs2017的版本15.9.36,取版本的第一个字段15,所以vc15其实是vs2017,本人编译的是64位版本。

这里面有个make-solutions.bat,用于生成解决方案sln。但是先不要执行,首先打开cmd,
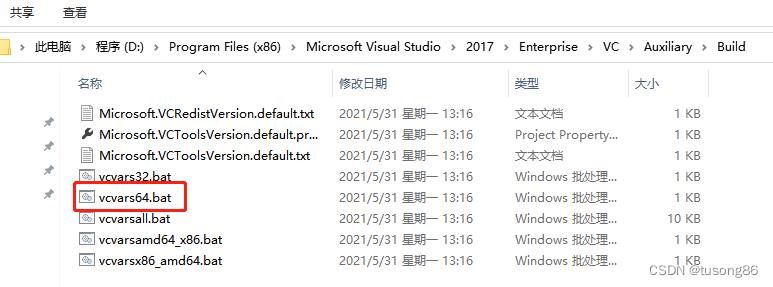
切换到目录D:\\Program Files (x86)\\Microsoft Visual Studio\\2017\\Enterprise\\VC\\Auxiliary\\Build,这也是本人vs2017的安装目录,
该目录下有如下文件

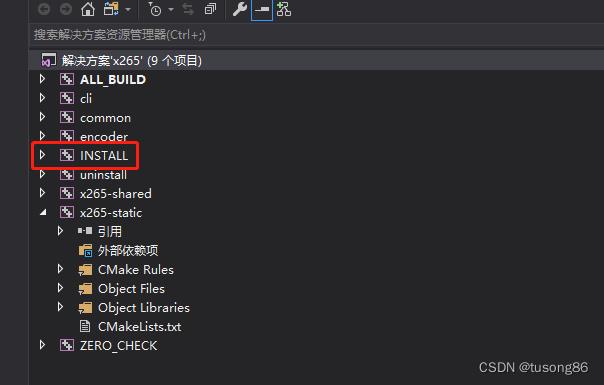
cmd中执行vcvars64.bat,初始化vs内部环境变量,执行后,诸如编译器cl.exe就能被命令行识别,然后再切换到libx265的build/vc15-x86_64目录,执行make-solutions.bat,然后会生成解决方案x265.sln,打开此解决方案,如下所示:

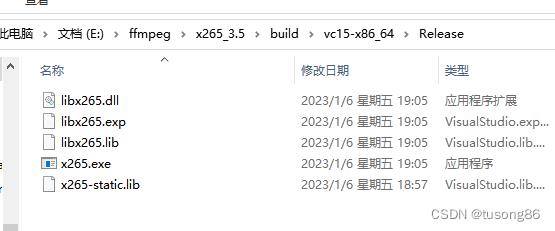
直接编译INSTALL工程,就会编译静态库和动态库,编译出的成果物如下所示:

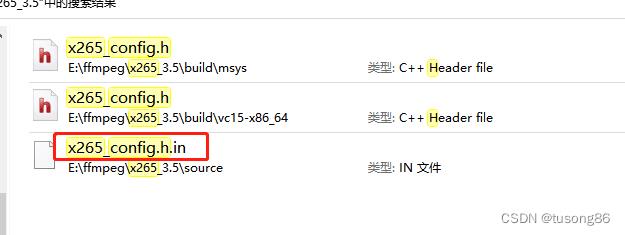
头文件有两个:x265_config.h和x265.h,其中x265.h的内容是固定的,直接在源码文件中找就可以,而x265_config.h其实是由x265_config.h.in变化而来,不同编译器最终生成的也会不同。

读者可以看到这里面有两个x265_config.h,其中一个是由msys编译生成。

本人此处用msys也生成一遍,主要是vs编译器生成的不带x265.pc,本人最终在ffmpeg集成进libx265,需要x265.pc;其实这个文件也可以自己写。

本人的x265.pc内容如下:

prefix=/usr/local/x265
exec_prefix=$prefix
libdir=$exec_prefix/lib
includedir=$prefix/include

Name: x265
Description: H.265/HEVC video encoder
Version: 3.5
Libs: -L$exec_prefix/lib -lx265
Libs.private: 
Cflags: -I$prefix/include 

很明显本人将x265的成果物拷贝到msys2目录下(本人拷贝的是动态库的引入库,不是静态库)。

然后打开msys2终端,设置x265的pkgconfigpath,如下所示:

export PKG_CONFIG_PATH=/usr/local/x265/lib/pkgconfig:$PKG_CONFIG_PATH

然后进入到ffmpeg的主目录,执行命令:

./configure --toolchain=msvc --arch=x86_64 --disable-debug --enable-gpl --enable-libfreetype --enable-libfontconfig --enable-libx264 --enable-libx265 --extra-cflags=-I/usr/local/x264/include --extra-ldflags='-LIBPATH:/usr/local/x264/lib' --prefix=/home/ffmpeg_x264_x265_vpx_freetype_fontconfig_static --enable-libvpx --enable-encoder=libvpx_vp8 --enable-encoder=libvpx_vp9 --enable-decoder=vp8 --enable-decoder=vp9 --enable-parser=vp8 --enable-parser=vp9

可以看到,本人此次编译ffmpeg,视频格式支持h264,h265,vp8,vp9。
生成makefile文件后,就可以进行编译了。

此处本人事先尝试了使用x265的静态库,但是在configure的时候报错,config.log显示大量的链接错误,本人只好用x265动态库的引入库,从而通过了configure,只是最终应用exe需要依赖libx265.dll,如果是静态库,则最终的成果物不需要libx265.dll,成果物会少一个文件。
关于这个问题,本人后续会研究下。

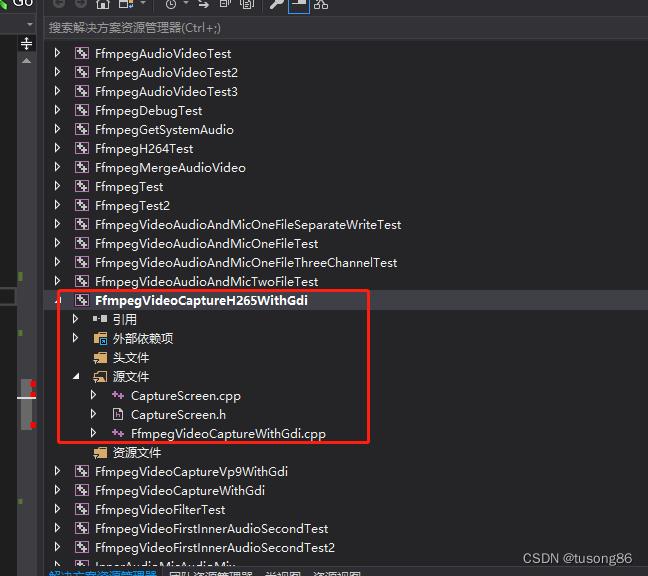
下面写一个录制桌面的例子:

其中文件CaptureScreen.h内容如下:

#ifndef _CCAPTURE_SCREEN_HH
#define _CCAPTURE_SCREEN_HH

#include<time.h>
#include <d3d9.h>
#include <stdio.h>
#include <stdlib.h>
#include <stdarg.h>
#include <windows.h>

#include <tchar.h>
#include <winbase.h>
#include <winreg.h>
#include <Strsafe.h>


//
// ---抓屏类----
//
class CCaptureScreen

public:
	CCaptureScreen(void);
	~CCaptureScreen(void);

public:
	/*-----------定义外部调用函数-----------*/
	int Init(int&, int&);//初始化
	BYTE* CaptureImage(); //抓取屏幕

private:
	/*-----------定义内部调用函数-----------*/
	void* CaptureScreenFrame(int, int, int, int);//抓屏
	HCURSOR FetchCursorHandle(); //获取鼠标光标

private:
	/*-----------定义私有变量-----------*/
	int m_width;
	int m_height;
	UINT   wLineLen;
	DWORD  dwSize;
	DWORD  wColSize;

	//设备句柄
	HDC hScreenDC;
	HDC hMemDC;
	//图像RGB内存缓存
	PRGBTRIPLE m_hdib;
	//位图头信息结构体
	BITMAPINFO pbi;

	HBITMAP hbm;
	//鼠标光标
	HCURSOR m_hSavedCursor;


;

#endif //--_CCAPTURE_SCREEN_HH

文件CaptureScreen.cpp内容如下:

//#include "stdafx.h"
#include "CaptureScreen.h"

CCaptureScreen::CCaptureScreen(void)

	m_hdib = NULL;
	m_hSavedCursor = NULL;
	hScreenDC = NULL;
	hMemDC = NULL;
	hbm = NULL;
	m_width = 1920;
	m_height = 1080;
	FetchCursorHandle();

//
// 释放资源
//
CCaptureScreen::~CCaptureScreen(void)

	DeleteObject(hbm);
	if (m_hdib)

		free(m_hdib);
		m_hdib = NULL;
	
	if (hScreenDC)

		::ReleaseDC(NULL, hScreenDC);
	
	if (hMemDC) 

		DeleteDC(hMemDC);
	
	if (hbm)
	
		DeleteObject(hbm);


//
// 初始化
//
int CCaptureScreen::Init(int& src_VideoWidth, int& src_VideoHeight)

	hScreenDC = ::GetDC(GetDesktopWindow());
	if (hScreenDC == NULL) return 0;

	int m_nMaxxScreen = GetDeviceCaps(hScreenDC, HORZRES);
	int m_nMaxyScreen = GetDeviceCaps(hScreenDC, VERTRES);

	hMemDC = ::CreateCompatibleDC(hScreenDC);
	if (hMemDC == NULL) return 0;

	m_width = m_nMaxxScreen;
	m_height = m_nMaxyScreen;

	if (!m_hdib)
		m_hdib = (PRGBTRIPLE)malloc(m_width * m_height * 3);//24位图像大小
	
	//位图头信息结构体
	pbi.bmiHeader.biSize = sizeof(BITMAPINFOHEADER);
	pbi.bmiHeader.biWidth = m_width;
	pbi.bmiHeader.biHeight = m_height;
	pbi.bmiHeader.biPlanes = 1;
	pbi.bmiHeader.biBitCount = 24;
	pbi.bmiHeader.biCompression = BI_RGB;

	src_VideoWidth = m_width;
	src_VideoHeight = m_height;

	hbm = CreateCompatibleBitmap(hScreenDC, m_width, m_height);
	SelectObject(hMemDC, hbm);

	wLineLen = ((m_width * 24 + 31) & 0xffffffe0) / 8;
	wColSize = sizeof(RGBQUAD)* ((24 <= 8) ? 1 << 24 : 0);
	dwSize = (DWORD)(UINT)wLineLen * (DWORD)(UINT)m_height;

	return 1;


//抓取屏幕数据
BYTE* CCaptureScreen::CaptureImage()


	VOID*  alpbi = CaptureScreenFrame(0, 0, m_width, m_height);
	return (BYTE*)(alpbi);


void* CCaptureScreen::CaptureScreenFrame(int left, int top, int width, int height)


	if (hbm == NULL || hMemDC == NULL || hScreenDC == NULL) return NULL;

	BitBlt(hMemDC, 0, 0, width, height, hScreenDC, left, top, SRCCOPY);
	/*-------------------------捕获鼠标-------------------------------*/
	
		POINT xPoint;
		GetCursorPos(&xPoint);
		HCURSOR hcur = FetchCursorHandle();
		xPoint.x -= left;
		xPoint.y -= top;

		ICONINFO iconinfo;
		BOOL ret;
		ret = GetIconInfo(hcur, &iconinfo);
		if (ret)
			xPoint.x -= iconinfo.xHotspot;
			xPoint.y -= iconinfo.yHotspot;

			if (iconinfo.hbmMask) DeleteObject(iconinfo.hbmMask);
			if (iconinfo.hbmColor) DeleteObject(iconinfo.hbmColor);
		
		/*画鼠标*/
		::DrawIcon(hMemDC, xPoint.x, xPoint.y, hcur);
	
	//动态分配的内存
	PRGBTRIPLE hdib = m_hdib;
	if (!hdib)
		return hdib;

	GetDIBits(hMemDC, hbm, 0, m_height, hdib, (LPBITMAPINFO)&pbi, DIB_RGB_COLORS);
	return hdib;


//
// 获取窗体鼠标光标
//
HCURSOR CCaptureScreen::FetchCursorHandle()

	if (m_hSavedCursor == NULL)
	
		m_hSavedCursor = GetCursor();
	
	return m_hSavedCursor;

文件FfmpegVideoCaptureWithGdi.cpp内容如下:

// RecordingScreen.cpp : 定义控制台应用程序的入口点。
//

//#include "stdafx.h"
#include "CaptureScreen.h"
extern "C"

#include <libavutil/opt.h>
#include <libavutil/mathematics.h>
#include <libavutil\\time.h>
#include <libavformat/avformat.h>
#include <libswscale/swscale.h>
#include <libswresample/swresample.h>
#include <libavutil/imgutils.h>
#include <libavcodec/avcodec.h>
#include <libavdevice\\avdevice.h>

#pragma comment(lib, "avcodec.lib")
#pragma comment(lib, "avformat.lib")
#pragma comment(lib, "avutil.lib")
#pragma comment(lib, "avdevice.lib")
#pragma comment(lib, "avfilter.lib")
#pragma comment(lib, "postproc.lib")
#pragma comment(lib, "swresample.lib")
#pragma comment(lib, "swscale.lib")


//#include <ipp.h>
#include <chrono>

//signed int Bgr2YuvI420(const BYTE* srcBgr, int image_width, int image_height, BYTE* dstYuvI420)
//
//	IppStatus ipp_status;
//
//	int srcStep = image_width * 3;
//	int dstYStep = image_width;
//	int dstCbCrStep = image_width;
//	IppiSize roiSize =  image_width, image_height ;
//
//	const Ipp8u* pSrc = (Ipp8u*)srcBgr;
//
//	Ipp8u *pDstY = (Ipp8u*)dstYuvI420;
//	Ipp8u *pDstU = (Ipp8u*)&dstYuvI420[image_width * image_height];
//	Ipp8u *pDstV = (Ipp8u*)&dstYuvI420[image_width * image_height * 5 / 4];
//	Ipp8u *pDst[3];
//	pDst[0] = pDstY;
//	pDst[1] = pDstU;
//	pDst[2] = pDstV;
//	int dstStep[3] =  image_width, image_width / 2, image_width / 2 ;
//
//	ipp_status = ippiBGRToYCbCr420_8u_C3P3R(pSrc, srcStep, pDst, dstStep, roiSize);
//
//	return ipp_status;
//


unsigned char clip_value(unsigned char x, unsigned char min_val, unsigned char  max_val) 
	if (x > max_val) 
		return max_val;
	
	else if (x < min_val) 
		return min_val;
	
	else 
		return x;


//RGB to YUV420
bool RGB24_TO_YUV420(unsigned char *RgbBuf, int w, int h, unsigned char *yuvBuf)

	unsigned char*ptrY, *ptrU, *ptrV, *ptrRGB;
	memset(yuvBuf, 0, w*h * 3 / 2);
	ptrY = yuvBuf;
	ptrU = yuvBuf + w * h;
	ptrV = ptrU + (w*h * 1 / 4);
	unsigned char y, u, v, r, g, b;
	for (int j = h - 1; j >= 0; j--) 
		ptrRGB = RgbBuf + w * j * 3;
		for (int i = 0; i < w; i++) 

			b = *(ptrRGB++);
			g = *(ptrRGB++);
			r = *(ptrRGB++);


			y = (unsigned char)((66 * r + 129 * g + 25 * b + 128) >> 8) + 16;
			u = (unsigned char)((-38 * r - 74 * g + 112 * b + 128) >> 8) + 128;
			v = (unsigned char)((112 * r - 94 * g - 18 * b + 128) >> 8) + 128;
			*(ptrY++) = clip_value(y, 0, 255);
			if (j % 2 == 0 && i % 2 == 0) 
				*(ptrU++) = clip_value(u, 0, 255);
			
			else 
				if (i % 2 == 0) 
					*(ptrV++) = clip_value(v, 0, 255);


	return true;


DWORD WINAPI ScreenCapThreadProc(LPVOID lpParam)

	CCaptureScreen* ccs = new CCaptureScreen();
	int width = 0;
	int height = 0;

	ccs->Init(width, height);

	AVFormatContext* avFormCtx_Out;
	AVCodecContext*  avCodecCtx_Out;
	AVCodec*  avCodec;
	AVStream* avStream;
	AVFrame* frame;
	AVPacket* packet;

	int frameRate = 10;
	int ret = 0;
	const char* filename = "out.mp4";

	ret = avformat_alloc_output_context2(&avFormCtx_Out, NULL, NULL, filename);
	if (ret < 0)
	
		printf("Init avformat object is faild! \\n");
		return 0;
	

	//avCodec = (AVCodec *)avcodec_find_encoder(avFormCtx_Out->oformat->video_codec);
	avCodec = (AVCodec *)avcodec_find_encoder(AV_CODEC_ID_H265);
	
	if (!avCodec)
	
		printf("Init avCodec object is faild! \\n");
		return 0;
	

	avCodecCtx_Out = avcodec_alloc_context3(avCodec);
	if (!avCodecCtx_Out)
	
		printf("Init avCodecCtx_Out object is faild! \\n");
		return 0;
	
	avStream = avformat_new_stream(avFormCtx_Out, avCodec);
	if (!avStream)
	
		printf("Init avStream object is faild! \\n");
		return 0;
	

	avCodecCtx_Out->flags |= AV_CODEC_FLAG_QSCALE;
	avCodecCtx_Out->bit_rate = 4000000;
	avCodecCtx_Out->rc_min_rate = 4000000;
	avCodecCtx_Out->rc_max_rate = 4000000;
	avCodecCtx_Out->bit_rate_tolerance = 4000000;
	avCodecCtx_Out->time_base.den = frameRate;
	avCodecCtx_Out->time_base.num = 1;

	avCodecCtx_Out->width = width;
	avCodecCtx_Out->height = height;
	//pH264Encoder->pCodecCtx->frame_number = 1;
	avCodecCtx_Out->gop_size = 12;
	avCodecCtx_Out->max_b_frames = 0;
	avCodecCtx_Out->thread_count = 4;
	avCodecCtx_Out->pix_fmt = AV_PIX_FMT_YUV420P;
	avCodecCtx_Out->codec_id = AV_CODEC_ID_H265;
	avCodecCtx_Out->codec_type = AVMEDIA_TYPE_VIDEO;

	av_opt_set(avCodecCtx_Out->priv_data, "b-pyramid", "none", 0);
	av_opt_set(avCodecCtx_Out->priv_data, "preset", "superfast", 0);
	av_opt_set(avCodecCtx_Out->priv_data, "tune", "zerolatency", 0);

	if (avFormCtx_Out->oformat->flags & AVFMT_GLOBALHEADER)
		avCodecCtx_Out->flags |= AV_CODEC_FLAG_GLOBAL_HEADER;

	ret = avcodec_open2(avCodecCtx_Out, avCodec, NULL);
	if (ret < 0)
	
		printf("Open avcodec is faild! \\n");
		return 0;
	公司最近在做视频直播的项目,我这里分配到对直播的视频进行录制,录制的方式是通过rtmpdump对rtmp的视频流进行录制

前置的知识

  • ffmpeg: 用于实现把录屏工具发出的视频和音频流,转换成我们需要的格式,然后发送到rtmp中转服务器上。
  • rtmpdump: 用于实现视频的录制,从rtmp的中转服务器接受到视频流,并把视频流保存成flv文件
  • nginx-rtmp-module: 用户rtmp中转服务,虽然他可以做很多功能,但是我这里只是使用了这一个
  • screen capture: windows下的开源屏幕录制工具

首先,我们安装ffmpeg, rtmpdump和nginx-rtmp-module:

这里我使用的ffmpegrtmpdump都是windows版的,虽然和linux下的有所区别,但是在这里并没有使用到这些区别。

nginx是在windows下的虚拟机中的linux下编译的,因为windows编译这玩意是在太麻烦了,我实在不想编译第二次。

ffmpeg 的简单使用

首先我们需要查看以下我们的自己上的设备信息,在安装了screen capture recorder之后就可以使用下面的命令:

ffmpeg -list_devices true -f dshow -i dummy

输出如下结果:

ffmpeg version N-63013-g4cdea92 Copyright (c) 2000-2014 the FFmpeg developers
  built on May  6 2014 22:09:20 with gcc 4.8.2 (GCC)
  configuration: --enable-gpl --enable-version3 --disable-w32threads --enable-avisynth --enable-bzlib --enable-fontconfig --enable-frei0r --enable-gnutls --enable-iconv --enable-libass --enable-libbluray --enable-libcaca --enable-libfreetype --enable-libgsm --enable-libilbc --enable-libmodplug --enable-libmp3lame --enable-libopencore-amrnb --enable-libopencore-amrwb --enable-libopenjpeg --enable-libopus --enable-librtmp --enable-libschroedinger --enable-libsoxr --enable-libspeex --enable-libtheora --enable-libtwolame --enable-libvidstab --enable-libvo-aacenc --enable-libvo-amrwbenc --enable-libvorbis --enable-libvpx --enable-libwavpack --enable-libx264 --enable-libx265 --enable-libxavs --enable-libxvid --enable-decklink --enable-zlib
  libavutil      52. 81.100 / 52. 81.100
  libavcodec     55. 60.103 / 55. 60.103
  libavformat    55. 37.102 / 55. 37.102
  libavdevice    55. 13.101 / 55. 13.101
  libavfilter     4.  5.100 /  4.  5.100
  libswscale      2.  6.100 /  2.  6.100
  libswresample   0. 18.100 /  0. 18.100
  libpostproc    52.  3.100 / 52.  3.100
[dshow @ 00000000029f0e20] DirectShow video devices
[dshow @ 00000000029f0e20]  "screen-capture-recorder"
[dshow @ 00000000029f0e20] DirectShow audio devices
[dshow @ 00000000029f0e20]  "FrontMic (Realtek High Definiti"
[dshow @ 00000000029f0e20]  "virtual-audio-capturer"
[dshow @ 00000000029f0e20]  "Realtek Digital Input (Realtek "
dummy: Immediate exit requested

DirectShow video devices下面的是视频设备,DirectShow audio devices是音频设备,ffmpeg录制就需要从这些设备上得到视频和音频的流.

下面我们看以下ffmpeg如果从这些设备中录制视频。

ffmpeg -f dshow -i video="screen-capture-recorder":audio="FrontMic (Realtek High Definiti"  test.avi

这杨就可以把录屏和通过麦克风说话的声音都录下来,保存成avii,当然这里也可以使用更加丰富的参数来调整视频,使视频更清醒,声音也更响亮,不过这些都不在本文的讨论范围,所以就不在这里多少,有兴趣的华可以去http://ffmpeg.org/documentation.html上详细的查看。

当然我们是要使用rtmp协议的,所以这里就需要把视频流发送到rtmp服务端去,如下命令:

ffmpeg -f dshow -i video="screen-capture-recorder":audio="FrontMic (Realtek High Definiti"  -f flv rtmp://192.168.56.101/live/test

这里只说明一点,如果是发送到rtmp协议的话是需要加上-f flv这个参数的,如果不加会报错,这样就算是把录制的视频流发送到了rtmp服务端,当然我这里的nginx服务器要配置好并且启动了,否则还是会报错的。

nginx rtmp module

安装

在编译安装模块的时候需要说明一点,如果在 configure的时候出现了openssl的错误,请安装libssl-dev.

ubuntu下: sudo apt-get install libssl-dev

./configure --prefix=/usr/local/rtmp-nginx --without-http_rewrite_module
make
make install

配置

下面是我的配置:

rtmp {
    server {
        listen 1935;

        chunk_size 4096;

        application live {
            live on;
        }
    }
}
http {
    server {
        listen      8080;

        location /stat {
            rtmp_stat all;
            rtmp_stat_stylesheet stat.xsl;
        }

        location /stat.xsl {
            root stat;
        }

        location / {
            root /publisher;
        }
    }
}

我们只需要加入一个关于rtmp协议的块和在http协议下加入一个server块,用来配置统计星系等,这就是最简单的配置,这样已经快而已完成我们例子中的功能,如果需要更详细的,请查看NGINX-based Media Streaming Server

RTMPDump

RTMPDump 是一位匈牙利大神在Adobe未公开RTMP协议的条件下,写出了针对RTMP协议的客户端程序。

在这里rtmpdump的使用是很简单的,当然rtmpdump其实也是有一些问题的,我们先来看看如果使用rtmpdump录制视频流

使用

rtmpdump -v -m 0 -r rtmp://192.168.56.101/live/test -o test.flv

上面的命令就是录制rtmp协议的视频流的命令,下面简单说明一下:

  • -v:是说明视频流是一个直播流
  • -m:是超时时间,0表示不超时
  • -r:表示rtmp的url

rtmpdump的使用就是如此的简单

问题

我在实际的使用过程中遇到了一个疑问,就是当视频的发送端崩溃或者死机,造成视频流中断,再次发送的时候会发送一个新的视频流,但是rtmpdump无法分辨这个新视频流,他会把这个视频流继续添加在文件后面,保存成一个文件而不是一个新的视频文件。相反对于网络中断而视频的发送端没有中断这种问题是可以处理的,不过中间可能会出现画面定在网络中断的那个时间点上,知道网络再次恢复。

不过这个问题是可以通过程序的方式解决的,在python的库中有一个flvlib的库可以处理这类问题,请看下面的代码:

def split_flv(f):
    if isinstance(f, str):
        f = open(f, \'rb\')
    flv = tags.FLV(f)
    path, ext = os.path.splitext(f.name)
    output_template = path + "_%d" + ext
    input_flv = open(f.name, \'rb\')
    output_flv = None
    split_index = 0;
    filelist = []
    for tag in flv.iter_tags():
        if isinstance(tag, tags.ScriptTag) and tag.timestamp == 0:
            if output_flv:
                output_flv.close()
            output_flv = open(output_template % split_index, \'wb\')
            filelist.append(output_flv.name)
            split_index += 1
            output_flv.write(tags.create_flv_header(flv.has_audio, flv.has_video))
            output_flv.write(tags.create_script_tag(\'onMetaData\', tag.variable, tag.timestamp))
        elif isinstance(tag, tags.VideoTag):
            input_flv.seek(tag.offset + 11)
            data = input_flv.read(tag.size)
            newtag = tags.create_flv_tag(9, data, tag.timestamp)
            output_flv.write(newtag)
        elif isinstance(tag, tags.AudioTag):
            input_flv.seek(tag.offset + 11)
            data = input_flv.read(tag.size)
            newtag = tags.create_flv_tag(8, data, tag.timestamp)
            output_flv.write(newtag)
    output_flv.close()
    input_flv.close()
    return filelist


def concat_flv(filelist, src_file):
    tempf = tempfile.TemporaryFile(\'w+b\', delete=False)
    tempf.writelines(["file \'%s\'\\n" % f for f in filelist])
    tempf.close()
    curdir = os.path.dirname(__file__)
    cmd = \'ffmpeg\'
    if platform.system() == \'Windows\':
        cmd = \'"\' + os.path.join(curdir, \'rtmpdump/ffmpeg.exe\') + \'"\'
    src_file_name, src_file_ext = os.path.splitext(src_file)
    output_file = src_file_name + "_concat" + src_file_ext
    cmd += \' -f concat -i \' + tempf.name + \' -y -c copy \' + output_file
    p = subprocess.Popen(cmd, shell=False, stdout=subprocess.PIPE, stderr=subprocess.PIPE)
    output = p.communicate()
    logger.info(output[0])
    return (output_file, None)

这两段代码就是先把视频分割开,然后在连接到一起生成一个新文件。

总结

这是我解决直播的一个测试方案,因为公司的直播系统还没有起来,所以我采用了这样一中思路模拟直播测试我的录制系统。

转自http://www.cnblogs.com/fx2008/p/4226820.html

以上是关于ffmpeg录制H265格式的桌面视频的主要内容,如果未能解决你的问题,请参考以下文章

音视频开发: ffmpeg录制桌面屏幕保存视频

FFmpeg 录制桌面麦克风摄像头

FFmpeg 录制桌面麦克风摄像头

流媒体开发9ffmpeg实现视频录制

流媒体开发9ffmpeg实现视频录制

Python使用ffmpeg合成视频音频