Android基于opencv4.6.0实现人脸识别功能
Posted jszlittlecat_720
tags:
篇首语:本文由小常识网(cha138.com)小编为大家整理,主要介绍了Android基于opencv4.6.0实现人脸识别功能相关的知识,希望对你有一定的参考价值。
前言
步骤:
1.整合opencv
2.获取相机的SurfaceView传到native层去检测(亦或是不断的获取SurfaceView的Bitmap,传到native层)
3.检测人脸,在本地保存人脸特征信息
4.上传至后台(不实现)
人脸识别实现的思路(例:人脸登录)
1.人脸信息录入
1.1获取相机的Bitmap,检测人脸(保证人脸信息比较精准) 人脸要足够大,当前范围内人脸只能有一张人脸,正常、眨眼睛、张嘴巴(3张人脸信息)
1.2获取到人脸必须要保存人脸特征信息,然后上传至后台(后台会再次做算法优化),保存到数据库
2.人脸特征值匹配
2.1获取相机的Bitmap,检测人脸(保证人脸信息比较精准) 人脸要足够大,当前范围内人脸只能有一张人脸,正常、眨眼睛、张嘴巴(3张人脸信息)
2.2从后台去查询用户进行登录
一.android Studio配置opencv
1.opencv资源获取
opencv官网:Home - OpenCV
opencv最新的版本是4.6.0于2022年06月07日发布,4.6.0网址:OpenCV 4.6.0 Is Now Available! - OpenCV
opencv 4.6.0android sdk 下载链接https://nchc.dl.sourceforge.net/project/opencvlibrary/4.6.0/opencv-4.6.0-android-sdk.zip
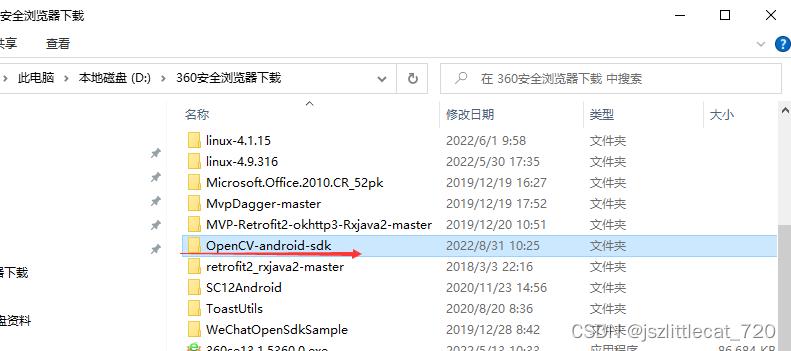
2.解压opencv-4.6.0-android-sdk.zip文件
解压之后的文件夹:OpenCV-android-sdk
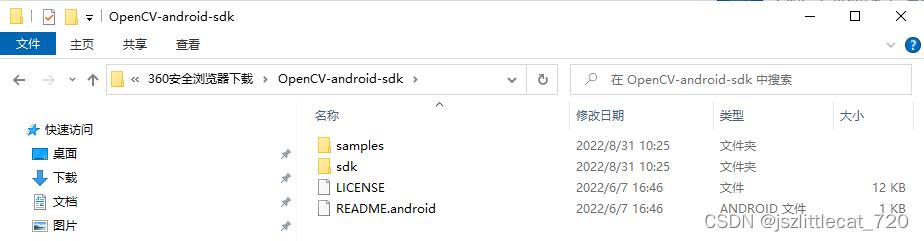
samples: 所有与android相关的一些示例代码,基本全部是java代码,封装了很多功能(图片转成灰度,高斯模糊,边缘检测)
sdk:所有的资源,so库,头文件,NDK自己动手写
源码下载链接:https://github.com/opencv/opencv/archive/4.6.0.zip
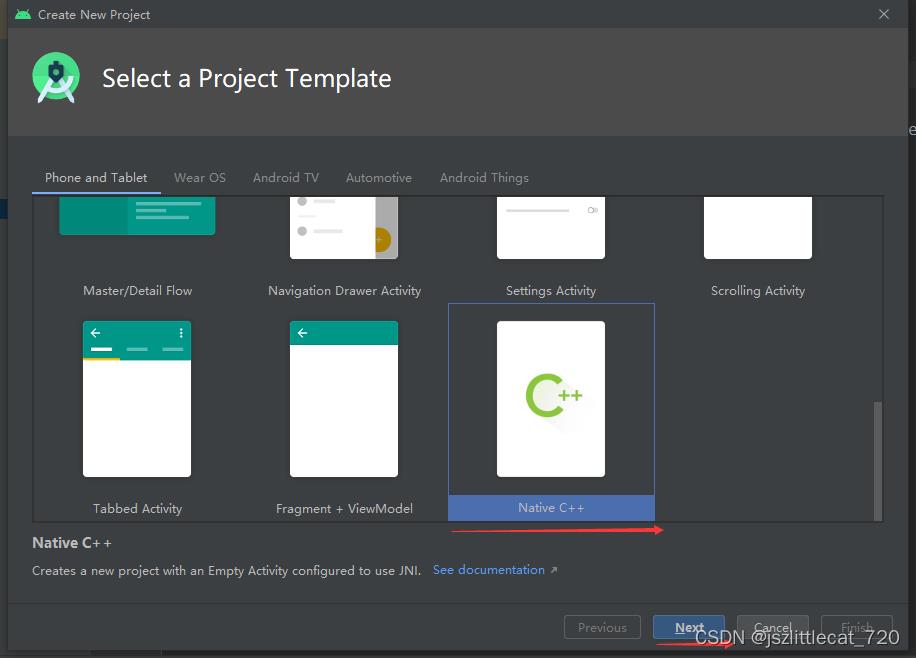
3.新建Android项目(native c++)
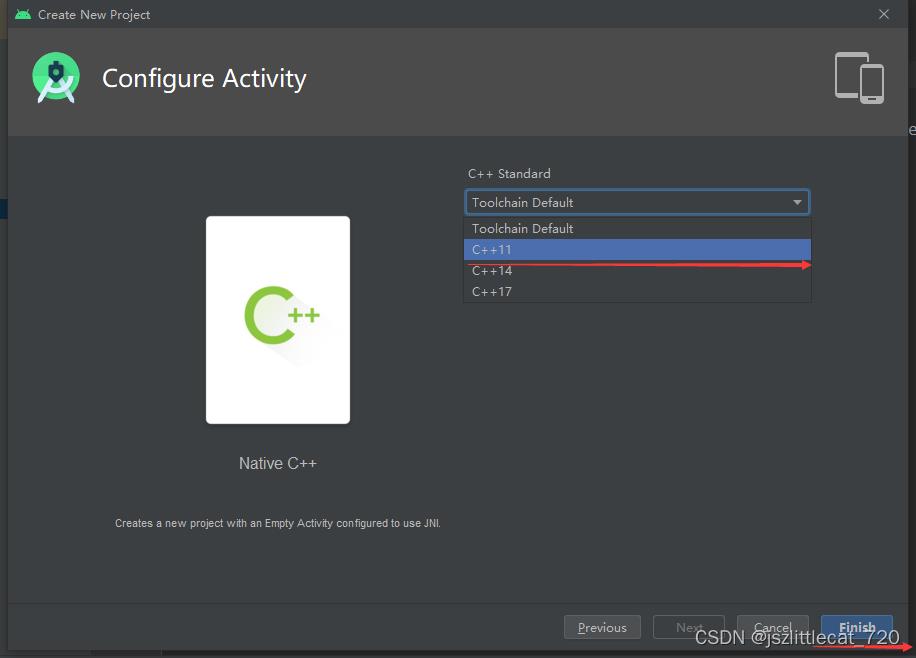
C++ Standard 选择C++11
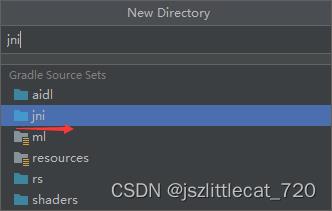
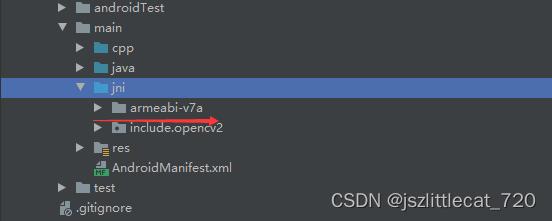
在main目录下新建jni文件夹
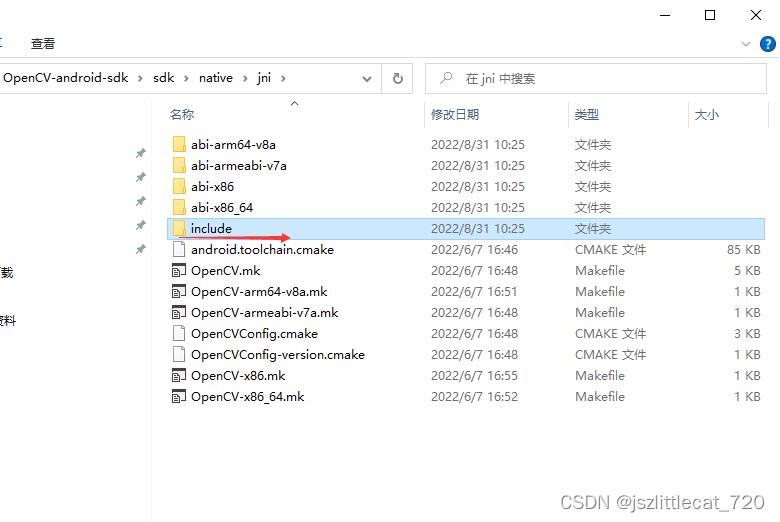
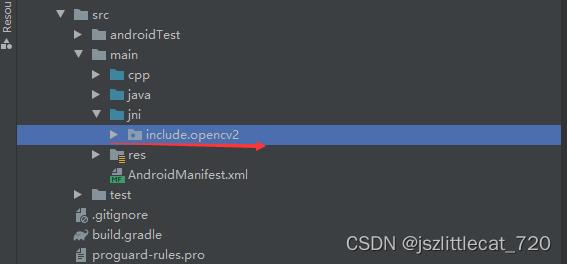
将OpenCV-android-sdk\\sdk\\native\\jni下的include文件夹复制至项目中的jni文件夹下
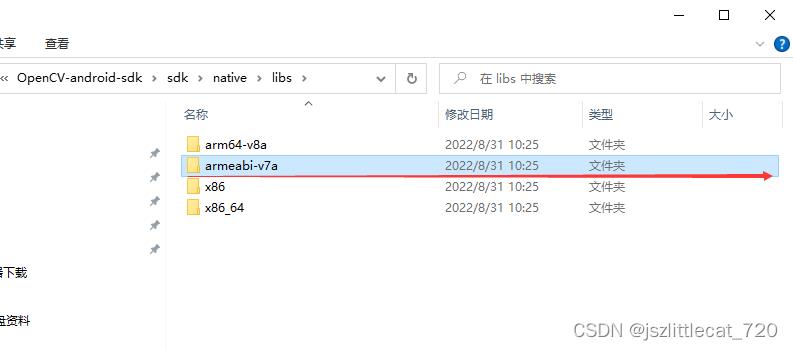
将OpenCV-android-sdk\\sdk\\native\\libs下的armeabi-v7a文件夹复制至jni文件夹下
3.1配置CMakeLists.txt
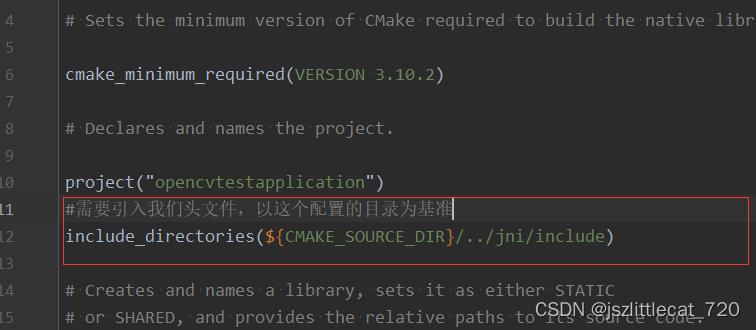
引入头文件
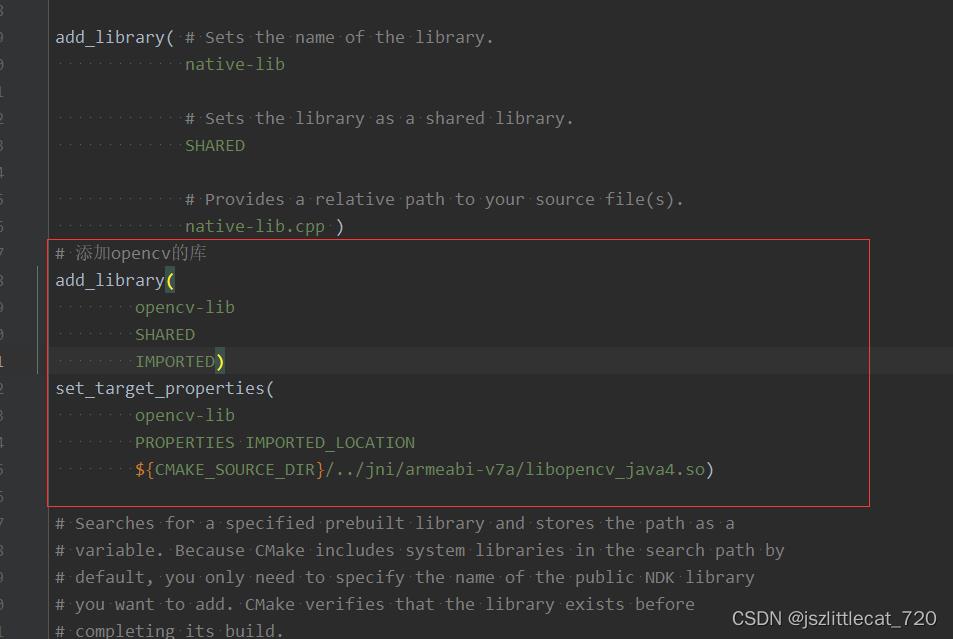
添加opencv库并设置目标属性(注意路径)
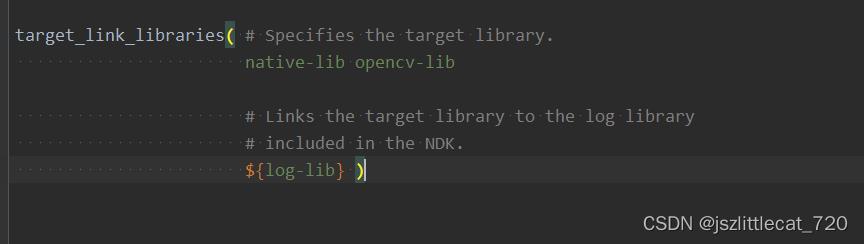
添加目标链接库opencv-lib
CMakeLists.txt内容:
# For more information about using CMake with Android Studio, read the
# documentation: https://d.android.com/studio/projects/add-native-code.html
# Sets the minimum version of CMake required to build the native library.
cmake_minimum_required(VERSION 3.10.2)
# Declares and names the project.
project("opencvtestapplication")
#需要引入我们头文件,以这个配置的目录为基准
include_directories($CMAKE_SOURCE_DIR/../jni/include)
# Creates and names a library, sets it as either STATIC
# or SHARED, and provides the relative paths to its source code.
# You can define multiple libraries, and CMake builds them for you.
# Gradle automatically packages shared libraries with your APK.
add_library( # Sets the name of the library.
native-lib
# Sets the library as a shared library.
SHARED
# Provides a relative path to your source file(s).
native-lib.cpp )
# 添加opencv的库
add_library(
opencv-lib
SHARED
IMPORTED)
set_target_properties(
opencv-lib
PROPERTIES IMPORTED_LOCATION
$CMAKE_SOURCE_DIR/../jni/armeabi-v7a/libopencv_java4.so)
# Searches for a specified prebuilt library and stores the path as a
# variable. Because CMake includes system libraries in the search path by
# default, you only need to specify the name of the public NDK library
# you want to add. CMake verifies that the library exists before
# completing its build.
find_library( # Sets the name of the path variable.
log-lib
# Specifies the name of the NDK library that
# you want CMake to locate.
log )
# Specifies libraries CMake should link to your target library. You
# can link multiple libraries, such as libraries you define in this
# build script, prebuilt third-party libraries, or system libraries.
target_link_libraries( # Specifies the target library.
native-lib opencv-lib
# Links the target library to the log library
# included in the NDK.
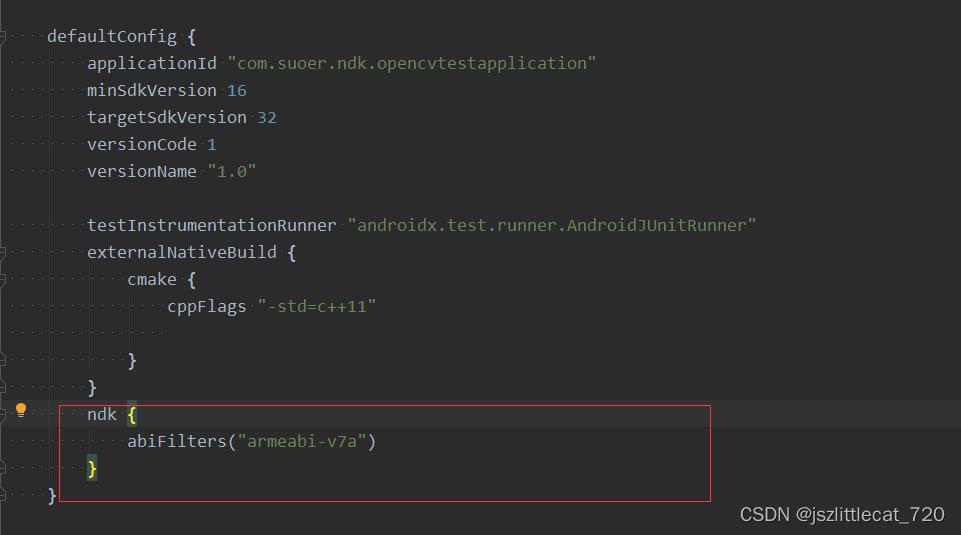
$log-lib )3.2修改app下的build.gradle文件 只支持armv7
同步运行项目至手机设备
出现如下图所示错误:
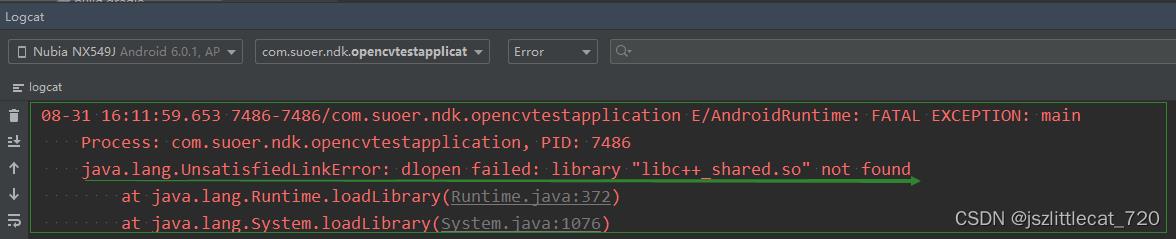
java.lang.UnsatisfiedLinkError: dlopen failed: library "libc++_shared.so" not found
解决方式如下:
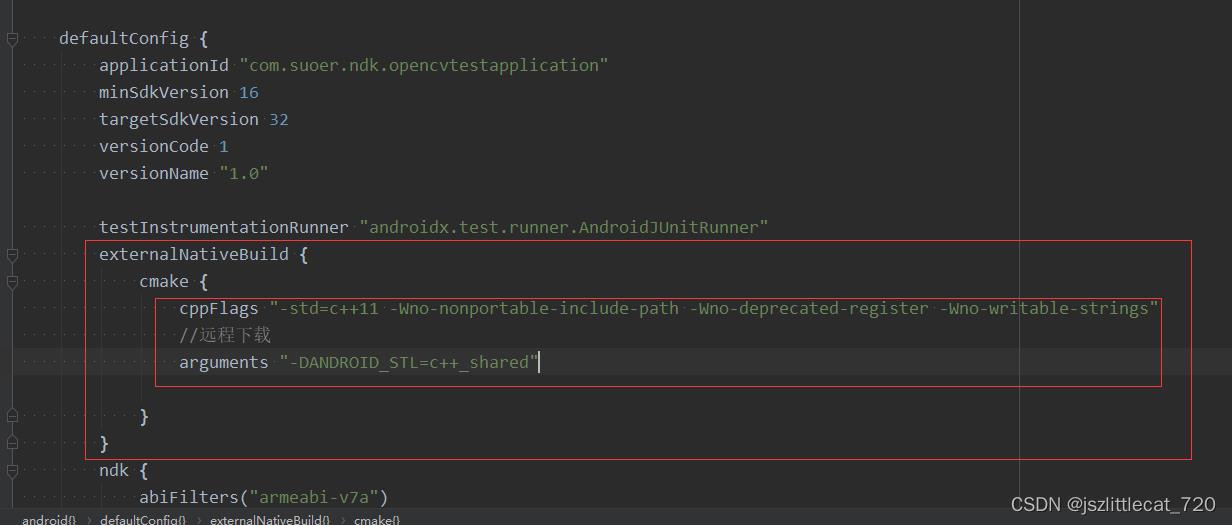
修改app下的build.gradle文件
重新同步项目并运行项目至手机设备
3.3新建FaceDetection类
FaceDetection内容如下:
package com.suoer.ndk.opencvtestapplication;

import android.graphics.Bitmap;

public class FaceDetection
    // Used to load the 'native-lib' library on application startup.
    static
        System.loadLibrary("native-lib");

    /**
     * 检测人脸并保存人脸信息
     * @param faceBitmap
     */

    public native int faceDetectionSaveInfo(Bitmap faceBitmap);

    /**
     * 加载人脸识别的分类器文件
     * @param filePath
     */
    public native boolean loadCascade(String filePath);
3.4修改MainActivity类
因为需要拍照以及保存图片,所以需要权限处理。这里使用rxpermissions
rxpermissions的具体使用请参照github链接:GitHub - tbruyelle/RxPermissions: Android runtime permissions powered by RxJava2
因为保存图片是耗时操作,需要开启子线程完成,所以需要处理线程问题。这里使用rxandroid
rxandroid的具体使用请参照github链接:GitHub - ReactiveX/RxAndroid: RxJava bindings for Android
修改app下的build.gradle文件

app下的build.gradle文件内容:
plugins
    id 'com.android.application'


android
    compileSdkVersion 32
    buildToolsVersion "32.0.0"

    defaultConfig
        applicationId "com.suoer.ndk.opencvtestapplication"
        minSdkVersion 16
        targetSdkVersion 32
        versionCode 1
        versionName "1.0"

        testInstrumentationRunner "androidx.test.runner.AndroidJUnitRunner"
        externalNativeBuild
            cmake
                cppFlags "-std=c++11 -Wno-nonportable-include-path -Wno-deprecated-register -Wno-writable-strings"
                //远程下载
                arguments "-DANDROID_STL=c++_shared"


        ndk
            abiFilters("armeabi-v7a")


    buildTypes
        release
            minifyEnabled false
            proguardFiles getDefaultProguardFile('proguard-android-optimize.txt'), 'proguard-rules.pro'


    externalNativeBuild
        cmake
            path "src/main/cpp/CMakeLists.txt"
            version "3.10.2"


    compileOptions
        sourceCompatibility JavaVersion.VERSION_1_8
        targetCompatibility JavaVersion.VERSION_1_8


dependencies

    implementation 'androidx.appcompat:appcompat:1.1.0'
    implementation 'com.google.android.material:material:1.1.0'
    implementation 'androidx.constraintlayout:constraintlayout:1.1.3'
    testImplementation 'junit:junit:4.+'
    androidTestImplementation 'androidx.test.ext:junit:1.1.1'
    androidTestImplementation 'androidx.test.espresso:espresso-core:3.2.0'
    implementation 'com.github.tbruyelle:rxpermissions:0.12'
    implementation 'io.reactivex.rxjava3:rxandroid:3.0.0'
修改项目下的build.gradle文件
项目下的build.gradle文件内容:
// Top-level build file where you can add configuration options common to all sub-projects/modules.
buildscript
repositories
google()
jcenter()
dependencies
classpath "com.android.tools.build:gradle:4.1.0"
// NOTE: Do not place your application dependencies here; they belong
// in the individual module build.gradle files
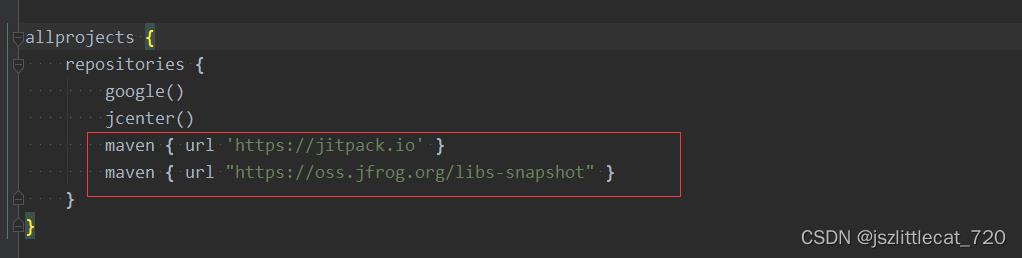
allprojects
repositories
google()
jcenter()
maven url 'https://jitpack.io'
maven url "https://oss.jfrog.org/libs-snapshot"
task clean(type: Delete)
delete rootProject.buildDir
修改AndroidManifest.xml添加权限
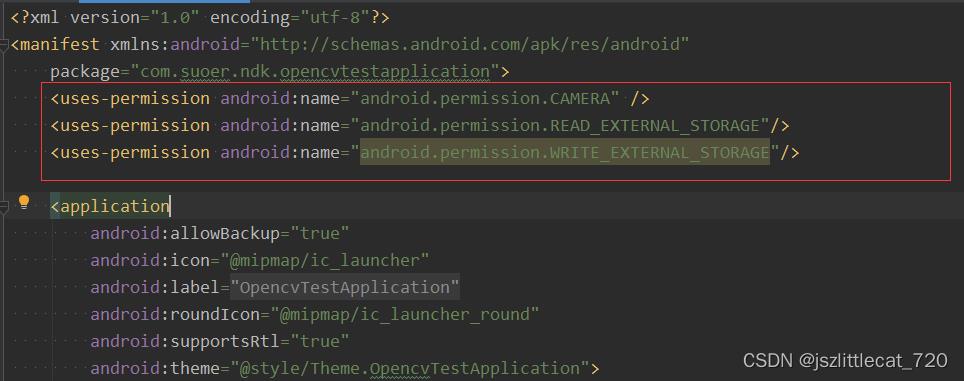
    <uses-permission android:name="android.permission.CAMERA" />
    <uses-permission android:name="android.permission.READ_EXTERNAL_STORAGE"/>
    <uses-permission android:name="android.permission.WRITE_EXTERNAL_STORAGE"/>
MainActivity类内容如下:
package com.suoer.ndk.opencvtestapplication;

import android.Manifest;
import android.content.Context;
import android.content.pm.PackageManager;
import android.graphics.Bitmap;
import android.os.Bundle;
import android.util.Log;
import android.view.SurfaceView;
import android.view.View;
import android.view.Window;
import android.view.WindowManager;
import android.widget.Button;
import android.widget.ImageView;
import android.widget.Toast;

import com.suoer.ndk.opencvtestapplication.camerahandle.BitmapInterface;
import com.suoer.ndk.opencvtestapplication.camerahandle.CameraSurfaceHolder;
import com.suoer.ndk.opencvtestapplication.camerahandle.FrontCamera;
import com.suoer.ndk.opencvtestapplication.camerahandle.SaveImageTask;
import com.suoer.ndk.opencvtestapplication.camerahandle.SurfaceViewCallback;
import com.tbruyelle.rxpermissions3.RxPermissions;

import java.io.ByteArrayOutputStream;
import java.io.File;
import java.io.FileOutputStream;
import java.io.IOException;
import java.io.InputStream;

import androidx.appcompat.app.AppCompatActivity;
import io.reactivex.rxjava3.functions.Consumer;

public class MainActivity extends AppCompatActivity
    private static final String TAG = "MainActivity";
    private SurfaceView mSurfaceView;
    private ImageView faceImg;
    private Button faceDetectionBtn;

    private FaceDetection mFaceDetection;
    private File mCascadeFile;

    private CameraSurfaceHolder mCameraSurfaceHolder=new CameraSurfaceHolder();
    private SurfaceViewCallback mSurfaceViewCallback;
    private FrontCamera mFrontCamera;


    @Override
    protected void onCreate(Bundle savedInstanceState)
        super.onCreate(savedInstanceState);
        requestWindowFeature(Window.FEATURE_NO_TITLE);
        getWindow().addFlags(WindowManager.LayoutParams.FLAG_FULLSCREEN);
        initView();
        applyPermission();
        initFaceDetection();


    private void initFaceDetection()
        copyCascadeFile();
        mFaceDetection = new FaceDetection();
        if (mFaceDetection != null)
            boolean load = mFaceDetection.loadCascade(mCascadeFile.getAbsolutePath());
            if (load)
                Toast.makeText(this, "加载分类器文件成功!", Toast.LENGTH_SHORT).show();
             else
                Toast.makeText(this, "加载分类器文件失败!", Toast.LENGTH_SHORT).show();


    //申请权限
    private void applyPermission()
        if (!checkCameraHardware(this))
            return;

        RxPermissions rxPermissions = new RxPermissions(this);
        rxPermissions.request(Manifest.permission.READ_EXTERNAL_STORAGE, Manifest.permission.WRITE_EXTERNAL_STORAGE, Manifest.permission.CAMERA).subscribe(new Consumer<Boolean>()
            @Override
            public void accept(Boolean aBoolean) throws Throwable
                if (aBoolean)
                    Log.e(TAG, "accept: " + aBoolean);
                    faceDetectionBtn.setVisibility(View.VISIBLE);
                    mSurfaceView.setVisibility(View.VISIBLE);
                    //权限全部获取
                    initSurfaceViewPreView();


        );


    private void initSurfaceViewPreView()
        mCameraSurfaceHolder.setCameraSurfaceHolder(MainActivity.this, mSurfaceView);
        mSurfaceViewCallback = mCameraSurfaceHolder.mSurfaceViewCallback;
        if (mSurfaceViewCallback != null)
            mFrontCamera = mSurfaceViewCallback.mFrontCamera;


    ;

    private void initView()
        setContentView(R.layout.activity_main);
        mSurfaceView = findViewById(R.id.face_surfaceView);
        mSurfaceView.setVisibility(View.GONE);
        faceDetectionBtn = findViewById(R.id.faceDetectionBtn);
        faceImg = findViewById(R.id.faceImg);
        faceDetectionBtn.setOnClickListener(new View.OnClickListener()
            @Override
            public void onClick(View v)
                if (mFrontCamera != null)
                    //拍照的时候进行人脸识别
                    mFrontCamera.takePicture(new BitmapInterface()
                        @Override
                        public void setBitMap(Bitmap bitMap)
                            if(bitMap==null)
                                Toast.makeText(MainActivity.this,"拍照失败!",Toast.LENGTH_SHORT).show();
                                return;

                            //人脸识别
                            int result = mFaceDetection.faceDetectionSaveInfo(bitMap);
                            if (result != 0)
                                Toast.makeText(MainActivity.this, "检测人脸失败!", Toast.LENGTH_SHORT).show();
                                return;


                            faceImg.setVisibility(View.VISIBLE);
                            faceImg.setImageBitmap(bitMap);
                            byte[]data= bitmap2byte(bitMap);
                            //rxandroid实现开启子线程保存文件
                            new SaveImageTask(MainActivity.this,faceImg).saveImage(data);
                            //AsyncTask异步任务实现开启子线程保存文件
                            //new SaveImageAsyncTask(MainActivity.this,faceImg).execute(data);

                    );


        );


    private byte[] bitmap2byte(Bitmap photoBitmap)
        创建对应的流对象
        ByteArrayOutputStream byteArrayOutputStream = new ByteArrayOutputStream();
        photoBitmap.compress(Bitmap.CompressFormat.JPEG,100,byteArrayOutputStream);//将流对象与Bitmap对象进行关联。
        byte [] array=byteArrayOutputStream.toByteArray();//使用流对象,将Bitmap对象转换为byte[]数组
        return array;


    private void copyCascadeFile()

        try
            // load cascade file from application resources
            InputStream is = getResources().openRawResource(R.raw.lbpcascade_frontalface);
            File cascadeDir = getDir("cascade", Context.MODE_PRIVATE);
            mCascadeFile = new File(cascadeDir, "lbpcascade_frontalface.xml");
            if (mCascadeFile.exists()) return;
            FileOutputStream os = new FileOutputStream(mCascadeFile);

            byte[] buffer = new byte[4096];
            int bytesRead;
            while ((bytesRead = is.read(buffer)) != -1)
                os.write(buffer, 0, bytesRead);

            is.close();
            os.close();
            cascadeDir.delete();

         catch (IOException e)
            e.printStackTrace();
            Log.e(TAG, "Failed to load cascade. Exception thrown: " + e);


    /**
     * 检测是否存在摄像头
     *
     * @param context
     * @return
     */
    private boolean checkCameraHardware(Context context)
        if (context.getPackageManager().hasSystemFeature(PackageManager.FEATURE_CAMERA))
            return true;
         else
            Toast.makeText(this, "不具备摄像头硬件", Toast.LENGTH_SHORT).show();
            return false;
布局activity_main.xml
<?xml version="1.0" encoding="utf-8"?>
<androidx.constraintlayout.widget.ConstraintLayout xmlns:android="http://schemas.android.com/apk/res/android"
    xmlns:app="http://schemas.android.com/apk/res-auto"
    xmlns:tools="http://schemas.android.com/tools"
    android:layout_width="match_parent"
    android:layout_height="match_parent"
    tools:context=".MainActivity">
    <SurfaceView
        app:layout_constraintTop_toTopOf="@+id/faceDetectionBtn"
        android:id="@+id/face_surfaceView"
        android:layout_width="match_parent"
        android:layout_height="match_parent"/>
    <ImageView
        app:layout_constraintTop_toTopOf="@+id/faceDetectionBtn"
        android:visibility="gone"
        android:id="@+id/faceImg"
        android:src="@drawable/face"
        android:layout_width="match_parent"
        android:layout_height="match_parent"></ImageView>
    <Button
        android:visibility="gone"
        android:id="@+id/faceDetectionBtn"
        android:layout_width="match_parent"
        android:layout_height="wrap_content"
        android:text="人脸识别"
        app:layout_constraintBottom_toBottomOf="parent"
        app:layout_constraintLeft_toLeftOf="parent"
        app:layout_constraintRight_toRightOf="parent"
         />

</androidx.constraintlayout.widget.ConstraintLayout>
3.5修改native-lib.cpp
#include <jni.h>
#include <string>
#include <opencv2/opencv.hpp>
#include <android/bitmap.h>
#include <android/log.h>
#include <opencv2/imgcodecs/legacy/constants_c.h>

#define TAG "JNI_LOG"
#define LOGE(...)__android_log_print(ANDROID_LOG_ERROR,TAG,__VA_ARGS__)
using namespace cv;
CascadeClassifier cascadeClassifier;


//使用命名空间
void bitmap2Mat(JNIEnv *env, Mat &mat, jobject bitmap);

//mat转成bitmap
void mat2Bitmap(JNIEnv *env, Mat mat, jobject bitmap);

//bitmap转成mat
void bitmap2Mat(JNIEnv *env, Mat &mat, jobject bitmap)
//Mat里面有个type:CV_8UC4 刚好对上bitmap中的ARGB_8888 CV_8UC2 刚好匹配bitmap中的RGB_565
//1.获取bitmap信息
AndroidBitmapInfo info;
void *pixels;
AndroidBitmap_getInfo(env,bitmap,&info);

//锁定bitmap画布
AndroidBitmap_lockPixels(env,bitmap,&pixels);
//指定mat的宽高和type BGRA
mat.create(info.height,info.width,CV_8UC4);

if(info.format==ANDROID_BITMAP_FORMAT_RGBA_8888)
//对应的mat应该是CV_8UC4
Mat temp(info.height,info.width,CV_8UC4,pixels);
//把数据temp复制到mat里面
temp.copyTo(mat);

else if(info.format==ANDROID_BITMAP_FORMAT_RGB_565)
    //对应的mat应该是CV_8UC2
    Mat temp(info.height,info.width,CV_8UC2,pixels);
    //上面mat创建的是CV_8UC4 要改为CV_8UC2  CV_8UC2数据拷贝到CV_8UC4
    cvtColor(temp,mat,COLOR_BGR5652BGRA);

//其他需要自己去转
//解锁画布
AndroidBitmap_unlockPixels(env,bitmap);


extern "C"
JNIEXPORT jint JNICALL
Java_com_suoer_ndk_opencvtestapplication_FaceDetection_faceDetectionSaveInfo(JNIEnv *env,
                                                                             jobject thiz,
                                                                             jobject face_bitmap)
    // TODO: implement faceDetectionSaveInfo()
    //检测人脸 opencv有关键的类是Mat,opencv是c和c++写的,只会处理Mat,android里面是Bitmap
    //1.Bitmap转成opencv能操作的c++对象 Mat ,Mat是一个矩阵
    Mat mat;
    bitmap2Mat(env,mat,face_bitmap);
    //处理灰度opencv 处理灰度图 提高效率,一般所有的操作都会对齐进行处理
    Mat gray_mat;
    cvtColor(mat,gray_mat,COLOR_BGRA2GRAY);

    //再次处理直方均衡补偿
    Mat equalize_mat;
    equalizeHist(gray_mat,equalize_mat);
    //识别人脸 当然我们可以直接用彩色图去做,识别人脸要加载人脸分类器文件
    std::vector<Rect> faces;
    cascadeClassifier.detectMultiScale(equalize_mat,faces,1.1,5);
    LOGE("人脸个数:%d",faces.size());
    if(faces.size()!=1)
        return -1;


        Rect faceRect=faces[0];
        //在人脸部分画个图
        rectangle(mat,faceRect,Scalar(255,155,155),8);
        //把mat 放到bitmap中 图片展示出来
        //mat2Bitmap(env,mat,face_bitmap);
        //保存人脸信息 Mat,图片
        Mat face_info_mat(equalize_mat,faceRect);
        //保存face_info_mat
        mat2Bitmap(env,face_info_mat,face_bitmap);
        //mat2Bitmap(env,equalize_mat,face_bitmap);


    //保存人脸信息
    return 0;


void mat2Bitmap(JNIEnv *env, Mat mat, jobject bitmap)
//Mat里面有个type:CV_8UC4 刚好对上bitmap中的ARGB_8888 CV_8UC2 刚好匹配bitmap中的RGB_565
//1.获取bitmap信息
    AndroidBitmapInfo info;
    void *pixels;
    AndroidBitmap_getInfo(env,bitmap,&info);

//锁定bitmap画布
    AndroidBitmap_lockPixels(env,bitmap,&pixels);


    if(info.format==ANDROID_BITMAP_FORMAT_RGBA_8888)
//对应的mat应该是CV_8UC4
        Mat temp(info.height,info.width,CV_8UC4,pixels);
        if(mat.type()==CV_8UC4)
            mat.copyTo(temp);
        else if(mat.type()==CV_8UC2)
            cvtColor(mat,temp,COLOR_BGR5652BGRA);

        else if(mat.type()==CV_8UC1)//灰度mat
            cvtColor(mat,temp,COLOR_GRAY2BGRA);

    else if(info.format==ANDROID_BITMAP_FORMAT_RGB_565)
        //对应的mat应该是CV_8UC2
        Mat temp(info.height,info.width,CV_8UC2,pixels);
        if(mat.type()==CV_8UC4)
            cvtColor(mat,temp,COLOR_BGRA2BGR565);
        else if(mat.type()==CV_8UC2)
            mat.copyTo(temp);

        else if(mat.type()==CV_8UC1)//灰度mat
            cvtColor(mat,temp,COLOR_GRAY2BGR565);


//其他需要自己去转
//解锁画布
    AndroidBitmap_unlockPixels(env,bitmap);


extern "C"
JNIEXPORT jboolean JNICALL
Java_com_suoer_ndk_opencvtestapplication_FaceDetection_loadCascade(JNIEnv *env, jobject thiz,
                                                                   jstring file_path)
    // TODO: implement loadCascade()
    const char *filePath=env->GetStringUTFChars(file_path,0);
    bool load=cascadeClassifier.load(filePath);
    env->ReleaseStringUTFChars(file_path,filePath);
    return load;
运行app至手机设备出现如下图所示错误
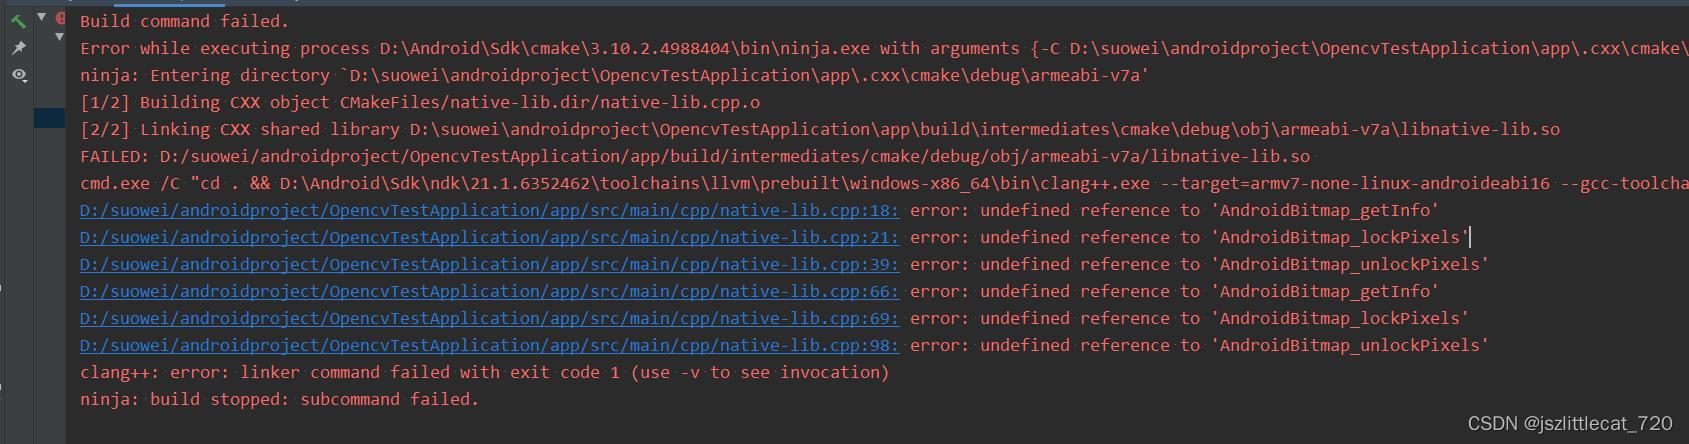
error: undefined reference to 'AndroidBitmap_getInfo'
解决方式修改CMakeLists.txt
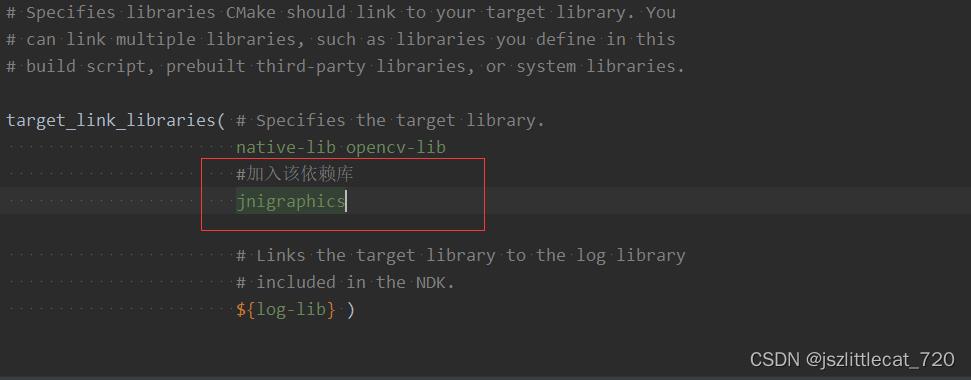
target_link_libraries( # Specifies the target library.
                       native-lib opencv-lib
                       #加入该依赖库
                       jnigraphics

                       # Links the target library to the log library
                       # included in the NDK.
                       $log-lib )
CMakeLists.txt内容如下:
# For more information about using CMake with Android Studio, read the
# documentation: https://d.android.com/studio/projects/add-native-code.html

# Sets the minimum version of CMake required to build the native library.

cmake_minimum_required(VERSION 3.10.2)

# Declares and names the project.

project("opencvtestapplication")
#需要引入我们头文件,以这个配置的目录为基准
include_directories($CMAKE_SOURCE_DIR/../jni/include)

# Creates and names a library, sets it as either STATIC
# or SHARED, and provides the relative paths to its source code.
# You can define multiple libraries, and CMake builds them for you.
# Gradle automatically packages shared libraries with your APK.

add_library( # Sets the name of the library.
             native-lib

             # Sets the library as a shared library.
             SHARED

             # Provides a relative path to your source file(s).
             native-lib.cpp )
# 添加opencv的库
add_library(
        opencv-lib
        SHARED
        IMPORTED)
set_target_properties(
        opencv-lib
        PROPERTIES IMPORTED_LOCATION
        $CMAKE_SOURCE_DIR/../jni/armeabi-v7a/libopencv_java4.so)

# Searches for a specified prebuilt library and stores the path as a
# variable. Because CMake includes system libraries in the search path by
# default, you only need to specify the name of the public NDK library
# you want to add. CMake verifies that the library exists before
# completing its build.

find_library( # Sets the name of the path variable.
              log-lib

              # Specifies the name of the NDK library that
              # you want CMake to locate.
              log )

# Specifies libraries CMake should link to your target library. You
# can link multiple libraries, such as libraries you define in this
# build script, prebuilt third-party libraries, or system libraries.

target_link_libraries( # Specifies the target library.
                       native-lib opencv-lib
                       #加入该依赖库
                       jnigraphics

                       # Links the target library to the log library
                       # included in the NDK.
                       $log-lib )
其他详细内容可见Demo。
万张PubFig人脸数据实现基于python+OpenCV的人脸特征定位程序
在最近刷今日头条以及其他媒体软件时,经常会发现一些AI换脸的视频,于是我想,可不可以自己实现一个可以进行人脸识别的软件程序。我的具体流程是先配合python网络爬虫先进行万张PubFig人脸公共图片的爬取,分析出图片具体特征,然后再配合机器学习的OpenCV视觉库进行软件的构建。有一篇Github的文章讲得很详细,大家可以参考:https://github.com/Hironsan/BossSensor。
前几篇博客先向大家讲解如何爬取PubFig人脸数据,然后本片的话先用一些动漫人脸图片,向大家展示基本的opencv库的操作,以及用一些公共人脸数据进行简单的人脸识别技术学习。
1.OpenCV简介
OpenCV是一个开源的跨平台计算机视觉库,提供的有python接口,并实现了图像处理和计算机视觉方面的很多通用算法。
2.需要安装的包
本篇先安装Opencv和numpy,pandas等数据分析包即可,如果感觉麻烦的话,可以直接安装Anaconda科学包(数据分析,挖掘,机器学习库合集),安装与不同编译器配置环境过程这里就不讲解了。
下载地址(官网太慢了,推荐下面的地址):https://mirrors.tuna.tsinghua.edu.cn/pypi/web/simple/opencv-python/。python3.5以上的需要下载opencv_python-4.0之类的版本,这里用到的是opencv_python-4.0.0.21-cp37-cp37m-win_amd64.whl这个文件。
安装完后,我们先用下面的代码输出一个图片:
import cv2


img = cv2.imread("1.jpg", 1)
cv2.imshow("1", img)
cv2.waitKey()
结果如下:
发现我们的环境已经成功安装了。
3.初步人脸识别
由于本篇文章是第一篇,因此这里先简单的展示一下opencv的一些机器视觉的基础方法,下面就进行介绍。
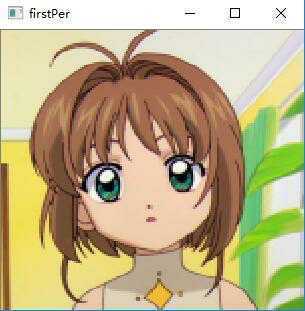
(1)导入人脸图片,这里用一张动漫图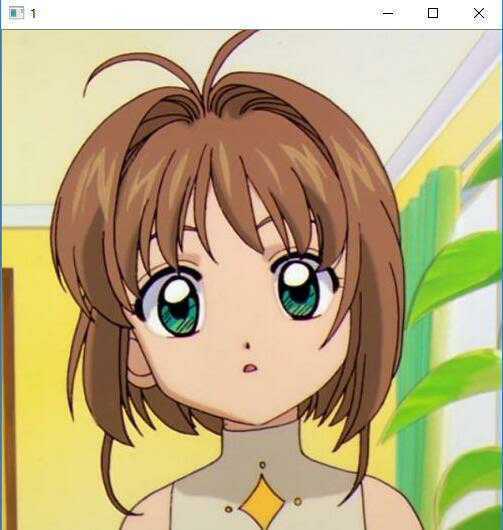
代码和上面的类似,更改图片即可:
import cv2


img = cv2.imread("firstPer.jpg", 1)
cv2.imshow("1", img)
cv2.waitKey()
cv2.destroyAllWindows()
这里我们把这段代码封装成一个函数:
def viewImage(image, name_of_window):
    ‘‘‘
    image:图像对象
    name_of_window:图像窗口名称
    ‘‘‘
    cv2.namedWindow(name_of_window, cv2.WINDOW_NORMAL)
    cv2.imshow(name_of_window, image)
    cv2.waitKey()
    cv2.destroyAllWindows()
(2)一些基础图像处理的方法
cropped:cropped = image[y:y+h, x:x+w],就是以(y, x)为起点,裁剪大小为(h, w)的图像,以左上角为起点,竖直向下的方向为y轴,横向为x轴。
resized:dim = (width, height)
resized = cv2.resize(img, dim, interpolation = cv2.INTER_AREA)
调整图像的大小。
用下面的代码分别进行这两种图像的处理:
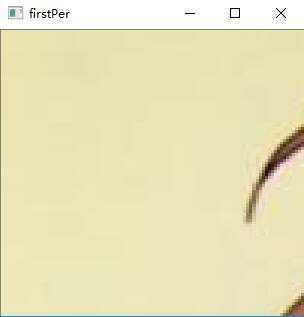
img = cv2.imread("firstPer.jpg", 1)
# 裁剪图片大小,裁剪100范围的图片
cropped = img[0:100, 0:100]
viewImage(cropped,"firstPer")
img = cv2.imread("firstPer.jpg", 1)
scale_percent = 30    #调整30%的大小
width = int(img.shape[1] * scale_percent / 100)
height = int(img.shape[0] * scale_percent / 100)
dim = (width, height)
resized = cv2.resize(img, dim, interpolation = cv2.INTER_AREA)
viewImage(resized,"firstPer")
还有一一些用的操作方法,就是旋转,调节亮度,变模糊/平滑,绘制边框,绘制线段等,在这里并不是进行图像处理,因此就先不先向大家讲解。哈哈。
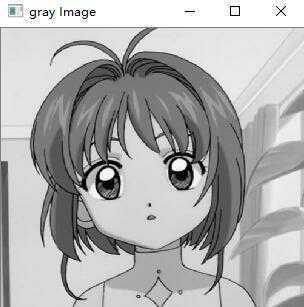
(3)图像灰度处理
在进行人脸识别时,好多地方都先进行图像变灰度的操作,这里也给大家介绍一下:
这里有一个阈值函数,gray_image,将所有图像变为比127更暗直至0或者增加亮度到255,将图像的彩色边框的内容略过。
灰度处理代码:
gray_image = cv2.cvtColor(img, cv2.COLOR_BGR2GRAY)
viewImage(gray_image,"gray Image")
结果:
亮度彩色阈值处理代码:
one,threshold_image = cv2.threshold(img, 127, 255, 0)
viewImage(threshold_image,"firstPer")
结果:

主要是有后面的三个参数控制,大家有兴趣可以自行学习。
(4)人脸识别初讲
如果我们需要进行人脸识别,需要下载一些opencv配置文件,地址为:https://github.com/opencv/opencv/tree/master/data/haarcascades,这里我们用到的是haarcascade_frontalface_default.xml文件。用下面的代码进行检测:
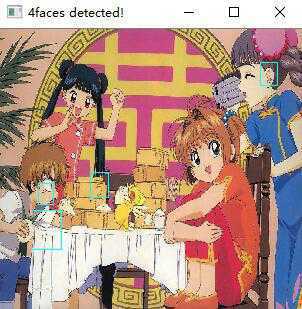
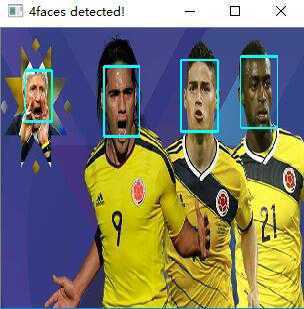
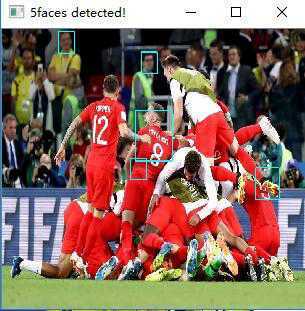
face_cascade = cv2.CascadeClassifier(‘haarcascade_frontalface_default.xml‘)
img = cv2.imread("firstPer.jpg")
gray = cv2.cvtColor(img, cv2.COLOR_BGR2GRAY)
faces = face_cascade.detectMultiScale(
gray,                # 灰度图
scaleFactor= 1.1,    # 缩放比例
minNeighbors= 2,    # 识别出一个人脸之前在当前物体周围需要检测的物体数目
minSize=(50, 50)    #窗口的大小
)

firstPer = format(len(faces)) + "faces detected!"
print(firstPer)# Draw a rectangle around the faces
for (x, y, w, h) in faces:
    cv2.rectangle(img, (x, y), (x+w, y+h), (255, 255, 0), 2)
viewImage(img,firstPer)
detectMultiScale函数是一个检测物体的通用函数。当我们把它用于人脸检测时,它就会从图像中检测出人脸。
但是我们却发现,根本没有检测出我们可爱的小樱的脸,这是为什么呢?不急,我们先用其他图片检测:
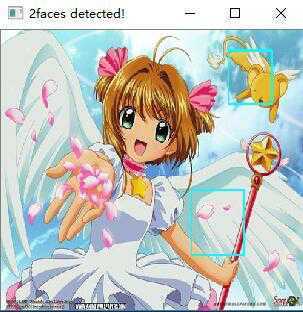
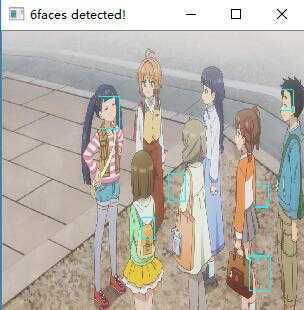
再来一张最美的图片:
这时我们发现,识别程序识别的时候会有两个要注意的地方,第一个是动漫图片线条简单,有时候并不能识别出;而且识别的能力和图片的清晰度也有关系。
针对第一个问题,在接下来的教程中,我会使用哥伦比亚大学的公共PubFig人脸库作为人脸识别数据集,进行机器视觉的训练。向大家讲解一下如何用机器学习训练一个不仅仅能够识别人脸,而且还能够识别表情的软件,欢迎大家继续关注我的博客,如果有宝贵建议的话,请在下方评论。
以上是关于Android基于opencv4.6.0实现人脸识别功能的主要内容,如果未能解决你的问题,请参考以下文章