UnityDelegate, Event, UnityEvent, Action, UnityAction, Func 傻傻分不清
Posted 溢流眼泪
tags:
篇首语:本文由小常识网(cha138.com)小编为大家整理,主要介绍了UnityDelegate, Event, UnityEvent, Action, UnityAction, Func 傻傻分不清相关的知识,希望对你有一定的参考价值。
【Unity】Delegate, Event, UnityEvent, Action, UnityAction, Func 傻傻分不清
- Delegate 委托,函数指针
- 事件 Event,特殊的委托
- UnityEvent
- Action,一个委托
- UnityAction,一个委托
- Func,带返回值的 Action
- 使用匿名函数 / Lambda 来监听回调函数
- 学习打开别人一个魔塔的项目,看到了满页的
Action代码,而本人委托那一块自己写的时候压根不会用……遂学习相关知识。 - 多数学习自知乎
- 本文可能会有知识点错误,欢迎讨论。
Delegate 委托,函数指针
- 首先,Delegate是C#的内容,简单来说委托是一种回调机制,被广泛应用在观察者模式中。
回调机制貌似挺复杂,这里可以简单理解为允许使用回调函数,而在这里的回调函数可以简单理解为函数指针。
观察者模式没有学习过的可以看其他的博客。
一个简单的例子:一对一依赖
using System.Collections;
using System.Collections.Generic;
using UnityEngine;

public class TestMyDelegate : MonoBehaviour

    public delegate void DeleFunc(int x);
    // Start is called before the first frame update
    void Start()

        DeleFunc deleFunc;
        deleFunc = show;
        deleFunc(10);
        deleFunc(8);
        deleFunc = doubleShow;
        deleFunc(10);


    void show(int x)

        Debug.Log(x);

    void doubleShow(int x)

        Debug.Log(x * 2);
- 我们声明了一个委托
DeleFunc(就如一个函数指针),使用到关键字delegate
然后,这个委托我们只告诉了它的形参和返回类型。我们需要实例化,实例化了deleFunc
然后,我们声明一个新的函数show,注意这里形参和返回值需要和委托的一致
然后,我们把deleFunc指向show,进行方法回调
然后,我们申明了一个新的函数doubleShow,同理,进行方法回调
进行测试,正常运行。
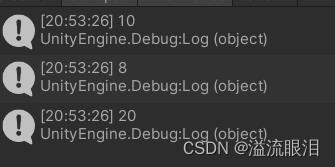
一个简单的例子:一对多依赖
- 我们使用
+=为同一个委托监听多个方法回调
对应的,使用-=删除一个监听方法
using System.Collections;
using System.Collections.Generic;
using UnityEngine;

public class TestMyDelegate : MonoBehaviour

    public delegate void DeleFunc(int x);
    // Start is called before the first frame update
    public DeleFunc deleFunc;
    void Start()

        deleFunc += show;
        deleFunc += doubleShow;
        deleFunc(5);
        deleFunc -= doubleShow;
        deleFunc(5);


    void show(int x)

        Debug.Log(x);

    void doubleShow(int x)

        Debug.Log(x * 2);

- 注意,不能写成
	public delegate void DeleFunc(int x);
    // Start is called before the first frame update
    void Start()

        DeleFunc deleFunc;	// 不能写到里面来,会报错 [使用了未赋值的局部变量“deleFunc”]
        deleFunc += show;
        deleFunc += doubleShow;
        deleFunc(5);
所以话说……委托有啥用呢?
- 委托不是必须用的,它的产生是随着OO,设计模式等产生的,用于代码解耦。
- 场景一:你有很多种行为,比如
eat(),drink(),sleep(),行为越来越多,相应的调用代码也越来越长
class Service
	void eat()// something
	void drink()// something
	void sleep()// something
	public void service(string name)
		switch (name)
			case "eat":eat();break;
			case "drink":drink();break;
			case "sleep":sleep();break;
若使用委托进行封装,便可以
class Service
	void eat()// something
	void drink()// something
	void sleep()// something
	public delegate void action();
	public void service(action act)
		act();
调用的时候,这样:
	action act = eat();
	Service.service(act);
	Service.service(cook);
- 场景二:代码解耦
一个游戏,玩家死亡后会调用函数GameOver(),但我目前还不知道该函数里面还需要一些代码和方法
比如,我们可能会如下实现
public void GameOver()
	GamePause();
	PlaySound("death");
	ClearFlags();
	AddDeathCount(1);
	ShowGameOverPanel();
	// ……
- 然后这里面的每个方法又有很多代码实现。若发现死亡后的播放音效需要更改,还需要去这个代码里面单独修改。若增加了一个功能,需要在这个函数内调用,还要跑到这个函数里进行增添代码,十分麻烦,难以维护。
- 一个做法:使用委托,即:
	public delegate void GameOver();
	public GameOver gameOver;
接下来,比如在音效系统的代码中,为其增添回调函数
class VoiceManager
	// ……
	public void addSounds()
		gameOver += PlaySound("death");

	public void PlaySound(string name)
		// ……
其他系统同理。这样,对于需要更改音效的地方,就集中统一管理到了相应的类。
但注意,这里的 gameOver 的委托实例获取方式仍然有些耦合。需要更解耦貌似还需要使用后续提到其他的内容。
事件 Event,特殊的委托
- 仍然,事件是
C#的内容,并且事件是一种特殊的委托
怎么理解呢?先看代码
这里有两个类,一个为TestMyDelegate,代码同上述
一个为AnotherDelegate,相对第一个类,为一个外部类(这里指委托没有声明在该类)
using System.Collections;
using System.Collections.Generic;
using UnityEngine;

public class TestMyDelegate : MonoBehaviour

    public delegate void DeleFunc(int x);
    // Start is called before the first frame update
    public DeleFunc deleFunc;
    void Start()

        deleFunc += show;
        deleFunc += doubleShow;
        deleFunc(1);


    void show(int x)

        Debug.Log(x);

    void doubleShow(int x)

        Debug.Log(x * 2);


/*****************************************/
using System.Collections;
using System.Collections.Generic;
using UnityEngine;

public class AnotherDelegate : MonoBehaviour

    void Start()

        TestMyDelegate test = GetComponent<TestMyDelegate>();
        test.deleFunc += myfunc;
        test.deleFunc(100);

    void myfunc(int x)

        Debug.Log(x * 3);
- 进行测试,结果如下:

- 很明显,首先外部类为其增加监听器,然后先输出了
300
然后内部类增加了两个监听器,并相应输出了三个数字 - 接下来,我们在内部类,把委托的实例增加
event关键字,改成事件
public event DeleFunc deleFunc;
然后发现外部类报错了

没错,事件相较于委托,即事件只能在创建类中进行调用
外部类可以对事件进行增加、删除监听器,但是不能使用=。等于的功能即令该委托/事件只监听这个回调函数。

UnityEvent
- 自然,该为
Unity中的内容,为Unity做的一个小封装。
我们在代码中,首先引入头文件UnityEngine.Events,然后写一下UnityEvent,然后F12查看源代码

- 哦,我们发现,
UnityEvent相较于委托,它规范化了+=和-=,以 OO 的方式改为了AdListener(UnityAction call)和RemoveListener(UnityAction call),除此之外好处是更容易调试debug,编辑器可视化等。
还有一点,由于委托是多播设计,可能会导致重复添加同一监听器。这里UnityEvent与其他系统 (如UnityAction,EventSystem等)结合,更加方便。 - 我们试一下代码
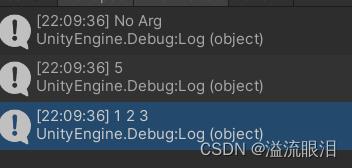
这里使用了三个UnityEvent事件,分别监听了无参函数、一参函数和三个参数函数
using System.Collections;
using System.Collections.Generic;
using UnityEngine;
using UnityEngine.Events;
public class TestUnityEvent : MonoBehaviour

    public UnityEvent myEvent;
    public UnityEvent<int> anotherEvent;
    public UnityEvent<int, int, int> alsoEvent;
    // Start is called before the first frame update
    void Start()

        myEvent.AddListener(noArg);
        myEvent.Invoke();

        anotherEvent.AddListener(show);
        anotherEvent.Invoke(5);

        alsoEvent.AddListener(threeArgs);
        alsoEvent.Invoke(1, 2, 3);


    void show(int x)

        Debug.Log(x);


    void noArg()

        Debug.Log("No Arg");


    void threeArgs(int a, int b, int c)

        Debug.Log(a + " " + b + " " + c);
顺利运行
Action,一个委托
- 首先,
Action为C#在System库中的内容
我们引入该头文件,然后输入Action,F12查看原码

- 额,好简单,所以
Action就是一个委托。
若你输入Action<>再F12进去看,则会显示

- 所以,若你自己写代码
public delegate void myAction<in T>(T obj);,那么该myAction和Action就没有区别。
那么,该测试部分和之前的委托就没什么差异了
using System.Collections;
using System.Collections.Generic;
using UnityEngine;
using UnityEngine.Events;
using System;
public class TestAction : MonoBehaviour

    public Action<int> myAction;
    // Start is called before the first frame update
    void Start()

        myAction = show;
        myAction += show;
        myAction(100);


    void show(int x)

        Debug.Log(x);
UnityAction,一个委托
-
在看这个,这个明显就是
Unity中的一个Action
头文件在UnityEngine.Events中,我们进入查看原码


-
呃呃呃,你们都那么简单,好吧。
那对比,Action和UnityAction只有头文件不同的区别了,其他的部分都一样啊。
Func,带返回值的 Action
- 该内容在系统库
System,我们查看原码

- 沃耶,对比
Action,Func即多了一个返回值的地方,原来他们都这么简单…
好吧确实,因为它的定义即如此,有时候自己实现一个内容还能有更多的功能…
我们照常测试一下
using System.Collections;
using System.Collections.Generic;
using UnityEngine;
using UnityEngine.Events;
using System;
public class TestFunc : MonoBehaviour

    public Func<string, int> func;	// 这里的 int 就是返回类型
    // Start is called before the first frame update
    void Start()

        func += show;
        Debug.Log(func("Hello World"));


    int show(string x)

        Debug.Log(x);
        return 12;
完美实现

使用匿名函数 / Lambda 来监听回调函数
- 除了上述声明函数并直接给委托监听外,也可以用匿名函数和 lambda表达式来进行处理
using System.Collections;
using System.Collections.Generic;
using UnityEngine;
using UnityEngine.Events;
public class TestOtherMethods : MonoBehaviour

    public UnityAction<int, int> myAction;
    // Start is called before the first frame update
    void Start()

        // anony-
        myAction = delegate (int x, int y)

            Debug.Log(x + " " + y);
        ;
        myAction(1, 2);

        // lambda
        myAction = (int x, int y) =>

            Debug.Log(x + " " + y);
        ;
        myAction(3, 4);
- 学了这么多了,试了这么多例子了,大致也应该了解各个内容了
在项目开发中,具体用到哪种其实都可以,虽然有人是推荐UnityEvent,有人说Action/Func直接用,之类的。
uni-app云开发入门
云函数
首先创建一个uniapp项目,创建项目时选择启用uniCloud云开发。
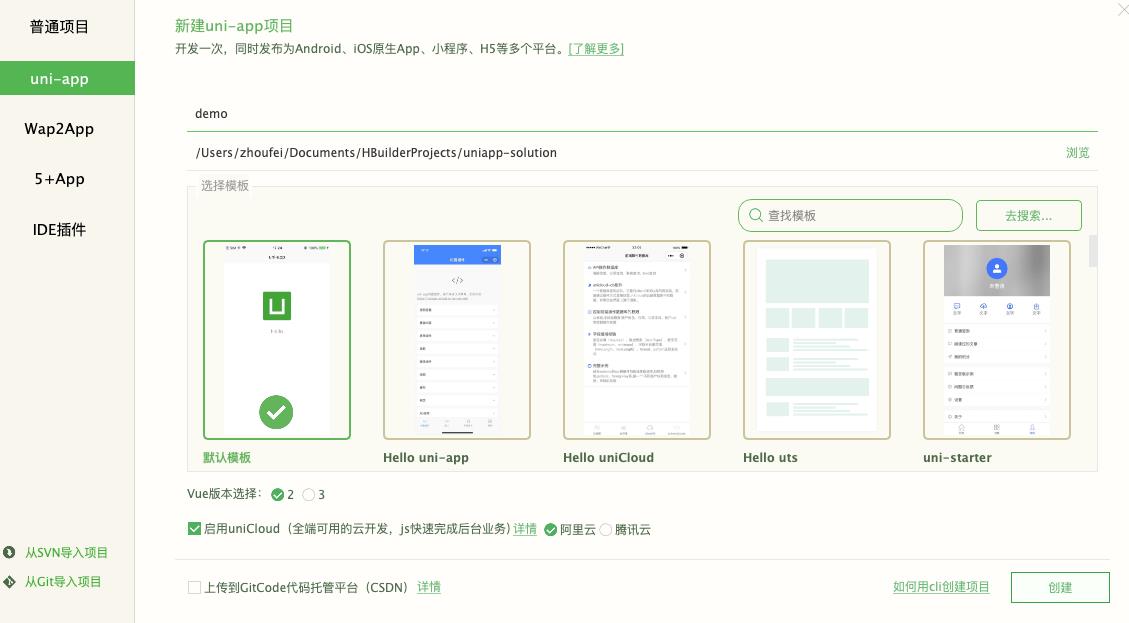
创建项目成功后,按照下面的步骤进行开发。
创建云函数
1.关联云服务器
2.创建云函数
一个云函数可以看成是一个后台接口
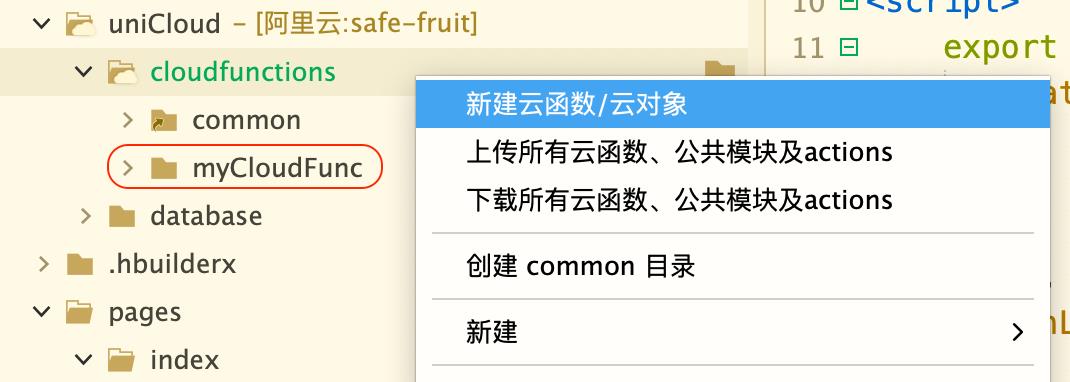
云函数实现
\'use strict\';
exports.main = async (event, context) =>
    //event为客户端上传的参数
    console.log(\'event : \', event)

    //返回数据给客户端
    return "Hello Cloud Func"
;
onLoad()
    uniCloud.callFunction(
        name:\'myCloudFunc\'
        ).then((res)=>
            console.log(res)
        )
,

本地云函数与远端云函数调试的区别
云函数:一个后台接口与接口的实现。
本地云函数调试是使用本地的接口查询逻辑,此时本地元函数逻辑与远端元函数可能不一样,可以理解远端元函数是发布的版本,本地云函数是开发的版本。本地版本调试没有问题了就上传到远端。
当新建一个云项目时,可以直接将远端云函数下载到本地,进行本地云函数的调试。
云数据库
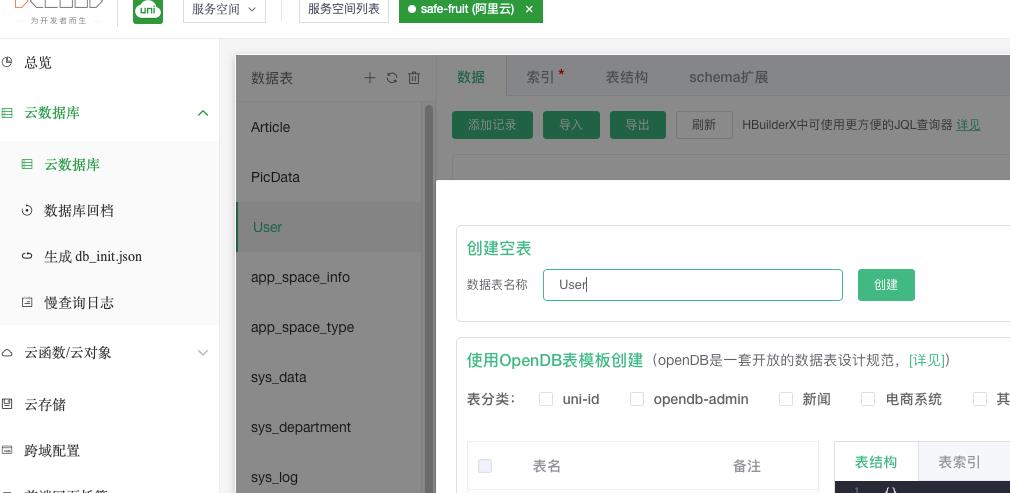
1.在云后台创建表User
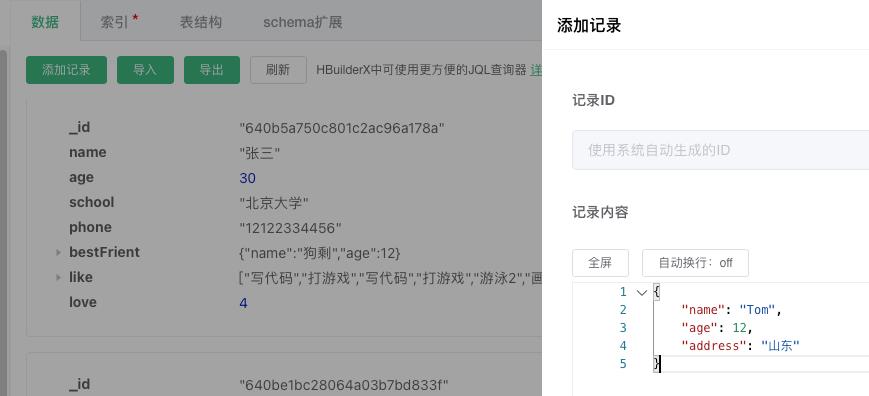
2.添加表数据
3.创建一个云函数,连接数据库,查询数据库
uniCloud的数据库是nosql非关系性数据库
\'use strict\';

const db = uniCloud.database();

exports.main = async (event, context) =>
    //event为客户端上传的参数
    console.log(\'event : \', event)

    const collection = await db.collection(\'User\').get()

    //返回数据给客户端
    return collection
;
onLoad()
    uniCloud.callFunction(
        name:\'myCloudDB\',
        success: (res) =>
            console.log(res);

    )
,
提交表单,存储数据到云数据库
<template>
    <view class="content">
        <form @submit="submitData">
            <input type="text" name="name">
            <input type="tel" name="phone">
            <button form-type="submit">提交表单</button>
        </form>
    </view>
</template>

<script>
    export default
        methods:
            async submitData(v)
                console.log(v)
                let name,phone = v.detail.value
                 let res = await uniCloud.callFunction(
                    name:\'myCloudDB\',
                    data:
                        name,
                        phone

                )
                console.log(res)


</script>
云数据库条件查询
定义云函数

\'use strict\';

const db = uniCloud.database()
const dbCmd = db.command

exports.main = async (event, context) =>
    //event为客户端上传的参数
    console.log(\'event : \', event)

    // doc: 根据id查询
    // let res = await db.collection(\'User\').doc(\'640b5a9228064a03b7aa1ac7\').get()
    // 限制条数
    // let res = await db.collection(\'User\').limit(5).get()
    // // skip:跳过的条数,分页的话数字是页数*每页条数
    // let res = await db.collection(\'User\').limit(5).skip(5).get()

    // field:只返回声明的字段,_id默认返回
    // let res = await db.collection(\'User\').field(name: true).get()
    // orderBy: 排序字段+升序/降序类型
    // let res = await db.collection(\'User\').orderBy(\'age\',\'desc\').get()

/*
1.简单的值等于查询,如name: \'Tom\'
2.逻辑指令单条件查询,如age: dbCmd.gt(15)
3.逻辑指令多条件查询,如dbCmd.or(dbCmd.lt(15), dbCmd.gt(20))
4.正则匹配
使用//简单正则匹配,中间写要匹配的内容,如/^梅/ig(i忽略大小写,g全局)
使用RegExp对象匹配,如new RegExp(\'梅\',\'ig\')
    */
    let res = await db.collection(\'User\').where(
        // age: dbCmd.gt(15)
        // age: dbCmd.or(dbCmd.lt(15), dbCmd.gt(20))
        // name: /梅/ig
         // name: new RegExp(\'梅\',\'ig\')
        ).get()

    //返回数据给客户端
    return res
;


vue组件调用
<script>
    export default
        onReady()
            uniCloud.callFunction(
                name:\'myCloudGet\',
                success: (res) =>
                    console.log(res)
                    this.list = res.result.data

            )
        ,

</script>
云数据库更新
\'use strict\';

const  link  = require("fs");

const db = uniCloud.database()
const dbCmd = db.command

exports.main = async (event, context) =>
    //event为客户端上传的参数
    console.log(\'event : \', event)

    // 单条记录更新
    // const res = await db.collection(\'User\').doc(\'640bf773e766bb2975957423\').update(
    //     phone: \'88889999\'
    // )

    // 多条记录更新
    // const res = await db.collection(\'User\').where(
    //     _id: dbCmd.in([\'640bf773e766bb2975957423\',\'640be1bc28064a03b7bd833f\'])
    // ).update(
    //     phone: \'88889999000\'
    // )

    // const res = await db.collection(\'User\').where(
    //     name: /梅/ig
    // ).update(
    //     address: \'冬梅大桥旁,33号\'
    // )

    // 更新对象和数组
    // const res = await db.collection(\'User\').where(
    //     name: "张三"
    // ).update(
    //     like:
    //         0: "游泳2"
    //     ,
    //     bestFrient:
    //         name:"jack"
    //
    // )


    // set: 覆盖一个对象, update:更新局部字段
    const res = await db.collection(\'User\').where(
        name: "张三"
    ).update(
        // dbCmd.inc(1):自增加一
        love: dbCmd.inc(1),
        // dbCmd.unshift(["写代码","打游戏"]): 数组头部添加数据
        like: dbCmd.unshift(["写代码","打游戏"]),
        // dbCmd.set() 更新一个对象,参数为传入的一个对象
        bestFrient: dbCmd.set(
            name: \'狗剩\',
            age: 12
        )
    )

    //返回数据给客户端
    return res
;
删除云数据库
\'use strict\';

const db = uniCloud.database()
const dbCmd = db.command

exports.main = async (event, context) =>
    //event为客户端上传的参数
    console.log(\'event : \', event)

    // 全部删除
    const res = db.collection(\'User\').where(
        _id: dbCmd.neq(-1)
    ).remove()

    //返回数据给客户端
    return res
;
云存储
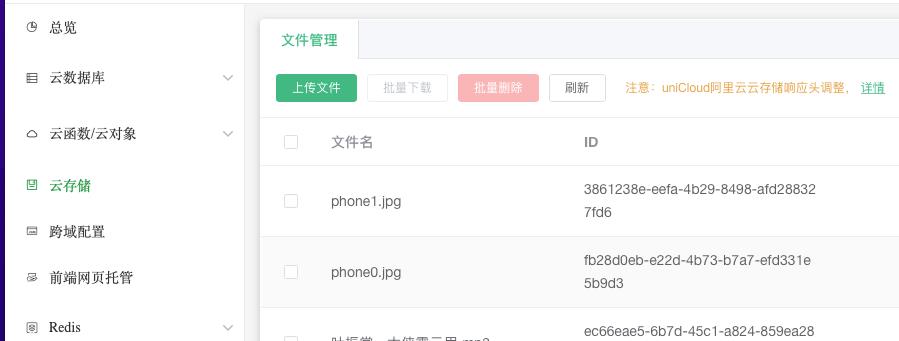
点击云存储后台,点击上传文件,直接上传,应用中可以直接使用这个链接地址访问。
使用扩展组件uni-file-picker自动上传图片到云存储
<template>
    <view class="content">
        <uni-file-picker
            v-model="imageValue"
            fileMediatype="image"
                        limit="3"
            mode="grid"
            @select="select"
            @progress="progress"
            @success="success"
            @fail="fail"
        />
    </view>
</template>

<script>
    export default
        data()
            return
                imageValue: []


</script>
手动上传云存储
通过this.$refs.files.update()调用,进行手动上传。
<template>
    <view class="content">
        <uni-file-picker
            v-model="imageValue"
            fileMediatype="image"
            mode="grid"
            :auto-upload="false"
            @select="select"
            @progress="progress"
            @success="success"
            @fail="fail"
            ref="files"
        />
        <button @click="upload">开始上传</button>
    </view>
</template>

<script>
    export default
        data()
            return
                imageValue: []

        ,
        onLoad()

        ,
        methods:
            upload()
                this.$refs.files.upload()


</script>
<template>
    <view class="content">
        <input type="text" v-model="title"/>
        <uni-file-picker
            v-model="imageValue"
            fileMediatype="image"
            mode="grid"
            :auto-upload="false"
            @select="select"
            @progress="progress"
            @success="success"
            @fail="fail"
            ref="files"
        />
        <button @click="upload">开始上传</button>
    </view>
</template>

<script>
    export default
        data()
            return
                imageValue: [],
                imageUrls: [],
                title: \'\'

        ,
        onLoad()

        ,
        methods:

            // 上传成功
            success(e)
                console.log(\'上传成功\',e)
                this.imageUrls = e.tempFilePaths

                uniCloud.callFunction(
                    name:\'add_pic_data_one\',
                    data:
                        title: this.title,
                        imageUrls: this.imageUrls

                ).then(res =>
                    console.log(res)
                )
            ,

            upload()
                this.$refs.files.upload()


</script>
云数据库
\'use strict\';

const db = uniCloud.database()

exports.main = async (event, context) =>
    //event为客户端上传的参数
    console.log(\'event : \', event)

    let title, imageUrls = event

    const res = await db.collection(\'PicData\').add(
        title,
        imageUrls
    )

    //返回数据给客户端
    return res
;
发布
H5打包
第一步,上传云函数到后台
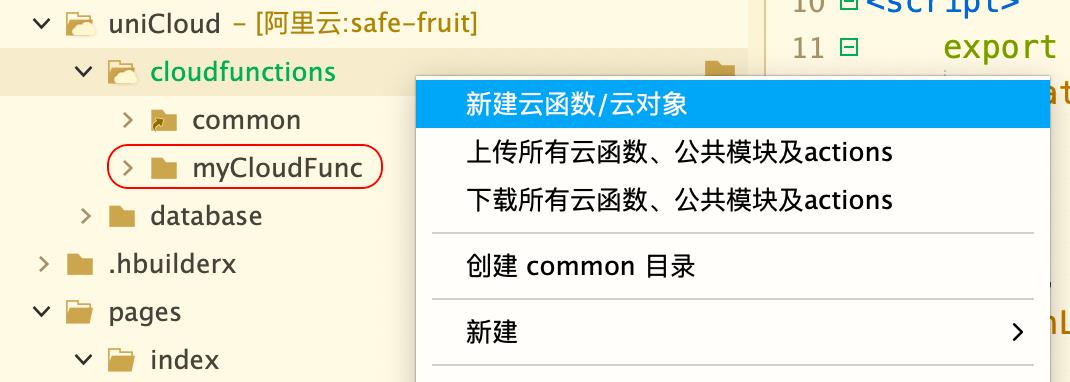
一般本地开发时,用的都是本地调试,此时后台是没有这些云函数的,所以要对着
cloudfunctions右击,点击上传所有云函数
第二步
设置页面标题:文章管理系统
设置路由模式:hash
设置运行的基本路径:./
第三步
发行 - H5
设置网站标题
网站域名可暂时不写
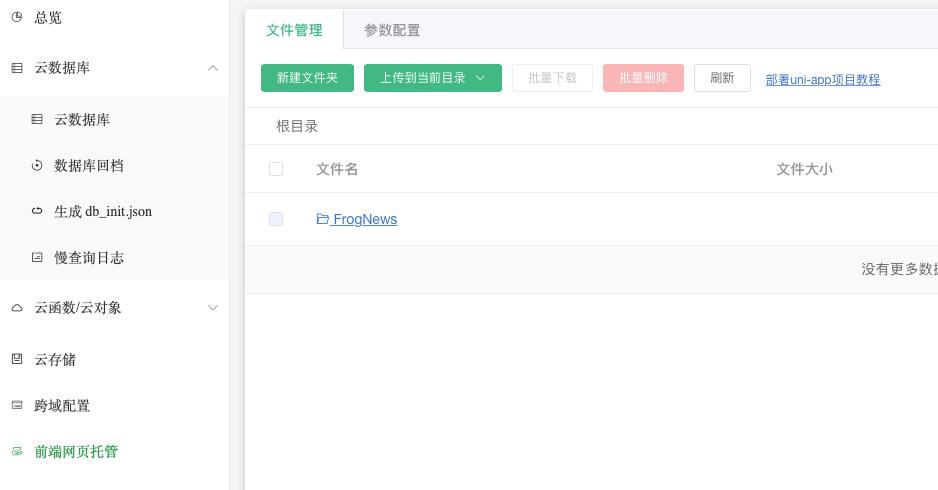
打包完成后,给网站的根路径取一个名字,然后上传到uniCloud的前端网页托管,提供了默认默认域名供使用。
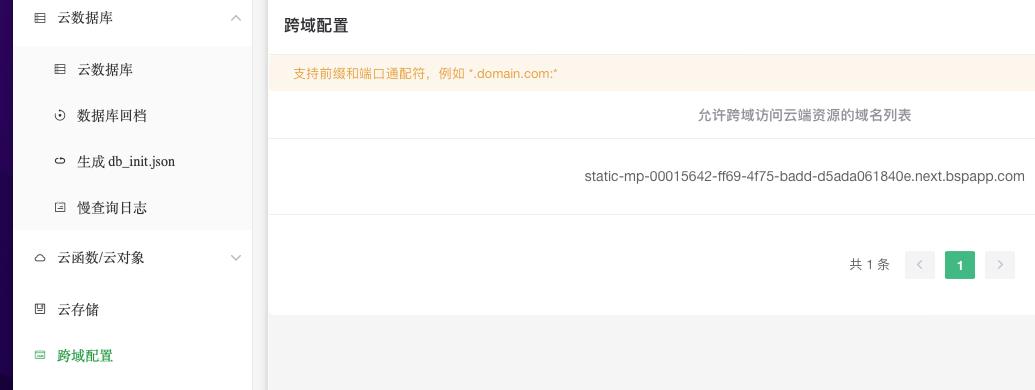
在uniCloud下的跨域设置项,配置跨域设置,让自己的部署域名也能访问到云数据库。
设置跨域配置
uniClound提供的域名过长,不好记忆问题如何解决?
1.通过草料二维码,直接把网址生成二维码,让别人扫描。
2.自己买域名,在阿里云上自己买域名,然后在uniCloud上对应配置网站域名。
微信小程序发布
第一步
进入manifest.json,添加微信小程序的AppId。
第二步
点击发行 发行 -> 微信小程序。
第三步
编译完成后,自动打开微信开发工具,修改本地设置,“不校验合法域名”去掉,查看报错信息,把要添加的页面添加到微信开发者中心下的开发设置-服务器域名
上传要单独配置上传服务器域名。
App打包
第一步
进入manifest.json,选择自动生成图标->生成所有图标。
第二步
发布-打原生APP-云打包。
以上是关于UnityDelegate, Event, UnityEvent, Action, UnityAction, Func 傻傻分不清的主要内容,如果未能解决你的问题,请参考以下文章