Linux Shell 实现一键部署Rabbitmq
Posted CIAS
tags:
篇首语:本文由小常识网(cha138.com)小编为大家整理,主要介绍了Linux Shell 实现一键部署Rabbitmq相关的知识,希望对你有一定的参考价值。


rabbitmq 前言
RabbitMQ是实现了高级消息队列协议(AMQP)的开源消息代理软件(亦称面向消息的中间件)。RabbitMQ服务器是用Erlang语言编写的,而集群和故障转移是构建在开放电信平台框架上的。所有主要的编程语言均有与代理接口通讯的客户端库。
rabbitmq 参考
- 版本兼容性参考
| rabbitmq | erlang |
| download | download |
| 备用download |
Linux 各系统下载使用参考
| Red Hat | Rocky Linux | Oracle Linux | AlmaLinux | ubuntu | suselinux | esxi | RHEL标准安装 | 系统安装参考 | YUM参考 | MobaXterm 远程连接工具 | Red Hat Enterprise 9.0 文档 | Kickstart 生成器 | |||||
| download | download | download | download | download | download | download | 参考 | 参考 | 配置参考 | download | 参考 | Kickstart | |||||
| 版本兼容性 | |||||||||||||||||
安装 rabbitmq
-
创建安装自动化脚本
-
版本兼容性参考
- 实现在线安装rabbitmq,erlang,配置rabbitmq配置文件,防火墙配置,企业微信机器人通知。
- 以下基于Redhat系统
- find / -name rabbitmq #rabbitmq目录查看
- find / -name erlang #erlang目录查看
- rabbitmq 用户名密码admin/Report@123
- Redhat 9 functions使用需要执行安装yum install initscripts -y
- curl 'https://qyapi.weixin.qq.com/cgi-bin/webhook/send?key=XXXXX' #更改自己的企业微信机器人地址
- curl -o /etc/yum.repos.d/redhat.repo http://mirrors.aliyun.com/repo/Centos-8.repo #阿里在线repo
- yum install figlet -y #用于将文字转换为放大艺术字(使用figlet mysql显示)
vim /rabbitmq_install.sh#!/bin/bash -e
# Author: CIASM
# Date: 2023/04/07
<<!
██████╗ █████╗ ██████╗ ██████╗ ██╗████████╗███╗ ███╗ ██████╗
██╔══██╗██╔══██╗██╔══██╗██╔══██╗██║╚══██╔══╝████╗ ████║██╔═══██╗
██████╔╝███████║██████╔╝██████╔╝██║ ██║ ██╔████╔██║██║ ██║
██╔══██╗██╔══██║██╔══██╗██╔══██╗██║ ██║ ██║╚██╔╝██║██║▄▄ ██║
██║ ██║██║ ██║██████╔╝██████╔╝██║ ██║ ██║ ╚═╝ ██║╚██████╔╝
╚═╝ ╚═╝╚═╝ ╚═╝╚═════╝ ╚═════╝ ╚═╝ ╚═╝ ╚═╝ ╚═╝ ╚═
!
<<!
#Redhat 9 install erlang
yum install -y https://github.com/rabbitmq/erlang-rpm/releases/download/v25.3/erlang-25.3-1.el9.x86_64.rpm
yum install -y https://github.com/rabbitmq/erlang-rpm/releases/download/v25.3/erlang-debuginfo-25.3-1.el9.x86_64.rpm
yum install -y https://github.com/rabbitmq/erlang-rpm/releases/download/v25.3/erlang-debugsource-25.3-1.el9.x86_64.rpm
!
source /etc/rc.d/init.d/functions
rabbitmq_PREFIX=/var/lib/rabbitmq
function install_rabbitmq ()
if [ ! -d $rabbitmq_PREFIX ];then
yum install -y net-tools socat
yum install -y ncurses-devel unixODBC unixODBC-devel
yum install -y https://github.com/rabbitmq/erlang-rpm/releases/download/v25.3/erlang-25.3-1.el8.x86_64.rpm
yum install -y https://github.com/rabbitmq/erlang-rpm/releases/download/v25.3/erlang-debuginfo-25.3-1.el8.x86_64.rpm
yum install -y https://github.com/rabbitmq/erlang-rpm/releases/download/v25.3/erlang-debugsource-25.3-1.el8.x86_64.rpm
yum install -y https://mirrors.huaweicloud.com/rabbitmq-server/v3.11.6/rabbitmq-server-3.11.6-1.el8.noarch.rpm
if [ $? -eq 0 ];then
systemctl enable --now rabbitmq-server.service
firewall-cmd --zone=public --permanent --add-port=4369,25672,5671,5672,15672,61613,61614,1883,8883/tcp
firewall-cmd --reload
rabbitmq-plugins enable rabbitmq_management
rabbitmqctl add_user admin Report@123
rabbitmqctl set_user_tags admin administrator
rabbitmqctl set_permissions -p / admin ".*" ".*" ".*"
action "The rabbitmq Install Sussess..." /bin/true
else
action "The rabbitmq Install Failed..." /bin/false
exit 1
fi
else
echo -e "\\033[31mThe rabbitmq already Install...\\033[0m"
fi
function Deployment_completion_notification ()
host_ID=`dmidecode -s system-serial-number | sed -r 's/\\s+//g'`
host_IP=`ifconfig -a | grep inet | grep -v '127.0.0.1' | awk ' print $2' | awk 'NR==1'`
memory_Size=`dmidecode -t memory | grep Size | grep -v No | awk 'sum+=$2 END printf "%.0fG\\n",sum/1^C4'`
CPU_Model=`cat /proc/cpuinfo | grep 'model name' | awk 'print $6' | uniq`
Disk_size=`fdisk -l | grep "sda:" | awk 'print $3$4'`
redhat_version=`cat /etc/redhat-release | grep "release" | awk 'print $6'`
redhat_core=`cat /proc/version | grep "version" | awk 'print $3'`
rabbitmq_server=`rabbitmqctl version`
erl_version=`erl -eval 'ok, Version = file:read_file(filename:join([code:root_dir(), "releases", erlang:system_info(otp_release), "OTP_VERSION"])), io:fwrite(Version), halt().' -noshell`
curl 'https://qyapi.weixin.qq.com/cgi-bin/webhook/send?key=b27af453-0dd1-4b0e-a5d1-ca17e9fca6f6' \\
-H 'Content-Type: application/json' \\
-d '
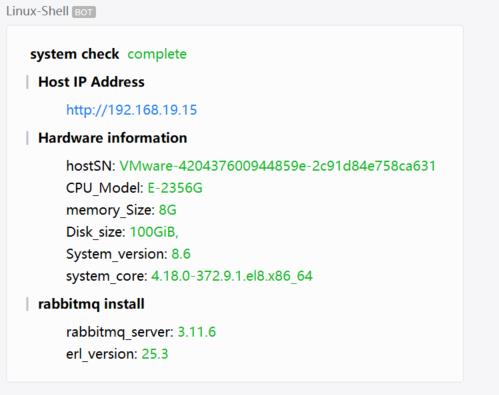
"msgtype": "markdown",
"markdown":
"content": " **system check** <font color=\\"info\\"> complete </font> \\n
> **Host IP Address** \\n
[http://'$host_IP'](http://'$host_IP') \\n
> **Hardware information** \\n
hostSN:<font color=\\"info\\"> '$host_ID' </font> \\n
CPU_Model:<font color=\\"info\\"> '$CPU_Model' </font> \\n
memory_Size:<font color=\\"info\\"> '$memory_Size' </font> \\n
Disk_size:<font color=\\"info\\"> '$Disk_size' </font> \\n
System_version:<font color=\\"info\\"> '$redhat_version' </font> \\n
system_core:<font color=\\"info\\"> '$redhat_core' </font> \\n
> **rabbitmq install** \\n
rabbitmq_server:<font color=\\"info\\"> '$rabbitmq_server' </font> \\n
erl_version:<font color=\\"info\\"> '$erl_version' </font> \\n",
'
function main ()
install_rabbitmq
Deployment_completion_notification
main执行安装
sh /rabbitmq_install.sh企业微信机器人通知

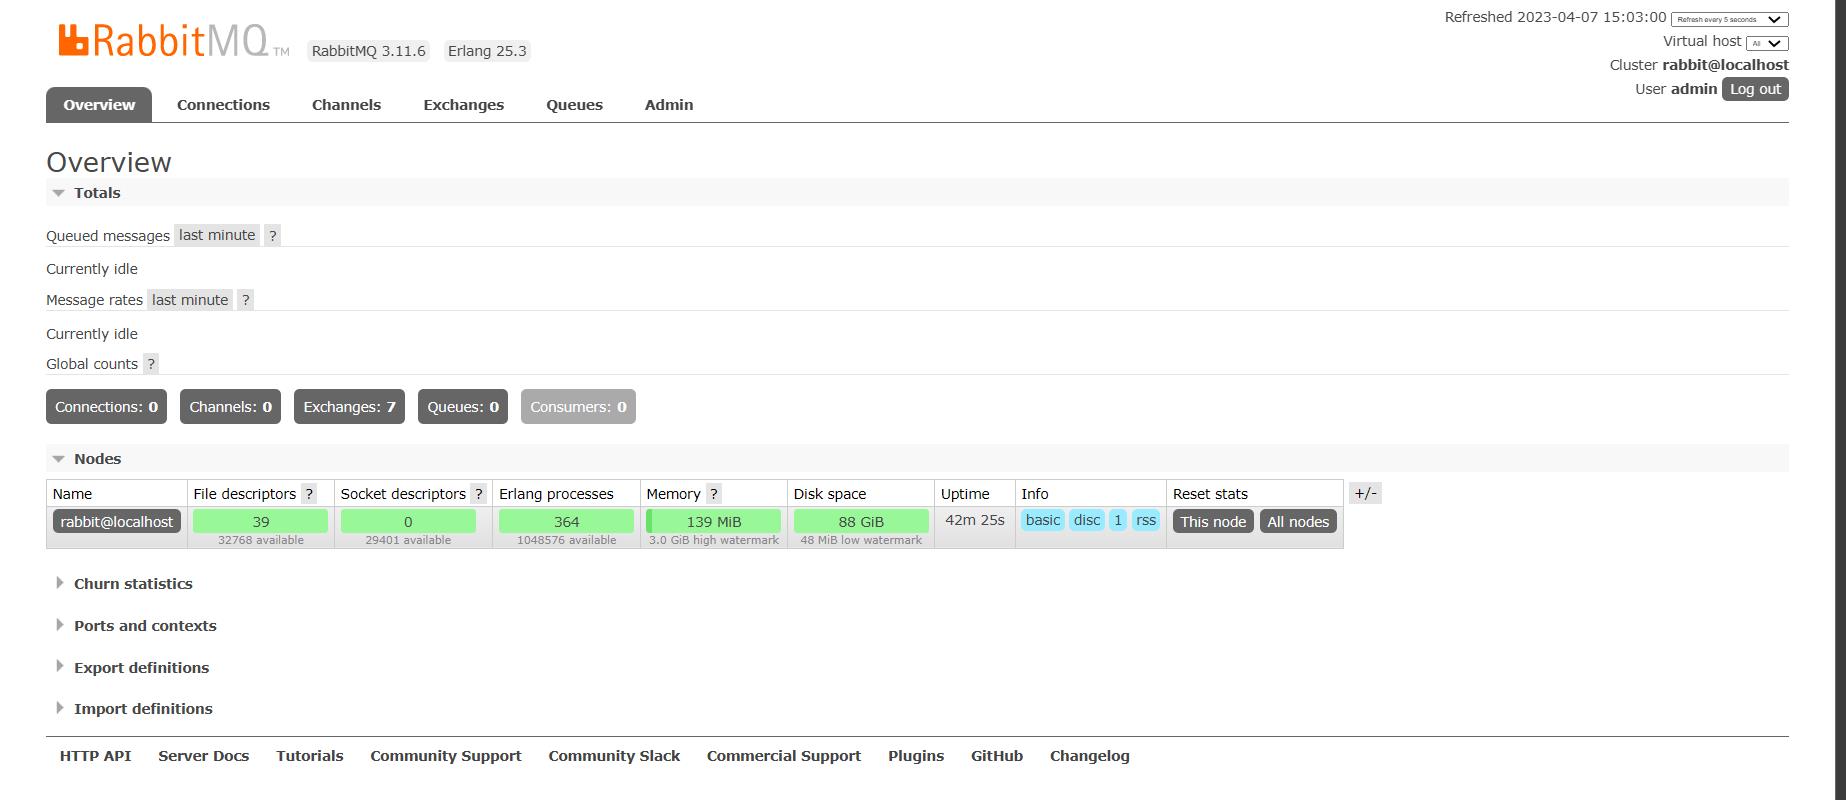
网页访问测试
- http://YOU_ip:15672
- 用户名密码admin/Report@123

Tomcat多实例一键部署shell脚本
#!bin/bash
#Tomcat部署脚本,提前将apache-tomcat-8.5.30.tar.gz、jdk-8u172-linux-x64.tar.gz上传至服务器的/tmp/目录下

#1.安装JDK
tar -zxf /tmp/jdk-8u172-linux-x64.tar.gz -C /usr/local/
ln -s /usr/local/jdk1.8.0_172/ /usr/local/jdk
#配置java环境
cat >> /etc/profile.d/java.sh <<EOF
export JAVA_HOME=/usr/local/jdk/
export PATH=\$JAVA_HOME/bin:\$JAVA_HOME/jre/bin:\$PATH
EOF

#注意此处的source /etc/profile,脚本运行完成后,需要退出再重新登录服务器加载/etc/profile。否则java环境失效
source /etc/profile
#2.安装Tomcat

tar -zxf /tmp/apache-tomcat-8.5.30.tar.gz -C /usr/local/
ln -s /usr/local/apache-tomcat-8.5.30/ /usr/local/tomcat
cd /usr/local/tomcat/
mkdir -pv /usr/local/tomcat_dir
mv conf/ logs/ temp/ webapps/ work/ /usr/local/tomcat_dir
#n为建立Tomcat实例的个数

n=7

for((i=1;i<=n;i++))
do
      /usr/bin/mkdir -pv /usr/local/tomcat$i
      /usr/bin/cp -a /usr/local/tomcat_dir/* /usr/local/tomcat$i
      sed -i 's/Server port="8005"/Server port="708'$i'"/' /usr/local/tomcat$i/conf/server.xml
      sed -i 's/Connector port="8080"/Connector port="808'$i'"/' /usr/local/tomcat$i/conf/server.xml
      sed -i 's/Connector port="8009"/Connector port="908'$i'"/' /usr/local/tomcat$i/conf/server.xml
done

rm -rf /usr/local/tomcat_dir/
mkdir -pv /usr/local/tomcat_sh/

#注意下面的“\”,代表不转译。
cat > /usr/local/tomcat_sh/start_tomcat.sh <<EOF
#!/bin/bash

source /etc/profile
PATH=/usr/local/sbin:/usr/local/bin:/usr/sbin:/usr/bin:/root/bin

export CATALINA_HOME=/usr/local/tomcat
export CATALINA_BASE=\${1%/}
export log=\$CATALINA_BASE/startup.log
# use %/ is for next grep match
echo \$CATALINA_BASE
Tomcat_PID=\$(ps aux | grep "java" | grep -v "grep"  | grep "Dcatalina.base=\${CATALINA_BASE}"  |awk '{print \$2}')

if [ -n "\$Tomcat_PID" ];then
    echo "The tomcat instance \$CATALINA_BASE is running,please checkout the status";
    exit 1;
fi
/usr/bin/sh \$CATALINA_HOME/bin/startup.sh > \$log 2>&1

if [ "\$?" = 0 ];then
    echo "The tomcat instance \$CATALINA_BASE start succeed!!!";
else
    echo "The tomcat instance \$CATALINA_BASE start faild!!!"
    tail -f \$log
fi
EOF


cat > /usr/local/tomcat_sh/stop_tomcat.sh <<EOF
#!/bin/bash

source /etc/profile
PATH=/usr/local/sbin:/usr/local/bin:/usr/sbin:/usr/bin:/root/bin

export CATALINA_HOME=/usr/local/tomcat
export CATALINA_BASE=\${1%/}
export log=\$CATALINA_BASE/stop.log
# use %/ is for next grep match
echo \$CATALINA_BASE
Tomcat_PID=\$(ps aux | grep "java" | grep -v "grep"  | grep "Dcatalina.base=\${CATALINA_BASE}"  |awk '{print \$2}')

if [ -n "\$Tomcat_PID" ];then
    /usr/bin/sh \$CATALINA_HOME/bin/shutdown.sh > \$log 2>&1
else
    echo "The tomcat instance \$CATALINA_BASE is not running,please checkout the status"
    exit 1;

fi

if [ "\$?" = 0 ];then
    echo "The tomcat instance \$CATALINA_BASE stop succeed!!!";
else
    echo "The tomcat instance \$CATALINA_BASE stop faild!!!"
    tail -f \$log
fi
EOF

chmod +x -R /usr/local/tomcat_sh/
以上是关于Linux Shell 实现一键部署Rabbitmq的主要内容,如果未能解决你的问题,请参考以下文章