使用mui.js实现下拉刷新
Posted 爱喝酸奶的吃货
tags:
篇首语:本文由小常识网(cha138.com)小编为大家整理,主要介绍了使用mui.js实现下拉刷新相关的知识,希望对你有一定的参考价值。
闲聊:
最近因公司项目需求,小颖需要写一些html5页面,方便公司ios和android给APP中嵌套使用,其中需要实现拉下刷新功能,其实就是调用了一下mui.js就可以啦嘻嘻,下面跟着小颖一起来看看具体是怎么实现的吧.
目录:

效果图:

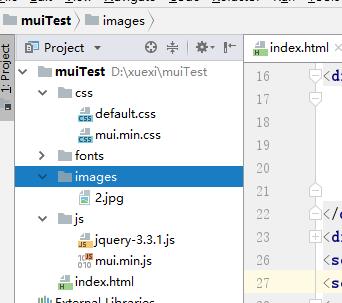
mui.min.js、mui.min.css和jquery-3.3.1.js 小颖就不粘贴啦,大家在网上百度下载下来就可以啦嘻嘻,小颖就把default.css和index.html文件粘贴出来哦。
default.css
* {
    margin: 0;
    padding: 0;
    border: 0;
}

html,
body,
.view-container {
    height: 100%;
    font-family: PingFangSC-Medium;
}

.bg {
    width: 100%;
    height: 100%;
    display: flex;
    align-items: center;
    justify-content: center;
    display: none;
    position: absolute;
    top: 0;
    left: 0;
    background-color: rgba(0, 0, 0, 0.5);
    z-index: 999;
}

.bg .loading {
    width: 40px;
    height: 40px;
    border-radius: 50%;
    border: 5px solid #BEBEBE;
    border-left: 5px solid #498aca;
    animation: load 1s linear infinite;
    -moz-animation: load 1s linear infinite;
    -webkit-animation: load 1s linear infinite;
    -o-animation: load 1s linear infinite;
}

@-webkit-keyframes load {
    from {
        -webkit-transform: rotate(0deg);
    }
    to {
        -webkit-transform: rotate(360deg);
    }
}

@-moz-keyframes load {
    from {
        -moz-transform: rotate(0deg);
    }
    to {
        -moz-transform: rotate(360deg);
    }
}

@-o-keyframes load {
    from {
        -o-transform: rotate(0deg);
    }
    to {
        -o-transform: rotate(360deg);
    }
}

.top-title {
    background: url(../images/2.jpg) no-repeat center;
    background-size: cover;
    width: 100%;
    height: 350px;
}
index.html
<!DOCTYPE html>
<html>

<head>
    <meta charset="utf-8">
    <title>Hello MUI</title>
    <meta name="viewport" content="width=device-width, initial-scale=1,maximum-scale=1,user-scalable=no">
    <meta name="apple-mobile-web-app-capable" content="yes">
    <meta name="apple-mobile-web-app-status-bar-style" content="black">
    <link rel="stylesheet" href="./css/mui.min.css">
    <link rel="stylesheet" href="./css/default.css">
</head>

<body>
<!--下拉刷新容器-->
<div id="pullrefresh" class="mui-content mui-scroll-wrapper">
    <div class="mui-scroll">
        <div class="top-title"></div>
        <!--数据列表-->
        <ul class="mui-table-view mui-table-view-chevron" id="dataList"></ul>
    </div>
</div>
<div class="bg">
    <div class="loading"></div>
</div>
<script src="./js/jquery-3.3.1.js" type="text/javascript" charset="utf-8"></script>
<script src="./js/mui.min.js" type="text/javascript" charset="utf-8"></script>
<script>
    // //进度显示
    $(\'.bg\').css(\'display\', \'flex\');

    mui.init({
        pullRefresh: {
            container: \'#pullrefresh\',
            down: {
                style: \'circle\',
                callback: pulldownRefresh
            },
            // up: {
            //     auto:true,
            //     contentrefresh: \'正在加载...\',
            //     callback: pullupRefresh
            // }
        }
    });

    var count = 0;

    function pullupRefresh() {
        setTimeout(function () {
            getDt(\'default\');
        }, 1500);
    }

    pullupRefresh();

    function addData() {
        getDt(\'down\');
    }

    /**
     * 下拉刷新具体业务实现
     */
    function pulldownRefresh() {
        setTimeout(function () {
            if (count < 3) {
                addData();
                mui(\'#pullrefresh\').pullRefresh().endPulldownToRefresh();
                mui.toast("为你推荐了5篇文章");
            } else {
                mui(\'#pullrefresh\').pullRefresh().endPulldownToRefresh();
                mui.toast("没有更多数据了");
            }
        }, 1500);
    }

    function getDt(ways) {
        count++;
        var table = document.body.querySelector(\'.mui-table-view\');
        var cells = document.body.querySelectorAll(\'.mui-table-view-cell\');
        var len;
        if (ways == \'default\') {
            var newCount = cells.length > 0 ? 5 : 10;//首次加载10条,满屏
            for (var i = cells.length, len = i + newCount; i < len; i++) {
                var li = document.createElement(\'li\');
                li.className = \'mui-table-view-cell\';
                li.innerHTML = \'<a class="mui-navigate-right" href="http://www.cnblogs.com/yingzi1028">Item \' + (i + 1) + \'</a>\';
                table.appendChild(li);
            }
        }
        if (ways == \'down\') {
            for (var i = cells.length, len = i + 5; i < len; i++) {
                var li = document.createElement(\'li\');
                li.className = \'mui-table-view-cell\';
                li.innerHTML = \'<a class="mui-navigate-right" href="http://www.cnblogs.com/yingzi1028">Item \' + (i + 1) + \'</a>\';
                //下拉刷新,新纪录插到最前面;
                table.insertBefore(li, table.firstChild);
            }
        }
        //进度隐藏
        $(\'.bg\').css(\'display\', \'none\');
    }

    mui(\'body\').on(\'tap\', \'a\', function () {
        window.top.location.href = this.href;
    });
    $(\'a\').ontouchstart = function (e) {
        e.preventDefault();
    };
</script>
</body>

</html>
git地址:https://gitee.com/lucy1028/muiTest
以上是关于使用mui.js实现下拉刷新的主要内容,如果未能解决你的问题,请参考以下文章