Java 定时任务-最简单的3种实现方法
Posted 深海呐
tags:
篇首语:本文由小常识网(cha138.com)小编为大家整理,主要介绍了Java 定时任务-最简单的3种实现方法相关的知识,希望对你有一定的参考价值。
一、Timer
Timer是JAVA自带的定时任务类,实现如下:
public class MyTimerTask
    public static void main(String[] args)
        // 定义一个任务
        TimerTask timerTask = new TimerTask()
        @Override
            public void run()
            System.out.println("打印当前时间:" + new Date());

         ;
        // 计时器
        Timer timer = new Timer();
        // 开始执行任务 (延迟1000毫秒执行,每3000毫秒执行一次)
        timer.schedule(timerTask, 1000, 3000);
Timer 优缺点分析
优点是使用简单,缺点是当添加并执行多个任务时,前面任务的执行用时和异常将影响到后面任务,这边深海建议谨慎使用。
二、ScheduledExecutorService
ScheduledExecutorService 也是Java自带的类,
它可以实现Timer具备的所有功能,并解决了 Timer类存在的问题。
实现如下:
public class MyScheduledExecutorService
    public static void main(String[] args)
        // 创建任务队列   10 为线程数量
        ScheduledExecutorService scheduledExecutorService =
                Executors.newScheduledThreadPool(10);
        // 执行任务
        scheduledExecutorService.scheduleAtFixedRate(() ->
            System.out.println("打印当前时间:" + new Date());
        , 1, 3, TimeUnit.SECONDS); // 1s 后开始执行,每 3s 执行一次
ScheduledExecutorService 优缺点分析
优点是,该类是JDK1.5自带的类,使用简单,缺点是该方案仅适用于单机环境。
三、Spring Task
Spring系列框架中Spring Framework自带的定时任务,
使用上面两种方式,很难实现某些特定需求,比如每周一执行某任务,但SpringTask可轻松实现。
以SpringBoot为例来实现:
1、开启定时任务
在SpringBoot的启动类上声明 @EnableScheduling:
@SpringBootApplication
@EnableScheduling //开启定时任务
public class DemoApplication
     // --  --
2、添加定时任务
只需使用@Scheduled注解标注即可,
如果有多个定时任务,可以创建多个@Scheduled标注的方法,示例如下:
import org.springframework.scheduling.annotation.Scheduled;
import org.springframework.stereotype.Component;
@Component // 把此类托管给 Spring,不能省略
public class TaskUtils
    // 添加定时任务
    @Scheduled(cron = "30 40 23 0 0 5") // cron表达式:每周一 23:40:30 执行
    public void doTask()
        System.out.println("我是定时任务~");
Spring Boot 启动后会自动加载并执行定时任务,无需手动操作。
Cron 表达式
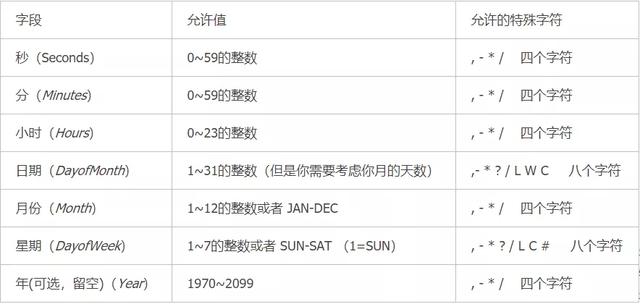
Spring Task 的实现需要使用 cron 表达式来声明执行的频率和规则,cron 表达式是由 6 位或者 7 位组成的(最后一位可以省略),每位之间以空格分隔,每位从左到右代表的含义如下:

其中 * 和 ? 号都表示匹配所有的时间。

cron 表达式在线生成地址:https://cron.qqe2.com/
知识扩展:分布式定时任务
上面的方法都是关于单机定时任务的实现,如果是分布式环境可以使用 Redis 来实现定时任务。
使用 Redis 实现延迟任务的方法大体可分为两类:通过 ZSet 的方式和键空间通知的方式。
1、ZSet 实现方式
通过 ZSet 实现定时任务的思路是,将定时任务存放到 ZSet 集合中,并且将过期时间存储到 ZSet 的 Score 字段中,然后通过一个无线循环来判断当前时间内是否有需要执行的定时任务,如果有则进行执行,具体实现代码如下:
import redis.clients.jedis.Jedis;
import utils.JedisUtils;
import java.time.Instant;
import java.util.Set;
public class DelayQueueExample
    private static final String _KEY = "DelayQueueExample";
    public static void main(String[] args) throws InterruptedException
        Jedis jedis = JedisUtils.getJedis();
        // 30s 后执行
        long delayTime = Instant.now().plusSeconds(30).getEpochSecond();
        jedis.zadd(_KEY, delayTime, "order_1");
        // 继续添加测试数据
       jedis.zadd(_KEY, Instant.now().plusSeconds(2).getEpochSecond(), "order_2");
      jedis.zadd(_KEY, Instant.now().plusSeconds(2).getEpochSecond(), "order_3");
      jedis.zadd(_KEY, Instant.now().plusSeconds(7).getEpochSecond(), "order_4");
     jedis.zadd(_KEY, Instant.now().plusSeconds(10).getEpochSecond(), "order_5");
        // 开启定时任务队列
        doDelayQueue(jedis);

    /**
    * 定时任务队列消费
    * @param jedis Redis 客户端
    */
    public static void doDelayQueue(Jedis jedis) throws InterruptedException
        while (true)
            // 当前时间
            Instant nowInstant = Instant.now();
            long lastSecond = nowInstant.plusSeconds(-1).getEpochSecond();
            // 上一秒时间
            long nowSecond = nowInstant.getEpochSecond();
            // 查询当前时间的所有任务
            Set data = jedis.zrangeByScore(_KEY, lastSecond, nowSecond);
            for (String item : data)
            // 消费任务
            System.out.println("消费:" + item);

        // 删除已经执行的任务
        jedis.zremrangeByScore(_KEY, lastSecond, nowSecond);
        Thread.sleep(1000); // 每秒查询一次
2、键空间通知
我们可以通过 Redis 的键空间通知来实现定时任务,它的实现思路是给所有的定时任务设置一个过期时间,等到了过期之后,我们通过订阅过期消息就能感知到定时任务需要被执行了,此时我们执行定时任务即可。
默认情况下 Redis 是不开启键空间通知的,需要我们通过 config set notify-keyspace-events Ex 的命令手动开启,开启之后定时任务的代码如下:
import redis.clients.jedis.Jedis;
import redis.clients.jedis.JedisPubSub;
import utils.JedisUtils;
public class TaskExample
    public static final String _TOPIC = "__keyevent@0__:expired"; // 订阅频道名称
    public static void main(String[] args)
        Jedis jedis = JedisUtils.getJedis();
        // 执行定时任务
        doTask(jedis);

     /**
       * 订阅过期消息,执行定时任务
       * @param jedis Redis 客户端
       */
    public static void doTask(Jedis jedis)
        // 订阅过期消息
        jedis.psubscribe(new JedisPubSub()
            @Override
 public void onPMessage(String pattern, String channel, String message)
            // 接收到消息,执行定时任务
            System.out.println("收到消息:" + message);

        , _TOPIC);
简单定时器的Java实现
这两个类使用起来非常方便,可以完成我们对定时器的绝大多数需求
Timer类是用来执行任务的类,它接受一个TimerTask做参数
Timer有两种执行任务的模式,最常用的是schedule,它可以以两种方式执行任务:1:在某个时间(Data),2:在某个固定的时间之后(int delay).这两种方式都可以指定任务执行的频率
TimerTest.java:
package com.cn;

import java.io.IOException;

import java.util.Timer;


public class TimerTest{


    public static void main(String[] args){

        Timer timer = new Timer();

        timer.schedule(new MyTask(), 1000, 2000);//在1秒后执行此任务,每次间隔2秒执行一次,如果传递一个Data参数,就可以在某个固定的时间执行这个任务.

        while(true){//这个是用来停止此任务的,否则就一直循环执行此任务

            try{

                int in = System.in.read();

                if(in == ‘s‘){

                    timer.cancel();//使用这个方法退出任务

                    break;

                }

            } catch (IOException e){

                // TODO Auto-generated catch block

                e.printStackTrace();

            }

        }

    }


    static class MyTask extends java.util.TimerTask{

        public void run(){

            System.out.println("________");

        }

    }

}
此类运行时:
程序启动1秒后在控制台打印“————”
间隔两秒后接着执行MyTask的run()方法,打印“————”
这样一直循环
当在控制台输入s字符时,timer定时器取消工作
跳出整个循环
程序运行结束!
TimerTest2.java:
package com.cn;


import java.io.IOException;

import java.util.Date;

import java.util.Timer;


public class TimerTest2{


    public static void main(String[] args){

        Timer timer = new Timer();

        MyTask myTask1 = new MyTask();

        MyTask myTask2 = new MyTask();

        myTask2.setInfo("myTask-info-2");


        timer.schedule(myTask1, 1000, 2000);  //任务1 一秒钟后执行,每两秒执行一次。

        timer.scheduleAtFixedRate(myTask2, 2000, 3000);   //任务2 2秒后开始进行重复的固定速率执行(3秒钟重复一次)


        while (true){

            try{
                //用来接收键盘输入的字符串
                byte[] info = new byte[1024];
                int len = System.in.read(info);

                String strInfo = new String(info, 0, len, "GBK");//从控制台读出信息


                if (strInfo.charAt(strInfo.length() - 1) == ‘ ‘){

                    strInfo = strInfo.substring(0, strInfo.length() - 2);

                }


                if (strInfo.startsWith("Cancel-1")){

                    myTask1.cancel();//退出任务1

                    // 其实应该在这里判断myTask2是否也退出了,是的话就应该break.但是因为无法在包外得到

                    // myTask2的状态,所以,这里不能做出是否退出循环的判断.

                } else if (strInfo.startsWith("Cancel-2")){

                    myTask2.cancel();  //退出任务2

                } else if (strInfo.startsWith("Cancel-All")){

                    timer.cancel();//退出Timer

                    break;

                } else{

                    // 只对myTask1作出判断,偷个懒^_^

                    myTask1.setInfo(strInfo);

                }

            } catch (IOException e){

                // TODO Auto-generated catch block

                e.printStackTrace();

            }

        }

    }


    static class MyTask extends java.util.TimerTask{


        String info = "INFO";


        @Override

        public void run(){

            // TODO Auto-generated method stub

            System.out.println(new Date() + "      " + info);

        }


        public String getInfo(){

            return info;

        }

        public void setInfo(String info){

            this.info = info;

        }

    }


}
此类创建了两个定时任务mytask1和mytask2
mytask1任务和上面的TimerTest类中的例子用法一样。即安排指定的任务从指定的延迟后开始进行重复的固定延迟执行。
mytask2任务就不同于上面的用法了,timer.scheduleAtFixedRate它是用的timer定时器的scheduleAtFixedRate()方法来执行。
scheduleAtFixedRate()方法在API1.6.0中是这样定义的:
安排指定的任务在指定的时间开始进行重复的固定速率执行。以近似固定的时间间隔(由指定的周期分隔)进行后续执行。
近似固定的时间间隔的意思是说:在固定速率执行中,相对于已安排的初始执行时间来安排每次执行。如果由于任何原因(如垃圾回收或其他后台活动)而延迟了某次执行,则将快速连续地出现两次或更多次执行,从而使后续执行能够赶上来。
Timer类的常用其他方法:
cancel()
终止此计时器,丢弃所有当前已安排的任务。
purge()
从此计时器的任务队列中移除所有已取消的任务。
schedule(TimerTask task, Date time)
安排在指定的时间执行指定的任务。
TimerTask类的常用其他方法:
cancel()
取消此计时器任务。
run()
此计时器任务要执行的操作。
scheduledExecutionTime()
返回此任务最近实际 执行的已安排 执行时间。
以上是关于Java 定时任务-最简单的3种实现方法的主要内容,如果未能解决你的问题,请参考以下文章