JavaWEB快速入门之三层架构[新闻发布系统08]11
Posted ning_ning_03
tags:
篇首语:本文由小常识网(cha138.com)小编为大家整理,主要介绍了JavaWEB快速入门之三层架构[新闻发布系统08]11相关的知识,希望对你有一定的参考价值。
一、JavaEE开发模式
(1)JavaEE开发模式
开发模式: 指模式在开发过程中总结出的"套路",总结出的一套约定俗称的设计模式。
(2)JavaEE模式
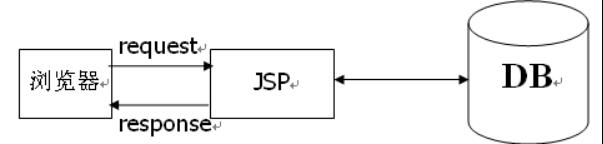
① model1模式——【①】JSP Model1是JavaWeb早期的模型,它适合小型Web项目,开发成本低!Model1第一代时期,服务器端只有JSP页面,所有的操作都在JSP页面中,连访问数据库的API也在JSP页面中完成。也就是说,所有的东西都耦合在一起,对后期的维护和扩展极为不利。
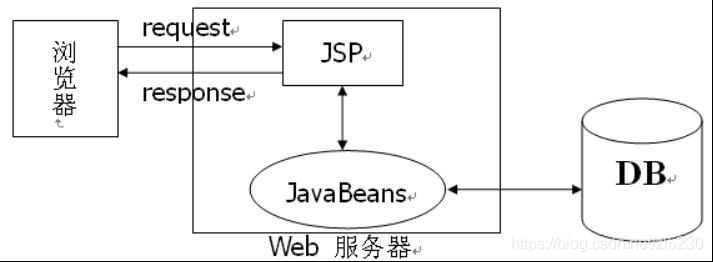
【②】JSP Model1优化后有所改进,把业务逻辑和数据访问的内容放到了JavaBean(狭义JavaBean:实体类,广义JavaBean:实体类,dao,service,工具类)中,而JSP页面负责显示以及请求调度的工作。虽然第二代比第一代好了些,但还让JSP做了过多的工作,JSP中把视图工作和请求调度(控制器)的工作耦合在一起了。
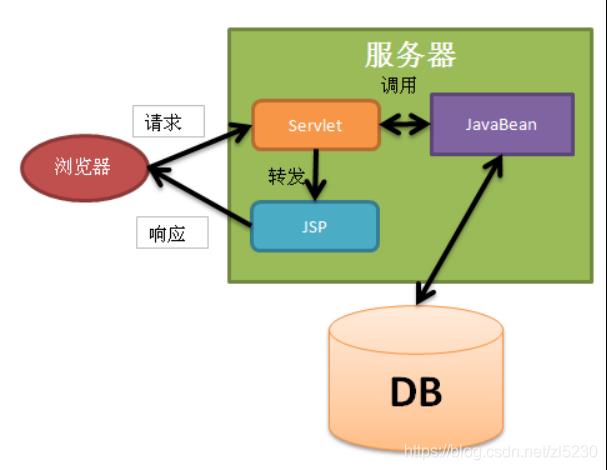
② model2模式——JSP Model2模式已经可以清晰的看到MVC完整的结构了。JSP:视图层,用来与用户打交道。负责接收数据,以及显示数据给用户;Servlet:控制层,负责找到合适的模型对象来处理业务逻辑,转发到合适的视图; JavaBean:模型层,完成具体的业务工作,例如:开启、转账等。
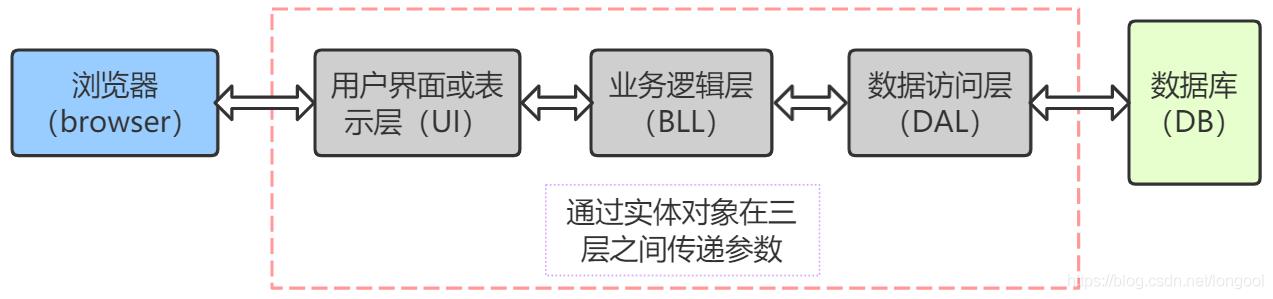
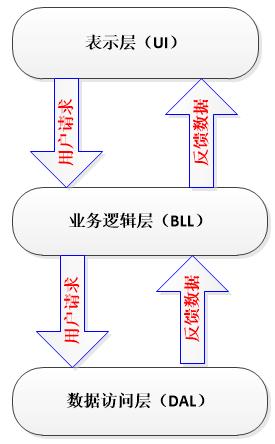
③ 三层架构——三层架构就是为了符合“高内聚,低耦合”思想,把各个功能模块划分为表示层(UI)、业务逻辑层(BLL)和数据访问层(DAL)三层架构,各层之间采用接口相互访问,并通过对象模型的实体类(Model)作为数据传递的载体,不同的对象模型的实体类一般对应于数据库的不同表,实体类的属性与数据库表的字段名一致。
生活原理:
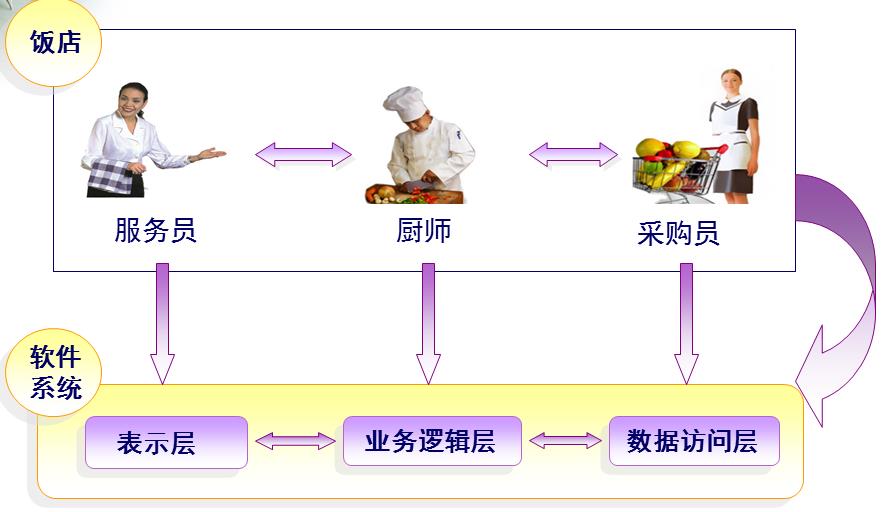
二、三层架构
(1)表示层(UI) web层 显示层
表示层又称表现层或视图层或用户界面层 UI(User Interface layer):就是实现与用户交互的功能,将用户的需求传达和反馈,即用于接受用户输入的数据,同时反馈相关的输出数据展示给用户。
【职责】收集用户的数据和需求、展示数据(2)业务逻辑层(BLL)
业务逻辑层 BLL(Business Logic Layer):是连接表示层和数据访问层的桥梁,实现业务逻辑的功能。可以对接受到的数据进行处理、执行相关的计算等一些逻辑操作。业务逻辑层通过调用数据访问层的各种操作方法,将这些方法按一定的逻辑组合起来实现具体需求,将这个过程比作搭积木的过程。
【职责】数据加工处理、处理DAO完成业务实现(3)数据访问层(DAL )
数据访问层又称持久层 DAL (Data access layer):主要用来操作数据库中的数据,实现数据的增加、删除、修改、查询等操作,并将操作结果反馈到业务逻辑层 BBL。比如在数据访问层定义了一些操作数据的方法,即增、删、改、查的方法,将这些方法比作一块块的积木。
【职责】想业务层提供数据,将业务层加工后的数据同步到数据库
创建三级架构:
编写接口——(业务逻辑层):
package com.zking.news.biz;
import com.zking.news.entity.Users;
/**
 * 用户功能接口(业务逻辑层)
 * @author Administrator
 *
 */
public interface IUsersBiz
	/**
	 * 用户登录
	 */
	Users usersLogin(Users users);
实现接口:
package com.zking.news.biz.impl;
import com.zking.news.biz.IUsersBiz;
import com.zking.news.dao.IUsersDao;
import com.zking.news.dao.impl.UsersDaoImpl;
import com.zking.news.entity.Users;
public class UsersBizImpl implements IUsersBiz
	//实例化DAO
	IUsersDao iud = new UsersDaoImpl();
	@Override
	public Users usersLogin(Users users)
		return iud.usersLogin(users);
简单布局:
<%@ page language="java" contentType="text/html; charset=UTF-8"
    pageEncoding="UTF-8"%>
<!DOCTYPE html PUBLIC "-//W3C//DTD HTML 4.01 Transitional//EN" "http://www.w3.org/TR/html4/loose.dtd">
<html>
<head>
<meta http-equiv="Content-Type" content="text/html; charset=UTF-8">
<title>Insert title here</title>
</head>
<body>
<form action = "doLogin.jsp" method = "post">
	账户: <input type ="text" name = "username"/>
	<br>
	密码 <input type = "password" name = "password"/>
	<br>
	<input type = "submit" value = "登录"/>

</form>
</body>
</html>
中转站(使用三级架构):
<%@page import="com.zking.news.biz.impl.UsersBizImpl"%>
<%@page import="com.zking.news.biz.IUsersBiz"%>
<%@page import="com.zking.news.dao.impl.UsersDaoImpl"%>
<%@page import="com.zking.news.dao.IUsersDao"%>
<%@page import="com.zking.news.entity.Users"%>
<%@ page language="java" contentType="text/html; charset=UTF-8"
    pageEncoding="UTF-8"%>
    <%
    	//1.设置编码
    	request.setCharacterEncoding("utf-8");

    	//2获取数据
    	String username = request.getParameter("username");
    	String password = request.getParameter("password");

    	//3.封装实体
    	Users users = new Users(username,password);


    	//实例化业务逻辑层
    	IUsersBiz iub = new UsersBizImpl();
    	Users u = iub.usersLogin(users);

    	if(null!=u)
    		//OK
    		request.getRequestDispatcher("home.jsp").forward(request, response);
    	else
    		//no
    		response.sendRedirect("login.jsp");

    %>

三层架构的优势:
- 1,结构清晰、耦合度低
- 2,可维护性高,可扩展性高
- 3,利于开发任务同步进行, 容易适应需求变化
三层架构的优劣势:
- 1、降低了系统的性能。这是不言而喻的。如果不采用分层式结构,很多业务可以直接造访数据库,以此获取相应的数据,如今却必须通过中间层来完成。
- 2、有时会导致级联的修改。这种修改尤其体现在自上而下的方向。如果在表示层中需要增加一个功能,为保证其设计符合分层式结构,可能需要在相应的业务逻辑层和数据访问层中都增加相应的代码
- 3、增加了代码量,增加了工作量
SprinMvc快速入门
1.spring mvc
Spring MVC是Spring Framework的一部分,是基于Java实现MVC的轻量级Web框架。
查看官方文档:https://docs.spring.io/spring/docs/5.2.0.RELEASE/spring-framework-reference/web.html#spring-web
1.1.三层结构
B/S架构系统标准的三层架构包括表现层、业务层和持久层,每一层各司其职, 接下来我们就说说每层都负责哪些方面。
表现层
也就是我们常说的web层。它负责接收客户端请求,向客户端响应结果,通常客户端使用http协议请求web 层,web 需要接收 http 请求,完成 http 响应。
-
表现层又包括展示层和控制层:控制层负责接收请求,展示层负责结果的展示。
-
表现层依赖业务层,接收到客户端请求一般会调用业务层进行业务处理,并将处理结果响应给客户端。
-
表现层的设计一般都使用 MVC 模型。(MVC 是表现层的设计模型,和其他层没有关系)
业务层:
也就是我们常说的 service 层。它负责业务逻辑处理,和我们开发项目的需求息息相关。
-
web 层依赖业务层,但是业务层不依赖 web 层。
-
业务层在业务处理时可能会依赖持久层,如果要对数据持久化需要保证事务一致性。(也就是我们说的,事务应该放到业务层来控制)
持久层:
也就是我们是常说的 dao 层。负责数据持久化,包括数据层即数据库和数据访问层,数据库是对数据进行持久化的载体,数据访问层是业务层和持久层交互的接口,业务层需要通过数据访问层将数据持久化到数据库中。通俗的讲,持久层就是和数据库交互,对数据库表进行曾删改查的。
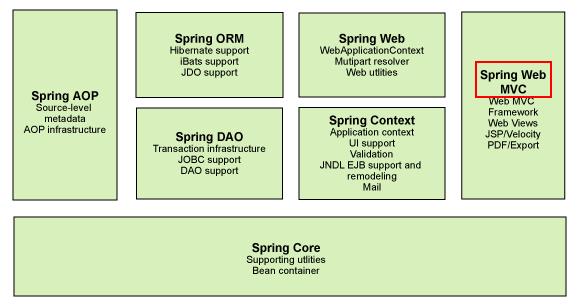
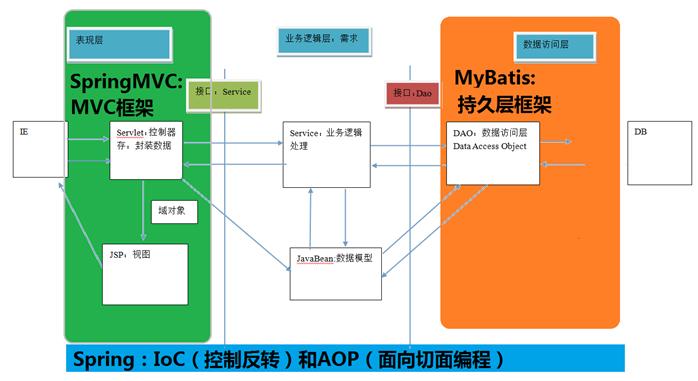
通过分层更好的实现了各个部分的职责,在每一层将再细化出不同的框架,分别解决各层关注的问题。三层架构与SSM的关系示意图如下,其中SpringMVC属于表现层框架,MyBatis属于持久层框架,而Spring不属于任何一层,是用来整合其它框架的。
1.2.mvc 模型
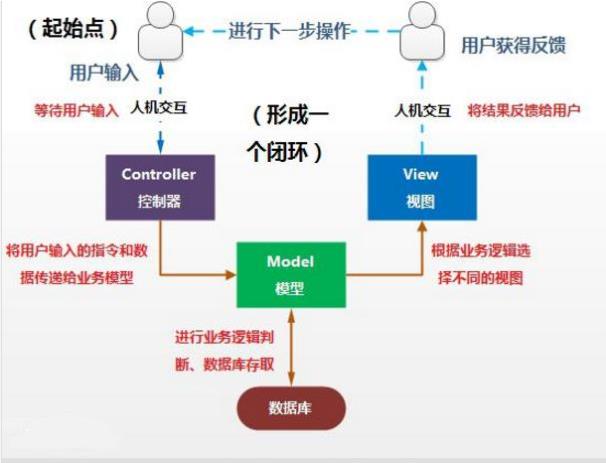
MVC全名是Model View Controller,是模型(model)-视图(view)-控制器(controller)的缩写,是一种用于设计创建 Web 应用程序表现层的模式。MVC 中每个部分各司其职:
Model(模型)
指的就是我们的数据模型,一般情况下用于封装数据。
View(视图)
指的就是我们的 jsp 或者 html等页面,一般用于展示数据的,其是依据模型数据创建的。
Controller(控制器)
是应用程序中处理用户交互的部分,用来处理程序逻辑的。例如参数校验等。
1.3.Spring MVC
1.3.1.特点:
-
清晰的角色划分
前端控制器(DispatcherServlet)
请求到处理器映射(HandlerMapping)
处理器适配器(HandlerAdapter)
视图解析器(ViewResolver)
处理器或页面控制器(Controller)
验证器( Validator)
命令对象(Command 请求参数绑定到的对象就叫命令对象)
表单对象(Form Object 提供给表单展示和提交到的对象就叫表单对象)。
-
分工明确,而且扩展点相当灵活,可以很容易扩展,虽然几乎不需要。
-
由于命令对象就是一个 POJO,无需继承框架特定 API,可以使用命令对象直接作为业务对象。
-
和 Spring 其他框架无缝集成,是其它 Web 框架所不具备的。
-
可适配,通过 HandlerAdapter 可以支持任意的类作为处理器。
-
可定制性,HandlerMapping、ViewResolver 等能够非常简单的定制。
-
功能强大的数据验证、格式化、绑定机制。
-
利用 Spring 提供的 Mock 对象能够非常简单的进行 Web 层单元测试。
-
本地化、主题的解析的支持,使我们更容易进行国际化和主题的切换。
-
强大的 JSP 标签库,使 JSP 编写更容易。
-
还有比如RESTful风格的支持、简单的文件上传、约定大于配置的契约式编程支持、基于注解的零配置支持,数据验证、格式化、本地化、主题等等。
-
用的人多。
1.3.2.执行流程

1.4.SpringMVC 和 Struts2
共同点:
-
它们都是表现层框架,都是基于 MVC 模型编写的。
-
它们的底层都离不开原始 ServletAPI。
-
它们处理请求的机制都是一个核心控制器。
区别:
-
Spring MVC 的入口是 Servlet, 而 Struts2 是 Filter
-
Spring MVC 是基于方法设计的,而 Struts2 是基于类,Struts2 每次执行都会创建一个动作类。所以 Spring MVC 会稍微比 Struts2 快些。
-
Spring MVC 使用更加简洁,同时还支持 JSR303, 处理 ajax 的请求更方便(JSR303 是一套 JavaBean 参数校验的标准,它定义了很多常用的校验注解,我们可以直接将这些注解加在我们 JavaBean 的属性上面,就可以在需要校验的时候进行校验了。)
-
Struts2 的 OGNL 表达式使页面的开发效率相比 Spring MVC 更高些,但执行效率并没有比 JSTL 提升,尤其是 struts2 的表单标签,远没有 html 执行效率高
2.spring mvc入门demo
2.1.配置版
创建model,添加目录java,resources.
实现步骤其实非常的简单:
- 新建一个web项目
- 导入相关jar包
- 编写web.xml , 注册DispatcherServlet
- 编写springmvc配置文件
- 接下来就是去创建对应的控制类 , controller
- 最后完善前端视图和controller之间的对应
- 测试运行调试.
2.1.1.添加依赖
<dependencies>
    <!--spring-->
    <dependency>
      <groupId>org.springframework</groupId>
      <artifactId>spring-context</artifactId>
      <version>${spring.version}</version>
    </dependency>
    <!--spring-web-->
    <dependency>
      <groupId>org.springframework</groupId>
      <artifactId>spring-web</artifactId>
      <version>${spring.version}</version>
    </dependency>
    <!--spring-mvc-->
    <dependency>
      <groupId>org.springframework</groupId>
      <artifactId>spring-webmvc</artifactId>
      <version>${spring.version}</version>
    </dependency>
    <!--servletAPI-->
    <dependency>
      <groupId>javax.servlet</groupId>
      <artifactId>servlet-api</artifactId>
      <version>2.5</version>
      <scope>provided</scope>
    </dependency>
</dependencies>
2.1.2.配置web.xml , 注册DispatcherServlet
<?xml version="1.0" encoding="UTF-8"?>
<web-app xmlns="http://xmlns.jcp.org/xml/ns/javaee"
         xmlns:xsi="http://www.w3.org/2001/XMLSchema-instance"
         xsi:schemaLocation="http://xmlns.jcp.org/xml/ns/javaee http://xmlns.jcp.org/xml/ns/javaee/web-app_4_0.xsd"
         version="4.0">

  <!--1.注册DispatcherServlet-->
  <servlet>
    <servlet-name>springmvc</servlet-name>
    <servlet-class>org.springframework.web.servlet.DispatcherServlet</servlet-class>
    <!--关联一个springmvc的配置文件:【servlet-name】-servlet.xml-->
    <init-param>
      <param-name>contextConfigLocation</param-name>
      <param-value>classpath:springmvc-servlet.xml</param-value>
    </init-param>
    <!--启动级别-1-->
    <load-on-startup>1</load-on-startup>

  </servlet>
  <!--/ 匹配所有的请求;(不包括.jsp)-->
  <!--/* 匹配所有的请求;(包括.jsp)-->
  <servlet-mapping>
    <servlet-name>springmvc</servlet-name>
    <url-pattern>/</url-pattern>
  </servlet-mapping>

</web-app>
2.1.3.添加资源文件springmvc-servlet.xml
<?xml version="1.0" encoding="UTF-8"?>
<beans xmlns="http://www.springframework.org/schema/beans"
       xmlns:xsi="http://www.w3.org/2001/XMLSchema-instance"
       xmlns:context="http://www.springframework.org/schema/context"
       xmlns:mvc="http://www.springframework.org/schema/mvc"
       xsi:schemaLocation="http://www.springframework.org/schema/beans
       http://www.springframework.org/schema/beans/spring-beans.xsd
       http://www.springframework.org/schema/context
       https://www.springframework.org/schema/context/spring-context.xsd
       http://www.springframework.org/schema/mvc
       https://www.springframework.org/schema/mvc/spring-mvc.xsd">

    <!--添加 处理映射器-->
    <bean class="org.springframework.web.servlet.handler.BeanNameUrlHandlerMapping"/>
    <!--添加 处理器适配器-->
    <bean class="org.springframework.web.servlet.mvc.SimpleControllerHandlerAdapter"/>
    <!--视图解析器:DispatcherServlet给他的ModelAndView-->
    <bean class="org.springframework.web.servlet.view.InternalResourceViewResolver" id="InternalResourceViewResolver">
        <!--前缀-->
        <property name="prefix" value="/WEB-INF/page/"/>
        <!--后缀-->
        <property name="suffix" value=".jsp"/>
    </bean>
    <!--将自己的类交给SpringIOC容器,注册bean-->
    <!--Handler-->
    <bean id="/hello" class="com.wyl.HelloController"/>
</beans>
使用springMVC必须配置的三大件:
处理器映射器、处理器适配器、视图解析器
通常,我们只需要手动配置视图解析器,而处理器映射器和处理器适配器只需要开启注解驱动即可,而省去了大段的xml配置
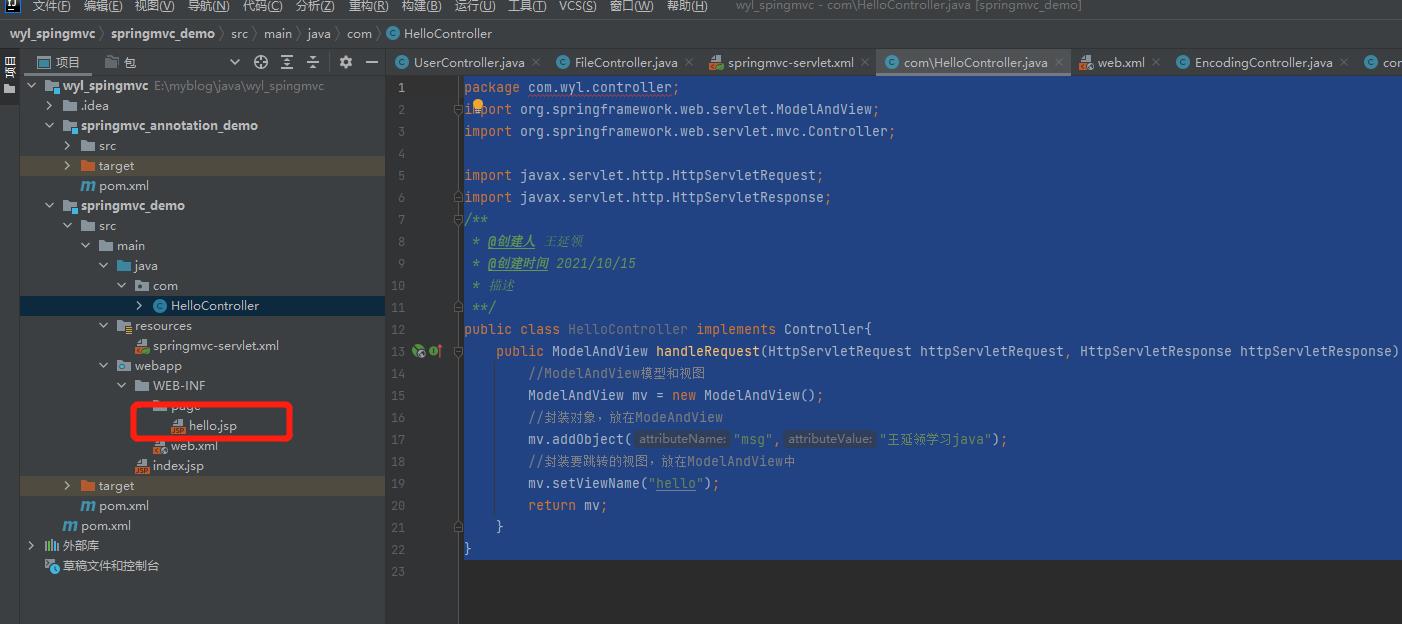
2.1.4.添加软件包 com.wyl.controller,添加controller
package com.wyl.controller;
import org.springframework.web.servlet.ModelAndView;
import org.springframework.web.servlet.mvc.Controller;

import javax.servlet.http.HttpServletRequest;
import javax.servlet.http.HttpServletResponse;
/**
 * @创建人 王延领
 * @创建时间 2021/10/15
 * 描述
 **/
public class HelloController implements Controller{
    public ModelAndView handleRequest(HttpServletRequest httpServletRequest, HttpServletResponse httpServletResponse) throws Exception {
        //ModelAndView模型和视图
        ModelAndView mv = new ModelAndView();
        //封装对象,放在ModeAndView
        mv.addObject("msg","王延领学习java");
        //封装要跳转的视图,放在ModelAndView中
        mv.setViewName("hello");
        return mv;
    }
}
2.1.5. 添加映射
 <!--将自己的类交给SpringIOC容器,注册bean-->
    <!--Handler-->
    <bean id="/hello" class="com.wyl.HelloController"/>
2.1.6.添加页面
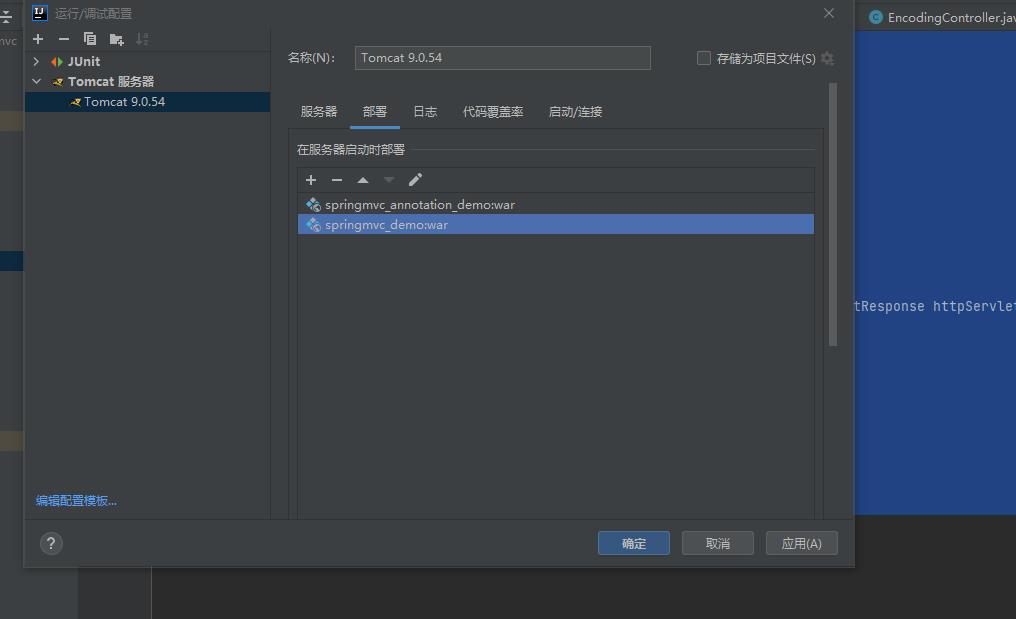
2.1.7.tomcat运行
2.2.注解版
2.2.1.添加依赖
<dependencies>
    <dependency>
      <groupId>junit</groupId>
      <artifactId>junit</artifactId>
      <version>4.11</version>
      <scope>test</scope>
    </dependency>
    <!--spring-->
    <dependency>
      <groupId>org.springframework</groupId>
      <artifactId>spring-context</artifactId>
      <version>${spring.version}</version>
    </dependency>
    <!--spring-web-->
    <dependency>
      <groupId>org.springframework</groupId>
      <artifactId>spring-web</artifactId>
      <version>${spring.version}</version>
    </dependency>
    <!--spring-mvc-->
    <dependency>
      <groupId>org.springframework</groupId>
      <artifactId>spring-webmvc</artifactId>
      <version>${spring.version}</version>
    </dependency>
    <!--servletAPI-->
    <dependency>
      <groupId>javax.servlet</groupId>
      <artifactId>servlet-api</artifactId>
      <version>2.5</version>
      <scope>provided</scope>
    </dependency>
      <dependency>
          <groupId>org.projectlombok</groupId>
          <artifactId>lombok</artifactId>
          <version>RELEASE</version>
          <scope>compile</scope>
      </dependency>
  </dependencies>
2.2.1.配置web.xml
<?xml version="1.0" encoding="UTF-8"?>
 <!--不要web-app,不然model 返回失效-->
 <web-app xmlns="http://xmlns.jcp.org/xml/ns/javaee"
         xmlns:xsi="http://www.w3.org/2001/XMLSchema-instance"
         xsi:schemaLocation="http://xmlns.jcp.org/xml/ns/javaee http://xmlns.jcp.org/xml/ns/javaee/web-app_4_0.xsd"
         version="4.0">

    <!--注册servlet-->
    <servlet>
        <servlet-name>SpringMVC</servlet-name>
        <servlet-class>org.springframework.web.servlet.DispatcherServlet</servlet-class>
        <!--通过初始化参数指定SpringMVC配置文件的位置,进行关联-->
        <init-param>
            <param-name>contextConfigLocation</param-name>
            <param-value>classpath:springmvc-servlet.xml</param-value>
        </init-param>
        <!-- 启动顺序,数字越小,启动越早 -->
        <load-on-startup>1</load-on-startup>
    </servlet>

    <!--所有请求都会被springmvc拦截 -->
    <servlet-mapping>
        <servlet-name>SpringMVC</servlet-name>
        <!--
/ 和/* 的区别:
< url-pattern > / </ url-pattern >
	不会匹配到.jsp, 只针对我们编写的请求;即:.jsp 不会进入spring的 DispatcherServlet类 。
< url-pattern > /* </ url-pattern >
	会匹配 *.jsp,会出现返回 jsp视图 时再次进入spring的DispatcherServlet 类,导致找不到对应的controller所以报404错-->
        <url-pattern>/</url-pattern>
    </servlet-mapping>
 </web-app>
2.2.3.添加资源文件springmvc-servlet.xml
<?xml version="1.0" encoding="UTF-8"?>
<beans xmlns="http://www.springframework.org/schema/beans"
      xmlns:xsi="http://www.w3.org/2001/XMLSchema-instance"
      xmlns:context="http://www.springframework.org/schema/context"
      xmlns:mvc="http://www.springframework.org/schema/mvc"
      xsi:schemaLocation="http://www.springframework.org/schema/beans
       http://www.springframework.org/schema/beans/spring-beans.xsd
       http://www.springframework.org/schema/context
       https://www.springframework.org/schema/context/spring-context.xsd
       http://www.springframework.org/schema/mvc
       https://www.springframework.org/schema/mvc/spring-mvc.xsd">

   <!-- 自动扫描包,让指定包下的注解生效,由IOC容器统一管理 -->
   <context:component-scan base-package="com.wyl.controller"/>
   <!-- 让Spring MVC不处理静态资源 -->
   <mvc:default-servlet-handler />
   <!--
   支持mvc注解驱动
       在spring中一般采用@RequestMapping注解来完成映射关系
       要想使@RequestMapping注解生效
       必须向上下文中注册DefaultAnnotationHandlerMapping
       和一个AnnotationMethodHandlerAdapter实例
       这两个实例分别在类级别和方法级别处理。
       而annotation-driven配置帮助我们自动完成上述两个实例的注入。
    -->
   <mvc:annotation-driven />

   <!-- 视图解析器 -->
   <bean class="org.springframework.web.servlet.view.InternalResourceViewResolver"
         id="internalResourceViewResolver">
       <!-- 前缀 -->
       <property name="prefix" value="/WEB-INF/jsp/" />
       <!-- 后缀 -->
       <property name="suffix" value=".jsp" />
   </bean>

</beans>
2.2.4.添加软件包 com.wyl.controller,添加controller
package com.wyl.controller;

import org.springframework.stereotype.Controller;
import org.springframework.ui.Model;
import org.springframework.web.bind.annotation.RequestMapping;

/**
 * @创建人 王延领
 * @创建时间 2021/10/18
 * 描述
 **/
@Controller
@RequestMapping("/hello")
public class HelloController {
    @RequestMapping("/sayHello")
    public String hello(Model model) {
        //会被视图解析器处理
        return "hello";
    }
}
2.1.5.添加页面
<%--
  Created by IntelliJ IDEA.
  User: 17144
  Date: 2021/10/15
  Time: 23:55
  To change this template use File | Settings | File Templates.
--%>
<%@ page contentType="text/html;charset=UTF-8" language="java" %>
<html>
<head>
    <title>Title</title>
</head>
<body>
成功!!!
</body>
</html>
3.控制器
3.1.@Controller
-
@Controller注解类型用于声明Spring类的实例是一个控制器;
-
Spring可以使用扫描机制来找到应用程序中所有基于注解的控制器类,为了保证Spring能找到你的控制器,需要在配置文件中声明组件扫描。
<!-- 自动扫描指定的包,下面所有注解类交给IOC容器管理 -->
<context:component-scan base-package="com.wyl.controller"/>
//@Controller注解的类会自动添加到Spring上下文中 @Controller public class ControllerTest2{ //映射访问路径 @RequestMapping("/t2") public String index(Model model){ //Spring MVC会自动实例化一个Model对象用于向视图中传值 model.addAttribute("msg", "ControllerTest2"); //返回视图位置 return "test"; } }
3.2.@RequestMapping
3.2.1.RequestMapping注解:
* 作用:
* 用于建立请求URL和处理请求方法之间的对应关系
* 它可以作用在方法、类上
* 作用来类上:作用在类上时,类上的路径作为一级目录
* 在访问方法时需要加类上的路径
* 作用在方法上:指定这个方法要拦截处理哪个URL请求
* 属性:
* value:与path属性的作用是相同的,当只有value一个属性时,属性可以省略,直接写属性值
* path:与value属性作用一致,用于指定请求的URL
* method:用于指定请求的方式,比如POST、GET等使用RequestMethod枚举
* params:用于指定限制请求参数的条件,它支持简单的表达式
* 要求请求参数的key和value必须和配置的一模一样
* headers:用于指定限制请求消息头的条件
@Controller
@RequestMapping("/User")
public class RequestMappingDemoController {
    @RequestMapping("SetView")
    public String SetView(){
        System.out.println("Hello SpringMvc");
        //返回逻辑视图名
        return "success";
    }
    //类上加了@RequestMapping注解后,此方法拦截的URL变成了:user/testRequestMapping
    @RequestMapping("/testRequestMapping")
    public String testRequestMapping(){
        System.out.println("测试RequestMapping注解。。");
        //返回逻辑视图名
        return "success";
    }

    //指定此方法只能由POST请求访问
    @RequestMapping(path = {"/testRequestMappingMethod"},method = {RequestMethod.POST})
    public String testRequestMappingMethod(){
        System.out.println("测试RequestMapping注解的method属性。。");
        //返回逻辑视图名
        return "success";
    }
    //指定此方法必须带有name属性,且属性值必须为admin
    //http://localhost:8080/User/testRequestMappingParams?name=admin
    @RequestMapping(path = {"/testRequestMappingParams"},params = {"name=admin"})
    public String testRequestMappingParams(){
        System.out.println("测试RequestMapping注解的params属性。。");
        //返回逻辑视图名
        return "success";
    }
    //指定请求头中必须包含accept属性
    @RequestMapping(path = {"/testRequestMappingHeaders"},headers = {"accept"})
    public String testRequestMappingHeaders(){
        System.out.println("测试RequestMapping注解的headers属性。。");
        //返回逻辑视图名
        return "success";
    }
  }
3.2.2.RestFul风格
    //映射访问路径
   @RequestMapping("/commit/{p1}/{p2}")
   public String index(@PathVariable int p1, @PathVariable int p2, Model model){

       int result = p1+p2;
       //Spring MVC会自动实例化一个Model对象用于向视图中传值
       model.addAttribute("msg", "结果:"+result);
       //返回视图位置
       return "test";

  }
-
REST(英文:Representational State Transfer,简称REST)描述了一个架构样式的网络系统,比如 web 应用程序。它首次出现在 2000 年 Roy Fielding 的博士论文中,他是 HTTP 规范的主要编写者之一。在目前主流的三种Web服务交互方案中,REST相比于SOAP(Simple Object Access protocol,简单对象访问协议)以及XML-RPC更加简单明了,无论是对URL的处理还是对Payload的编码,REST都倾向于用更加简单轻量的方法设计和实现。值得注意的是REST并没有一个明确的标准,而更像是一种设计的风格。
-
它本身并没有什么实用性,其核心价值在于如何设计出符合REST风格的网络接口。
-
restful的优点 :
- 它结构清晰、符合标准、易于理解、扩展方便,所以正得到越来越多网站的采用。
-
restful的特性:
-
资源(Resources):
- 网络上的一个实体,或者说是网络上的一个具体信息。 它可以是一段文本、一张图片、一首歌曲、一种服务,总之就是一个具体的存在。可以用一个URI(统一资源定位符)指向它,每种资源对应一个特定的 URI 。要 获取这个资源,访问它的URI就可以,因此 URI 即为每一个资源的独一无二的识别符。
-
表现层(Representation):
- 把资源具体呈现出来的形式,叫做它的表现层 (Representation)。 比如,文本可以用 txt 格式表现,也可以用 HTML 格式、XML 格式、JSON 格式表现,甚至可以采用二进制格式。
-
状态转化(State Transfer):
- 每 发出一个请求,就代表了客户端和服务器的一次交互过程。 HTTP协议,是一个无状态协议,即所有的状态都保存在服务器端。因此,如果客户端想要操作服务器,必须通过某种手段,让服务器端发生“状态转化”(State Transfer)。而这种转化是建立在表现层之上的,所以就是 “表现层状态转化”。具体说,就是 HTTP 协议里面,四个表示操作方式的动词:GET、POST、PUT、DELETE。它们分别对应四种基本操作:GET 用来获取资源,POST 用来新建资源,PUT 用来更新资源,DELETE 用来删除资源。
-
3.2.3.组合注解
@GetMapping
@PostMapping
@PutMapping
@DeleteMapping
@PatchMapping
@GetMapping 是一个组合注解@RequestMapping(method =RequestMethod.GET) 的一个快捷方式
//原来的:http://localhost:8080/add?a=1&b=2
    //RestFul风格:http://localhost:8080/add/a/b
    // @RequestMapping(value = "/add/{a}/{b}",method = RequestMethod.GET)
    @GetMapping("/add/{a}/{b}")
    public String test1(@PathVariable int a, @PathVariable int b, Model model) {//@PathVariable路径变量
        int res = a + b;
        model.addAttribute("msg", "结果为:" + res);
        return "test";
    }

    // @RequestMapping(value = "/add/{a}/{b}",method = RequestMethod.Post)
    @PostMapping("/add/{a}/{b}")
    public String test2(@PathVariable int a, @PathVariable int b, Model model) {//@PathVariable路径变量
        int res = a + b;
        model.addAttribute("msg", "结果为:" + res);
        return "test";
    }
3.3.结果跳转
3.3.1.ModelAndView
设置ModelAndView对象 , 根据view的名称 , 和视图解析器跳到指定的页面 .
页面 : {视图解析器前缀} + viewName +{视图解析器后缀}
<!-- 视图解析器 -->
<bean class="org.springframework.web.servlet.view.InternalResourceViewResolver"
     id="internalResourceViewResolver">
   <!-- 前缀 -->
   <property name="prefix" value="/WEB-INF/jsp/" />
   <!-- 后缀 -->
   <property name="suffix" value=".jsp" />
</bean>
对应controller
public class ControllerTest1 implements Controller {

   public ModelAndView handleRequest(HttpServletRequest httpServletRequest, HttpServletResponse httpServletResponse) throws Exception {
       //返回一个模型视图对象
       ModelAndView mv = new ModelAndView();
       mv.addObject("msg","ModelAndView 返回!!!");
       mv.setViewName("test");
       return mv;
  }
}
3.3.2.ServletAPI
通过设置ServletAPI , 不需要视图解析器 .
1、通过HttpServletResponse进行输出
2、通过HttpServletResponse实现重定向
3、通过HttpServletResponse实现转发
@Controller
public class ResultGo {

   @RequestMapping("/result/t1")
   public void test1(HttpServletRequest req, HttpServletResponse rsp) throws IOException {
       rsp.getWriter().println("Hello,Spring BY servlet API");
  }

   @RequestMapping("/result/t2")
   public void test2(HttpServletRequest req, HttpServletResponse rsp) throws IOException {
       rsp.sendRedirect("/index.jsp");
  }
   @RequestMapping("/result/t3")
   public void test3(HttpServletRequest req, HttpServletResponse rsp) throws Exception {
       //转发
       req.setAttribute("msg","/result/t3");
       req.getRequestDispatcher("/WEB-INF/jsp/test.jsp").forward(req,rsp);
  }

}
3.3.3.SpringMVC
通过SpringMVC来实现转发和重定向 - 无需视图解析器;
测试前,需要将视图解析器注释掉
@Controller
public class ResultSpringMVC {
   @RequestMapping("/rsm/t1")
   public String test1(){
       //转发
       return "/index.jsp";
  }

   @RequestMapping("/rsm/t2")
   public String test2(){
       //转发二
       return "forward:/index.jsp";
  }

   @RequestMapping("/rsm/t3")
   public String test3(){
       //重定向
       return "redirect:/index.jsp";
  }
}
通过SpringMVC来实现转发和重定向 - 有视图解析器;
重定向 , 不需要视图解析器 , 本质就是重新请求一个新地方嘛 , 所以注意路径问题.
可以重定向到另外一个请求实现 .
@Controller
public class ResultSpringMVC2 {
   @RequestMapping("/rsm2/t1")
   public String test1(){
       //转发
       return "test";
  }

   @RequestMapping("/rsm2/t2")
   public String test2(){
       //重定向
       return "redirect:/index.jsp";
  }
     @RequestMapping("/rsm2/t2")
   public String test2(){
       //重定向
       return "redirect:hello.do";
  }
}
3.4.处理提交数据
3.4.1.提交的域名称和处理方法的参数名一致
提交数据 : http://localhost:8080/hello?name=wyl
处理方法 :
@RequestMapping("/hello")
public String hello(String name){
   System.out.println(name);
   return "test";
}
3.4.2.提交的域名称和处理方法的参数名不一致
提交数据 : http://localhost:8080/hello?username=wyl
处理方法 :
/**
* 请求参数绑定
* 请求的参数中如果有username属性的话,
* SpringMVC会自动将参数传入与方法参数列表对应的入参中
* @return
*/
@RequestMapping("/hello")
public String hello(@RequestParam("username") String name){
   System.out.println(name);
   return "test";
}
3.4.3.提交的是一个对象
要求提交的表单域和对象的属性名一致 , 参数使用对象即可
1、实体类
public class User {
   private int id;
   private String name;
   private int age;
   //构造
   //get/set
   //tostring()
}
2、提交数据 : http://localhost:8080/mvc04/user?name=wyl&id=1&age=18
3、处理方法
/**
*1、接收到的前端用户传递参数,判断参数的名字,假设名字直接在方法上,可以直接使用
*2、假设传递的是一个对象user,就会匹配user对象的字段名;如果字段一致则OK,否则匹配不到
*/
@RequestMapping("/user")
public String user(User user){
   System.out.println(user);
   return "hello";
}
3.3.4.获取原生ServletAPI对象
提交数据 : http://localhost:8080/hello?username=wyl&password=123456
处理方法
/**
* 获取原生ServletAPI对象
* 需要哪个对象,在方法入参处定义就好了
* @param request
* @param response
* @return
*/
    @RequestMapping("/hello")
    public String hello(HttpServletRequest request, HttpServletResponse response){
        System.out.println("获取原生ServletAPI对象。。。");
        System.out.println("request:"+request);
        System.out.println("从request对象中获取的用户名:"+request.getParameter("username"));
        System.out.println("从request对象中获取的密码:"+request.getParameter("password"));
        System.out.println("response:"+response);
        System.out.println("session:"+request.getSession());
        System.out.println("application:"+request.getSession().getServletContext());
        //返回逻辑视图名
        return "success";
    }
3.5.返回结果
3.5.1.ModelAndView
public class ControllerTest1 implements Controller {

   public ModelAndView handleRequest(HttpServletRequest httpServletRequest, HttpServletResponse httpServletResponse) throws Exception {
       //返回一个模型视图对象
       ModelAndView mv = new ModelAndView();
       mv.addObject("msg","ModelAndView");
       mv.setViewName("test");
       return mv;
  }
}
3.5.2.ModelMap
@RequestMapping("/hello")
public String hello(@RequestParam("username") String name, ModelMap model){
   //封装要显示到视图中的数据
   //相当于req.setAttribute("name",name);
   model.addAttribute("name",name);
   System.out.println(name);
   return "hello";
}
3.5.3.Model
@RequestMapping("/ct2/hello")
public String hello(@RequestParam("username") String name, Model model){
   //封装要显示到视图中的数据
   //相当于req.setAttribute("name",name);
   model.addAttribute("msg",name);
   System.out.println(name);
   return "test";
}
Model 只有寥寥几个方法只适合用于储存数据,简化了新手对于Model对象的操作和理解;
ModelMap 继承了 LinkedMap ,除了实现了自身的一些方法,同样的继承 LinkedMap 的方法和特性;
ModelAndView 可以在储存数据的同时,可以进行设置返回的逻辑视图,进行控制展示层的跳转。
4.异常处理
4.1.异常处理的思路
系统中异常包括两类: 预期异常和运行时异常 RuntimeException,前者通过捕获异常从而获取异常信息,后者主要通过规范代码开发、测试通过手段减少运行时异常的发生。
系统的dao、service、controller 出现都通过throws Exception 向上抛出,最后由springmvc 前端控制器交由异常处理器进行异常处理,如下图:

4.2.编写异常类和错误页面
/**
 * 自定义异常
 */
public class CustomException extends Exception {
  private String message;

  public CustomException(String message) {
    this.message = message;
  }

  public String getMessage() {
    return message;
  }
}
<%@ page language="java" contentType="text/html; charset=UTF-8" pageEncoding="UTF-8"%>
<!DOCTYPE html PUBLIC "-//W3C//DTD HTML 4.01 Transitional//EN" "http://www.w3.org/TR/html4/loose.dtd">
<html>

<head>
    <meta http-equiv="Content-Type" content="text/html; charset=UTF-8">
    <title>执行失败</title>
</head>

<body>
    执行失败!
    ${message }
</body>
</html>
4.3.自定义异常处理器
/**
 * 自定义异常处理器
 */
public class CustomExceptionResolver implements HandlerExceptionResolver {

  @Override
  public ModelAndView resolveException(
    HttpServletRequest request,
    HttpServletResponse response,
    Object handler,
    Exception ex
  ) {
    ex.printStackTrace();
    CustomException customException = null;

    //如果抛出的是系统自定义异常则直接转换
    if (ex instanceof CustomException) {
      customException = (CustomException) ex;
    } else {
      //如果抛出的不是系统自定义异常则重新构造一个系统错误异常。
      customException = new CustomException("系统错误,请与系统管理 员联系!");
    }
    ModelAndView modelAndView = new ModelAndView();
    modelAndView.addObject("message", customException.getMessage());
    modelAndView.setViewName("error");
    return modelAndView;
  }
}
4.4.
<!-- 配置自定义异常处理器 -->
 <bean id="handlerExceptionResolver"
        class="com.wyl.exception.CustomExceptionResolver" />
5.json处理
ajax我经常用到,传的数据是json数据,json数据又有对象,数组。所有总结下springmvc获取前端传来的json数据方式
5.1.Controller接受JSON数据
作用:
@ResponseBody注解用于将Controller的方法返回的对象,通过springmvc提供的HttpMessageConverter接口转换为指定格式的数据如:json,xml等,通过Response响应给客户端。
本例子应用:
@ResponseBody注解实现将Controller方法返回java对象转换为json响应给客户端。
5.1.1.以RequestParam接收
前端传来的是json数据不多时:[id:id],可以直接用@RequestParam来获取值
@Autowired
private AccomodationService accomodationService;

@RequestMapping(value = "/update")
@ResponseBody
public String updateAttr(@RequestParam ("id") int id) {
    int res=accomodationService.deleteData(id);
    return "success";
}
5.1.2.以实体类方式接收
前端传来的是一个json对象时:{【id,name】},可以用实体类直接进行自动绑定
@Autowired
private AccomodationService accomodationService;

    @RequestMapping(value = "/add")
    @ResponseBody
    public String addObj(@RequestBody Accomodation accomodation) {
        this.accomodationService.insert(accomodation);
        return "success";
    }
5.1.3.以Map接收
前端传来的是一个json对象时{【id,name】},可以用Map来获取
@Autowired
private AccomodationService accomodationService;

@RequestMapping(value = "/update")
@ResponseBody
public String updateAttr(@RequestBody Map<String, String> map) {
    if(map.containsKey("id"){
        Integer id = Integer.parseInt(map.get("id"));
    }
    if(map.containsKey("name"){
        String objname = map.get("name").toString();
    }
    // 操作 ...
    return "success";
}
5.1.4.以List接收
当前端传来这样一个json数组[{id,name},{id,name},{id,name},...]时,用List
@Autowired
private AccomodationService accomodationService;

@RequestMapping(value = "/update")
@ResponseBody
//参数前面必须又@RequestBody
public String updateAttr(@RequestBody List<Accomodation> list) {
    for(Accomodation accomodation:list){
        System.out.println(accomodation.toString());
    }
    return "success";
}
ajax请求
var testList=[];
var user={};
user.id=1;
user.name=\'jack\';
testList.push(user);
var user2={};
user2.id=2;
user2.name=\'tom\';
testList.push(user2);
$.ajax({
    // headers必须添加,否则会报415错误
    headers: {
        \'Accept\': \'application/json\',
        \'Content-Type\': \'application/json\'
    },
  type: \'POST\',
  dataType: "json", //表示返回值类型,不必须
  data: JSON.stringify(testList),
  url: \'/test/postList\',
  success: function(){
      alert(\'success\');
  }

});
需要注意点:1、参数是数组类型
2、传入data时,转换 JSON.stringify(testList)
3、必须有headers:
{ \'Accept\': \'application/json\',
  \'Content-Type\': \'application/json\'
}
5.2.Controller返回JSON数据
5.2.1.Jackson
Jackson应该是目前比较好的json解析工具了
当然工具不止这一个,比如还有阿里巴巴的 fastjson 等等。
我们这里使用Jackson,使用它需要导入它的jar包;
<!-- https://mvnrepository.com/artifact/com.fasterxml.jackson.core/jackson-core -->
<dependency>
   <groupId>com.fasterxml.jackson.core</groupId>
   <artifactId>jackson-databind</artifactId>
   <version>2.9.8</version>
</dependency>
Controller
这里我们需要两个新东西,一个是@ResponseBody,一个是ObjectMapper对象,我们看下具体的用法
public class UserController {

   @RequestMapping("/json1")
   @ResponseBody
   public String json1() throws JsonProcessingException {
       //创建一个jackson的对象映射器,用来解析数据
       ObjectMapper mapper = new ObjectMapper();
       //创建一个对象
       User user = new User("wyl", 3, "男");
       //将我们的对象解析成为json格式
       String str = mapper.writeValueAsString(user);
       //由于@ResponseBody注解,这里会将str转成json格式返回;十分方便
       return str;
  }
}
在类上直接使用 @RestController ,这样子,里面所有的方法都只会返回 json 字符串了,不用再每一个都添加@ResponseBody !我们在前后端分离开发中,一般都使用 @RestController ,十分便捷!
@RestController
public class UserController {

   //produces:指定响应体返回类型和编码
   @RequestMapping(value = "/json1")
   public String json1() throws JsonProcessingException {
       //创建一个jackson的对象映射器,用来解析数据
       ObjectMapper mapper = new ObjectMapper();
       //创建一个对象
       User user = new User("wyl", 3, "男");
       //将我们的对象解析成为json格式
       String str = mapper.writeValueAsString(user);
       //由于@ResponseBody注解,这里会将str转成json格式返回;十分方便
       return str;
  }

}
抽取为工具类
import com.fasterxml.jackson.core.JsonProcessingException;
import com.fasterxml.jackson.databind.ObjectMapper;
import com.fasterxml.jackson.databind.SerializationFeature;

import java.text.SimpleDateFormat;

public class JsonUtils {

   public static String getJson(Object object) {
       return getJson(object,"yyyy-MM-dd HH:mm:ss");
  }

   public static String getJson(Object object,String dateFormat) {
       ObjectMapper mapper = new ObjectMapper();
       //ps:Jackson 默认是会把时间转成timestamps形式(取消timestamps形式 , 自定义时间格式)
       mapper.configure(SerializationFeature.WRITE_DATES_AS_TIMESTAMPS, false);
       //自定义日期格式对象
       SimpleDateFormat sdf = new SimpleDateFormat(dateFormat);
       //指定日期格式
       mapper.setDateFormat(sdf);
       try {
           return mapper.writeValueAsString(object);
      } catch (JsonProcessingException e) {
           e.printStackTrace();
      }
       return null;
  }
}
demo
@RequestMapping("/jsonUnit")
public String json5() throws JsonProcessingException {
   Date date = new Date();
   String json = JsonUtils.getJson(date);
   return json;
}
5.2.2.FastJson
fastjson.jar是阿里开发的一款专门用于Java开发的包,可以方便的实现json对象与JavaBean对象的转换,实现JavaBean对象与json字符串的转换,实现json对象与json字符串的转换。实现json的转换方法很多,最后的实现结果都是一样的。
fastjson 的 pom依赖!
<dependency>
   <groupId>com.alibaba</groupId>
   <artifactId>fastjson</artifactId>
   <version>1.2.60</version>
</dependency>
fastjson 三个主要的类:
JSONObject 代表 json 对象
- JSONObject实现了Map接口, 猜想 JSONObject底层操作是由Map实现的。
- JSONObject对应json对象,通过各种形式的get()方法可以获取json对象中的数据,也可利用诸如size(),isEmpty()等方法获取"键:值"对的个数和判断是否为空。其本质是通过实现Map接口并调用接口中的方法完成的。
JSONArray 代表 json 对象数组
- 内部是有List接口中的方法来完成操作的。
JSON代表 JSONObject和JSONArray的转化
- JSON类源码分析与使用
- 仔细观察这些方法,主要是实现json对象,json对象数组,javabean对象,json字符串之间的相互转化。
代码测试,我们新建一个FastJsonDemo 类
import com.alibaba.fastjson.JSON;
import com.alibaba.fastjson.JSONObject;
import com.kuang.pojo.User;

import java.util.ArrayList;
import java.util.List;

public class FastJsonDemo {
   public static void main(String[] args) {
       //创建一个对象
       User user1 = new User("wyl1号", 3, "男");
       User user2 = new User("wyl2号", 3, "男");
       User user3 = new User("wyl3号", 3, "男");
       User user4 = new User("wyl4号", 3, "男");
       List<User> list = new ArrayList<User>();
       list.add(user1);
       list.add(user2);
       list.add(user3);
       list.add(user4);

       System.out.println("*******Java对象 转 JSON字符串*******");
       String str1 = JSON.toJSONString(list);
       System.out.println("JSON.toJSONString(list)==>"+str1);
       String str2 = JSON.toJSONString(user1);
       System.out.println("JSON.toJSONString(user1)==>"+str2);

       System.out.println("\\n****** JSON字符串 转 Java对象*******");
       User jp_user1=JSON.parseObject(str2,User.class);
       System.out.println("JSON.parseObject(str2,User.class)==>"+jp_user1);

       System.out.println("\\n****** Java对象 转 JSON对象 ******");
       JSONObject jsonObject1 = (JSONObject) JSON.toJSON(user2);
       System.out.println("(JSONObject) JSON.toJSON(user2)==>"+jsonObject1.getString("name"));

       System.out.println("\\n****** JSON对象 转 Java对象 ******");
       User to_java_user = JSON.toJavaObject(jsonObject1, User.class);
       System.out.println("JSON.toJavaObject(jsonObject1, User.class)==>"+to_java_user);
  }
}
6.拦截器
6.1.过滤器与拦截器的区别
SpringMVC的处理器拦截器类似于Servlet开发中的过滤器Filter,用于对处理器进行预处理和后处理。开发者可以自己定义一些拦截器来实现特定的功能。
过滤器与拦截器的区别:拦截器是AOP思想的具体应用。
过滤器
- servlet规范中的一部分,任何java web工程都可以使用
- 在url-pattern中配置了/*之后,可以对所有要访问的资源进行拦截
拦截器
-
拦截器是SpringMVC框架自己的,只有使用了SpringMVC框架的工程才能使用
-
拦截器只会拦截访问的控制器方法, 如果访问的是jsp/html/css/image/js是不会进行拦截的
6.2.自定义拦截器
我们要想自定义拦截器,要求必须实现HandlerInterceptor 接口。
6.2.1. 编写一个普通类实现HandlerInterceptor 接口
import org.springframework.web.servlet.HandlerInterceptor;
import org.springframework.web.servlet.ModelAndView;

import javax.servlet.http.HttpServletRequest;
import javax.servlet.http.HttpServletResponse;

public class MyInterceptor implements HandlerInterceptor {

   //在请求处理的方法之前执行
   //如果返回true执行下一个拦截器
   //如果返回false就不执行下一个拦截器
   public boolean preHandle(HttpServletRequest httpServletRequest, HttpServletResponse httpServletResponse, Object o) throws Exception {
       System.out.println("------------处理前------------");
       return true;
  }

   //在请求处理方法执行之后执行
   public void postHandle(HttpServletRequest httpServletRequest, HttpServletResponse httpServletResponse, Object o, ModelAndView modelAndView) throws Exception {
       System.out.println("------------处理后------------");
  }

   //在dispatcherServlet处理后执行,做清理工作.
   public void afterCompletion(HttpServletRequest httpServletRequest, HttpServletResponse httpServletResponse, Object o, Exception e) throws Exception {
       System.out.println("------------清理------------");
  }
}
6.1.2. 配置拦截器
 <!--关于拦截器的配置-->
<mvc:interceptors>
   <mvc:interceptor>
       <!--/** 包括路径及其子路径-->
       <!--/admin/* 拦截的是/admin/add等等这种 , /admin/add/user不会被拦截-->
       <!--/admin/** 拦截的是/admin/下的所有-->
       <mvc:mapping path="/**"/>
       <!--bean配置的就是拦截器-->
       <bean class="com.wyl.interceptor.MyInterceptor"/>
   </mvc:interceptor>
</mvc:interceptors>
6.2.3.控制器
import org.springframework.stereotype.Controller;
import org.springframework.web.bind.annotation.RequestMapping;
import org.springframework.web.bind.annotation.ResponseBody;

//测试拦截器的控制器
@Controller
public class InterceptorController {

   @RequestMapping("/interceptor")
   @ResponseBody
   public String testFunction() {
       System.out.println("控制器中的方法执行了");
       return "hello";
  }
}
6.2.3.前端 index.jsp
<a href="${pageContext.request.contextPath}/interceptor">拦截器测试</a>

6.3.拦截器的细节
6.3.1. 拦截器的放行
放行的含义是指,如果有下一个拦截器就执行下一个,如果该拦截器处于拦截器链的最后一个,则执行控制器中的方法。
6.3.2.拦截器中方法的说明
public interface HandlerInterceptor {
  /**
   * preHandle方法是controller方法执行前拦截的方法,按拦截器定义顺序调用
   *    return true放行,执行下一个拦截器,如果没有拦截器,执行controller中的方法进行业务处理。
   *    return false不放行,不会执行controller中的方法或调用其他的组件。
   */
  default boolean preHandle(
    HttpServletRequest request,
    HttpServletResponse response,
    Object handler
  )
    throws Exception {
    return true;
  }

  /**
   * postHandle是controller方法执行后执行的方法,在JSP视图执行前,按拦截器定义逆序调用。
   *     可以使用request或者response跳转到指定的页面
   *     如果指定了跳转的页面,那么controller方法跳转的页面将不会显示。
   */
  default void postHandle(
    HttpServletRequest request,
    HttpServletResponse response,
    Object handler,
    @Nullable ModelAndView modelAndView
  )
    throws Exception {}

  /**
   * afterCompletion方法是在JSP执行后执行,按拦截器定义逆序调用
   *      注意:因为结果页面已经返回完了,不能在该方法使用request或者response再跳转页面,但可以在该方法中进行一些资源清理的操作。
   */
  default void afterCompletion(
    HttpServletRequest request,
    HttpServletResponse response,
    Object handler,
    @Nullable Exception ex
  )
    throws Exception {}
}
6.3.3. 拦截器的作用路径
作用路径可以通过在配置文件中配置。
<!-- 配置拦截器的作用范围 -->
<mvc:interceptors>
    <mvc:interceptor>
        <mvc:mapping path="/**" /><!-- 用于指定对拦截的url -->
        <mvc:exclude-mapping path="" /><!-- 用于指定排除的url-->
        <bean id="handlerInterceptorDemo1"
                class="com.wyl.interceptor.HandlerInterceptorDemo1">
         </bean>
    </mvc:interceptor>
</mvc:interceptors>
6.3.4. 多个拦截器的执行顺序
多个拦截器是按照配置的顺序决定的。

6.3.4.1. 拦截器1 的代码
public class HandlerInterceptorDemo1 implements HandlerInterceptor {

  @Override
  public boolean preHandle(
    HttpServletRequest request,
    HttpServletResponse response,
    Object handler
  )
    throws Exception {
    System.out.println("拦截器 1: preHandle 拦截器拦截了");
    return true;
  }

  @Override
  public void postHandle(
    HttpServletRequest request,
    HttpServletResponse response,
    Object handler,
    ModelAndView modelAndView
  )
    throws Exception {
    System.out.println("拦截器 1: postHandle 方法执行了");
  }

  @Override
  public void afterCompletion(
    HttpServletRequest request,
    HttpServletResponse response,
    Object handler,
    Exception ex
  )
    throws Exception {
    System.out.println("拦截器 1: afterCompletion 方法执行了");
  }
}
6.3.4.2. 拦截器2 的代码:
public class HandlerInterceptorDemo2 implements HandlerInterceptor {

  @Override
  public boolean preHandle(
    HttpServletRequest request,
    HttpServletResponse response,
    Object handler
  )
    throws Exception {
    System.out.println("拦截器2: preHandle 拦截器拦截了");
    return true;
  }

  @Override
  public void postHandle(
    HttpServletRequest request,
    HttpServletResponse response,
    Object handler,
    ModelAndView modelAndView
  )
    throws Exception {
    System.out.println("拦截器2: postHandle 方法执行了");
  }

  @Override
  public void afterCompletion(
    HttpServletRequest request,
    HttpServletResponse response,
    Object handler,
    Exception ex
  )
    throws Exception {
    System.out.println("拦截器2: afterCompletion 方法执行了");
  }
}
6.3.4.3.配置拦截器的作用范围
  <mvc:interceptor>
    <mvc:mapping *path*="/**" />*<!--* *用于指定对拦截的**url -->*
    <bean *id*="handlerInterceptorDemo1" *class*="com.wyl.interceptor.HandlerInterceptorDemo1"></bean>
  </mvc:interceptor>
  <mvc:interceptor>
    <mvc:mapping *path*="/**" />
      <bean *id*="handlerInterceptorDemo2" *class*="com.wyl.interceptor.HandlerInterceptorDemo2"></bean>
  </mvc:interceptor>
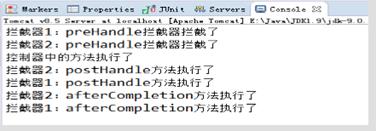
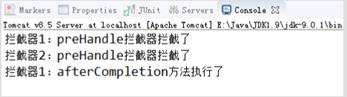
6.3.4.4.中断流程测试
拦截器2 返回false
7.上传文件
7.1.导入文件上传的jar包
<!--文件上传
commons-io 不属于文件上传组件的开发jar 文件,但Commons-fileupload 组件从1.1 版本开始,它
工作时需要commons-io 包的支持。
-->
<dependency>
   <groupId>commons-fileupload</groupId>
   <artifactId>commons-fileupload</artifactId>
   <version>1.3.3</version>
</dependency>
<!--servlet-api导入高版本的-->
<dependency>
   <groupId>javax.servlet</groupId>
   <artifactId>javax.servlet-api</artifactId>
   <version>4.0.1</version>
</dependency>
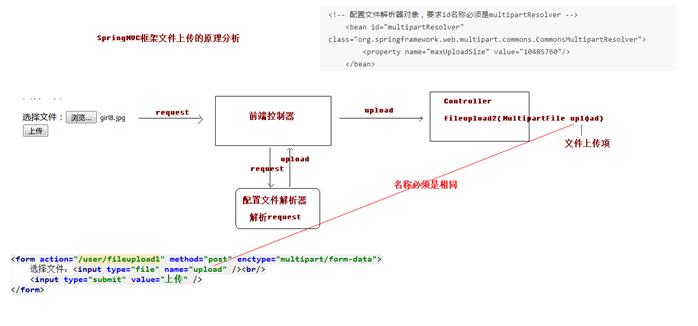
7.2. 编写文件上传的jsp 页面
<h3>文件上传</h3>
<form action="user/fileupload" method="post" enctype="multipart/form-data">
    选择文件:<input type="file" name="upload" /><br />
    <input type="submit" value="上传文件" />
</form>
至少有一个文件选择域
以POST方式提交
表单的enctype必须为 multipart/form-data
7.3.控制器(非SpringMVC版)
package com.wyl.controller;

import org.springframework.stereotype.Controller;
import org.springframework.web.bind.annotation.RequestMapping;
import org.springframework.web.bind.annotation.RequestParam;
import org.springframework.web.multipart.commons.CommonsMultipartFile;

import javax.servlet.http.HttpServletRequest;
import java.io.*;

@Controller
public class FileController {
   //@RequestParam("file") 将name=file控件得到的文件封装成CommonsMultipartFile 对象
   //批量上传CommonsMultipartFile则为数组即可
   @RequestMapping("/upload")
   public String fileUpload(@RequestParam("file") CommonsMultipartFile file , HttpServletRequest request) throws IOException {

       //获取文件名 : file.getOriginalFilename();
       String uploadFileName = file.getOriginalFilename();

       //如果文件名为空,直接回到首页!
       if ("".equals(uploadFileName)){
           return "redirect:/index.jsp";
      }
       System.out.println("上传文件名 : "+uploadFileName);

       //上传路径保存设置
       String path = request.getServletContext().getRealPath("/upload");
       //如果路径不存在,创建一个
       File realPath = new File(path);
       if (!realPath.exists()){
           realPath.mkdir();
      }
       System.out.println("上传文件保存地址:"+realPath);

       InputStream is = file.getInputStream(); //文件输入流
       OutputStream os = new FileOutputStream(new File(realPath,uploadFileName)); //文件输出流

       //读取写出
       int len=0;
       byte[] buffer = new byte[1024];
       while ((len=is.read(buffer))!=-1){
           os.write(buffer,0,len);
           os.flush();
      }
       os.close();
       is.close();
       return "redirect:/index.jsp";
  }
}
7.4.SpringMVC配置信息
SpringMVC框架提供了MultipartFile对象,该对象表示上传的文件,要求变量名称必须和表单file标签的name属性名称相同。
<!-- 配置文件解析器对象,要求id名称必须是multipartResolver -->
<bean id="multipartResolver"
       class="org.springframework.web.multipart.commons.CommonsMultipartResolver">
    <!-- 设置上传文件的最大尺寸为5MB -->
    <property name="maxUploadSize">
        <value>5242880</value>
    </property>
    <!-- property name="maxUploadSize" value="10485760"/ -->
</bean>
7.5.控制器代码(SpringMVC版)
/**
* SpringMVC方式的文件上传
*/
@RequestMapping(value="/fileupload2")
public String fileupload2(HttpServletRequest request,MultipartFile upload) throws Exception {
System.out.println("SpringMVC方式的文件上传...");
    // 先获取到要上传的文件目录
    String path = request.getSession().getServletContext().getRealPath("/uploads");
    // 创建File对象,一会向该路径下上传文件
    File file = new File(path);
    // 判断路径是否存在,如果不存在,创建该路径
    if(!file.exists()) {
        file.mkdirs();
    }

    // 获取到上传文件的名称
    String filename = upload.getOriginalFilename();
    String uuid = UUID.randomUUID().toString().replaceAll("-", "").toUpperCase();
    // 把文件的名称唯一化
    filename = uuid+"_"+filename;
    // 上传文件
    upload.transferTo(new File(file,filename));
    return "success";
}
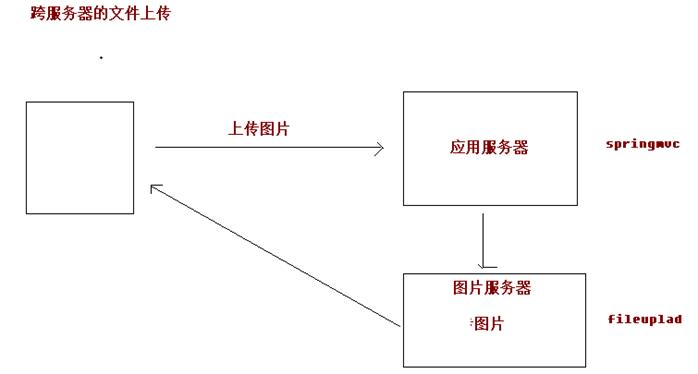
7.6.跨服务器
准备两个tomcat 服务器,其中一个作为文件服务器,一个作为应用服务器。
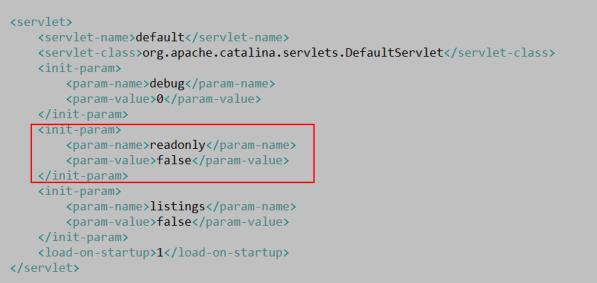
7.6.1.在文件服务器tomcat的web.xml中修改tomcat配置,允许读写操作。
7.6.2.导入包
<dependency>
    <groupId>com.sun.jersey</groupId>
    <artifactId>jersey-core</artifactId>
    <version>1.18.1</version>
</dependency>
<dependency>
    <groupId>com.sun.jersey</groupId>
    <artifactId>jersey-client</artifactId>
    <version>1.18.1</version>
</dependency>
7.6.3.控制器
**
* SpringMVC跨服务器方式的文件上传
*/
@RequestMapping(value="/fileupload3")
public String fileupload3(MultipartFile upload) throws Exception {
    System.out.println("SpringMVC跨服务器方式的文件上传...");
    // 定义图片服务器的请求路径
    String path = "http://localhost:9090/day02_springmvc5_02image/uploads/";
    // 获取到上传文件的名称
    String filename = upload.getOriginalFilename();
    String uuid = UUID.randomUUID().toString().replaceAll("-", "").toUpperCase();
    // 把文件的名称唯一化
    filename = uuid+"_"+filename;

    // 向图片服务器上传文件
    // 创建客户端对象(sun公司提供的jersey 包)
    Client client = Client.c以上是关于JavaWEB快速入门之三层架构[新闻发布系统08]11的主要内容,如果未能解决你的问题,请参考以下文章