babel-plugin-import 实现按需引入
Posted CamilleZJ
tags:
篇首语:本文由小常识网(cha138.com)小编为大家整理,主要介绍了babel-plugin-import 实现按需引入相关的知识,希望对你有一定的参考价值。
官方文档:https://github.com/umijs/babel-plugin-import#usage
组件库按需加载:
组件库以组件为基本单位产出 js、css、less 文件,借助插件或者部分引入的写法,使得项目代码或 babel 编译后的代码中只包含使用到的组件的 js、css、less 等。

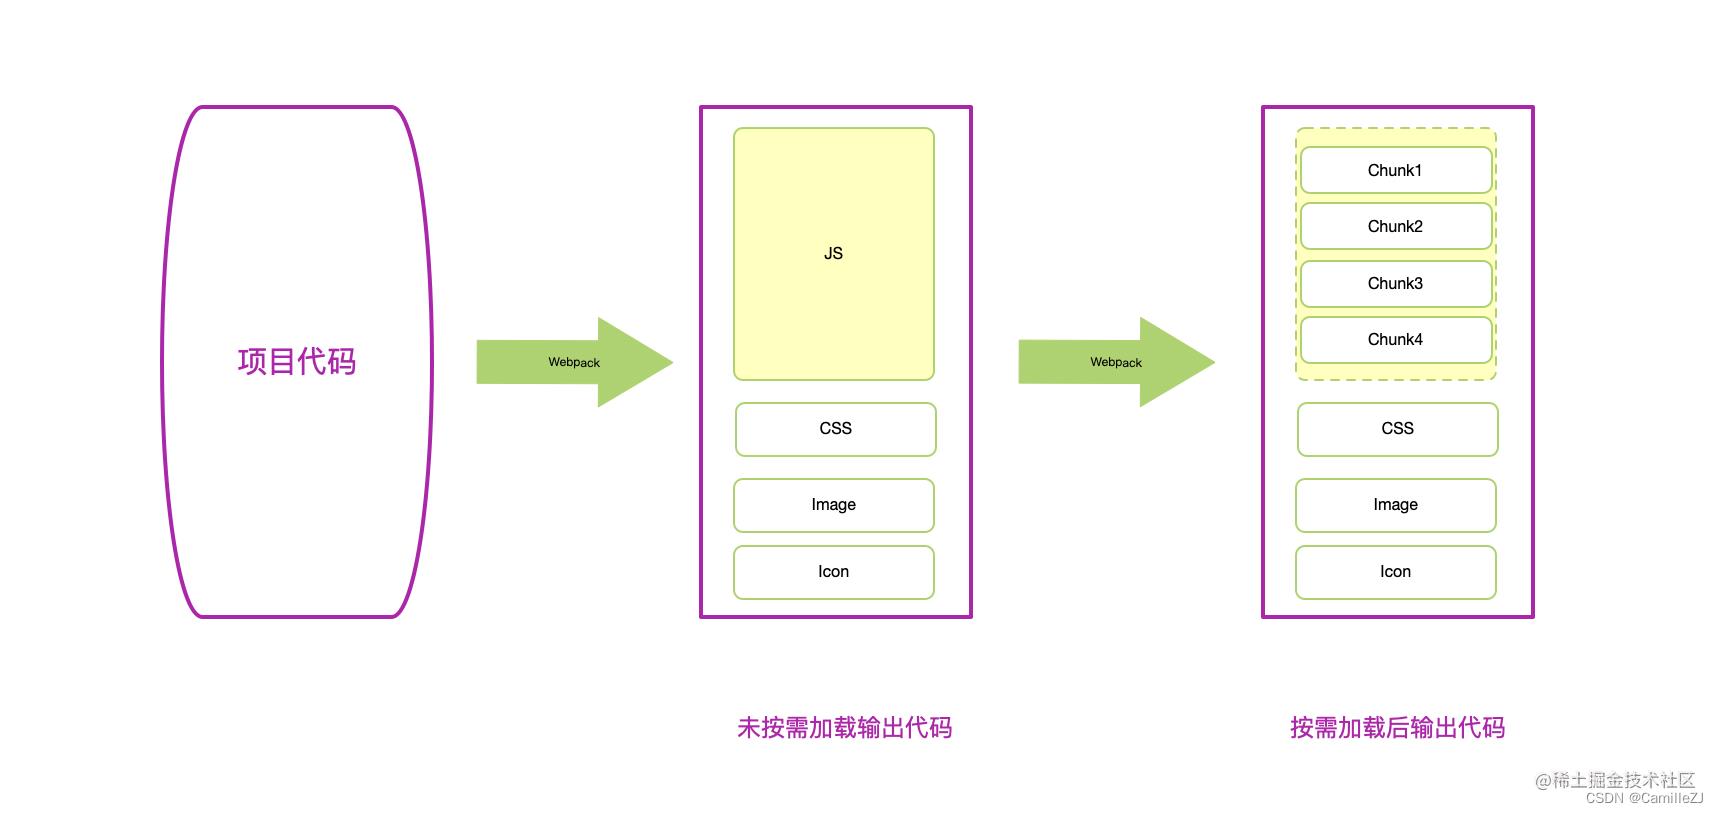
webpack 懒加载: webpack 将源码中的 import、require 引入的文件编译之后再根据动态加载语法配置(通常以页面路由为基本单位)将较大的代码拆分并构建出较小的 chunk 包,应用在运行时执行到相应业务逻辑时才去加载执行对应 chunk 代码。 webpack 懒加载主要发生在下图的 JS 拆分出不同的 Chunk 这一过程中。
两者的差别主要在于:
- 两者执行时机不同,组件库按需加载是在源码编写阶段或者 babel 编译 js 阶段,而 webpack 懒加载则是在构建生成打包产物时,组件库按需加载在前,webpack 懒加载在后;
- 两者原理不同,组件库按需加载是在源码阶段就去掉了无关代码,而 webpack 懒加载则是将经过 tree-shaking 优化过后的大文件包进行拆分在适当的运行时进行按需加载。
使用组件库:通常是引入min.js及css文件
import Vue from 'vue';
import Vant from 'vant';
import 'vant/lib/index.css';

Vue.use(Vant);
这种写法经过 webpack 构建之后会将组件库产出的 vant.min.js、index.css 引入并打包至构建产物中,而引入的 vant.min.js 文件是包含组件库全部组件的 js 部分,index.css 包含全部组件的 css 部分。因此,这会导致构建打包产物增大。
组件库按需加载:
方式一:手动加载
手动引入需要使用到的组件以及其对应的样式文件即可,在 webpack 构件时组件库中其他未被引入的文件不会被打包。
import Button from 'vant/lib/button';
import 'vant/lib/button/style';
组件库怎么实现产出为lib下对应组件?
elementUI:
//webpack.component.js
const Components = require('../components.json');
const webpackConfig =
  mode: 'production',
  entry: Components,
  output:
    path: path.resolve(process.cwd(), './lib'),
    publicPath: '/dist/',
    filename: '[name].js',
    chunkFilename: '[id].js',
    libraryTarget: 'commonjs2'
  ,
...


//components.json:

  "pagination": "./packages/pagination/index.js",
  "dialog": "./packages/dialog/index.js",
  "autocomplete": "./packages/autocomplete/index.js",
  "dropdown": "./packages/dropdown/index.js",
  "dropdown-menu": "./packages/dropdown-menu/index.js",
...
lib下还会生成整体的组件min.js及css:
module.exports =
  mode: 'production',
  entry:
    app: ['./src/index.js']
  ,
  output:
    path: path.resolve(process.cwd(), './lib'),
    publicPath: '/dist/',
    filename: 'element-ui.common.js',
    chunkFilename: '[id].js',
    libraryExport: 'default',
    library: 'ELEMENT',
    libraryTarget: 'commonjs2'
  ,
...
antd:
方式二:自动加载
安装 babel-plugin-import 插件
npm i babel-plugin-import -D修改 babel 插件配置
module.exports =
  plugins: [
    ['import',
      libraryName: 'vant',
      libraryDirectory: 'es',
      style: true
    , 'vant']
  ]
;
在项目代码中按需引入要用到的组件
import  Button  from 'vant';
Vue.use(Button);
自动转换为
import "vant/es/button/style";
import _Button from "vant/es/button";
为什么需要这个插件?
在 antd 和 element 两个组件库中,index.js 分别是这样的:
// antd
export  default as Button  from './button';
export  default as Table  from './table';

// element
import Button from '../packages/button/index.js';
import Table from '../packages/table/index.js';
export default
  Button,
  Table
antd 和 element 都是通过 ES6 module 的 export 来导出带有命名的各个组件,因此我们可以通过 import 导入单组件的 JS 文件,但是我们还需要手动引入组件的样式:
import Button from 'antd/lib/button';
import 'antd/dist/antd.css';
在上面的代码中,我们仅仅只需要一个 Button 组件,却把所有的样式都引入了,这明显是不合理的,会增加代码包的体积。
当然我们也可以只引入单个组件的样式:
import Button from 'antd/lib/button';
import 'antd/lib/button/style';
这样看上去没毛病,但是如果需要多个组件的时候,代码就显得不够优雅:
import  Affix, Avatar, Button, Rate  from 'antd';

import 'antd/lib/affix/style';
import 'antd/lib/avatar/style';
import 'antd/lib/button/style';
import 'antd/lib/rate/style';
这时候就应该思考一下,如何在引入组件的时候自动引入它的样式文件
这个插件做了什么?
简单来说,babel-plugin-import 就是解决了上面的问题,为组件库实现单组件按需加载并且自动引入其样式。
import  Button  from 'antd';

// 插件会自动将代码转换为按需引入的形式
import Button from 'antd/lib/button';
import 'antd/lib/button/style';
这个插件怎么用
简单来说只需关系三个参数即可。
//在 babel 配置文件 .babelrc or babel-loader 中配置
module.exports =
  plugins: [
    ['import',
      libraryName: 'vant', // 包名
      libraryDirectory: 'es', // 目录,默认 lib
      style: true // 是否引入 style
    , 'vant']
  ]
;


//多个包
// 如果是 babel@6 版本,可以将 import.options 配置为一个数组:
[

    "libraryName": "antd",
    "libraryDirectory": "lib",
    "style": true
  ,

    "libraryName": "antd-mobile"
  ,
]

// 如果是 babel@7+ 版本,可以配置多个 `import` 插件实例:

  "plugins": [
    ["import",  "libraryName": "antd", "libraryDirectory": "lib", "antd"],
    ["import",  "libraryName": "antd-mobile", "libraryDirectory": "lib", "antd-mobile"]
  ]
babel-plugin-import 具体实现按需加载思路如下:将代码解析成AST,去AST里面找ImportDeclaration,若是source对应的value为是该插件配置的libraryName,那么就是要处理的,之后看该引用有没有真正使用,未使用直接删掉引用,使用了,删掉引用语句,借助于babel相应plugin重新插入引用语句,比如引用对应目录下的组件及样式。
转换为 AST 语法树后结构如下:(语法转换可以在这里尝试:astexplorer.net)
  "type": "Program",
  "body": [

      "type": "ImportDeclaration",
      "specifiers": [

          "type": "ImportSpecifier",
          "imported":
            "type": "Identifier",
            "name": "Button"
          ,
          "local":
            "type": "Identifier",
            "name": "Button"

        ,

          "type": "ImportSpecifier",
          "imported":
            "type": "Identifier",
            "name": "Input"
          ,
          "local":
            "type": "Identifier",
            "name": "Input"


      ],
      "source":
        "type": "Literal",
        "value": "antd",


  ],
  "sourceType": "module"
以上 JSON 数据中,我们关注以下几个跟 import 导入有关的信息:
source.value:antd;specifiers.imported.name:Button;specifiers.local.name: Button;
babel-plugin-import 的核心实现都在 Plugin 中:
- 收集
import语句xxx中的模块名称; - 分析模块导入后,是否被
call 使用到; - 如果有被使用到,改写
import语句,使得path具体到模块的所在目录。
// Plugin.js

import  join  from 'path';
import  addSideEffect, addDefault, addNamed  from '@babel/helper-module-imports';

function transCamel(_str, symbol)
  const str = _str[0].toLowerCase() + _str.substr(1);
  return str.replace(/([A-Z])/g, $1 => `$symbol$$1.toLowerCase()`);


function winPath(path)
  return path.replace(/\\\\/g, '/');


export default class Plugin
  constructor(
    libraryName, // 需要使用按需加载的包名
    libraryDirectory = 'lib', // 按需加载的目录
    style = false, // 是否加载样式
    types, // babel-type 工具函数
    index = 0,
  )
    this.libraryName = libraryName;
    this.libraryDirectory = libraryDirectory;
    this.style = style;
    this.types = types;
    this.pluginStateKey = `importPluginState$index`;


  // 获取内部状态,收集依赖,state 指向 plugin.visitor
  getPluginState(state)
    if (!state[this.pluginStateKey])
      state[this.pluginStateKey] = ;

    return state[this.pluginStateKey];


  // 生成按需引入 import 语句(核心代码)
  importMethod(methodName, file, pluginState)
    ...


  ProgramEnter(path, state)
    const pluginState = this.getPluginState(state);
    // 初始化插件实例的 state 对象
    pluginState.specified = Object.create(null);
    pluginState.libraryObjs = Object.create(null);
    pluginState.selectedMethods = Object.create(null);
    pluginState.pathsToRemove = [];


  ProgramExit(path, state)
    // 删除旧的 import
    this.getPluginState(state).pathsToRemove.forEach(p => !p.removed && p.remove());


  // import 语句的处理方法,收集 import  xxx  中的模块
  ImportDeclaration(path, state)
    ...


  // import 的模块被使用时的处理方法。上面收集了依赖之后,得判断这些 import 的变量是否被用到
  // 比如使用方式为:React.createElement(Button, null, "Hello"); 可将这行代码转换为 AST 节点树结合更容易理解 CallExpression 做的事情
  CallExpression(path, state)
    ...
第一步 依赖收集
babel-plubin-import 会在 ImportDeclaration 里将所有的 specifier 收集起来。
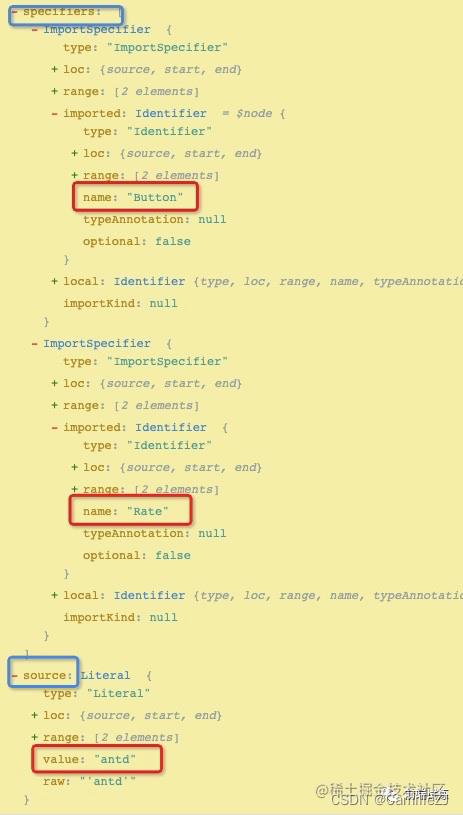
可以从这个 ImportDeclaration 语句中提取几个关键点:
- source.value: antd
- specifier.imported.name/specifier.local.name: Button
- specifier.local.name: Rate
local.name 是导入进来的别名,比如 import Button as MyButton from 'antd' 的 MyButton
imported.name 是包 antd 真实 `导出` 的变量名
需要做的事情也很简单:
import的包是不是antd,也就是libraryName- 把
Button和Rate收集起来
来看代码:
ImportDeclaration(path, state)
  const  node  = path;
  if (!node) return;
  // 代码里 import 的包名
  const  value  = node.source;
  // 配在插件 options 的包名
  const  libraryName  = this;
  // babel-type 工具函数
  const  types  = this;
  // 内部状态
  const pluginState = this.getPluginState(state);
  // 判断是不是需要使用该插件的包
  if (value === libraryName)
    // node.specifiers 表示 import 了什么
    node.specifiers.forEach(spec =>
      // 判断是不是 ImportSpecifier 类型的节点,也就是是否是大括号的
      if (types.isImportSpecifier(spec))
        // 收集依赖
        // 也就是 pluginState.specified.Button = Button
        // local.name 是导入进来的别名,比如 import  Button as MyButton  from 'antd' 的 MyButton
        // imported.name 是真实导出的变量名
        pluginState.specified[spec.local.name] = spec.imported.name;
       else
        // ImportDefaultSpecifier 和 ImportNamespaceSpecifier
        pluginState.libraryObjs[spec.local.name] = true;

    );
    pluginState.pathsToRemove.push(path);
待 babel 遍历了所有的 ImportDeclaration 类型的节点之后,就收集好了依赖关系,下一步就是如何加载它们了。
第二步 判断是否使用
查找模块是否被使用 调用 CallExpression 分析被使用到的模块名,调用 importMethod 方法改写 import 路径.
收集了依赖关系之后,得要判断一下这些 import 的变量是否被使用到了,我们这里说一种情况。
我们知道,JSX 最终是变成 React.createElement() 执行的:
ReactDOM.render(<Button>Hello</Button>);

      ↓ ↓ ↓ ↓ ↓ ↓

React.createElement(Button, null, "Hello");
没错,createElement 的第一个参数就是我们要找的东西,我们需要判断收集的依赖中是否有被 createElement 使用。
分析一下这行代码的 ast,很容易就找到这个节点:

来看代码:
// import 的模块被使用时的处理方法。上面收集了依赖之后,得判断这些 import 的变量是否被用到
// 比如使用方式为:React.createElement(Button, null, "Hello"); 可将这行代码转换为 AST 节点树结合更容易理解 CallExpression 做的事情
CallExpression(path, state)
  const  node  = path;
  const file = (path && path.hub && path.hub.file) || (state && state.file);
  // 方法调用者的 name,如:Button
  const  name  = node.callee;
  // babel-type 工具函数
  const  types  = this;
  // 内部状态
  const pluginState = this.getPluginState(state);

  // 如果方法调用者是 Identifier 类型
  if (types.isIdentifier(node.callee))
    if (pluginState.specified[name])
      node.callee = this.importMethod(pluginState.specified[name], file, pluginState);


  // 参数形式,如 React.createElement(Button, null, "Hello"),会将 Button 作为第一个参数
  node.arguments = node.arguments.map(arg =>
    const  name: argName  = arg;
    if (
      pluginState.specified[argName] &&
      path.scope.hasBinding(argName) &&  // 检查当前作用域内是否存在 Button 变量
      path.scope.getBinding(argName).path.type === 'ImportSpecifier' // 并且变量通过 import 方式创建
    )
      // 找到 specifier,调用 importMethod 方法
      return this.importMethod(pluginState.specified[argName], file, pluginState);

    return arg;
  );
除了 React.createElement(Button) 之外,还有 const btn = Button / [Button] ... 等多种情况会使用 Button,源码中都有对应的处理方法,感兴趣的可以自己看一下: babel-plugin-import/Plugin.js at master · umijs/babel-plugin-import · GitHub ,这里就不多说了。
第三步 生成引入代码(核心)
第一步和第二步主要的工作是找到需要被插件处理的依赖关系,比如:
import  Button, Rate  from 'antd';
ReactDOM.render(<Button>Hello</Button>);
Button 组件使用到了,Rate 在代码里未使用。所以插件要做的也只是自动引入 Button 的代码和样式即可。
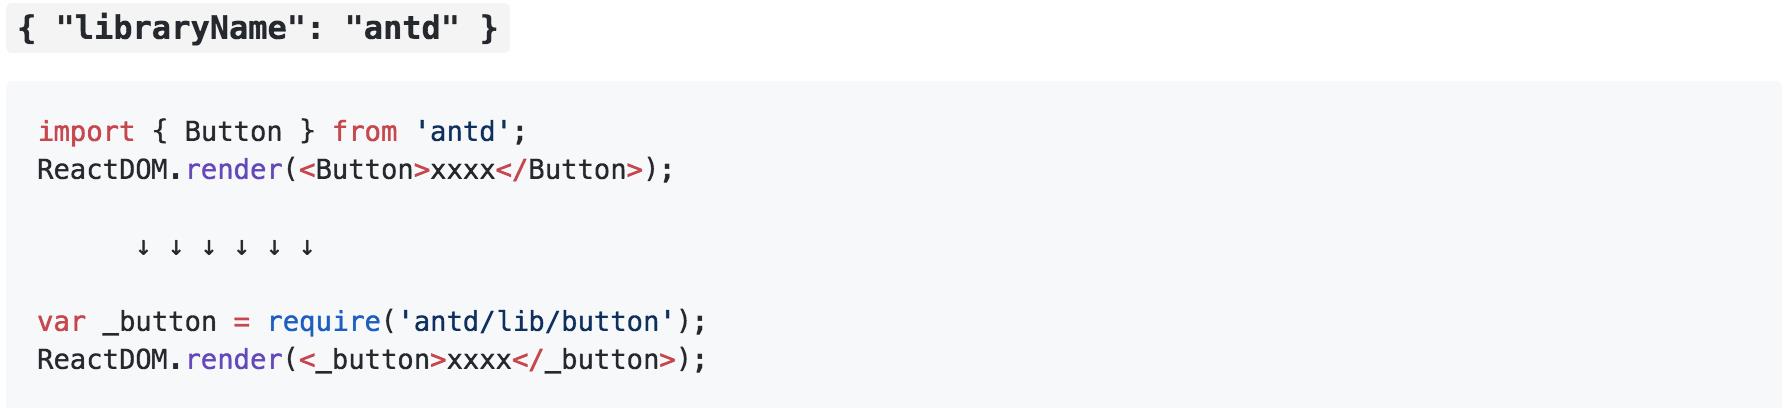
我们先回顾一下,当我们 import 一个组件的时候,希望它能够:
import  Button  from 'antd';

      ↓ ↓ ↓ ↓ ↓ ↓

var _button = require('antd/lib/button');
require('antd/lib/button/style');
并且再回想一下插件的配置 options,只需要将 libraryDirectory 以及 style 等配置用上就完事了。
小朋友,你是否有几个问号?这里该如何让 babel 去修改代码并且生成一个新的 import 以及一个样式的 import 呢,不慌,看看代码就知道了:
import addSideEffect, addDefault, addNamed from '@babel/helper-module-imports';
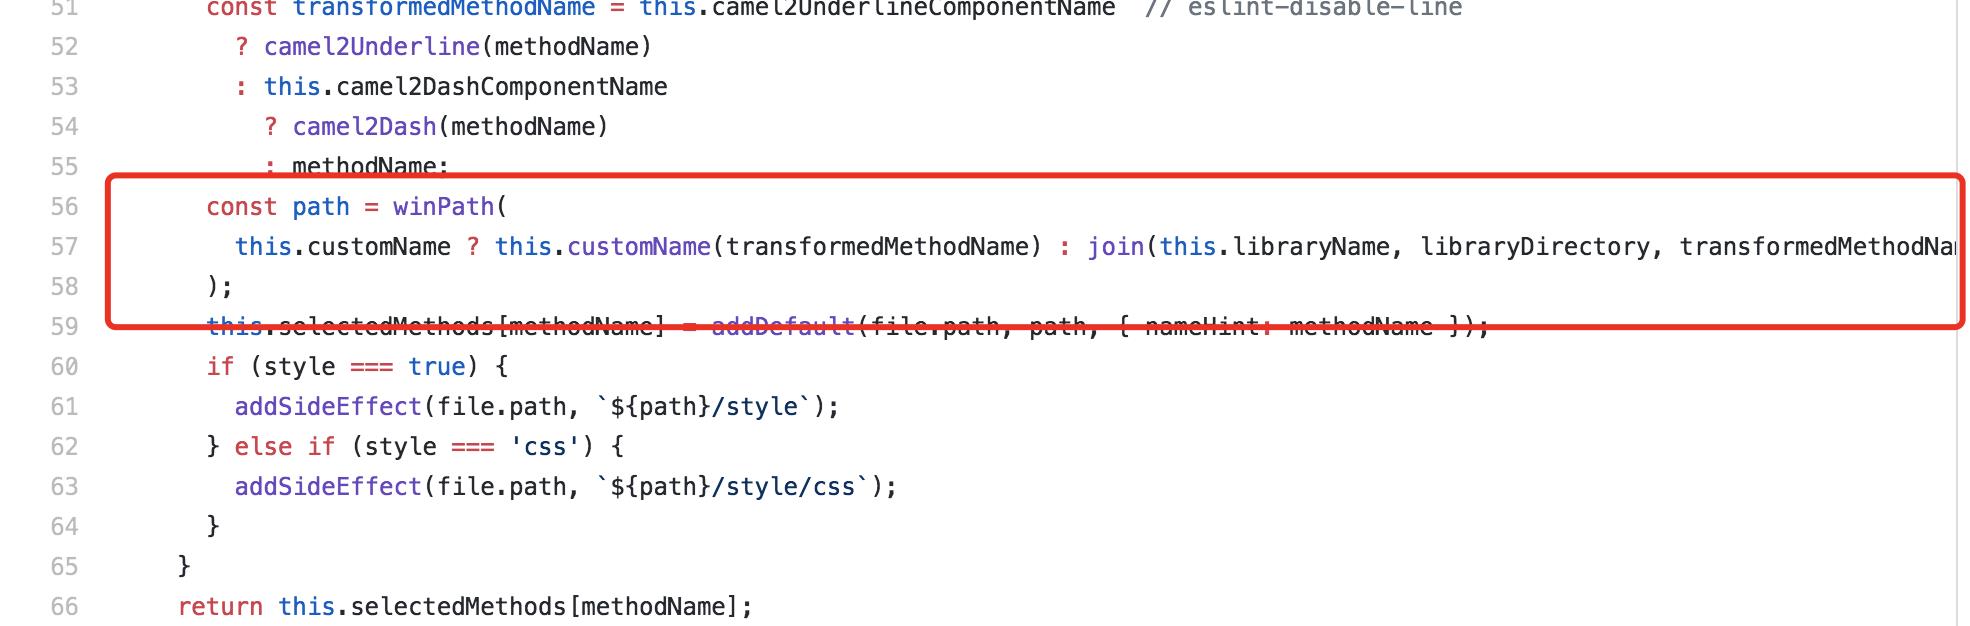
importMethod(methodName, file, pluginState)
if (!pluginState.selectedMethods[methodName])
// libraryDirectory:目录,默认 lib
// style:是否引入样式
const style, libraryDirectory = this;
// 组件名转换规则
// 优先级最高的是配了 camel2UnderlineComponentName:是否使用下划线作为连接符
// camel2DashComponentName 为 true,会转换成小写字母,并且使用 - 作为连接符
const transformedMethodName = this.camel2UnderlineComponentName
? transCamel(methodName, '_')
: this.camel2DashComponentName
? transCamel(methodName, '-')
: methodName;
// 兼容 windows 路径
// path.join('antd/lib/button') == 'antd/lib/button'
const path = winPath(
this.customName
? this.customName(transformedMethodName, file)
: join(this.libraryName, libraryDirectory, transformedMethodName, this.fileName),
);
// 根据是否有导出 default 来判断使用哪种方法来生成 import 语句,默认为 true
// addDefault(path, 'antd/lib/button', nameHint: 'button' )
// addNamed(path, 'button', 'antd/lib/button')
pluginState.selectedMethods[methodName] = this.transformToDefaultImport
? addDefault(file.path, path, nameHint: methodName )
: addNamed(file.path, methodName, path);
// 根据不同配置 import 样式
if (this.customStyleName)
const stylePath = winPath(this.customStyleName(transformedMethodName));
addSideEffect(file.path, `$stylePath`);
else if (this.styleLibraryDirectory)
const stylePath = winPath(
join(this.libraryName, this.styleLibraryDirectory, transformedMethodName, this.fileName),
);
addSideEffect(file.path, `$stylePath`);
else if (style === true)
addSideEffect(file.path, `$path/style`);
else if (style === 'css')
addSideEffect(file.path, `$path/style/css`);
else if (typeof style === 'function')
const stylePath = style(path, file);
if (stylePath)
addSideEffect(file.path, stylePath);
return ...pluginState.selectedMethods[methodName] ;
addSideEffect, addDefault 和 addNamed 是 @babel/helper-module-imports 的三个方法,作用都是创建一个 import 方法,具体表现是:
addSideEffect
addSideEffect(path, 'source');

      ↓ ↓ ↓ ↓ ↓ ↓

import "source"
addDefault
addDefault(path, 'source',  nameHint: "hintedName" )

      ↓ ↓ ↓ ↓ ↓ ↓

import hintedName from "source"
addNamed
addNamed(path, 'named', 'source',  nameHint: "hintedName" );

      ↓ ↓ ↓ ↓ ↓ ↓

import  named as _hintedName  from "source"
更多关于 @babel/helper-module-imports 见:@babel/helper-module-imports
总结
一起数个 1 2 3,babel-plugin-import 要做的事情也就做完了。
我们来总结一下,babel-plugin-import 和普遍的 babel 插件一样,会遍历代码的 ast,然后在 ast 上做了一些事情:
- 收集依赖:找到
importDeclaration,分析出包a和依赖b,c,d....,假如a和libraryName一致,就将b,c,d...在内部收集起来 - 判断是否使用:在多种情况下(比如文中提到的
CallExpression)判断 收集到的b,c,d...是否在代码中被使用,如果有使用的,就调用importMethod生成新的impport语句 - 生成引入代码:根据配置项生成代码和样式的
import语句
不过有一些细节这里就没提到,比如如何删除旧的 import 等... 感兴趣的可以自行阅读源码哦。
看完一遍源码,是不是有发现,其实除了 antd 和 element 等大型组件库之外,任意的组件库都可以使用 babel-plugin-import 来实现按需加载和自动加载样式。
没错,比如我们常用的 lodash,也可以使用 babel-plugin-import 来加载它的各种方法,可以动手试一下。
核心支持类:
@babel/parser
它是Babel中使用的javascript解析器。默认启用ES2017,支持JSX,Flow,TypeScript,支持实验性的语言提议(至少是stage-0)
@babel/traverse
它实现了访问者模式,对AST进行遍历,插件可以通过它获取相应的AST节点,并对对应节点进行具体操作。
@babel/generator
它将AST转换成源代码,同时支持SourceMap
参考
简单实现 babel-plugin-import 插件 - axuebin - 博客园
庖丁解牛:最全babel-plugin-import源码详解 - 掘金
[转] 组件库按需加载 借助babel-plugin-import实现
前段时间一直在基于webpack进行前端资源包的瘦身。在项目中基于路由进行代码分离,http://www.cnblogs.com/legu/p/7251562.html。对于公司内部的组件库,所有内容一次性加载源文件很大。比如登录主要就用了button和input,不需要打包table, tree这种复杂组件的。
在使用ant-design的时候,发现ant实现了按需加载,https://ant.design/docs/react/introduce-cn。所以想着自己的组件也支持相关的功能。
那先看看ant-design怎么实现的。ant-design主要是借助了自己写的babel插件babel-plugin-import,https://github.com/ant-design/babel-plugin-import。
原理很简单,见下图
在babel转码的时候,把整个库‘antd’的引用,变为\'antd/lib/button\'具体模块的引用。这样webpack收集依赖module就不是整个antd,而是里面的button.
那我们的组件也能通过这个插件处理吗?
在处理中,项目的组件根据功能进行的路径拆分,有的在src/form下面,有的在src/layout下面,有的比较复杂的单独进行文件夹保存,比如src/table,src/tree;
不是千篇一律的在src下面,那么我们需要组件查找的对应关系去处理,这就只能看看组件babel-plugin-import的源代码是怎么进行转换的,看看能不能支持
https://github.com/ant-design/babel-plugin-import/blob/master/src/Plugin.js
上面的代码比较关键,我们发现如果定义了customName方法,就会通过customName进行路径转换。
在.babelrc文件中加入相关配置如下。
一切看着就这么结束了,但是怎么报错了~~~原来.babelrc是json文件,是不支持function的,这就只能求助万能的Google了~~
不是不想百度,主要是百度啥都没有~~Google了半天,原来还不支持,babel7才会支持,现在只能通过下面方式进行处理
https://github.com/babel/babel/issues/4630
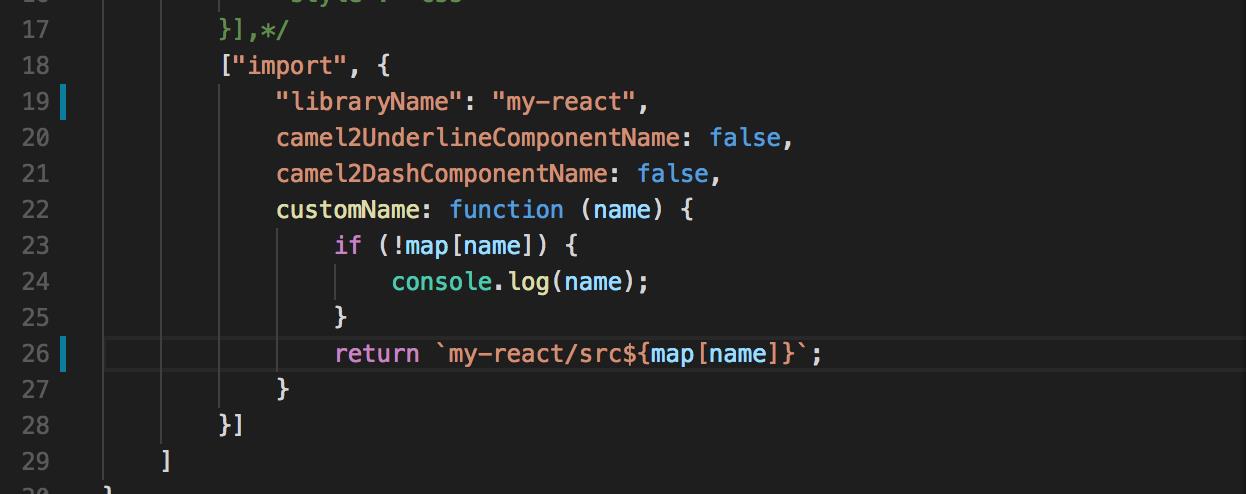
.babelrc文件写成这样
{
    "presets": ["./.babelrc.js"]
}
原来.babelrc的配置挪到.babelrc.js中,自己处理下map的对应关系

module.exports = {
    "presets": ["react", "es2015", "stage-0"],
    "plugins": [
        "transform-runtime",
        "lodash",
        "transform-decorators-legacy",
        "jsx-control-statements",
        ["transform-react-remove-prop-types", {
            "removeImport": true,
            "mode": "remove"
        }],
        ["import", {
            "libraryName": "my-react",
            camel2UnderlineComponentName: false,
            camel2DashComponentName: false,
            customName: function (name) {
                if (!map[name]) {
                    console.log(name);
                }
                return `my-react/src${map[name]}`;
            }
        }]
    ]
}
这边就简单介绍下怎么实现按需打包吧。其实底层功能是通过babel插件实现的,技术难点是在怎么实现这个插件,这方面没涉及到过,也没办法给大家介绍下。大家可以自己看看文档,主要还是语法树层面的东西。
https://github.com/jamiebuilds/babel-handbook/blob/master/translations/zh-Hans/plugin-handbook.md
以上是关于babel-plugin-import 实现按需引入的主要内容,如果未能解决你的问题,请参考以下文章