B站云E办Vue+SpringBoot前后端分离项目——MVC三层架构搭建后台项目
Posted 三月的一天
tags:
篇首语:本文由小常识网(cha138.com)小编为大家整理,主要介绍了B站云E办Vue+SpringBoot前后端分离项目——MVC三层架构搭建后台项目相关的知识,希望对你有一定的参考价值。
本项目来源B站云E办,笔记整理了项目搭建的过程和涉及的知识点。对于学习来说,不是复制粘贴代码即可,要知其然知其所以然。希望我的笔记能为大家提供思路,也欢迎各位伙伴的指正。
项目前端学习笔记目录
B站云E办Vue+SpringBoot前后端分离项目——搭建vue.js项目
B站云E办Vue+SpringBoot前后端分离项目——前端动态获取菜单目录
一、项目简介
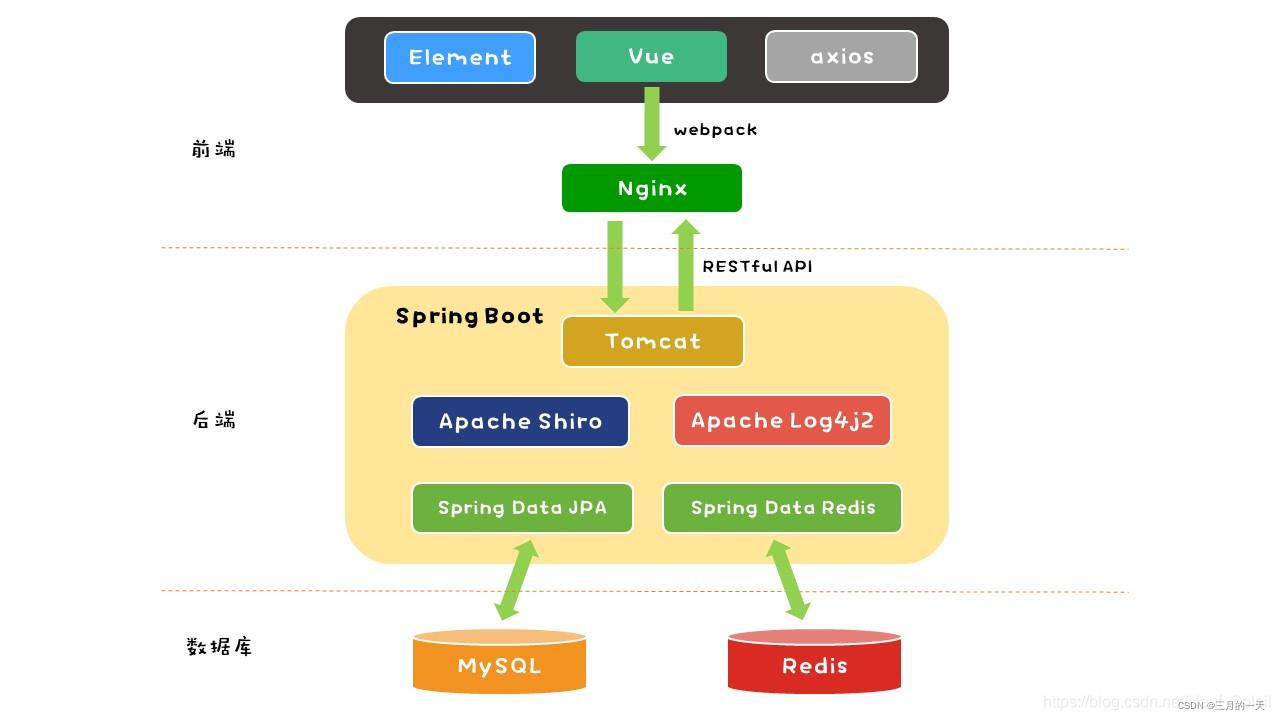
本项目基于Vue+Spring Boot构架一个前后端分离项目。本项目实现了一个在线办公系统,用来管理日常办公事物的:日常流程审批,新闻,通知,公告,文件信息,财务,人事,费用,资产,行政,项目,移动办公等。通过软件的方式方便管理。本项目在技术方面采用最主流的前后端分离开发模式,使用业界最流行、社区非常活跃的开源框架 Spring Boot来构建后端,旨在实现云E办在线办公系统。包括职位管理、职称管理、部门管理、员工管 理、工资管理、在线聊天等模块。项目中还会使用业界主流的第三方组件扩展大家的知识面和技能池。前端只需要独立编写客户端代码,后端也只需要独立编写服务端代码提供数据接口即可,项目框架设计如下:
二、后端技术架构
后端主流开发框架:SpringBoot+Spring MVC +MyBatisPlus。
- 从零开始搭建一个项目骨架,最好选择合适,熟悉的技术,并且在未来易拓展,适合微服务化体系等。所以一般以Springboot作为我们的框架基础,这是离不开的了。
- 然后数据层,我们常用的是Mybatis,易上手,方便维护。但是单表操作比较困难,特别是添加字段或减少字段的时候,比较繁琐,所以这里我推荐使用Mybatis Plus(https://mp.baomidou.com/),为简化开发而生,只需简单配置,即可快速进行 CRUD 操作,从而节省大量时间。
- 考虑到项目可能需要部署多台,这时候我们的会话等信息需要共享,Redis是现在主流的缓存中间件,也适合我们的项目。
- 然后因为前后端分离,所以我们使用jwt作为我们用户身份凭证。使用SpringSecurity做安全认证及权限管理。Redis做缓存,RabbitMq做邮件的发送,使用EasyPOI实现对员工数据的导入和导出,使用WebSocket做在线聊天。
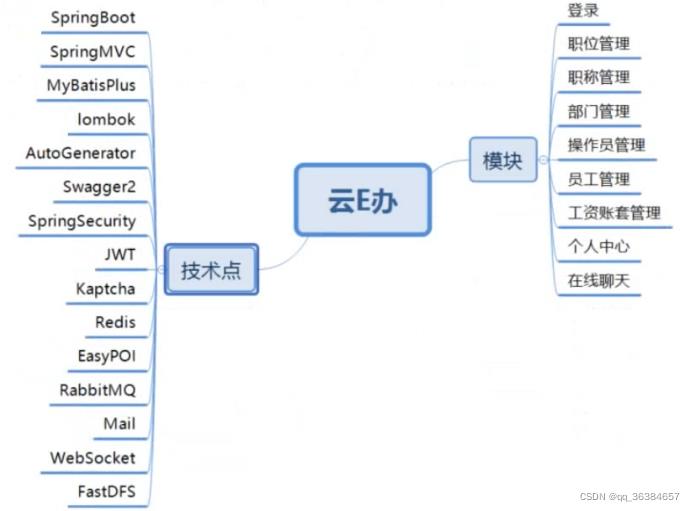
安全框架:SpringSecurity
令牌:JWT
图形验证码:Kaptcha
缓存:redis
文档导入导出:EasyPOI
消息队列:RabbitMQ 做异步的处理,邮件发送
邮件组件:Mail
在线聊天:WebSocket
文件服务器:FastDFS
数据库mysql+Redis
三、MVC三层架构
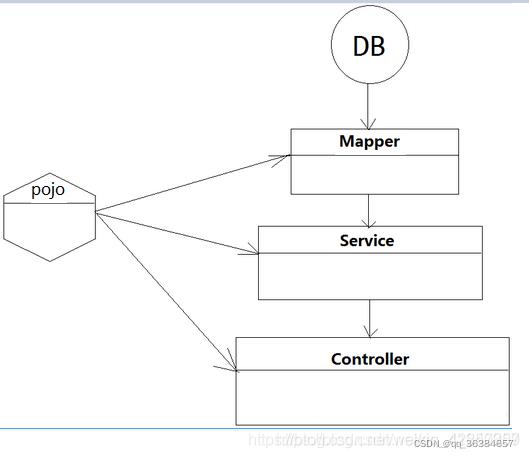
Controller层调用Service层的方法,Service层调用Dao层中的方法,其中调用的参数是使用Entity层进行传递的。总的来说这样使业务逻辑更加清晰,写代码更加方便。其实就是提供一种规则,让你把相同类型的代码放在一起,这样就形成了层次,从而达到分层解耦、复用、便于测试和维护的目的。我们的项目会在很长一段时间内采取这种简单的三层架构(DAO + Service + Controller),希望大家能慢慢体会这三个模块的分工。这里我简单总结一下,先有个初步印象:
DAO 用于与数据库的直接交互,定义增删改查等操作 Service 负责业务逻辑,跟功能相关的代码一般写在这里,编写、调用各种方法对 DAO 取得的数据进行操作 Controller 负责数据交互,即接收前端发送的数据,通过调用 Service 获得处理后的数据并返回
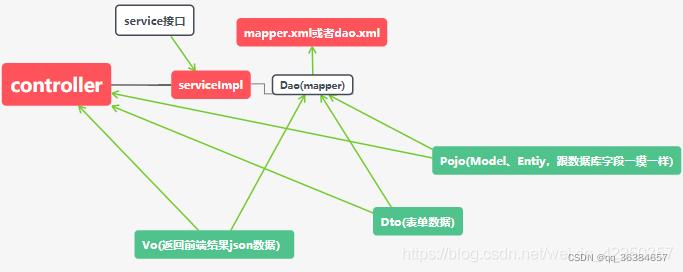
在具体的项目中,其流程为:
Controller-->service接口-->serviceImpl-->dao接口-->daoImpl-->mapper-->db
四、项目准备-引入数据库
1.数据库地址:
链接:https://pan.baidu.com/s/1PMIJdX3xXvKa0UrAtvUZ1Q?pwd=ay2b
提取码:ay2b
2.数据库准备
新建yeb数据库,数据库字符集选utf8mb4,导入放在database文件夹下的yeb.sql数据库脚本。数据库的采用是 MySQL,算是比较主流的选择,从性能和体量等方面都比较优秀,当然也有一些弊端,但数据库不是我们这里讨论的重点,暂时能用就行。通过navicat新建数据库:
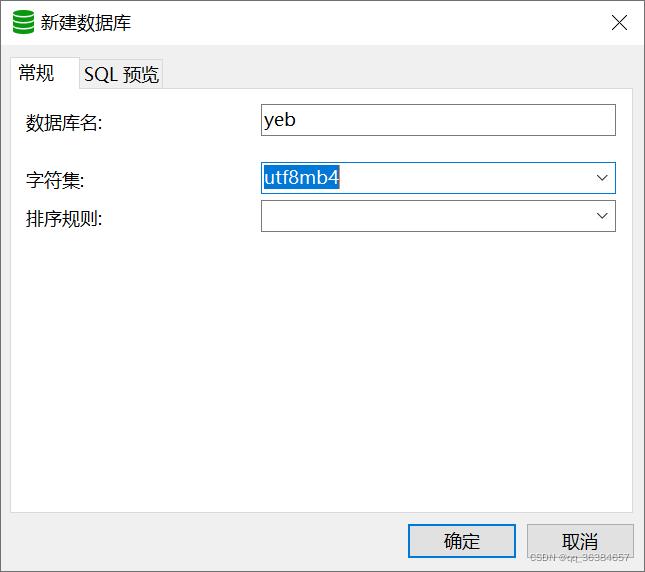
选择表-》右键运行sql,sql文件已放入百度网盘中
低版本选utf8,高版本选utf8mb4
mysql5.6版本
DEFAULT:数据库字符集,设置数据库的默认编码为utf8
COLLATE: 数据库校对规则,默认设置utf8_general_ci
mysql8版本
DEFAULT:数据库字符集,设置数据库的默认编码为utf8mb4
COLLATE: 数据库校对规则,默认设置utf8mb4_0900_ai_ci
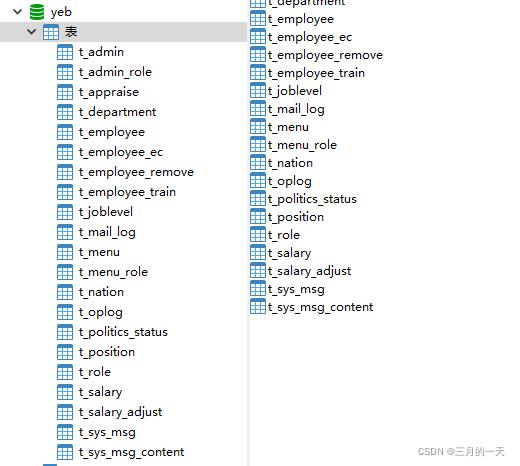
3.表目录
执行sql后生成的表如下
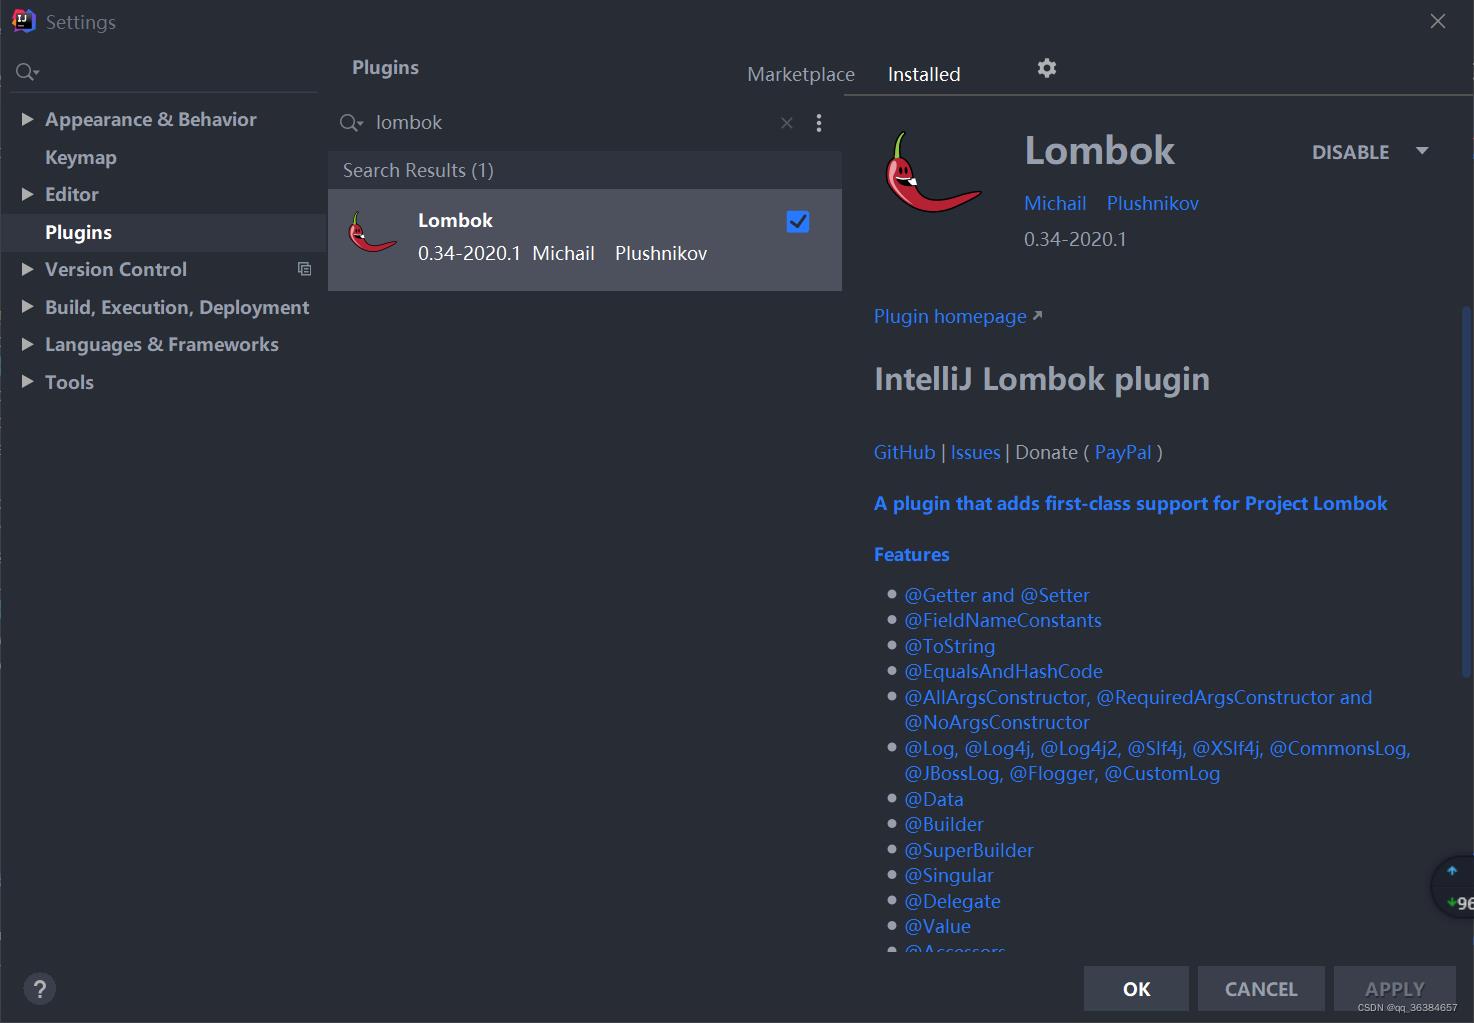
4.IDEA安装lombok
五、搭建项目
IDEA中使用 Spring Initializr 创建一个SpringBoot项目。后端项目采用maven聚合的形式,父工程做pom依赖管理。主要工作如下:
1)新建SpringBoot项目,作为我们的父工程,该父工程只是用来做我们所有项目的pom依赖管理,所以可以删掉大部分的文件及文件夹
2)修改pom.xml文件,删掉依赖dependencies标签和构建build标签及其内容,加入packaging标签里面写pom
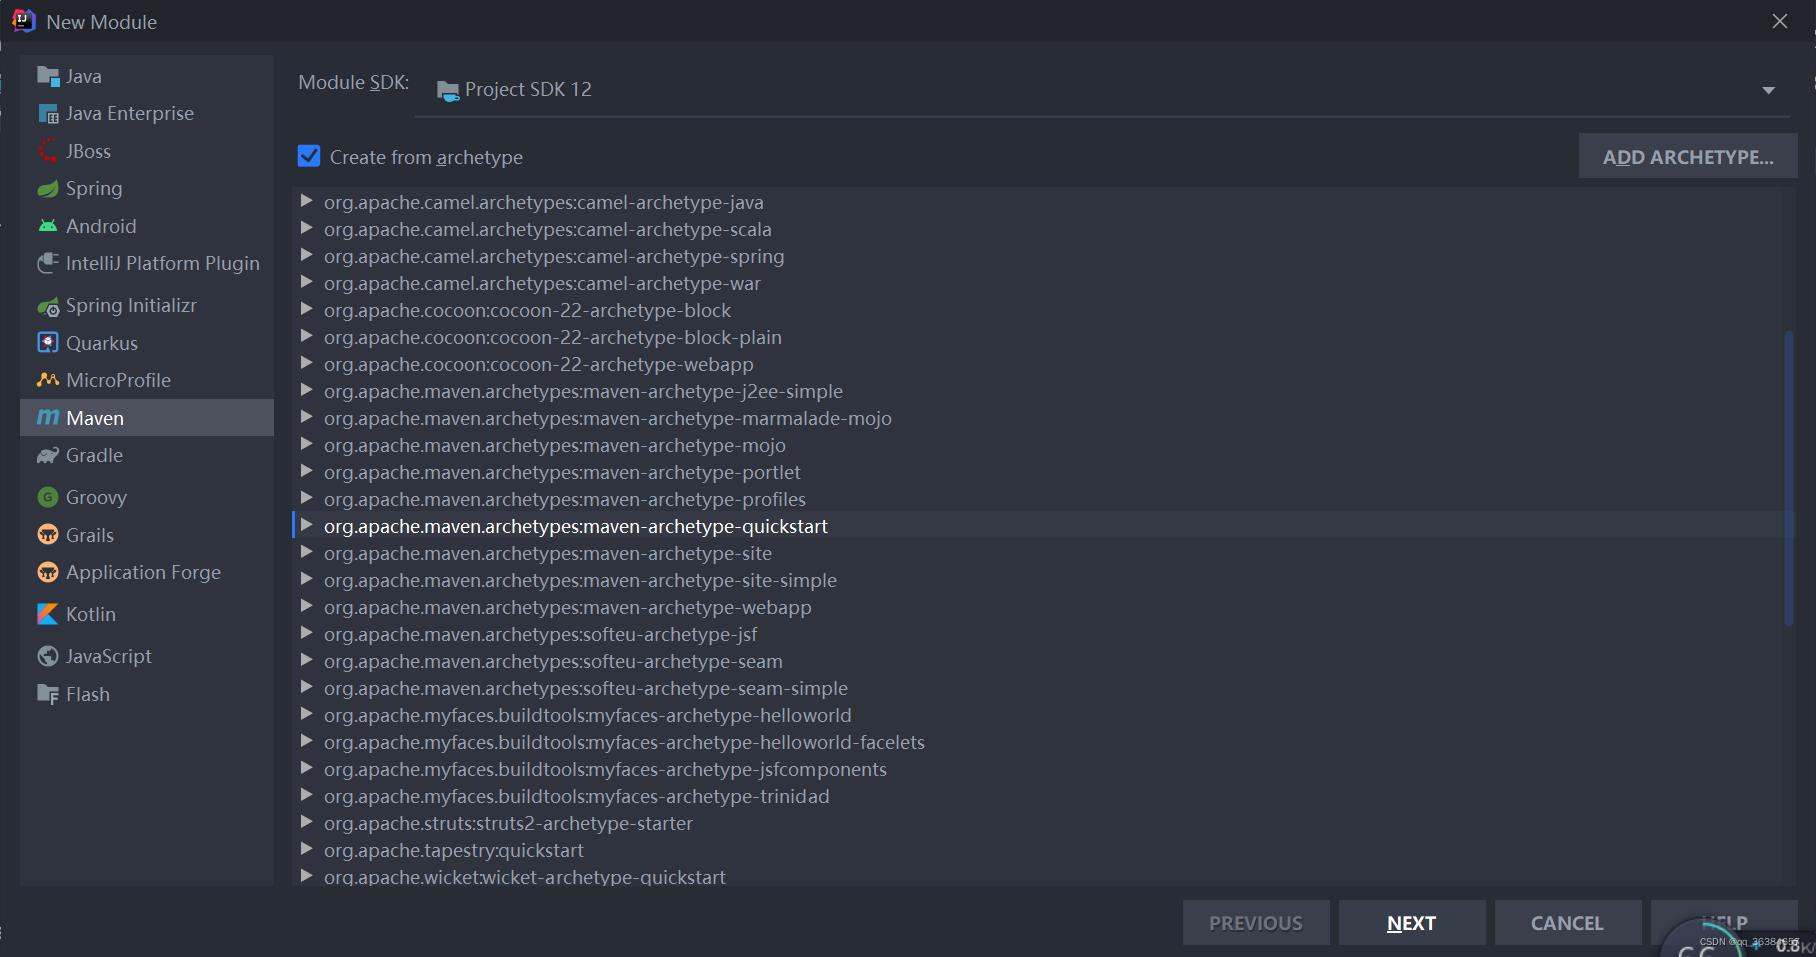
3)创建一个Module项目,使用Maven创建一个quickstart的Module子项目 yeb-server 负责我们整个的业务逻辑
4)对新建的Module项目 yeb-server 进行修改,删掉生成的App类和AppTest类,然后添加一个server包名
5)在yeb-server子项目的pom.xml中引入父工程坐标,关联父工程(主工程)
6)删除构建bulid标签,删除依赖(因为我们直接copy需要的依赖进来)
7)把子项目工程的目录补充完整,如 resources、各层目录等,并添加application.yml配置文件,注意copy配置文件里的内容很容易出现问题
8)添加启动类 YebApplication,并添加mapper扫描注解
9)把配置文件application.yml放到config目录下
1.创建父工程pom文件-yeb-back
该项目采用的是maven聚合的项目,会有一个父工程——yeb-back。父工程下面有子项目:完整云E办业务逻辑——yeb-server、邮箱项目、逆向工程项目——yeb-generator。
父工程,只是用来整个项目pom的依赖管理。除了pom.xml,其他文件都不需要,进行删除。
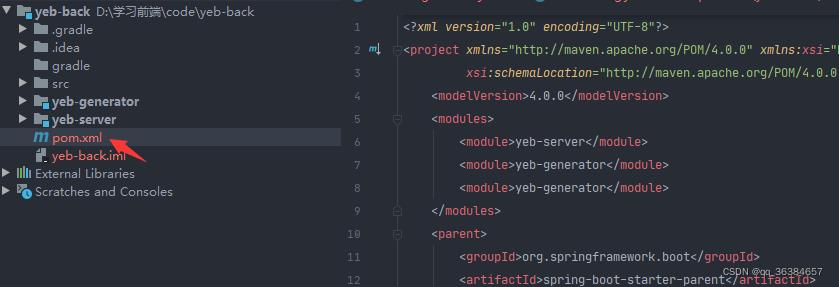
修改pom.xml文件,删掉依赖dependencies标签和构建build标签及其内容,加入packaging标签里面写pom
<?xml version="1.0" encoding="UTF-8"?>
<project xmlns="http://maven.apache.org/POM/4.0.0" xmlns:xsi="http://www.w3.org/2001/XMLSchema-instance"
         xsi:schemaLocation="http://maven.apache.org/POM/4.0.0 https://maven.apache.org/xsd/maven-4.0.0.xsd">
    <modelVersion>4.0.0</modelVersion>
    <modules>
        <module>yeb-server</module>
        <module>yeb-generator</module>
        <module>yeb-generator</module>
    </modules>
    <parent>
        <groupId>org.springframework.boot</groupId>
        <artifactId>spring-boot-starter-parent</artifactId>
        <version>2.1.1.RELEASE</version>
        <relativePath/> <!-- lookup parent from repository -->
    </parent>
    <groupId>com.example</groupId>
    <artifactId>yeb</artifactId>
    <version>0.0.1-SNAPSHOT</version>
    <packaging>pom</packaging>
    <name>yeb</name>
    <description>Demo project for Spring Boot</description>
    <properties>
        <java.version>1.8</java.version>
    </properties>
</project>
2.修改子工程pom文件-yeb-server
创建一个Module项目,使用Maven创建一个quickstart的Module子项目 yeb-server 负责我们整个的业务逻辑。对新建的Module项目 yeb-server 进行修改,删掉生成的App类和AppTest类,然后添加一个server包名。在yeb-server子项目的pom.xml中引入父工程坐标,关联父工程(主工程)。删除构建bulid标签,删除依赖(因为我们直接copy需要的依赖进来)
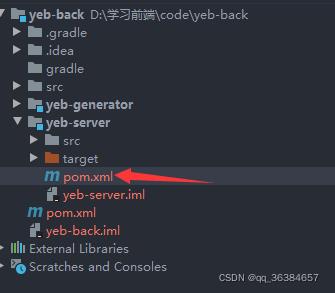
在xml文件中,添加依赖于父工程。并且添加项目中用到的依赖,整体代码:
<?xml version="1.0" encoding="UTF-8"?>

<project xmlns="http://maven.apache.org/POM/4.0.0" xmlns:xsi="http://www.w3.org/2001/XMLSchema-instance"
  xsi:schemaLocation="http://maven.apache.org/POM/4.0.0 http://maven.apache.org/xsd/maven-4.0.0.xsd">
  <modelVersion>4.0.0</modelVersion>
  <parent>
    <groupId>com.example</groupId>
    <artifactId>yeb</artifactId>
    <version>0.0.1-SNAPSHOT</version>
  </parent>

  <artifactId>yeb-server</artifactId>
  <version>0.0.1-SNAPSHOT</version>

  <properties>
    <project.build.sourceEncoding>UTF-8</project.build.sourceEncoding>
    <maven.compiler.source>1.8</maven.compiler.source>
    <maven.compiler.target>1.8</maven.compiler.target>
  </properties>

  <dependencies>
    <!--web依赖 -->
    <dependency>
      <groupId>org.springframework.boot</groupId>
      <artifactId>spring-boot-starter-web</artifactId>
    </dependency>

    <dependency>
      <groupId>mysql</groupId>
      <artifactId>mysql-connector-java</artifactId>
      <scope>runtime</scope>
    </dependency>
    <!-- mybatis-plus -->
    <dependency>
      <groupId>com.baomidou</groupId>
      <artifactId>mybatis-plus-boot-starter</artifactId>
      <version>3.4.1</version>
    </dependency>
    <dependency>
      <groupId>org.projectlombok</groupId>
      <artifactId>lombok</artifactId>
      <optional>true</optional>
    </dependency>
    <!-- swagger2 依赖 -->
    <dependency>
      <groupId>io.springfox</groupId>
      <artifactId>springfox-swagger2</artifactId>
      <version>2.7.0</version>
    </dependency>
    <!-- Swagger第三方ui依赖 -->
    <dependency>
      <groupId>com.github.xiaoymin</groupId>
      <artifactId>swagger-bootstrap-ui</artifactId>
      <version>1.9.6</version>
    </dependency>
    <!-- security 权限控制依赖 -->
    <dependency>
      <groupId>org.springframework.boot</groupId>
      <artifactId>spring-boot-starter-security</artifactId>
    </dependency>
    <!-- JWT 依赖 -->
    <dependency>
      <groupId>io.jsonwebtoken</groupId>
      <artifactId>jjwt</artifactId>
      <version>0.9.0</version>
    </dependency>
    <!-- google kaptcha 验证码 -->
    <dependency>
      <groupId>com.github.axet</groupId>
      <artifactId>kaptcha</artifactId>
      <version>0.0.9</version>
    </dependency>
    <!-- StringUtils.isBlank 用来做判断,是不是空,是不是有空格等等 -->
    <dependency>
      <groupId>org.apache.commons</groupId>
      <artifactId>commons-lang3</artifactId>
      <version>3.11</version>
    </dependency>
    <!-- redis -->
    <dependency>
      <groupId>org.springframework.boot</groupId>
      <artifactId>spring-boot-starter-data-redis</artifactId>
    </dependency>
    <!-- commons-pool2 对象池依赖 -->
    <dependency>
      <groupId>org.apache.commons</groupId>
      <artifactId>commons-pool2</artifactId>
    </dependency>
    <!-- easy poi 依赖,导入导出数据 -->
    <dependency>
      <groupId>cn.afterturn</groupId>
      <artifactId>easypoi-spring-boot-starter</artifactId>
      <version>4.2.0</version>
    </dependency>
    <!-- rabbitmq 消息队列 -->
    <dependency>
      <groupId>org.springframework.boot</groupId>
      <artifactId>spring-boot-starter-amqp</artifactId>
    </dependency>
    <!-- websocket 实时聊天 -->
    <dependency>
      <groupId>org.springframework.boot</groupId>
      <artifactId>spring-boot-starter-websocket</artifactId>
    </dependency>

  </dependencies>

</project>
3. 添加配置文件application.properties
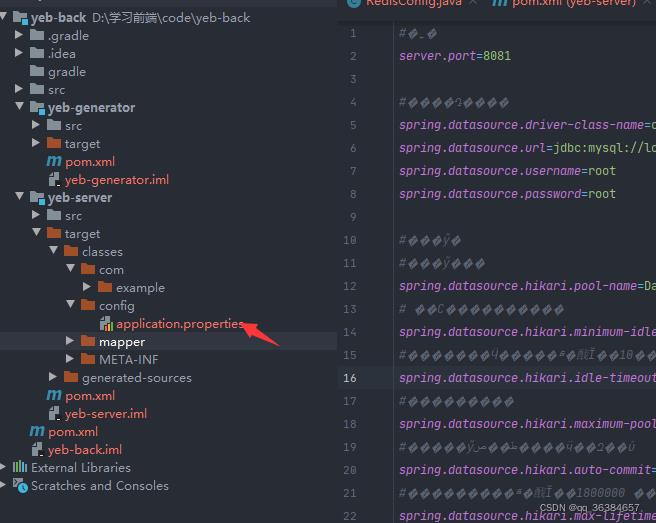
server.port=8081
spring.datasource.driver-class-name=com.mysql.cj.jdbc.Driver
spring.datasource.url=jdbc:mysql://localhost:3306/yeb?characterEncoding=utf-8&useSSL=false&serverTimezone=Asia/Shanghai
spring.datasource.username=root
spring.datasource.password=root


spring.datasource.hikari.pool-name=DateHikariCP

spring.datasource.hikari.minimum-idle=5

spring.datasource.hikari.idle-timeout=180000

spring.datasource.hikari.maximum-pool-size=10

spring.datasource.hikari.auto-commit=true

spring.datasource.hikari.max-lifetime=1800000

spring.datasource.hikari.connection-timeout=30000

spring.datasource.hikari.connection-test-query=SELECT 1

# redis
#redis��ַ ������ϵ�
#spring.redis.host=127.0.0.1
spring.redis.host=192.168.110.130
spring.redis.port=6379

spring.redis.database=1
spring.redis.timeout=10000s

#spring.redis.password=root

spring.redis.lettuce.pool.max-active= 1024

spring.redis.lettuce.pool.max-wait= 10000ms

spring.redis.lettuce.pool.max-idle=200

spring.redis.lettuce.pool.min-idle=5

#Mybatis-plus����

mybatis-plus.mapper-locations=classpath*:/mapper/*Mapper.xml

mybatis-plus.type-aliases-package=com.example.server.pojo

#mybatis-plus.configuration.map-underscore-to-camel-case=false

## Mybatis SQL
logging.level.com.example.server.mapper=debug

jwt.tokenHeader=Authorization
jwt.secret=yeb-secret
jwt.expiration=604800
jwt.tokenHead=Bearer

# \\u6D88\\u606F\\u961F\\u5217
spring.rabbitmq.username=guest
spring.rabbitmq.password=guest
spring.rabbitmq.host=172.16.100.4
spring.rabbitmq.port=5672

spring.rabbitmq.publisher-confirm-type=correlated

spring.rabbitmq.publisher-returns=true
4.添加YebApplication启动类
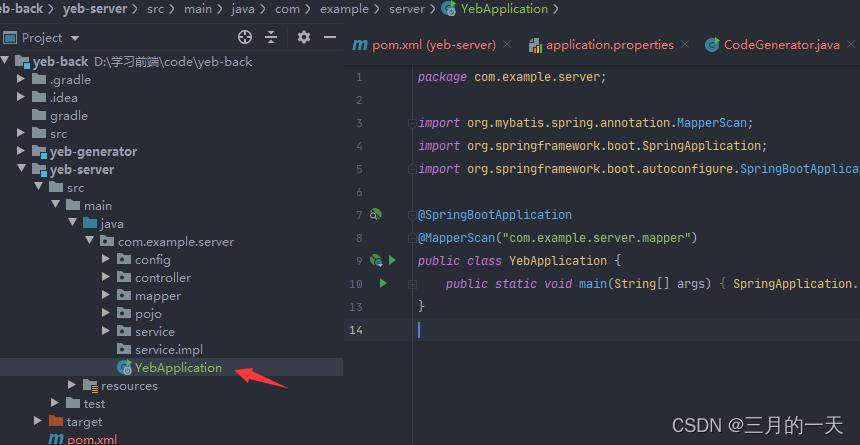
package com.example.server;

import org.mybatis.spring.annotation.MapperScan;
import org.springframework.boot.SpringApplication;
import org.springframework.boot.autoconfigure.SpringBootApplication;

@SpringBootApplication
@MapperScan("com.example.server.mapper")
public class YebApplication
    public static void main(String[] args)
        SpringApplication.run(YebApplication.class,args);
5.逆向工程AutoGenerator
1).AutoGenerator是什么
AutoGenerator 是 MyBatis-Plus 的代码生成器,通过 AutoGenerator 可以快速生成 Pojo、Mapper、Mapper XML、Service、Controller 等各个模块的代码。
2).AutoGenerator能干什么
可以避免重复大量的工作。比如:1.在开发功能之前,会根据表和字段去新建对应的Pojo类以及属性(private int age;)。而pojo类名要和表名对应,属性要和表字段相对应。对于单表而言,几乎是一个全能的工具,极大的提升了开发效率。更多的关注业务逻辑的实现。
3).怎么使用呢?
在我们项目中使用MyBatis的AutoGenerator自动生成mapper,service,Controller。使用MyBatisPlus自带的逆向工程代码生成器AutoGenerator可以快速生成Entity、Mapper、Mapper XML、Service、Controller 等各个模块的代码,极大的提升了开发效率。
4).yeb-generator项目目录结构
- 使用maven的quickstart新建逆向工程代码生成器子项目yeb-generator,专门用于各模块代码的生成。将自动生成的mapper|service|controller层代码复制到yeb-server中对应的位置。
- 删除新建的yeb-generator子项目pom.xml中用不到的内容,指定父工程坐标,copy依赖过来,还有新建包名generator。
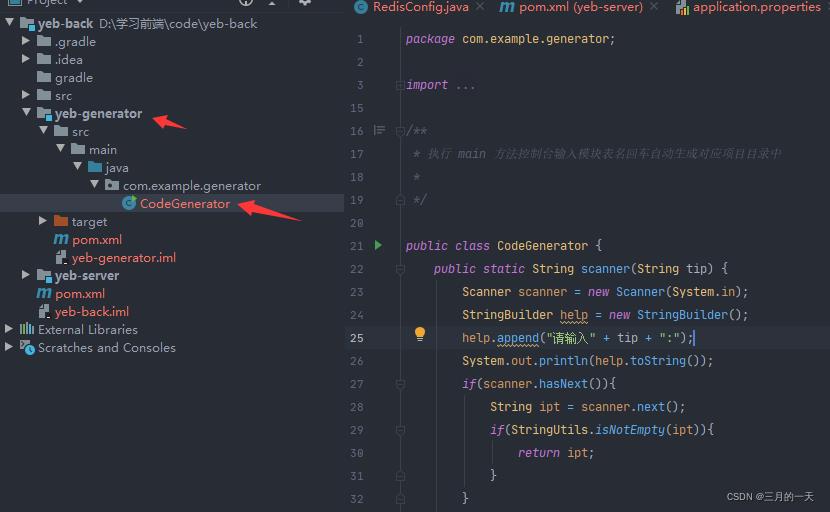
5). CodeGenerator类文件
运行我们编写的那个类中的main方法,然后在下面输入我们的表就可以了,下面的表的话(就是数据库里面对应的表)然后会自动生成对应的mapper文件。
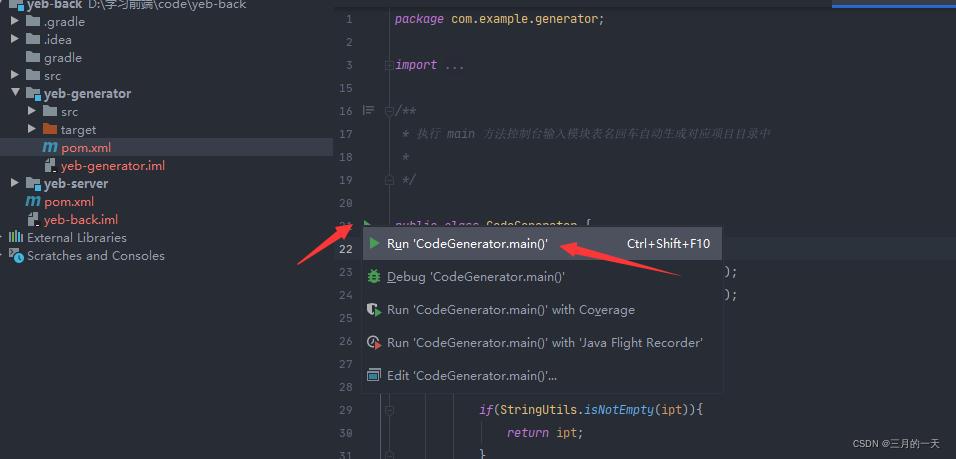
运行上面文件,然后在控制框,输入表格名字:
请输入表名,多个英文逗号分割:
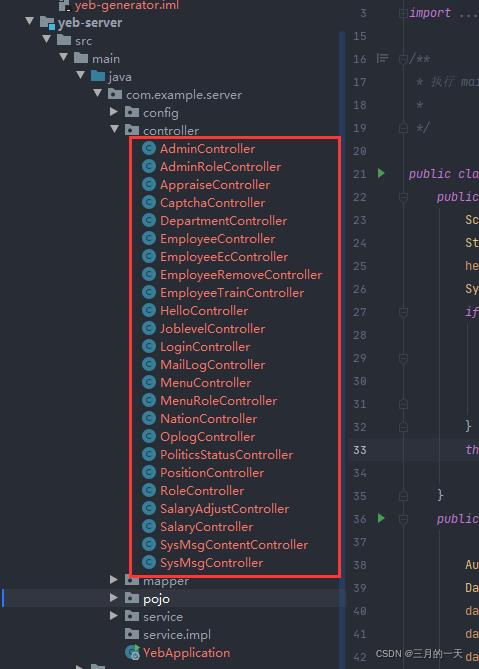
t_admin,t_admin_role,t_appraise,t_department,t_employee,t_employee_ec,t_employee_remove,t_employee_train,t_joblevel,t_mail_log,t_menu,t_menu_role,t_nation,t_oplog,t_politics_status,t_position,t_role,t_salary,t_salary_adjust,t_sys_msg,t_sys_msg_content
代码:
package com.example.generator;

import com.baomidou.mybatisplus.annotation.DbType;
import com.baomidou.mybatisplus.core.exceptions.MybatisPlusException;
import com.baomidou.mybatisplus.generator.AutoGenerator;
import com.baomidou.mybatisplus.generator.config.DataSourceConfig;
import com.baomidou.mybatisplus.generator.config.GlobalConfig;
import com.baomidou.mybatisplus.generator.config.PackageConfig;
import com.baomidou.mybatisplus.generator.config.StrategyConfig;
import com.baomidou.mybatisplus.generator.config.rules.DateType;
import com.baomidou.mybatisplus.generator.config.rules.NamingStrategy;
import org.apache.commons.lang3.StringUtils;

import java.util.Scanner;

/**
 * 执行 main 方法控制台输入模块表名回车自动生成对应项目目录中
 *
 */

public class CodeGenerator
    public static String scanner(String tip)
        Scanner scanner = new Scanner(System.in);
        StringBuilder help = new StringBuilder();
        help.append("请输入" + tip + ":");
        System.out.println(help.toString());
        if(scanner.hasNext())
            String ipt = scanner.next();
            if(StringUtils.isNotEmpty(ipt))
                return ipt;


        throw new MybatisPlusException("请输入正确的"+tip+"!");


    public static void main(String[] args)

        AutoGenerator autoGenerator = new AutoGenerator();
        DataSourceConfig dataSourceConfig = new DataSourceConfig();
        dataSourceConfig.setDbType(DbType.MYSQL);
        dataSourceConfig.setDriverName("com.mysql.cj.jdbc.Driver");
        dataSourceConfig.setUsername("root");
        dataSourceConfig.setPassword("root");
        dataSourceConfig.setUrl("jdbc:mysql://localhost:3306/yeb?useUnicode=true&characterEncoding=UTF-8");
        autoGenerator.setDataSource(dataSourceConfig);
        GlobalConfig globalConfig = new GlobalConfig();
        globalConfig.setOpen(true); // 代码生成后打开目录
        globalConfig.setOutputDir(System.getProperty("user.dir")+"/src/main/java");
        globalConfig.setAuthor("Zeng");
//        globalConfig.setIdType(IdType.ASSIGN_ID);// id 主键策略
//        globalConfig.setDateType(DateType.ONLY_DATE); // 定义生成的实体类中日期类型
        globalConfig.setSwagger2(true);// 开启Swaggers模式
        globalConfig.setServiceName("%sService");
        autoGenerator.setGlobalConfig(globalConfig);
        PackageConfig packageConfig = new PackageConfig();
        packageConfig.setParent("com.example");
        packageConfig.setEntity("pojo");
        packageConfig.setMapper("mapper");
        packageConfig.setController("controller");
        packageConfig.setService("service");
        packageConfig.setServiceImpl("service.impl");
        autoGenerator.setPackageInfo(packageConfig);
        StrategyConfig strategyConfig = new StrategyConfig();

//        strategyConfig.setInclude("t_admin"); // 生成单表写法
        // strategyConfig.setInclude("user","product"); // 生成多张表写法。生成所有表,不用配置
        strategyConfig.setTablePrefix("t"+"_"); // 去表前缀 t,根据实际情况填写

        strategyConfig.setEntityLombokModel(true);
        //数据库表映射到实体的命名策略
        strategyConfig.setNaming(NamingStrategy.underline_to_camel);
        strategyConfig.setColumnNaming(NamingStrategy.underline_to_camel);
        strategyConfig.setInclude(scanner("表名,多个英文逗号分割").split(","));
//        List<TableFill> list = new ArrayList<>();
//        TableFill tableFill1 = new TableFill("create_time", FieldFill.INSERT);
//        TableFill tableFill2 = new TableFill("update_time",FieldFill.INSERT_UPDATE);
//        list.add(tableFill1);
//        list.add(tableFill2);

//        strategyConfig.setTableFillList(list);
        autoGenerator.setStrategy(strategyConfig);

        autoGenerator.execute();
6.yeb-generator工程pom文件
<?xml version="1.0" encoding="UTF-8"?>

<project xmlns="http://maven.apache.org/POM/4.0.0" xmlns:xsi="http://www.w3.org/2001/XMLSchema-instance"
         xsi:schemaLocation="http://maven.apache.org/POM/4.0.0 http://maven.apache.org/xsd/maven-4.0.0.xsd">
    <parent>
        <artifactId>yeb</artifactId>
        <groupId>com.example</groupId>
        <version>0.0.1-SNAPSHOT</version>
    </parent>
    <modelVersion>4.0.0</modelVersion>

    <artifactId>yeb-generator</artifactId>
    <version>0.0.1-SNAPSHOT</version>

    <properties>
        <project.build.sourceEncoding>UTF-8</project.build.sourceEncoding>
        <maven.compiler.source>1.8</maven.compiler.source>
        <maven.compiler.target>1.8</maven.compiler.target>
    </properties>

    <dependencies>
        <!--web依赖-->
        <dependency>
            <groupId>org.springframework.boot</groupId>
            <artifactId>spring-boot-starter-web</artifactId>
        </dependency>
        <dependency>
            <groupId>mysql</groupId>
            <artifactId>mysql-connector-java</artifactId>
            <scope>runtime</scope>
        </dependency>
        <!-- mybatis-plus -->
        <dependency>
            <groupId>com.baomidou</groupId>
            <artifactId>mybatis-plus-boot-starter</artifactId>
            <version>3.4.1</version>
        </dependency>
        <!-- mybatis-plus 代码生成器 -->
        <dependency>
            <groupId>com.baomidou</groupId>
            <artifactId>mybatis-plus-generator</artifactId>
            <version>3.4.1</version>
        </dependency>

        <!-- mybatis-plus 代码生成器默认模板 -->
        <dependency>
            <groupId>org.apache.velocity</groupId>
            <artifactId>velocity-engine-core</artifactId>
            <version>2.2</version>
        </dependency>

        <!-- mybatis-plus 代码生成器模板引擎 -->
        <!--        <dependency>-->
        <!--            <groupId>org.freemarker</groupId>-->
        <!--            <artifactId>freemarker</artifactId>-->
        <!--            <version>2.3.30</version>-->
        <!--        </dependency>-->
    </dependencies>

</project>
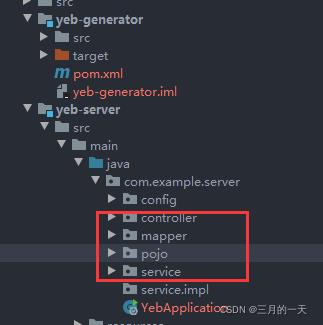
7.复制生成的mapper\\service\\controller到yeb-server目录
1)在yeb-generator子项目中,生成好各模块的类后,copy到yeb-server子项目中
2)copy到yeb-server子项目中后,删除掉在yeb-generator子项目中生成好的各模块的类,因为它们会报红
3)添加所需的依赖,解决报红的问题,如添加swagger2的依赖
4)逆向工程文件CodeGenerator,你需要在这个文件里配置你要生成对应模块类的包,里面有具体的注释说明
yeb-server目录
yeb-server/controller层目录如下图,各文件由CodeGenerator根据表名生成的
项目搭建完成,接下来开始项目实战啦
第二季SpringBoot+Vue前后端分离项目实战笔记
配套视频在b站:【第二季】全网最简单但实用的SpringBoot+Vue前后端分离项目实战
SpringBoot+Vue项目实战 第二季
一、些许优化
刷新丢失其它标签页
-
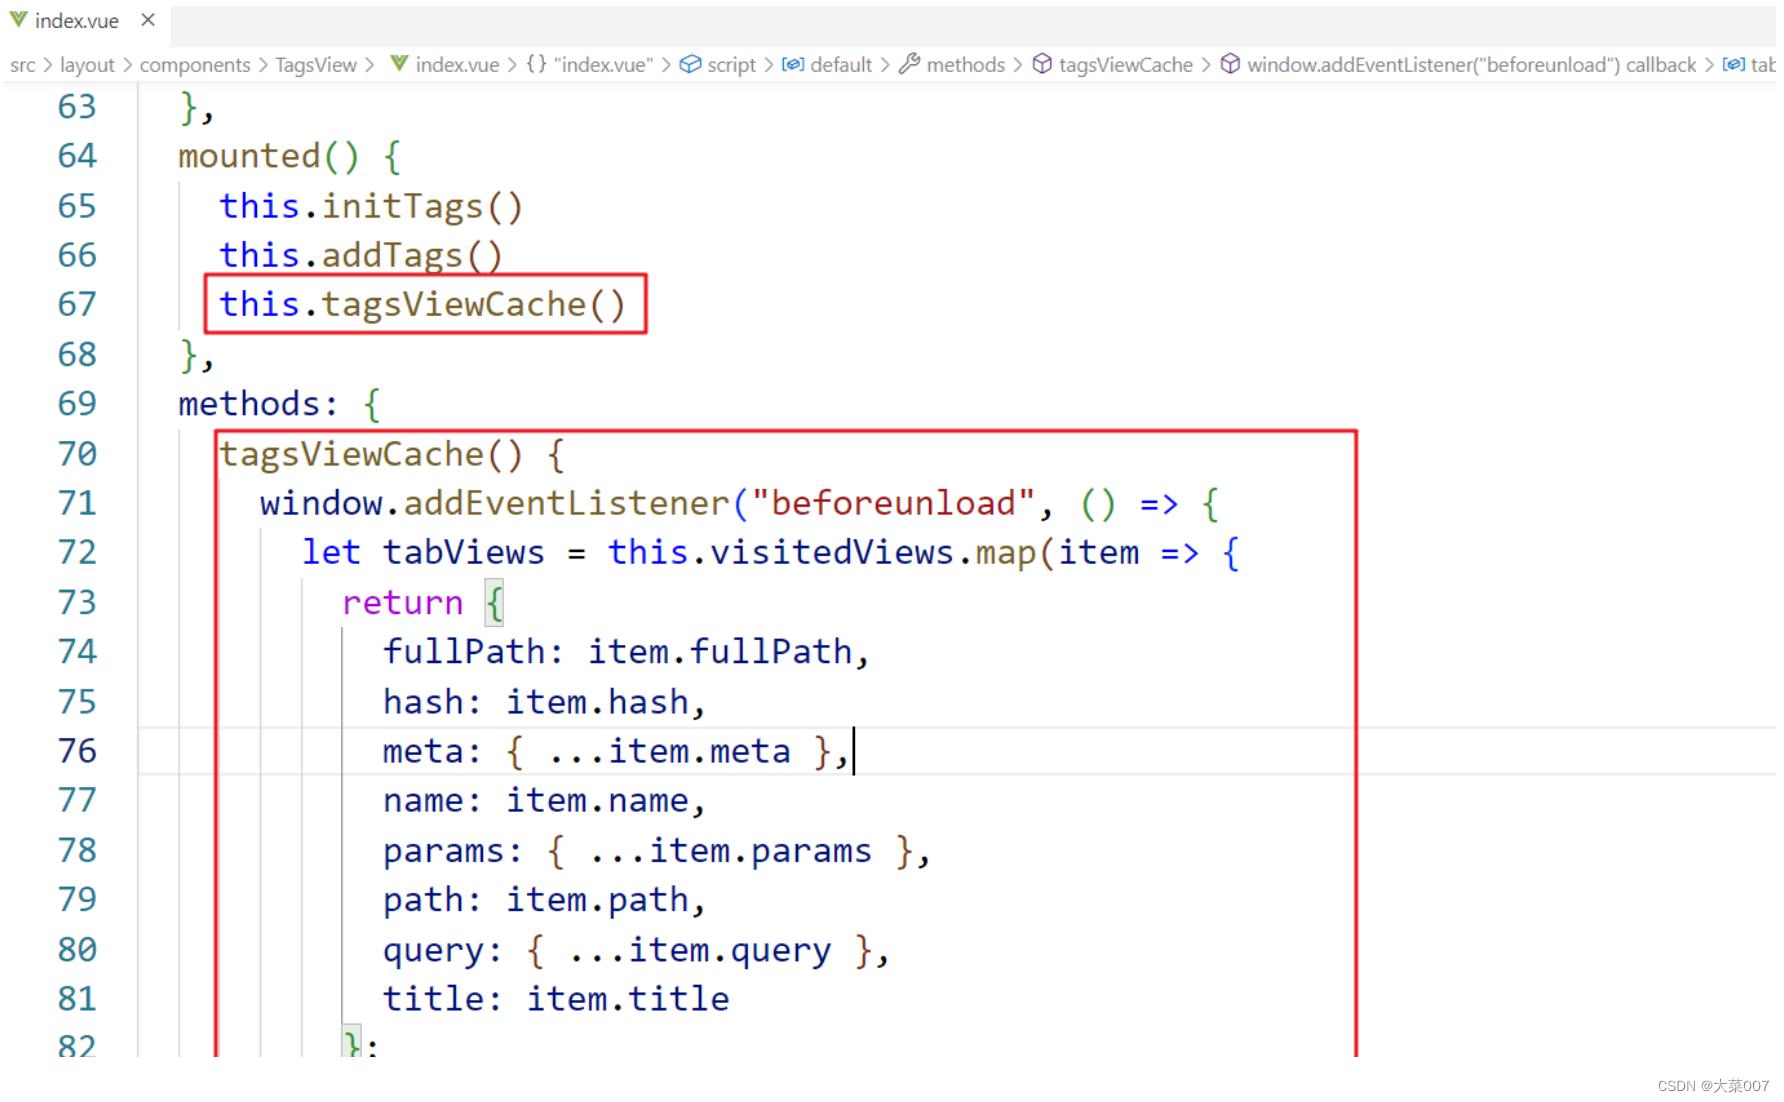
缓存已打开标签页
tagsViewCache()
    window.addEventListener("beforeunload", () =>
        let tabViews = this.visitedViews.map(item =>
            return
                fullPath: item.fullPath,
                hash: item.hash,
                meta:  ...item.meta ,
                name: item.name,
                params:  ...item.params ,
                path: item.path,
                query:  ...item.query ,
                title: item.title
            ;
        );
        sessionStorage.setItem("tabViews", JSON.stringify(tabViews));
    );
    let oldViews = JSON.parse(sessionStorage.getItem("tabViews")) || [];
    if (oldViews.length > 0)
        this.$store.state.tagsView.visitedViews = oldViews;

,
-
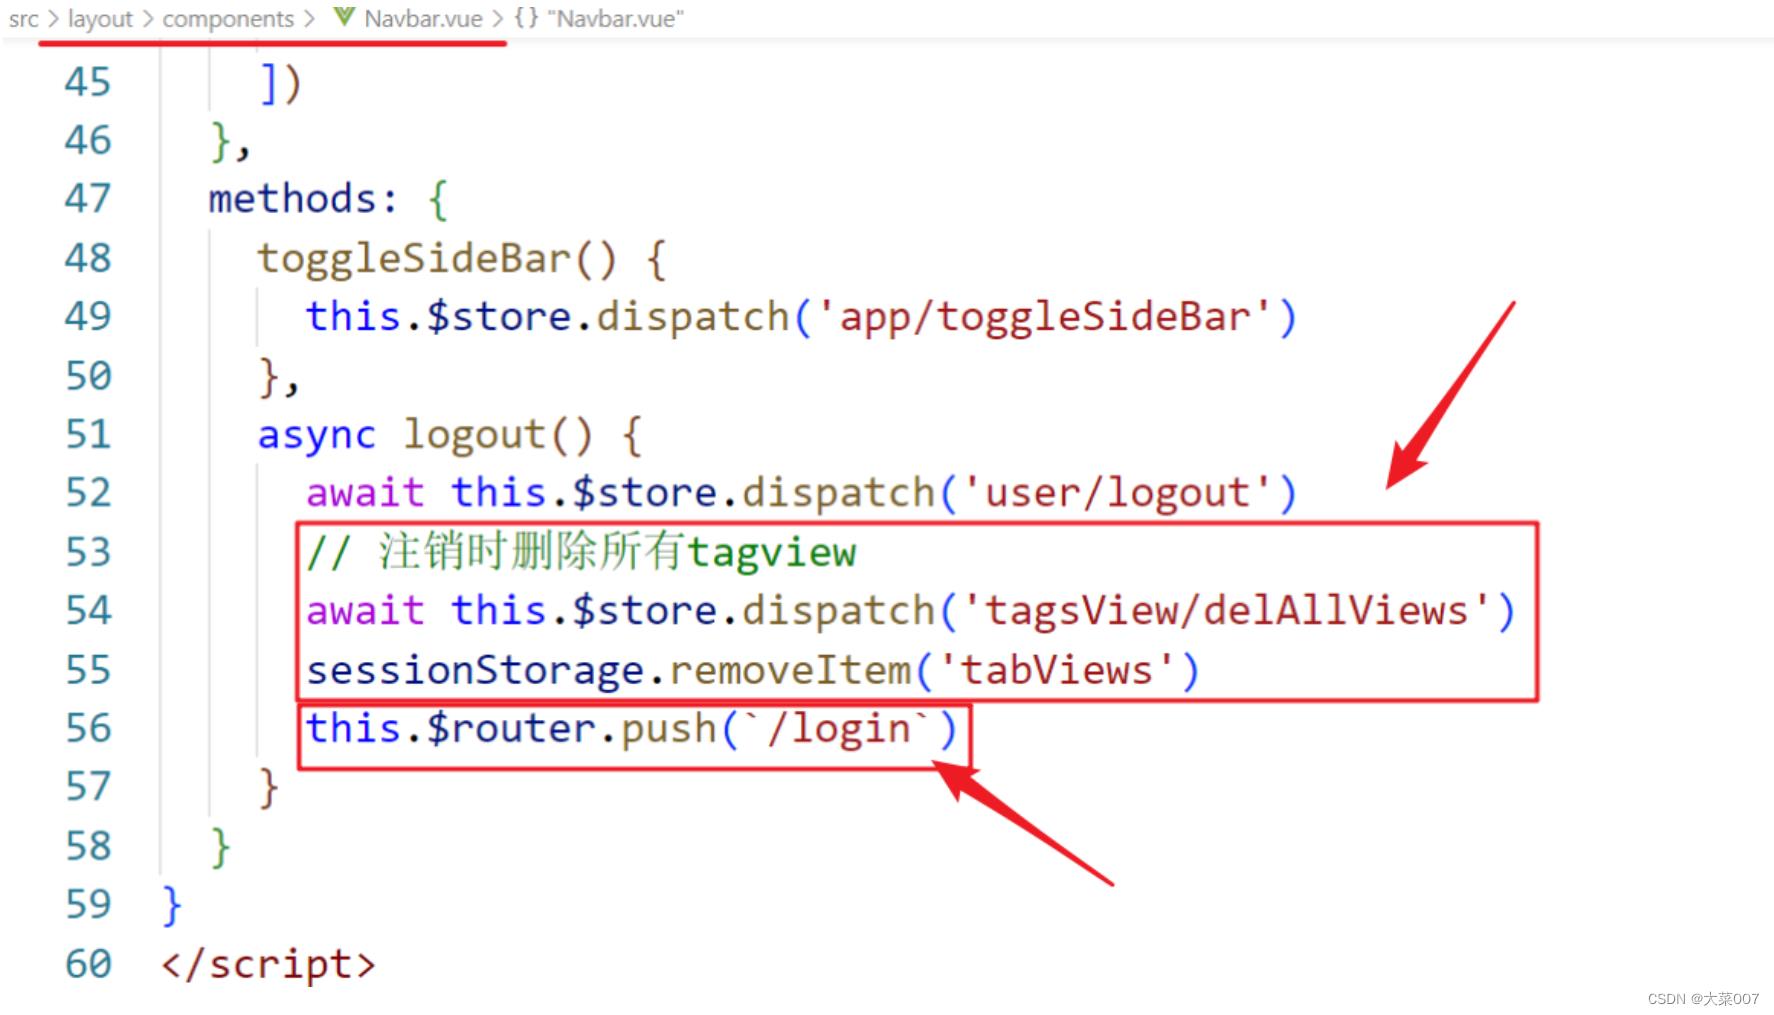
注销时删除所有tagview
// 注销时删除所有tagview
await this.$store.dispatch('tagsView/delAllViews')
sessionStorage.removeItem('tabViews')
二、Swagger整合
Swagger-UI可以动态地根据注解生成在线API文档。
常用注解
- @Api:用于修饰Controller类,生成Controller相关文档信息
- @ApiOperation:用于修饰Controller类中的方法,生成接口方法相关文档信息
- @ApiParam:用于修饰接口中的参数,生成接口参数相关文档信息
- @ApiModelProperty:用于修饰实体类的属性,当实体类是请求参数或返回结果时,直接生成相关文档信息
整合步骤:
-
添加依赖
<!--Swagger文档工具--> <dependency> <groupId>io.springfox</groupId> <artifactId>springfox-boot-starter</artifactId> <version>3.0.0</version> </dependency> -
swagger配置类
@Configuration @EnableOpenApi @EnableWebMvc public class SwaggerConfig @Bean public Docket api() return new Docket(DocumentationType.OAS_30) .apiInfo(apiInfo()) .select() .apis(RequestHandlerSelectors.basePackage("com.lantu")) .paths(PathSelectors.any()) .build(); private ApiInfo apiInfo() return new ApiInfoBuilder() .title("神盾局特工管理系统接口文档") .description("全网最简单的SpringBoot+Vue前后端分离项目实战") .version("1.0") .contact(new Contact("qqcn", "http://www.qqcn.cn", "qqcn@aliyun.com")) .build(); -
控制器根据需要添加swagger注解
-
测试:http://localhost:9999/swagger-ui/index.html
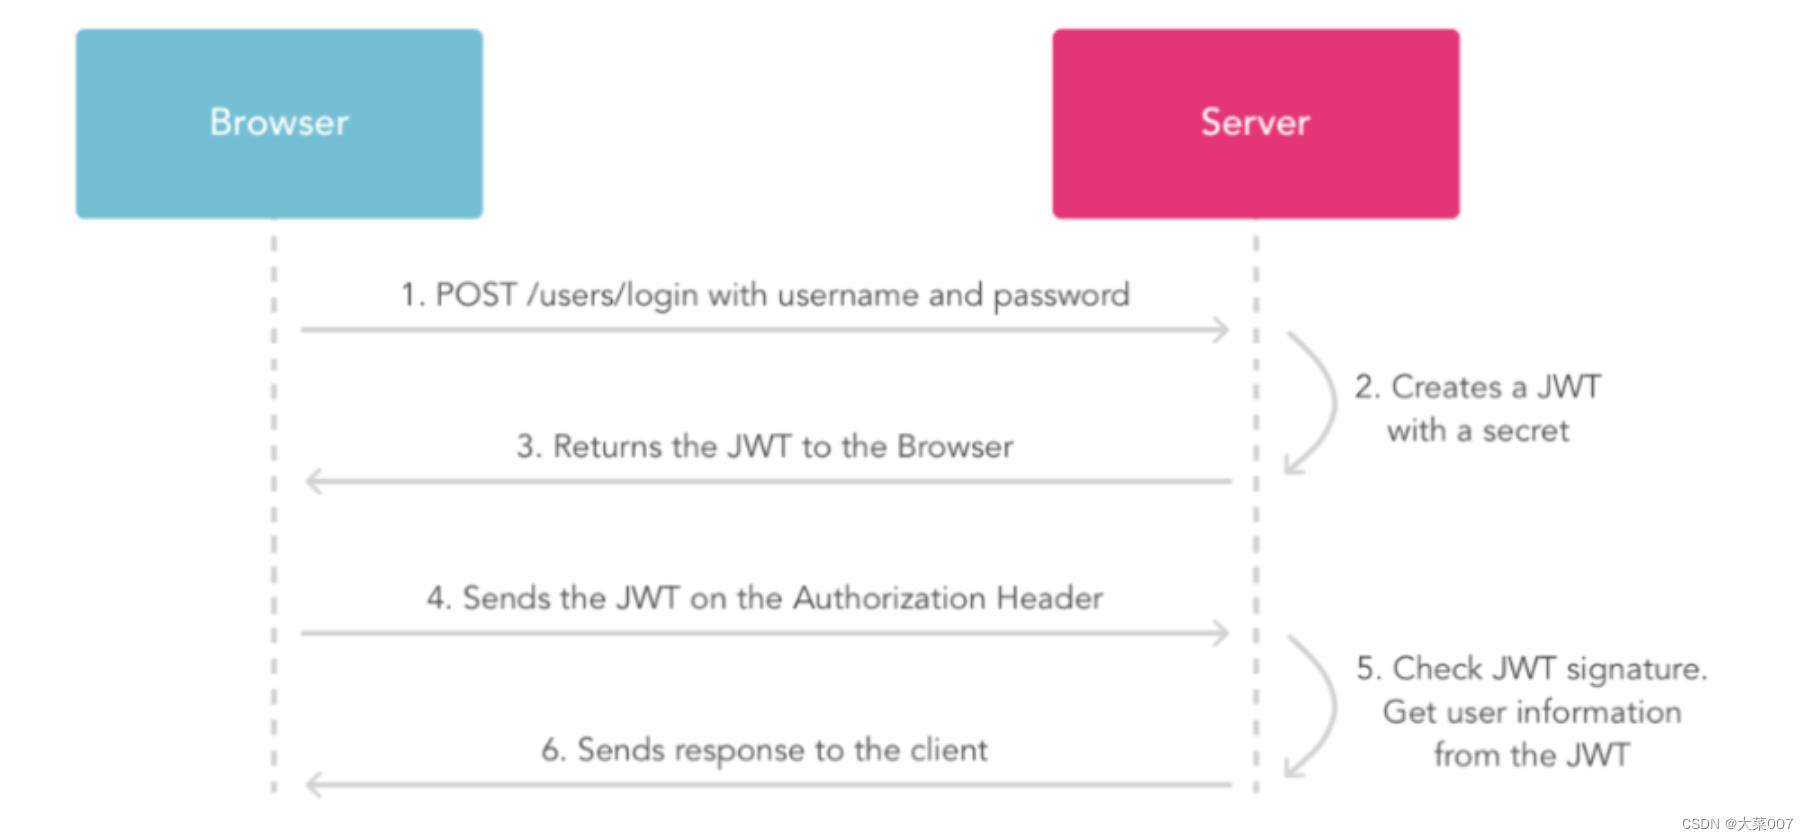
三、Jwt整合
JSON Web Token (JWT)是一个开放标准(RFC 7519),它定义了一种紧凑的、自包含的方式,用于作为JSON对象在各方之间安全地传输信息。该信息可以被验证和信任,因为它是数字签名的。
jwt形式举例:
eyJhbGciOiJIUzI1NiJ9.eyJqdGkiOiI5MjAzOThjZi1hYThiLTQzNWUtOTIxYS1iNGQ3MDNmYmZiZGQiLCJzdWIiOiJ7XCJwaG9uZVwiOlwiMTIzNDIzNFwiLFwidXNlcm5hbWVcIjpcInpoYW5nc2FuXCJ9IiwiaXNzIjoic3lzdGVtIiwiaWF0IjoxNjc3MTE4Njc2LCJleHAiOjE2NzcxMjA0NzZ9.acc7H6-6ACqcgNu5waqain7th7zJciP-41z-qgWeaSY
⑴ 整合步骤
-
pom
<dependency> <groupId>io.jsonwebtoken</groupId> <artifactId>jjwt</artifactId> <version>0.9.1</version> </dependency> -
工具类
@Component public class JwtUtil // 有效期 private static final long JWT_EXPIRE = 30*60*1000L; //半小时 // 令牌秘钥 private static final String JWT_KEY = "123456"; public String createToken(Object data) // 当前时间 long currentTime = System.currentTimeMillis(); // 过期时间 long expTime = currentTime+JWT_EXPIRE; // 构建jwt JwtBuilder builder = Jwts.builder() .setId(UUID.randomUUID()+"") .setSubject(JSON.toJSONString(data)) .setIssuer("system") .setIssuedAt(new Date(currentTime)) .signWith(SignatureAlgorithm.HS256, encodeSecret(JWT_KEY)) .setExpiration(new Date(expTime)); return builder.compact(); private SecretKey encodeSecret(String key) byte[] encode = Base64.getEncoder().encode(key.getBytes()); SecretKeySpec aes = new SecretKeySpec(encode, 0, encode.length, "AES"); return aes; public Claims parseToken(String token) Claims body = Jwts.parser() .setSigningKey(encodeSecret(JWT_KEY)) .parseClaimsJws(token) .getBody(); return body; public <T> T parseToken(String token,Class<T> clazz) Claims body = Jwts.parser() .setSigningKey(encodeSecret(JWT_KEY)) .parseClaimsJws(token) .getBody(); return JSON.parseObject(body.getSubject(),clazz); -
测试工具类
-
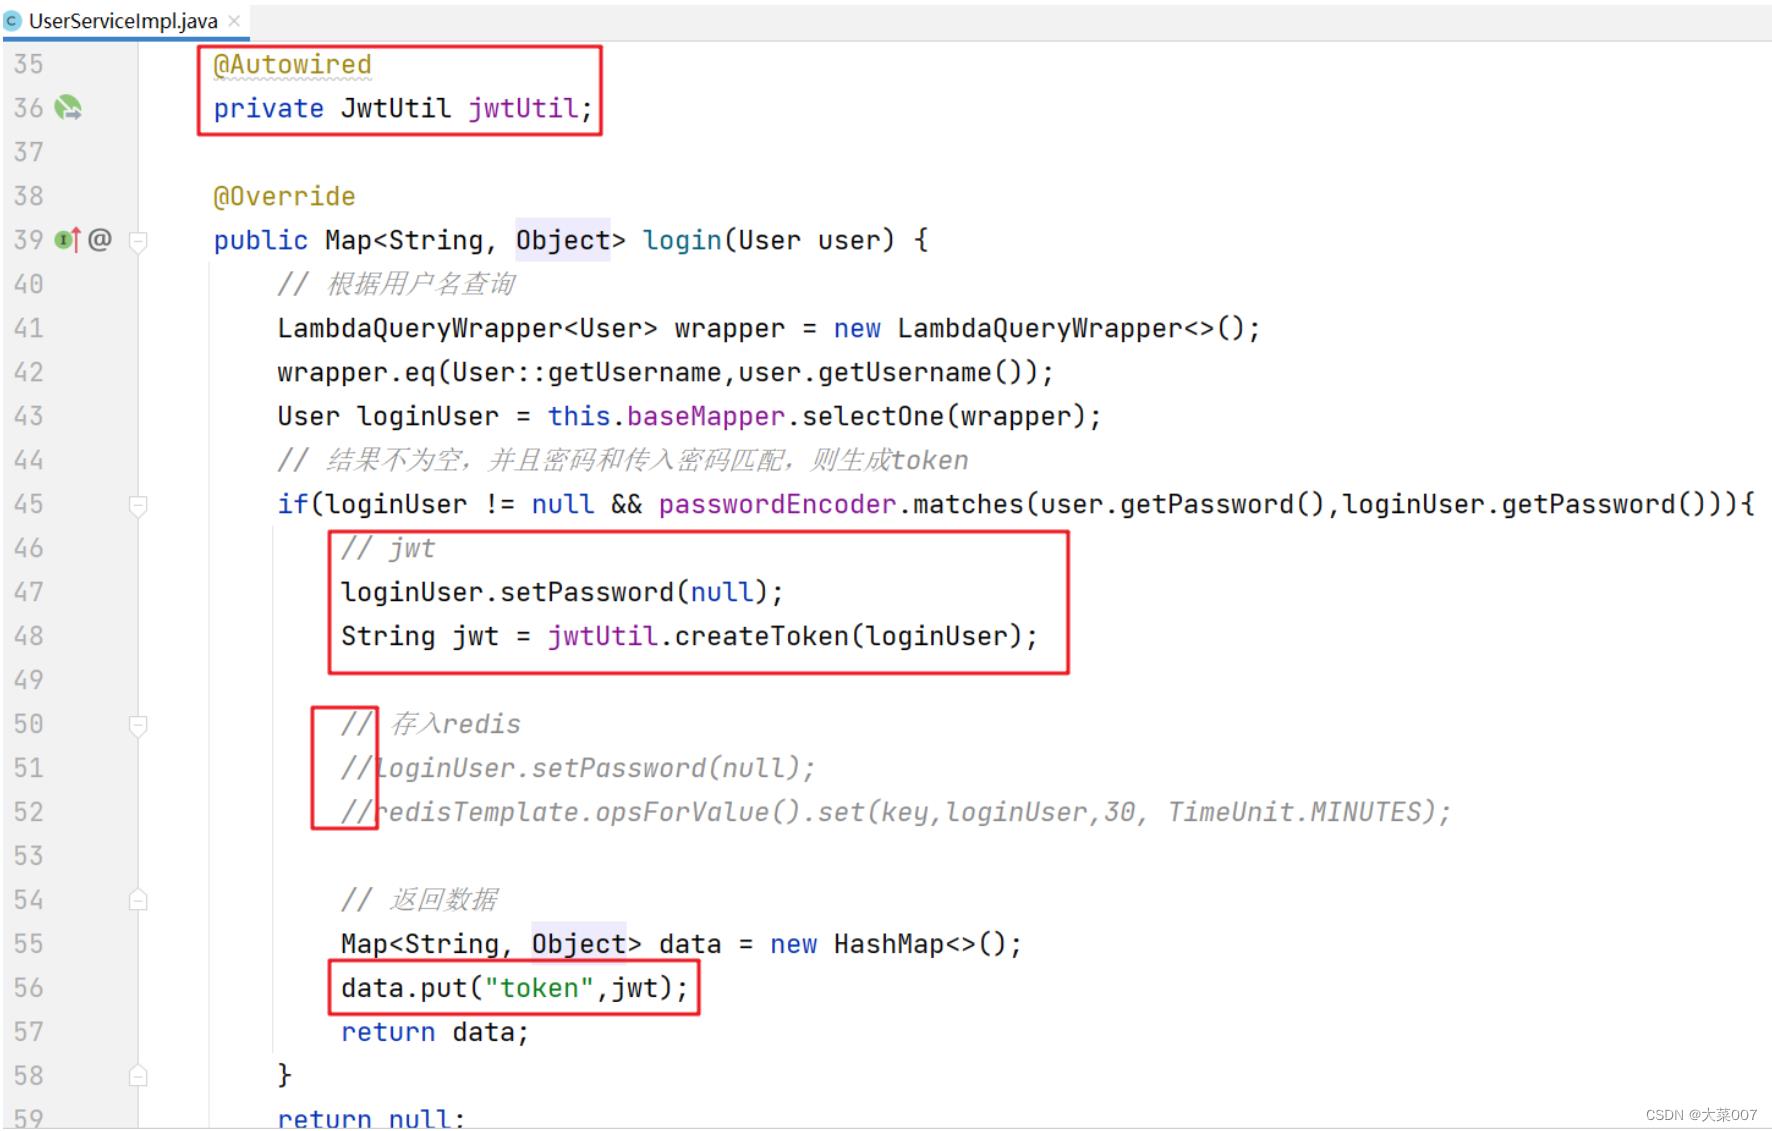
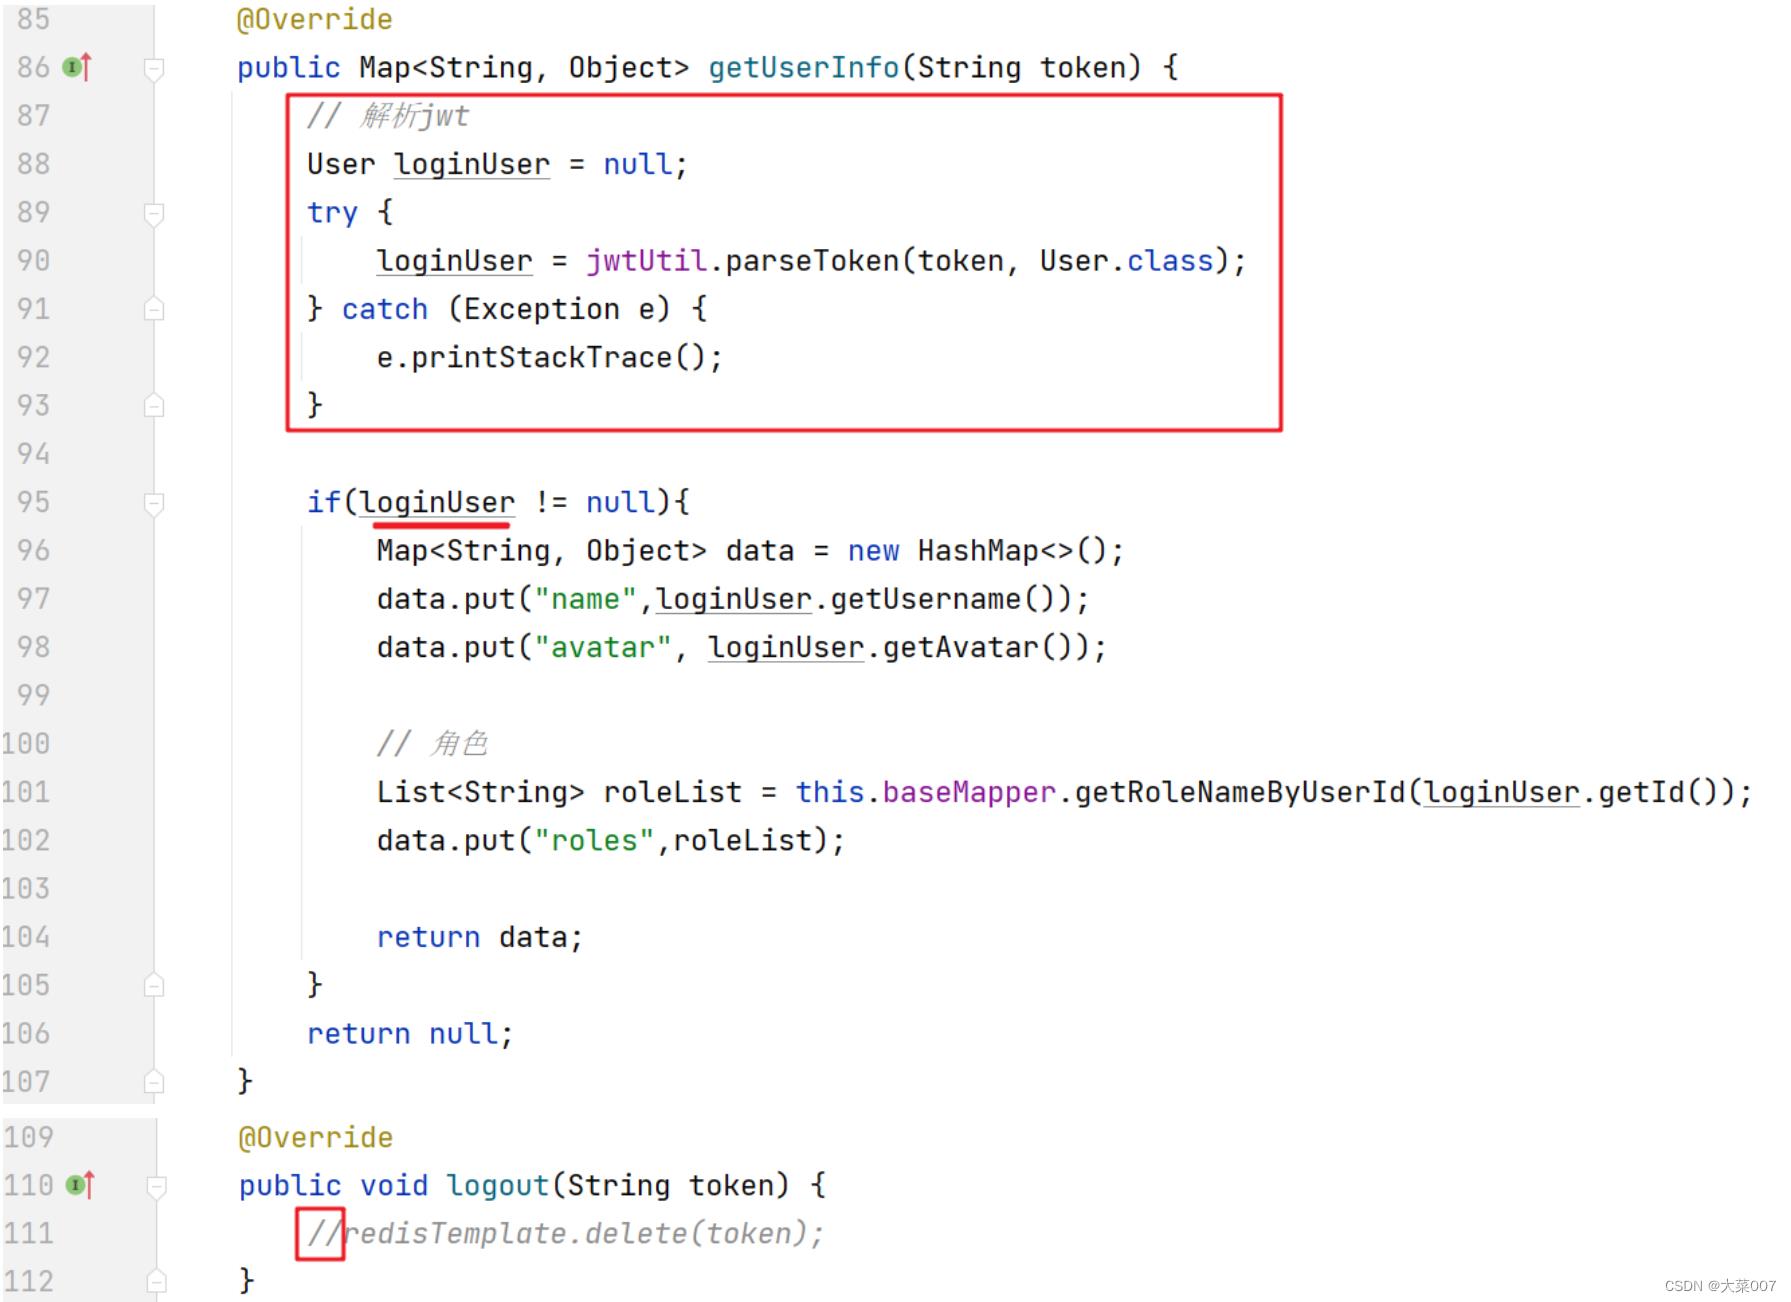
修改登录逻辑
-
测试登录
问题思考:
登录后续请求如何验证jwt ?
⑵ JWT验证拦截器
定义拦截器
@Component
@Slf4j
public class JwtValidateInterceptor implements HandlerInterceptor
    @Autowired
    private JwtUtil jwtUtil;

    @Override
    public boolean preHandle(HttpServletRequest request, HttpServletResponse response, Object handler) throws Exception
        String token = request.getHeader("X-Token");
        System.out.println(request.getRequestURI() +" 待验证:"+token);
        if(token != null)
            try
                jwtUtil.parseToken(token);
                log.debug(request.getRequestURI() + " 放行...");
                return true;
             catch (Exception e)
                e.printStackTrace();


        log.debug(request.getRequestURI() + " 禁止访问...");
        response.setContentType("application/json;charset=utf-8");
        response.getWriter().write(JSON.toJSONString(Result.fail(20003,"jwt令牌无效,请重新登录")));
        return false;
注册拦截器
@Configuration
public class MyWebConfig implements WebMvcConfigurer
    @Autowired
    private JwtValidateInterceptor jwtValidateInterceptor;

    @Override
    public void addInterceptors(InterceptorRegistry registry)
        InterceptorRegistration registration = registry.addInterceptor(jwtValidateInterceptor);
        registration.addPathPatterns("/**")
                .excludePathPatterns(
                        "/user/login",
                        "/user/info",
                        "/user/logout",
                        "/error",
                        "/swagger-ui/**",
                        "/swagger-resources/**",
                        "/v3/**");
⑶ Swagger授权配置
@Configuration
@EnableOpenApi
@EnableWebMvc
public class SwaggerConfig
    @Bean
    public Docket api()
        return new Docket(DocumentationType.OAS_30)
                .apiInfo(apiInfo())
                .select()
                .apis(RequestHandlerSelectors.basePackage("com.lantu"))
                .paths(PathSelectors.any())
                .build()
                .securitySchemes(Collections.singletonList(securityScheme()))
                .securityContexts(Collections.singletonList(securityContext()));


    private SecurityScheme securityScheme()
        //return new ApiKey("Authorization", "Authorization", "header");
        return new ApiKey("X-Token", "X-Token", "header");


    private SecurityContext securityContext()
        return SecurityContext.builder()
                .securityReferences(defaultAuth())
                .forPaths(PathSelectors.regex("^(?!auth).*$"))
                .build();


    private List<SecurityReference> defaultAuth()
        AuthorizationScope authorizationScope = new AuthorizationScope("global", "accessEverything");
        AuthorizationScope[] authorizationScopes = new AuthorizationScope[1];
        authorizationScopes[0] = authorizationScope;
        return Collections.singletonList(
                new SecurityReference("X-Token", authorizationScopes));


    private ApiInfo apiInfo()
        return new ApiInfoBuilder()
                .title("神盾局特工管理系统接口文档")
                .description("全网最简单的SpringBoot+Vue前后端分离项目实战")
                .version("1.0")
                .contact(new Contact("老蔡", "https://space.bilibili.com/431588578", "xxxx@aliyun.com"))
                .build();
四、角色管理
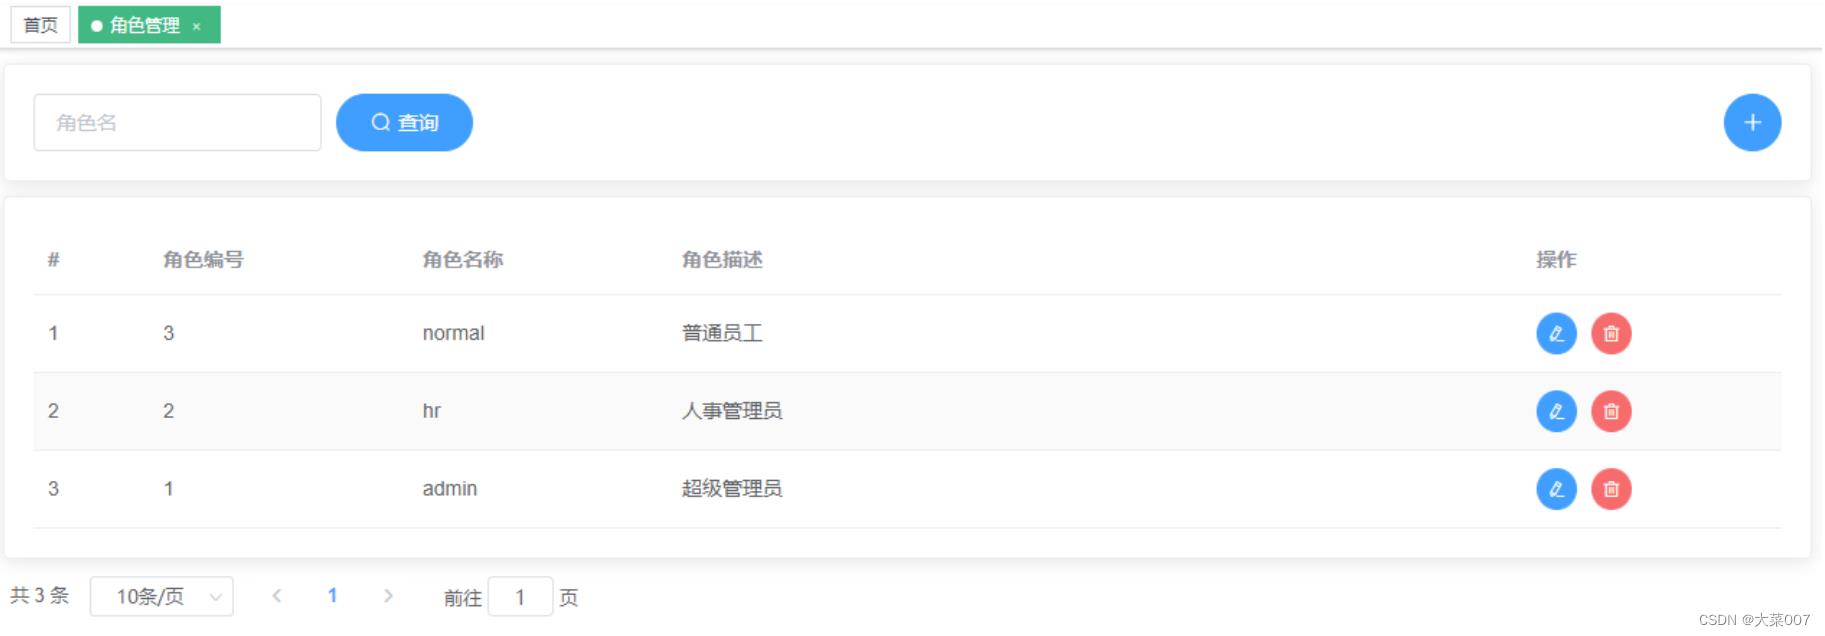
1. 基本功能
⑴ 预览效果
⑵ 前端
role.vue
<template>
  <div>
    <!-- 搜索栏 -->
    <el-card id="search">
      <el-row>
        <el-col :span="18">
          <el-input placeholder="角色名" v-model="searchModel.roleName" clearable> </el-input>
          <el-button @click="getRoleList" type="primary" icon="el-icon-search" round>查询</el-button>
        </el-col>
        <el-col :span="6" align="right">
          <el-button @click="openEditUI(null)" type="primary" icon="el-icon-plus" circle></el-button>
        </el-col>
      </el-row>
    </el-card>

    <!-- 结果列表 -->
    <el-card>

        <el-table :data="roleList" stripe style="width: 100%">
          <el-table-column label="#" width="80">
            <template slot-scope="scope">
              (searchModel.pageNo-1) * searchModel.pageSize + scope.$index + 1
            </template>
          </el-table-column>
          <el-table-column prop="roleId" label="角色编号" width="180">
          </el-table-column>
          <el-table-column prop="roleName" label="角色名称" width="180">
          </el-table-column>
          <el-table-column prop="roleDesc" label="角色描述" >
          </el-table-column>
          <el-table-column   label="操作" width="180">
            <template slot-scope="scope">
              <el-button @click="openEditUI(scope.row.roleId)" type="primary" icon="el-icon-edit" circle size="mini"></el-button>
              <el-button @click="deleteRole(scope.row)" type="danger" icon="el-icon-delete" circle size="mini"></el-button>
            </template>
          </el-table-column>
        </el-table>

    </el-card>
    <el-pagination
      @size-change="handleSizeChange"
      @current-change="handleCurrentChange"
      :current-page="searchModel.pageNo"
      :page-sizes="[5, 10, 20, 50]"
      :page-size="searchModel.pageSize"
      layout="total, sizes, prev, pager, next, jumper"
      :total="total">
    </el-pagination>

    <!-- 对话框 -->
    <el-dialog @close="clearForm" :title="title" :visible.sync="dialogFormVisible" :close-on-click-modal="false">
      <el-form :model="roleForm" ref="roleFormRef" :rules="rules">
        <el-form-item prop="roleName" label="角色名称" :label-width="formLabelWidth">
          <el-input v-model="roleForm.roleName" autocomplete="off"></el-input>
        </el-form-item>

        <el-form-item prop="roleDesc" label="角色描述" :label-width="formLabelWidth">
          <el-input v-model="roleForm.roleDesc" autocomplete="off"></el-input>
        </el-form-item>
      </el-form>
      <div slot="footer" class="dialog-footer">
        <el-button @click="dialogFormVisible = false">取 消</el-button>
        <el-button type="primary" @click="saveRole">确 定</el-button>
      </div>
    </el-dialog>
  </div>
</template>


<script>
import roleApi from '@/api/roleManage'
export default
  data()

    return
      formLabelWidth: '130px',
      roleForm: ,
      dialogFormVisible: false,
      title: '',
      searchModel:
        pageNo: 1,
        pageSize: 10
      ,
      roleList: [],
      total: 0,
      rules:
        roleName: [
           required: true, message: '请输入角色名称', trigger: 'blur' ,
           min: 3, max: 50, message: '长度在 3 到 50 个字符', trigger: 'blur'
        ]


  ,
  methods:
    deleteRole(role)
      this.$confirm(`您确定删除角色 $role.roleName ?`, '提示',
          confirmButtonText: '确定',
          cancelButtonText: '取消',
          type: 'warning'
      ).then(() =>
        roleApi.deleteRoleById(role.roleId).then(response =>
          this.$message(
            type: 'success',
            message: response.message
          );
          this.dialogFormVisible = false;
          this.getRoleList();
        );

      ).catch(() =>
        this.$message(
          type: 'info',
          message: '已取消删除'
        );
      );
    ,
    saveRole()
      // 触发表单验证
      this.$refs.roleFormRef.validate((valid) =>
        if (valid)
          // 提交保存请求
          roleApi.saveRole(this.roleForm).then(response =>
            // 成功提示
            this.$message(
              message: response.message,
              type: 'success'
            );
            // 关闭对话框
            this.dialogFormVisible = false;
            // 刷新表格数据
            this.getRoleList();
          );

         else
          console.log('error submit!!');
          return false;

      );

    ,
    clearForm()
      this.roleForm = ;
      this.$refs.roleFormRef.clearValidate();
    ,
    openEditUI(id)
      if(id == null)
        this.title = '新增角色';
      else
        this.title = '修改角色';
        roleApi.getRoleById(id).then(response =>
          this.roleForm = response.data;
        );

      this.dialogFormVisible = true;
    ,
    handleSizeChange(pageSize)
      this.searchModel.pageSize = pageSize;
      this.getRoleList();
    ,
    handleCurrentChange(pageNo)
      this.searchModel.pageNo = pageNo;
      this.getRoleList();
    ,
    getRoleList()
      roleApi.getRoleList(this.searchModel).then(response =>
        this.roleList = response.data.rows;
        this.total = response.data.total;
      );

  ,
  created()
    this.getRoleList();

;
</script>

<style>
#search .el-input
  width: 200px;
  margin-right: 10px;

.el-dialog .el-input
  width: 85%;

</style>
roleManage.js
import request from '@/utils/request'

export default
  // 分页查询角色列表
  getRoleList(searchModel)
    return request(
      url: '/role/list',
      method: 'get',
      params:
        roleName: searchModel.roleName,
        pageNo: searchModel.pageNo,
        pageSize: searchModel.pageSize

    );
  ,
  // 新增
  addRole(role)
    return request(
      url: '/role',
      method: 'post',
      data: role
    );
  ,
  // 修改
  updateRole(role)
    return request(
      url: '/role',
      method: 'put',
      data: role
    );
  ,
  // 保存角色数据
  saveRole(role)
    if(role.roleId == null || role.roleId == undefined)
      return this.addRole(role);

    return this.updateRole(role);
  ,
  // 根据id查询
  getRoleById(id)
    return request(
      url: `/role/$id`,
      method: 'get'
    );
  ,
  // 根据id删除
  deleteRoleById(id)
    return request(
      url: `/role/$id`,
      method: 'delete'
    );
  ,
⑶ 后端
RoleController
@RestController
@RequestMapping("/role")
public class RoleController
@Autowired
private IRoleService roleService;
@GetMapping("/list")
public Result<Map<String,Object>> getUserList(@RequestParam(value = "roleName",required = false) String roleName,