《代码实例后端》Element-Ui登录界面,动态菜单及分页
Posted 欧皇夏老板
tags:
篇首语:本文由小常识网(cha138.com)小编为大家整理,主要介绍了《代码实例后端》Element-Ui登录界面,动态菜单及分页相关的知识,希望对你有一定的参考价值。

SecurityConfig.java
package com.x.springsecurityday01.config;

import com.x.springsecurityday01.dao.UserDao;
import com.x.springsecurityday01.handler.*;
import com.x.springsecurityday01.service.SecurityService;
import org.springframework.beans.factory.annotation.Autowired;
import org.springframework.context.annotation.Bean;
import org.springframework.security.config.annotation.authentication.builders.AuthenticationManagerBuilder;
import org.springframework.security.config.annotation.method.configuration.EnableGlobalMethodSecurity;
import org.springframework.security.config.annotation.web.builders.HttpSecurity;
import org.springframework.security.config.annotation.web.configuration.EnableWebSecurity;
import org.springframework.security.config.annotation.web.configuration.WebSecurityConfigurerAdapter;
import org.springframework.security.config.annotation.web.configurers.ExpressionUrlAuthorizationConfigurer;
import org.springframework.security.config.http.SessionCreationPolicy;
import org.springframework.security.crypto.bcrypt.BCryptPasswordEncoder;
import org.springframework.security.crypto.password.PasswordEncoder;
import org.springframework.security.web.authentication.UsernamePasswordAuthenticationFilter;

@EnableWebSecurity
@EnableGlobalMethodSecurity(securedEnabled = true,jsr250Enabled = true,prePostEnabled=true)//作用:开启注解式鉴权
public class SecurityConfig extends WebSecurityConfigurerAdapter

    @Autowired
    private SecurityService securityService;

    @Autowired
    private LoginSuccessHandler loginSuccessHandler;

    @Autowired
    private JWTFilter jwtFilter;

    /**
     * 认证
     * @param auth
     * @throws Exception
     */
    @Override
    public void configure(AuthenticationManagerBuilder auth) throws Exception
        //BCryptPasswordEncoder passwordEncoder=new BCryptPasswordEncoder();
        //String encode=passwordEncoder.encode("123");
        //自定义用户名和密码
       // auth.inMemoryAuthentication().withUser("admin").password(encode).roles("admin");
        auth.userDetailsService(securityService);


    /**
     * 自定义登录页面
     * @param http
     * @throws Exception
     */
    @Override
    public void configure(HttpSecurity http) throws Exception
        http.formLogin() //告诉框架自定义页面
                //.loginPage("/login.html") //登录页面地址
                //.loginProcessingUrl("/dologin")//对应表单提交的action
                .successHandler(loginSuccessHandler)
                .failureHandler(new LoginFailHandler())
                .permitAll();//对上面两个请求放行
        //1.无权限2.未登录而登录
        http.exceptionHandling()
                .accessDeniedHandler(new NOAuthHandler())
                .authenticationEntryPoint(new NoLoginHandler());
        /**
         * 授权
         */
        http.authorizeRequests()
                //.antMatchers("/hello").hasAuthority("stu:query")
                //.antMatchers("/delete").hasAuthority("stu:query")
                //.antMatchers("/hello").hasAnyAuthority("stu:query","hello")
                //.antMatchers("/hello").hasRole("stu:query")
                //.antMatchers("/delete").permitAll() //配置免拦截方法

                .anyRequest().authenticated();//所有请求都拦截
        /**
         * 把jwtfilter注入进来
         */
        http.addFilterAfter(jwtFilter, UsernamePasswordAuthenticationFilter.class);

        /**
         * 把session禁掉
         */
        http.sessionManagement().sessionCreationPolicy(SessionCreationPolicy.STATELESS);

        //跨站脚本攻击关闭
        http.csrf().disable();

        //允许跨域请求
        //http.cors();


    @Bean
    public PasswordEncoder passwordEncoder()
        return new BCryptPasswordEncoder();
UserController.java
package com.x.springsecurityday01.controller;

import com.alibaba.fastjson.JSON;
import com.x.springsecurityday01.domain.Users;
import com.x.springsecurityday01.service.UserService;
import com.x.springsecurityday01.util.RequestParams;
import com.x.springsecurityday01.util.ResponseResult;
import lombok.extern.slf4j.Slf4j;
import org.springframework.beans.factory.annotation.Autowired;
import org.springframework.security.access.prepost.PreAuthorize;
import org.springframework.web.bind.annotation.*;

@RestController
@RequestMapping("/user")
@Slf4j
public class UserController
    @Autowired
    private UserService userService;

    @RequestMapping("/queryUser")
    public ResponseResult<?> queryUser(String name,Integer gender)
        return  userService.queryUserInfo(name,gender);


    @PostMapping("/addUser")
    @PreAuthorize("hasAuthority('stu:query')")
    public ResponseResult<?> addUser(@RequestBody Users users)
        //log.info(JSON.toJSONString(users));
        return userService.insertUser(users);


    @GetMapping("/removeUser")
    @PreAuthorize("hasAuthority('stu:query')")
    public ResponseResult<?> removeUser(Integer id)
        return userService.removeUser(id);


    @PostMapping("/updateUser")
    @PreAuthorize("hasAuthority('stu:query')")
    public ResponseResult<?> updateUser(@RequestBody Users users)
       return userService.updateUser(users);


    @GetMapping("/findId")
    @PreAuthorize("hasAuthority('stu:query')")
    public ResponseResult<?> selectById(Integer id)
        return userService.selectById(id);


    @RequestMapping("getUserMenu")
    public ResponseResult<?> queryUserMenus(String account)
        return userService.queryMenusByUser(account);


    @PostMapping("queryUser")
    public ResponseResult<?> queryUser(@RequestBody RequestParams<Users> requestParams)
        //log.info(JSON.toJSONString(requestParams));
        return userService.queryUserInfoByPage(requestParams);
MenuDao.java
package com.x.springsecurityday01.dao;

import com.x.springsecurityday01.domain.Menus;
import org.springframework.stereotype.Repository;

import java.util.List;

@Repository
public interface MenuDao
    /**
     * 根据登录人账号,去查该人拥有的菜单
     */
    List<Menus> queryMenusByAccount(String account);
UserDao.java
package com.x.springsecurityday01.dao;

import com.baomidou.mybatisplus.core.mapper.BaseMapper;
import com.x.springsecurityday01.domain.Users;
import org.springframework.stereotype.Repository;

import java.util.List;

@Repository
public interface UserDao
    /**
     * 根据账号查用户信息及其权限
     */
    Users getUserInfoByAccount(String account);

    /**
     * 根据用户名和性别查询用户信息
     * @param name
     * @param gender
     * @return
     */
    List<Users> getUserInfoByNameAndGender(String name,Integer gender);

    /**
     * 新增用户
     * @param users
     */
    void insertUser(Users users);

    void removeUser(Integer id);

    void updateUser(Users users);

    Users selectById(Integer id);
Menus.java
package com.x.springsecurityday01.domain;

import lombok.Data;

import java.util.List;

@Data
public class Menus

    private Integer id;

    private String name;

    private String icon;

    private String link;

    private Integer parentId;

    //放二级菜单
    private List<Menus> childrenMenu;
Users.java
package com.x.springsecurityday01.domain;

import com.baomidou.mybatisplus.annotation.TableField;
import lombok.AllArgsConstructor;
import lombok.Data;
import lombok.NoArgsConstructor;

import java.util.List;
@Data
@AllArgsConstructor
@NoArgsConstructor
public class Users

    private Integer id;

    private String username;

    private String account;

    private String password;

    private String phone;

    private Integer gender;//性别

    private List<String> anth;//该用户拥有的权限
JWTFilter.java
package com.x.springsecurityday01.handler;

import com.x.springsecurityday01.service.SecurityService;
import com.x.springsecurityday01.util.JWTUtil;
import lombok.SneakyThrows;
import org.springframework.beans.factory.annotation.Autowired;
import org.springframework.data.redis.core.StringRedisTemplate;
import org.springframework.security.authentication.UsernamePasswordAuthenticationToken;
import org.springframework.security.core.context.SecurityContextHolder;
import org.springframework.security.core.userdetails.UserDetails;
import org.springframework.stereotype.Component;
import org.springframework.web.filter.OncePerRequestFilter;

import javax.servlet.FilterChain;
import javax.servlet.ServletException;
import javax.servlet.http.HttpServletRequest;
import javax.servlet.http.HttpServletResponse;
import java.io.IOException;
import java.util.Map;
import java.util.concurrent.TimeUnit;

/**
 * 校验jwt
 *
 * 1:判断请求是否携带jwt
 *  否:放行不处理
 *  是:走到第二步
 * 2:对前端传过来的jwt解密
 *  否:放行不处理
 *  是:走到第三步
 * 3: 获取redis的jwt
 *  获取不到:放行不处理
 *  获取到:走到第四步
 * 4:对比jwt
 *  否:放行不处理
 *  是:走到第五步
 * 5:给jwt续期
 *
 */
@Component
public class JWTFilter extends OncePerRequestFilter
    /**
     * StringRedisTemplate和RedisTemplate区别
     */
    @Autowired
    private StringRedisTemplate redisTemplate;
    @Autowired
    private SecurityService securityService;
    @SneakyThrows
    @Override
    protected void doFilterInternal(HttpServletRequest request,
                                    HttpServletResponse response,
                                    FilterChain filterChain)
            throws ServletException, IOException
        /**
         * * 1:判断请求是否携带jwt
         *  *  否:放行不处理
         *  *  是:走到第二步
         */
        String jwt=request.getHeader("jwt");
        if(jwt==null)
            //交给下一个过滤器处理
            filterChain.doFilter(request,response);
            return;


        /**
         * 2:对前端传过来的jwt解密
         *  *  否:放行不处理
         *  *  是:走到第三步
         */
        if(!JWTUtil.decode(jwt))
            filterChain.doFilter(request,response);
            return;

        /**
         * 3: 获取redis的jwt
         *  *  获取不到:放行不处理
         *  *  获取到:走到第四步
         */
        Map payLoad = JWTUtil.getPayLoad(jwt);
        String username=(String)payLoad.get("username");
        String redisJwt = redisTemplate.opsForValue().get("jwt:" + username);
        if(redisJwt==null)
            filterChain.doFilter(request,response);
            return;

        /**
         * 4:对比jwt
         *  *  否:放行不处理
         *  *  是:走到第五步
         */
        if(!jwt.equals(redisJwt))
            filterChain.doFilter(request,response);
            return;

        /**
         * 5:给jwt续期
         */
        redisTemplate.opsForValue().set("jwt:"+ username,jwt,30, TimeUnit.MINUTES);

        //把用户信息放到security容器中去
        UserDetails userDetails = securityService.loadUserByUsername(username);
        UsernamePasswordAuthenticationToken upa=
                new UsernamePasswordAuthenticationToken(userDetails.getUsername(),
                                                        userDetails.getPassword(),
                                                        userDetails.getAuthorities());
        //把信息放到security容器中去
        SecurityContextHolder.getContext().setAuthentication(upa);

        filterChain.doFilter(request,response);
LoginFailHandler.java
package com.x.springsecurityday01.handler;

import com.alibaba.fastjson.JSON;
import com.x.springsecurityday01.util.ResponseResult;
import org.springframework.security.core.AuthenticationException;
import org.springframework.security.web.authentication.AuthenticationFailureHandler;
import org.springframework.security.web.authentication.AuthenticationSuccessHandler;

import javax.servlet.ServletException;
import javax.servlet.http.HttpServletRequest;
import javax.servlet.http.HttpServletResponse;
import java.io.IOException;
import java.util.HashMap;
import java.util.Map;

/**
 * 登陆失败
 */
public class LoginFailHandler implements AuthenticationFailureHandler
    @Override
    public void onAuthenticationFailure(HttpServletRequest httpServletRequest,
                                        HttpServletResponse httpServletResponse,
                                        AuthenticationException e)
            throws IOException, ServletException

        httpServletResponse.setContentType("application/json;charset=UTF-8");
//        Map map=new HashMap<>();
//        map.put("code",500);
        httpServletResponse.getWriter().write(JSON.toJSONString(ResponseResult.LOGIN_FAIL));
LoginSuccessHandler.java
package com.x.springsecurityday01.handler;
import com.springboot+vue结合,后端学习前端(前端拦截器+后端拦截器)未登录访问其他页面,直接进入登陆界面
前端拦截器+后端拦截器
处理#号问题

URL 的 # 号后面的地址被称为 hash ,这种实现方式我们称之为 Hash 模式,是非常典型的前端路由方式
另一种常用的方式被称为 History 模式
使用 History 模式
蓝色处为新添加的内容

前端部署到后端项目里(tomcat版本由8.5.23需要提高到9.0.56了)
()
点击蓝色处build,即可打包完成,成功状态如下

或通过命令 npm run build
内容位置如下:
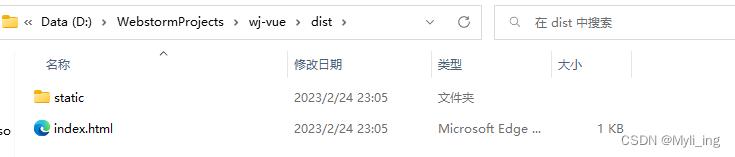
若想把前端与后端合并,可将dist中的所有内容放入后端的项目的 wj\\src\\main\\resources\\static 文件夹下
默认的错误页面
新建一个页面
import org.springframework.boot.web.server.ErrorPageRegistrar;
import org.springframework.boot.web.server.ErrorPage;
import org.springframework.boot.web.server.ErrorPageRegistry;
import org.springframework.http.HttpStatus;
import org.springframework.stereotype.Component;
@Component
public class ErrorConfig implements ErrorPageRegistrar
@Override
public void registerErrorPages(ErrorPageRegistry registry)
ErrorPage error404Page = new ErrorPage(HttpStatus.NOT_FOUND, "/index.html");
registry.addErrorPages(error404Page);
后端登录拦截器
一个简单拦截器的逻辑如下:
1.用户访问 URL,检测是否为登录页面,如果是登录页面则不拦截
2.如果用户访问的不是登录页面,检测用户是否已登录,如果未登录则跳转到登录页面
LoginController添加session
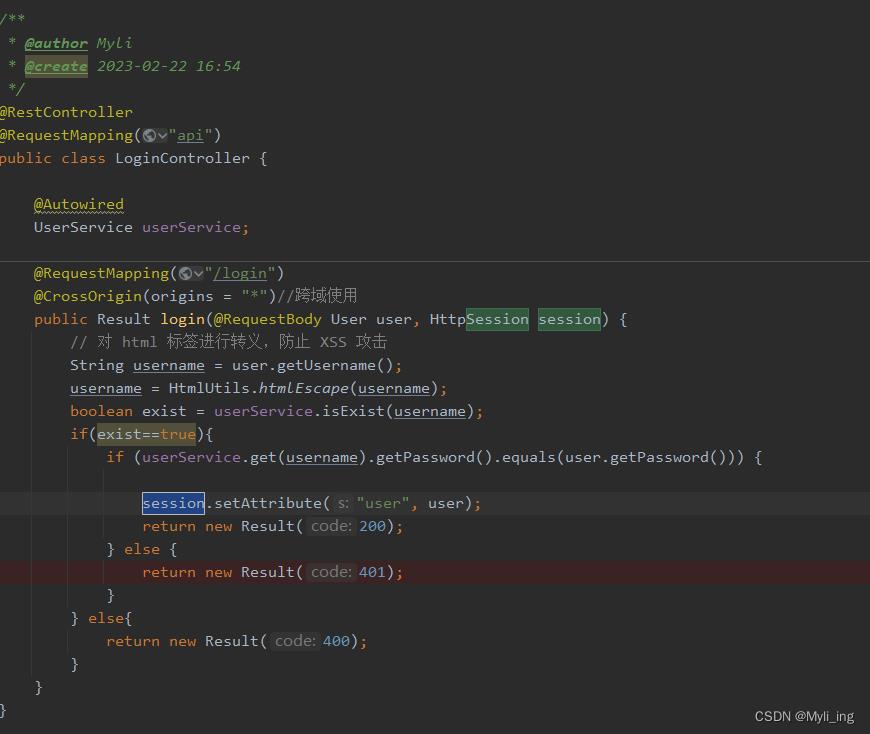
LoginInterceptor
判断 session 中是否存在 user 属性,如果存在就放行,如果不存在就跳转到 login 页面。
package com.myli.base;
import com.myli.entity.User;
import org.apache.commons.lang.StringUtils;
import org.springframework.web.servlet.HandlerInterceptor;
import javax.servlet.http.HttpServletRequest;
import javax.servlet.http.HttpServletResponse;
import javax.servlet.http.HttpSession;
public class LoginInterceptor implements HandlerInterceptor
@Override
public boolean preHandle (HttpServletRequest httpServletRequest, HttpServletResponse httpServletResponse, Object o) throws Exception
HttpSession session = httpServletRequest.getSession();
String contextPath=session.getServletContext().getContextPath();
String[] requireAuthPages = new String[]
"index",
;
String uri = httpServletRequest.getRequestURI();
uri = StringUtils.remove(uri, contextPath+"/");
String page = uri;
if(begingWith(page, requireAuthPages))
User user = (User) session.getAttribute("user");
if(user==null)
httpServletResponse.sendRedirect("login");
return false;
return true;
private boolean begingWith(String page, String[] requiredAuthPages)
boolean result = false;
for (String requiredAuthPage : requiredAuthPages)
if(StringUtils.startsWith(page, requiredAuthPage))
result = true;
break;
return result;
拦截器配置到项目里
package com.myli.base.config;
import com.myli.base.LoginInterceptor;
import org.springframework.boot.SpringBootConfiguration;
import org.springframework.context.annotation.Bean;
import org.springframework.web.servlet.config.annotation.*;
/**
* @author Myli
* @create 2023-02-22 17:29
*/
@SpringBootConfiguration
public class MyMvcConfig implements WebMvcConfigurer
@Bean
public LoginInterceptor getLoginIntercepter()
return new LoginInterceptor();
@Override
public void addInterceptors(InterceptorRegistry registry)
registry.addInterceptor(getLoginIntercepter()).addPathPatterns("/**").excludePathPatterns("/index.html");
访问一个 URL,会首先通过 Configurer 判断是否需要拦截,需要的化,触发拦截器 LoginInterceptor,根据自定义的规则再判断。
/index 与 /index.html 是不同的,也就是说 /index 会触发拦截器而 /index.html 不会,但根据拦截器 LoginInterceptor 中我们定义的判断条件,以 /index 开头的路径都会被转发,包括 index.html。
因为我们做的是单页面应用,之前通过配置 ErrorPage,实际上访问所有路径都会重定向到 /index.html 。我们直接在浏览器地址栏输入 /index 会触发拦截器,经过拦截器重定向到 /login,然后 /login 再经过 Configurer 的判断,再次触发拦截器,由于不在需要拦截的路径中,所以被放行,页面则重新定向到了 /index.html,如果没有再 Configurer 中取消对 /index.html 的拦截,则会再次触发拦截器,再次重定向到 /login。
Vuex 与前端登录拦截器
Vuex,在前端判断用户的登录状态
下载 Vuex
npm install vuex --save

引入Vuex
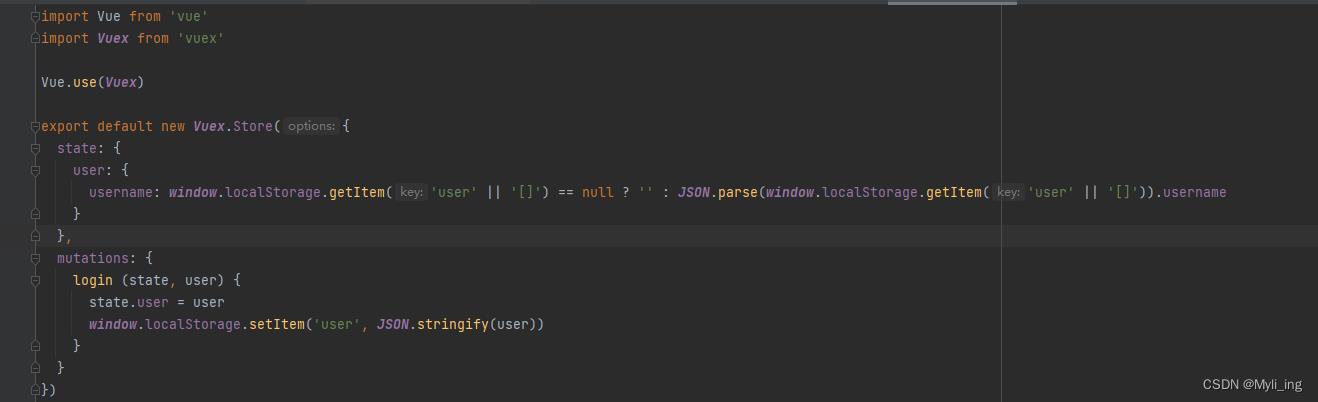
src 目录下新建一个文件夹 store,并在该目录下新建 index.js 文件
import Vue from 'vue'
import Vuex from 'vuex'
Vue.use(Vuex)
在该index.js中继续
export default new Vuex.Store(
state:
user:
username: window.localStorage.getItem('user' || '[]') == null ? '' : JSON.parse(window.localStorage.getItem('user' || '[]')).username
,
mutations:
login (state, user)
state.user = user
window.localStorage.setItem('user', JSON.stringify(user))
)
state意思为状态,记录用户信息
mutations方法,触发这个方法时可以为我们的用户对象赋值
localStorage:即本地存储,在项目打开的时候会判断本地存储中是否有 user 这个对象存在,如果存在就取出来并获得 username 的值,否则则把 username 设置为空。这样我们只要不清除缓存,登录的状态就会一直保存。
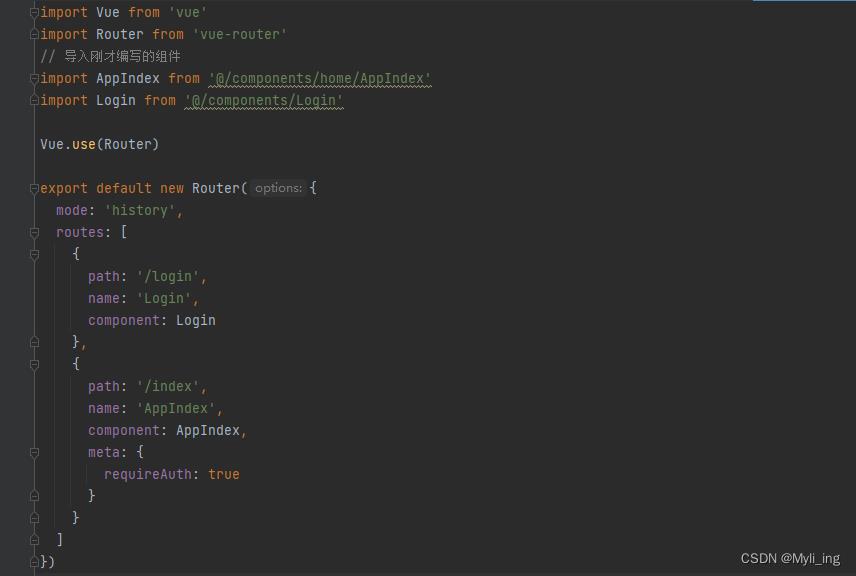
修改路由配置
src\\router\\index.js
设置一个 requireAuth 字段
path: '/index',
name: 'AppIndex',
component: AppIndex,
meta:
requireAuth: true
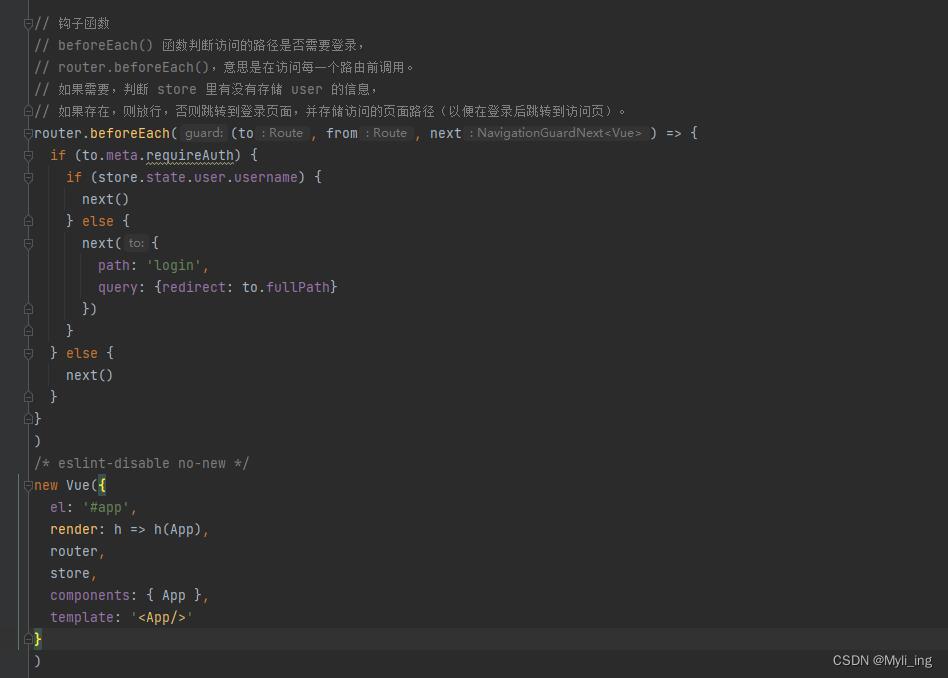
钩子函数
beforeEach() 为前端拦截的核心
// The Vue build version to load with the `import` command
// (runtime-only or standalone) has been set in webpack.base.conf with an alias.
import Vue from 'vue'
import App from './App'
import router from './router'
import ElementUI from 'element-ui'
import 'element-ui/lib/theme-chalk/index.css'
import store from './store'
// 设置反向代理,前端请求默认发送到 http://localhost:8443/api
var axios = require('axios')
axios.defaults.baseURL = 'http://localhost:8443/api'
// 全局注册,之后可在其他组件中通过 this.$axios 发送数据
Vue.prototype.$axios = axios
Vue.config.productionTip = false
Vue.use(ElementUI)
// 钩子函数
// beforeEach() 函数判断访问的路径是否需要登录,
// router.beforeEach(),意思是在访问每一个路由前调用。
// 如果需要,判断 store 里有没有存储 user 的信息,
// 如果存在,则放行,否则跳转到登录页面,并存储访问的页面路径(以便在登录后跳转到访问页)。
router.beforeEach((to, from, next) =>
if (to.meta.requireAuth)
if (store.state.user.username)
next()
else
next(
path: 'login',
query: redirect: to.fullPath
)
else
next()
)
/* eslint-disable no-new */
new Vue(
el: '#app',
render: h => h(App),
router,
store,
components: App ,
template: '<App/>'
)
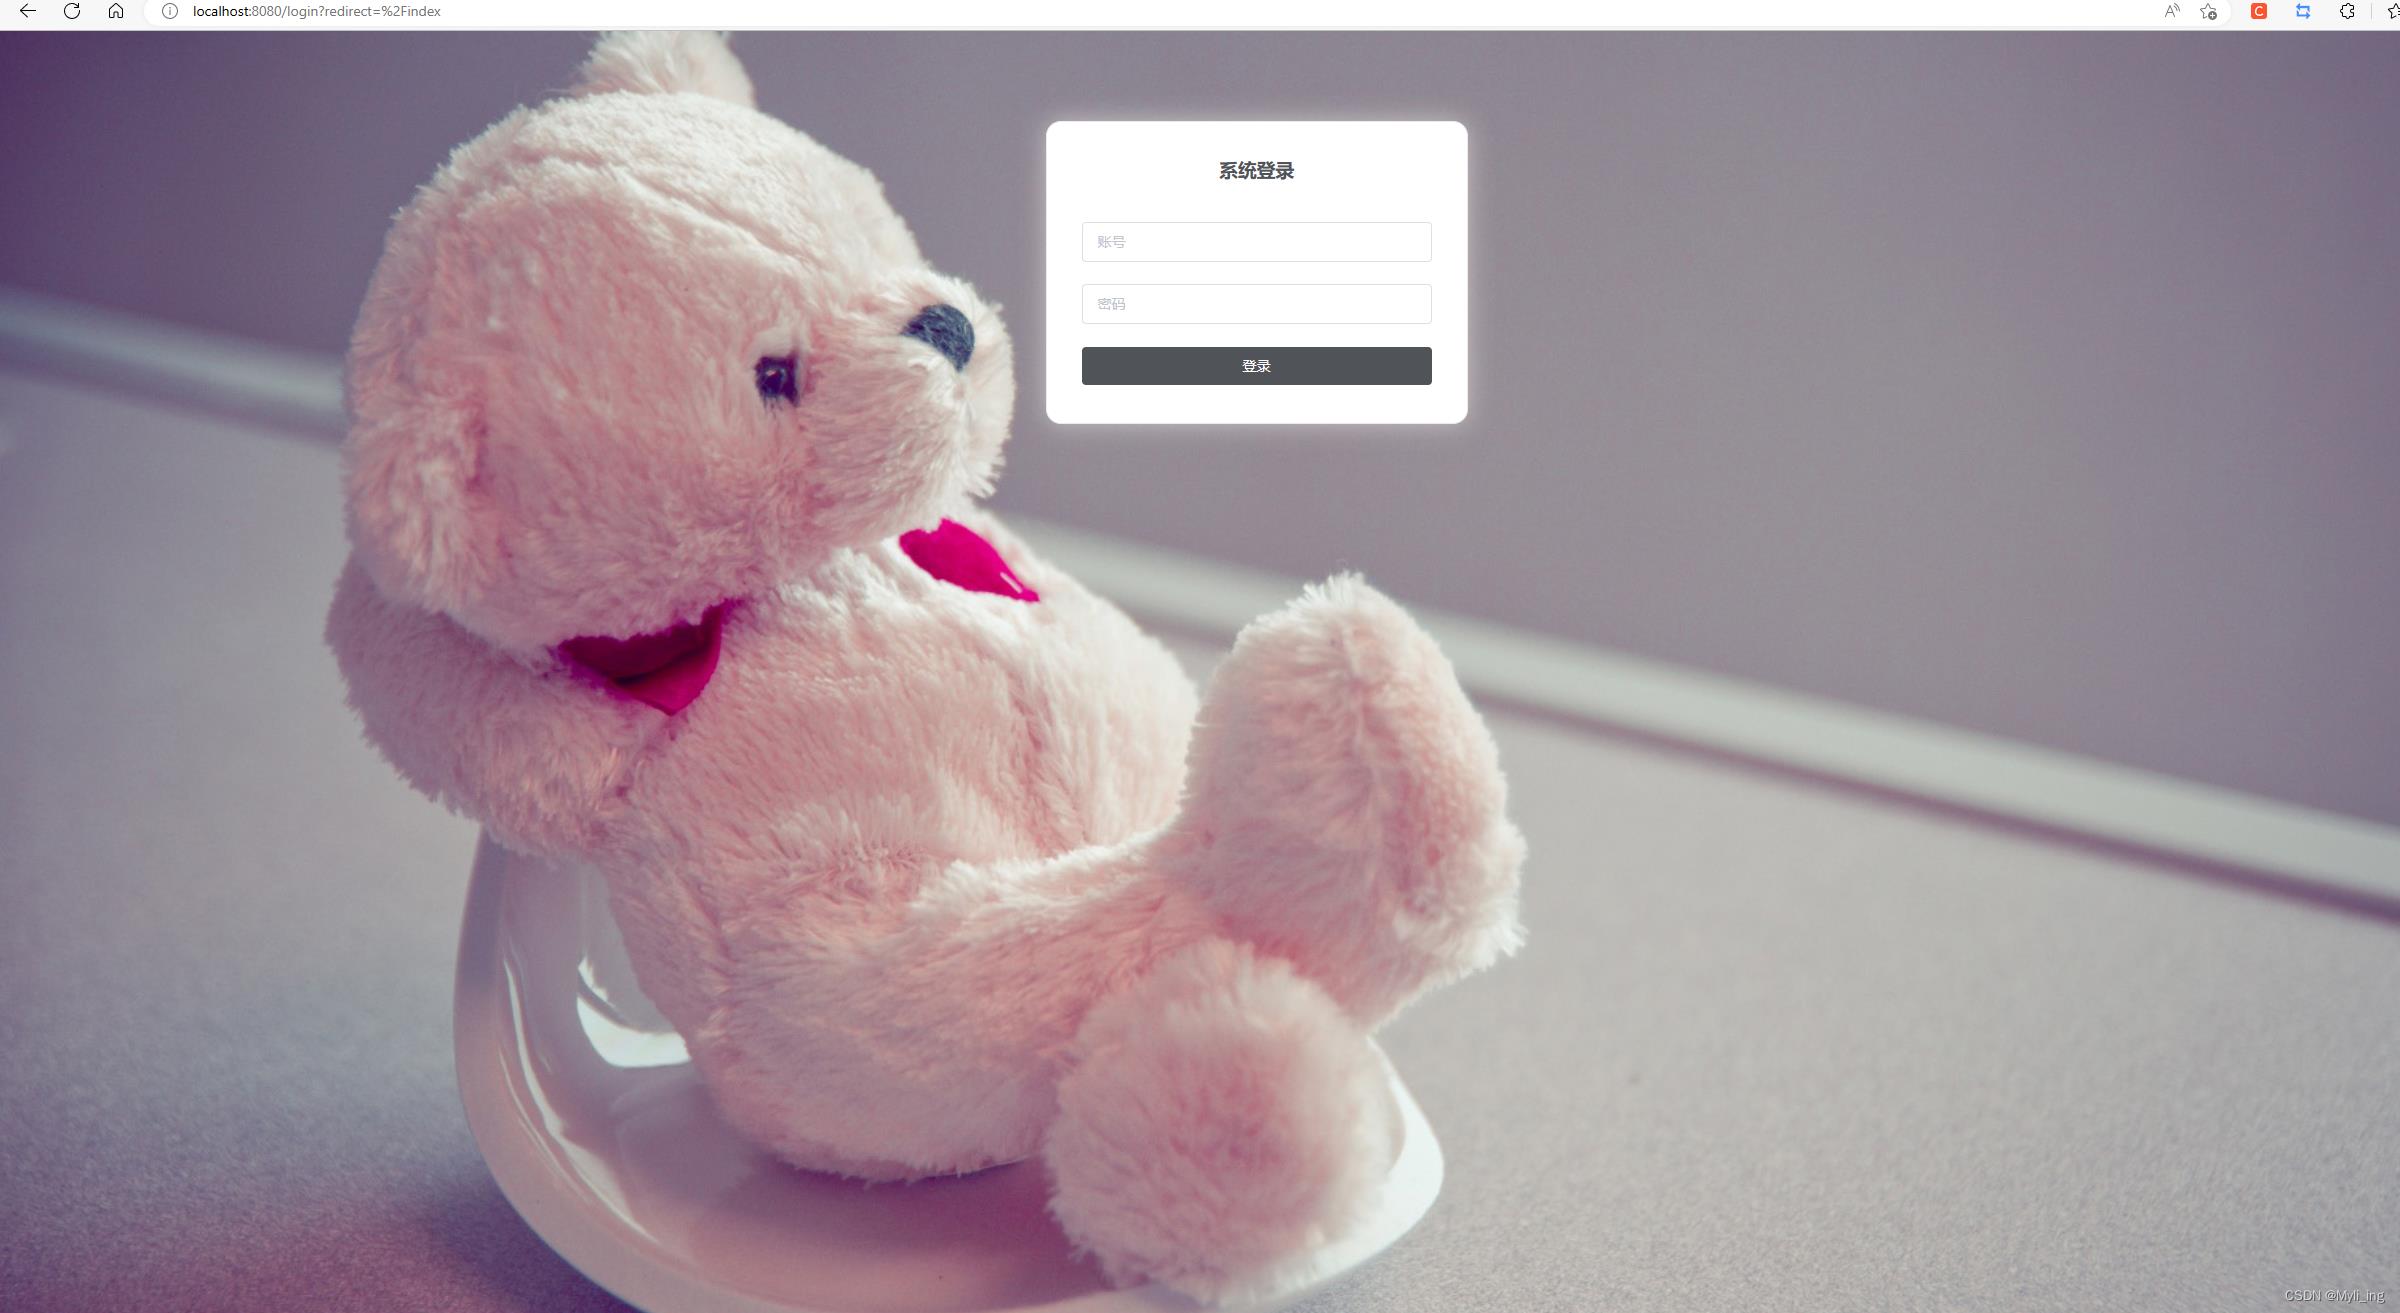
login.vue
把通过的用户信息存起来
<template>
<body id="poster">
<el-form class="login-container" label-position="left"
label-width="0px">
<h3 class="login_title">系统登录</h3>
<el-form-item>
<el-input type="text" v-model="loginForm.username"
auto-complete="off" placeholder="账号"></el-input>
</el-form-item>
<el-form-item>
<el-input type="password" v-model="loginForm.password"
auto-complete="off" placeholder="密码"></el-input>
</el-form-item>
<el-form-item style="width: 100%">
<el-button type="primary" style="width: 100%;background: #505458;border: none" v-on:click="login">登录</el-button>
</el-form-item>
</el-form>
</body>
</template>
<script>
export default
name: 'Login',
data ()
return
loginForm:
username: 'admin',
password: '123'
,
responseResult: []
,
methods:
login ()
var _this = this
console.log(this.$store.state)
this.$axios
.post('/login',
username: this.loginForm.username,
password: this.loginForm.password
)
.then(successResponse =>
if (successResponse.data.code === 200)
// var data = this.loginForm
_this.$store.commit('login', _this.loginForm)
var path = this.$route.query.redirect
this.$router.replace(path: path === '/' || path === undefined ? '/index' : path)
)
.catch(failResponse =>
)
</script>
<style>
#poster
background:url("../assets/eva.jpg") no-repeat;
background-position: center;
height: 100%;
width: 100%;
background-size: cover;
position: fixed;
body
margin: 0px;
.login-container
border-radius: 15px;
background-clip: padding-box;
margin: 90px auto;
width: 350px;
padding: 35px 35px 15px 35px;
background: #fff;
border: 1px solid #eaeaea;
box-shadow: 0 0 25px #cac6c6;
.login_title
margin: 0px auto 40px auto;
text-align: center;
color: #505458;
</style>
登录测试
输账号密码登录
看一下存了没
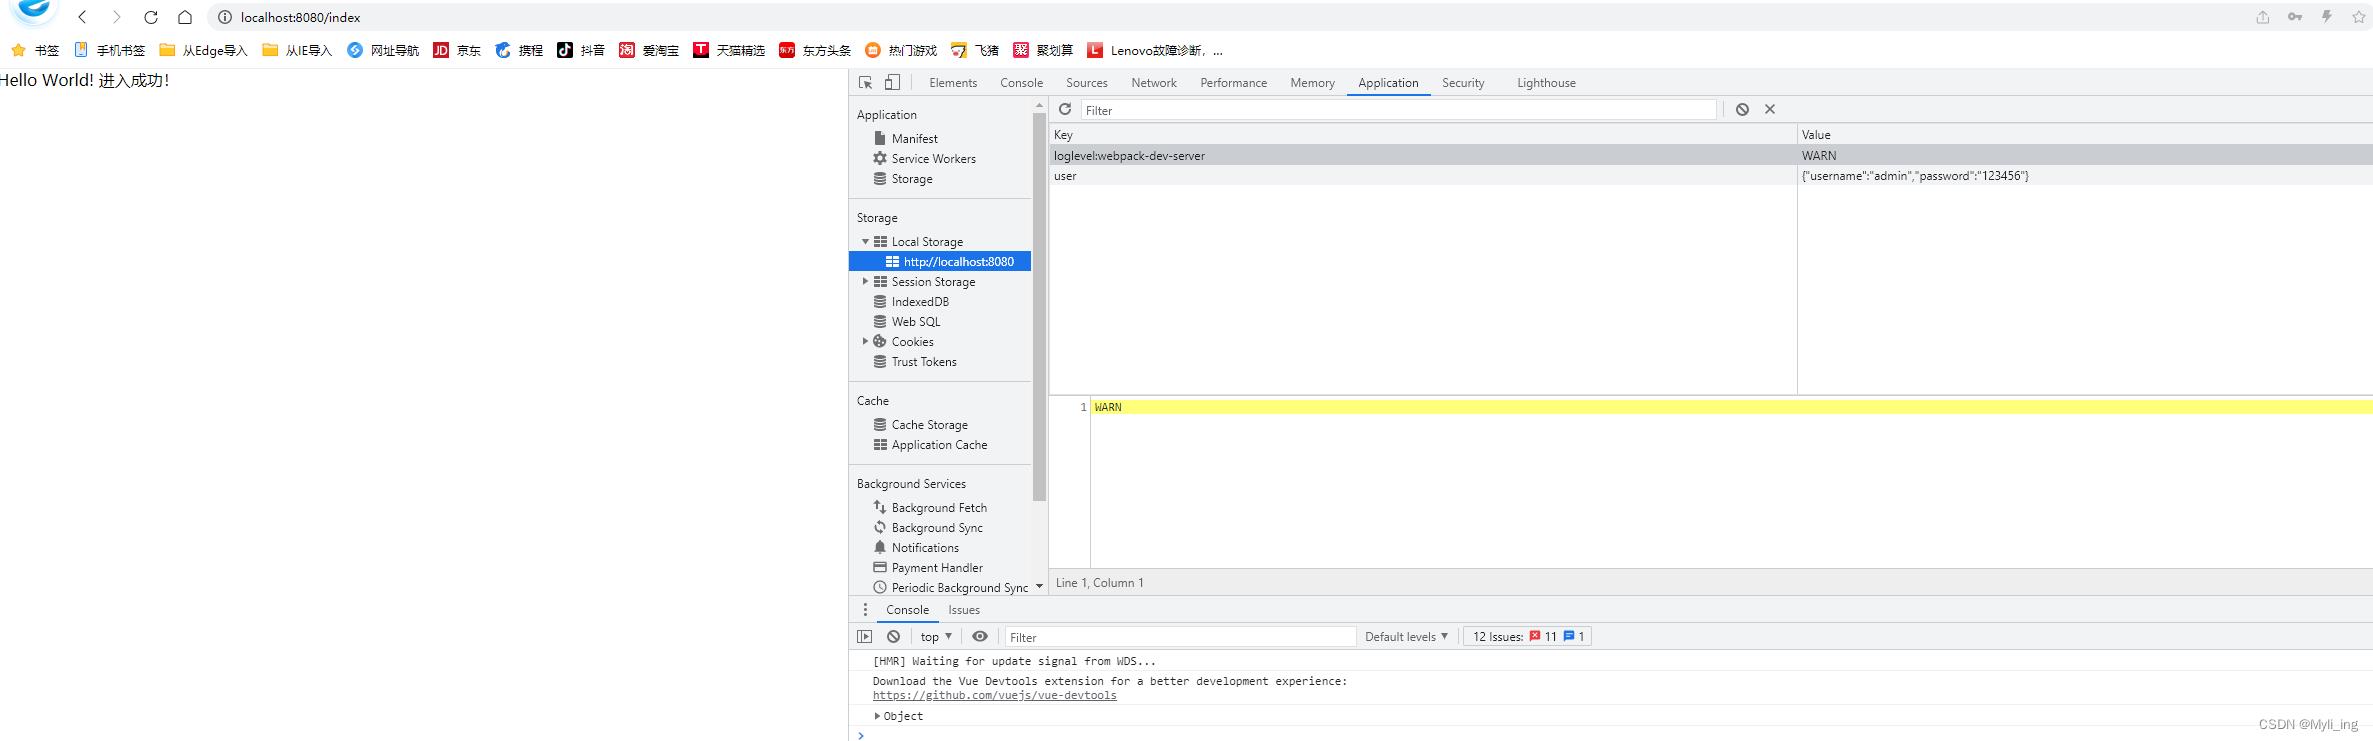
然后直接把user一行的数据删掉,
重新进index页面,如果直接到登录界面了,算成功
如果出现乱七八糟的错误,先把webstorm重启,然后看错误存在不存在,如果存在,再解决
注意:store下的indesx.js 中 window.localStorage替换成window.sessionStorage,可以完成浏览器不关闭前数据一直保留,但是不会永久存在!
以上是关于《代码实例后端》Element-Ui登录界面,动态菜单及分页的主要内容,如果未能解决你的问题,请参考以下文章