基于ASP.NET Core 6.0的整洁架构,asp.net core 6.0 功能
Posted 大哥手下留情
tags:
篇首语:本文由小常识网(cha138.com)小编为大家整理,主要介绍了基于ASP.NET Core 6.0的整洁架构,asp.net core 6.0 功能相关的知识,希望对你有一定的参考价值。
背景
最近尝试录制了一个系列视频:《ASP.NET Core 6.0+Vue.js 3实战开发》,本节是视频内部整洁架构的理论和实战的文字稿。因为在录制之前,我通常会编写完整的文字内容作为视频文案,这里分享给大家,希望对你有所帮助。如果您能捧个人场,订阅我的视频,感激不尽。
虽然是收费的视频,但是我的分享不会止步,再次感谢您的阅读。
视频地址
点击跳转链接
文章主题
本章将介绍基于ASP.NET Core的整洁架构的设计理念,同时基于理论落地的代码模型,包括文件夹、文件、项目的组织形式以及项目的依赖关系,为企业级可扩展的架构奠定基础。
本章学习主题包括:
- 整洁架构介绍
- 核心层
- 基础设施层
- 表示层
- 测试管理
- 构建整洁架构解决方案
3.1整洁架构介绍
很多公司系统多样,每个系统的分层结构各不相同,这给开发和未来的运维带来了巨大的成本,分层架构看似很简单,但保证整个研发中心都使用统一的分层架构就不容易了。
那么如何保证整个研发中心都使用统一的分层架构,以达到提高编写代码效率、保证工程统一性的目的?
我们推荐行业内目前比较流行的整洁架构。
整洁架构是什么?简而言之,它是组织软件体系结构的原则,可以轻松面对未来的不确定性,方便代码的重构。同时,它可以帮助我们为特定的领域模型构建服务,从而为将来可能的微服务体系结构做好准备。
我们看下整洁架构的洋葱示意图: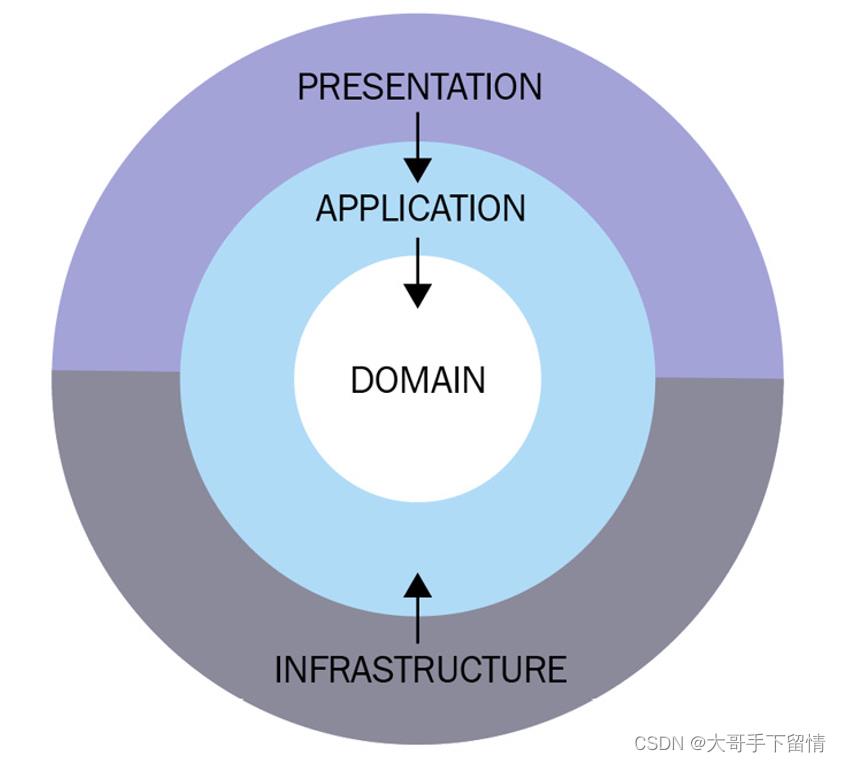
在整洁架构中,领域层(Domain)和应用层(Application)是架构的核心层。领域层包含实体、枚举和常量设置等,应用层则包含数据传输对象(DTO)、接口、映射、异常、行为和业务逻辑。
整洁架构和传统三层架构的不同之处在于依赖的不同,因为企业的核心逻辑是可以跨系统共享的,而应用逻辑或业务逻辑是特定的。所以为了复用,现在,我们不再让核心层依赖数据访问和基础设施,而是颠倒这些依赖关系。如上图所示,表示层和基础设施层现在是依赖于我们的核心层,但核心层对任何一层都没有依赖性。
这种架构必须通过在应用层内添加抽象或接口来实现,这些抽象或接口是在应用层之外的其他层实现的。例如,如果我们想要实现存储库模式(Repository),我们一般会在应用层添加一个IRepository接口,而实现放在基础设施层。
有了这个设计原则,所有依赖项都指向圆的重心,而最内部的领域层对其他层没有任何依赖性。随后,表示和基础设施层依赖于核心层,而不是彼此依赖。这一点非常重要,因为我们希望确保该系统的逻辑保留在核心内,这样我们就可以重用业务逻辑。我们举个反例,如果表示层依赖基础设施层,那么在发生短信通知的时候,这个逻辑就会停留在表示层中,因为它必须协调表示层和基础设施层之间的交互,如果是这样,未来我们就很难重用这种逻辑。
如果洋葱示意图不好理解,我们可以结合下面扁平化的示意图来理解。
扁平示意图: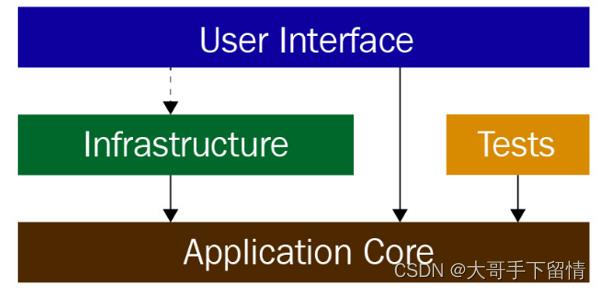
我们看到我们的应用层处在最底下,它没有任何依赖项。基础设施层依赖于应用层,最后整个应用程序变得高度可测试,我们可以快速编写单元测试、集成测试和功能测试。
下面,我们将把每一层的职责逐步展开介绍,最后我们会通过代码(基于.NET 6.0)把整洁架构这套理念落地到我们的解决方案当中。
核心层(Core)将包含应用项目和领域项目;
基础设施层(Infrastructure)将包含数据和共享项目;
展示层(Presentation)将包含一个WebApi项目。
以上就是基于NET Core解决方案的项目设置和文件夹安排。
3.1.1核心层(Core)
核心层是整洁架构的中心,因为它本身不会依赖于其他层。核心层包含两个项目,分别是.Domain和.Application,下面展开描述:
1)领域层(Domain)项目
.Domain项目是一个.NET Standard 2.1类库,它包含实体、接口、枚举、DTO等。
领域项目必须有一个空的项目引用,这表明它对任何项目都没有依赖关系。
2)应用层(Application)项目
.Application项目也是一个.NET Standard 2.1类库,它定义了接口,但实现不在这一层。该项目还具有CQRS模式的命令和查询、MediatR的行为、AutoMapper对象映射、异常、模型等。
思考:
如果我们要构建微服务,并意识到核心层中有代码会在其他服务中重用,该怎么办?
答案:
我们可以抽象出一个共享项目(.Shared),可以作为一个NuGet包,在微服务中共享代码。
3.1.2基础设施层
基础设施层包含应用层中定义的接口的实现,内部还包括SMTP、文件系统或web服务等资源,都在这一层中实现。
该层是解决方案中的另一个文件夹目录,内部包括多个项目,比如数据层和共享层,另外我们还可以添加Identity的项目进行身份验证(这里暂时省略)。
1)数据(Data)项目
数据项目是一个NET 6.0类库项目,用于数据库持久化,内部包括仓储类、实体类、数据迁移等内容。
2)共享(Shared)项目
共享项目也是一个NET 6.0类库项目,该项目包含了不同服务之间的共享代码,比如电子邮件、短信或日期等。
3.1.3展示层
展示层是构建web应用程序的地方,我们可以使用ASP.NET Core MVC、ASP.NET Core Web API、单页应用程序(SPA)或移动应用程序。
1)Web API项目
本视频会使用一个Web API项目和一个网站作为案例演示。
WebApi是基于.NET 6.0构建的一个ASP NET Web API项目,可与任何客户端应用程序交互,例如web、移动、桌面和物联网(IoT)。
此外,WebApi依赖于应用层和基础设施层。
2)客户端项目
客户端项目用于用户界面的展示,我们将采用Vue.js 3进行搭建(在第11节介绍),它也将被归类在展示层。
3.1.4测试管理
测试管理项目并不是整洁架构原则的一部分,但是这里也一并介绍。因为,基于测试驱动的开发是一种好的编程习惯,这里的测试包括单元测试、功能测试、集成测试和负载测试等。
1)单元测试项目
单元测试是测试代码的小部分代码,比如特定的方法或者服务。可以使用XUnit、NUnit或MSTest项目创建此项目。
2)集成测试项目
集成测试是测试类库或组件是否能在一起工作。可以使用XUnit、NUnit或MSTest项目创建此项目。
现在,我们已经完成整洁架构的整体介绍,是时候编码实现了。
3.2构建整洁架构解决方案
本小节将通过代码落地一个基于整洁架构的物联网解决方案。该项目的目标是适用大部分物联网场景,管理员可以在其中添加、删除、更新和读取物模型。
本视频的所有命令行都可以在我的博客上获得,不想敲命令的同学可以自行获取。
开始之前,请先打开终端并导航到项目文件的目录中。
我这里使用的Hyper终端,对于Windows用户,请使用PowerShell或Git Bash终端。如果使用PowerShell,请记住使用反斜杠而不是正斜杠。
创建解决方案如果使用IDE(比如Visual Studio 2022)会简单很多,这里使用命令行有个用意,一个是尝鲜,了解命令的构建方式;另一个是考虑将来可能的CI/CD,为自动化开发做准备。
1)创建解决方案
我们运行以下命令创建一个iot文件夹:
mkdir iot
然后进入该目录:
cd iot
使用dotnet CLI创建一个解决方案:
dotnet new sln
该命令默认使用目录名称iot作为解决方案的名称。
接着,在iot目录中创建一个src文件夹:
mkdir src
现在,进入src目录,并分别创建三个目录:
cd src
mkdir 1.core
mkdir 2.infrastructure
mkdir 3.presentation
2)创建core文件夹
一级目录和文件夹创建完成后,我们进入core文件夹:
cd 1.core
在core目录中,我们将创建两个项目Iot.Domain和Iot.Application:
dotnet new classlib-f netstandard2.1--name Iot.Domain
dotnet new classlib-f netstandard2.1--name Iot.Application
以上两个项目都是基于.NET Standard 2.1,现在进入Iot.Application目录并创建对Iot.Domain的依赖关系:
cd Iot.Application
dotnet add reference../Iot.Domain/Iot.Domain.csproj
3)创建infrasturcture文件夹
接下来,我们转入infrasturcture目录:
cd../../2.infrastructure
在该目录中,我们创建两个基于.NET 6.0的项目,分别是Iot.Data和Iot.Shared:
dotnet new classlib-f net6.0--name Iot.Data
dotnet new classlib-f net6.0--name Iot.Shared
接下来,进入Iot.Data目录:
cd Iot.Data
创建对Iot.Domain和Iot.Application的依赖
dotnet add reference../../1.core/Iot.Domain/Iot.Domain.csproj
dotnet add reference../../1.core/Iot.Application/Iot.Application.csproj
现在,转到Iot.Shared目录:
cd../Iot.Shared
创建对Iot.Application的依赖
dotnet add reference../../1.core/Iot.Application/Iot.Application.csproj
4)创建presentation文件夹
转到presentation目录:
cd../../3.presentation
创建WebApi项目,并转入到Iot.WebApi:
dotnet new webapi--name Iot.WebApi
cd Iot.WebApi
创建对Iot.Application和Iot.Data的依赖
dotnet add reference../../1.core/Iot.Application/Iot.Application.csproj
dotnet add reference../../2.infrastructure/Iot.Data/Iot.Data.csproj
接下来,创建对Iot.Shared的依赖:
dotnet add reference../../2.infrastructure/Iot.Shared/Iot.Shared.csproj
5)注册项目到解决方案
转到解决方案所在的根目录:
cd../../../
注册所有的项目到解决方案,注册顺序依次:
dotnet sln add src/1.core/Iot.Domain/Iot.Domain.csproj
dotnet sln add src/1.core/Iot.Application/Iot.Application.csproj
dotnet sln add src/2.infrastructure/Iot.Data/Iot.Data.csproj
dotnet sln add src/2.infrastructure/Iot.Shared/Iot.Shared.csproj
dotnet sln add src/3.presentation/Iot.WebApi/Iot.WebApi.csproj
至此,我们已经通过.NET CLI完成了我们解决方案的实现,接下来我们关闭终端并使用Visual Studio 2022打开我们的解决方案,如下图所示:
整洁架构的解决方案示意图: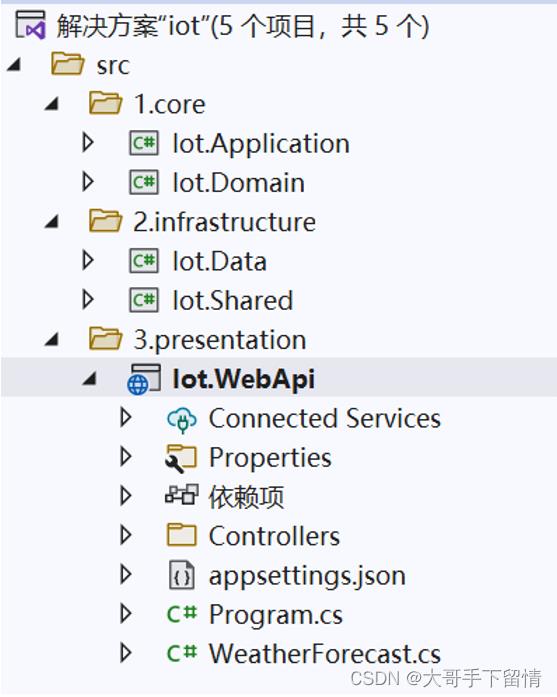
3.3本节总结
通过本节的学习,我们了解了什么是整洁架构,整洁架构的模块内容以及依赖关心,以及它将如何帮助开发人员构建可扩展、可演化、可测试的应用程序,比如为将来从单体向微服务演化打下一定的基础。
另外,我们还学习了如何在整洁架构中构造测试,最后,如何通过dotnet CLI构建ASP.NET Core的解决方案。
在下一节中,我们将设置我们的数据库并构建路由和控制器,以了解它们如何处理HTTP请
ASP.NET Core分布式项目实战Docker制作dotnet core控制台程序镜像
Docker制作dotnet core控制台程序镜像
基于dotnet SDK
- 新建控制台程序
mkdir /home/console
cd /home/console
dotnet new console
dotnet restore
- 创建 Dockerfile 文件,参考https://github.com/dotnet/dotnet-docker/blob/master/samples/aspnetapp/Dockerfile
vim /home/console/Dockerfile

# ------

FROM mcr.microsoft.com/dotnet/core/sdk:2.2 AS build
WORKDIR /app

COPY . /app

RUN dotnet run
-
构建镜像
docker build -t wyt/console:dev .
- 运行容器
dotnet run --name console-dev wyt/console
基于dotnet Runtime
- 新建控制台程序
mkdir /home/console
cd /home/console
dotnet new console
dotnet restore
 View Code
using System;
using System.Threading;

namespace console

    class Program

        static void Main(string[] args)

            Console.WriteLine("Hello World from docker!");

            Thread.Sleep(Timeout.Infinite);
- 创建 Dockerfile 文件
FROM mcr.microsoft.com/dotnet/core/sdk:2.2 AS build
WORKDIR /code

COPY *.csproj /code
RUN dotnet restore

COPY . /code
RUN dotnet publish -c Release -o out

FROM mcr.microsoft.com/dotnet/core/aspnet:2.2 AS runtime
WORKDIR /app
COPY --from=build /code/out /app
ENTRYPOINT ["dotnet", "console.dll"]
- 构建镜像
docker build -t wyt/console:prod .
- 运行容器
docker run --name=console-prod wyt/console:prod

镜像大小对比
docker images
REPOSITORY                             TAG                 IMAGE ID            CREATED             SIZE
wyt/console                            prod                d2c683338197        3 minutes ago       260MB
wyt/console                            dev                 93b346366bc5        20 minutes ago      1.74GB
mcr.microsoft.com/dotnet/core/sdk      2.2                 155911c343f3        11 days ago         1.74GB
mcr.microsoft.com/dotnet/core/aspnet   2.2                 c56aab97bc42        11 days ago         260MB
Mysql EF Core 快速构建 web api
- 新建文件夹beta,创建WebAPI项目User.API,添加EFCore引用
Install-Package MySql.Data.EntityFrameworkCore
- 新建文件夹Data、Models
新建 AppUser.cs
View Codenamespace User.API.Models public class AppUser public int Id get; set; public string Name get; set; public string Company get; set; public string Title get; set;
新建 UserContext.cs
View Codenamespace User.API.Data public class UserContext:DbContext public UserContext(DbContextOptions<UserContext> options) : base(options) public DbSet<AppUser> Users get; set; protected override void OnModelCreating(ModelBuilder modelBuilder) modelBuilder.Entity<AppUser>().ToTable(nameof(Users)).HasKey(t => t.Id); base.OnModelCreating(modelBuilder);
- 修改 Startup.cs
View Codenamespace User.API public class Startup public Startup(IConfiguration configuration) Configuration = configuration; public IConfiguration Configuration get; // This method gets called by the runtime. Use this method to add services to the container. public void ConfigureServices(IServiceCollection services) services.AddDbContext<UserContext>(options => options.UseMySQL(Configuration.GetConnectionString("MysqlUser")); ); services.AddMvc().SetCompatibilityVersion(CompatibilityVersion.Version_2_2); // This method gets called by the runtime. Use this method to configure the HTTP request pipeline. public void Configure(IApplicationBuilder app, IHostingEnvironment env) if (env.IsDevelopment()) app.UseDeveloperExceptionPage(); app.UseMvc(); InitDatabase(app); public void InitDatabase(IApplicationBuilder app) using (var scope=app.ApplicationServices.CreateScope()) var userContext = scope.ServiceProvider.GetRequiredService<UserContext>(); //userContext.Database.Migrate(); if (userContext.Users.Count()==0) userContext.Users.Add(new AppUser() Name = "wyt" ); userContext.SaveChanges();
- 修改 appsettings.json 添加数据库配置
"ConnectionStrings":
  "MysqlUser": "Server=192.168.103.240;Port=3306;Database=beta_user;Uid=root;Pwd=pwd123456"
-
生成数据库
Add-Migration init Update-Database - 修改 ValuesController.cs 加入依赖注入
View Codenamespace User.API.Controllers [Route("api/[controller]")] [ApiController] public class ValuesController : Controller private UserContext _userContext; public ValuesController(UserContext userContext) _userContext = userContext; // GET api/values [HttpGet] public async Task<IActionResult> Get() return Json(await _userContext.Users.FirstOrDefaultAsync(u => u.Name == "wyt"));
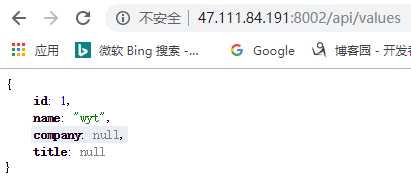
-
访问api

ASPNETCORE WEB API与MYSQL互联
- 修改 appsettings.json 与 appsettings.Development.json ,采用不同配置
//appsettings.json


  "Logging":
    "LogLevel":
      "Default": "Warning"

  ,
  "AllowedHosts": "*",
  "ConnectionStrings":
    "MysqlUser": "Server=db;Port=3306;Database=beta_user;Uid=root;Pwd=pwd123456"


//appsettings.Development.json


  "Logging":
    "LogLevel":
      "Default": "Debug",
      "System": "Information",
      "Microsoft": "Information"

  ,
  "ConnectionStrings":
    "MysqlUser": "Server=47.111.84.191;Port=3306;Database=beta_user;Uid=root;Pwd=pwd123456"
-
修改 Program.cs 设置80端口
public static IWebHostBuilder CreateWebHostBuilder(string[] args) =>
    WebHost.CreateDefaultBuilder(args)
        .UseUrls("http://*:80")
        .UseStartup<Startup>();
-
创建 Dockerfile
FROM mcr.microsoft.com/dotnet/core/sdk:2.2 AS build
WORKDIR /code
COPY *.csproj ./
RUN dotnet restore

COPY . ./
RUN dotnet publish -c Release -o out

FROM mcr.microsoft.com/dotnet/core/aspnet:2.2 AS runtime
WORKDIR /app
COPY --from=build /code/out ./

EXPOSE 80

ENTRYPOINT ["dotnet", "User.API.dll"]
-
拷贝到Linux服务器上,并执行下方命令创建镜像
docker build -t wyt/aspnetcore:pred .
View Code[[email protected] User.API]# docker build -t wyt/aspnetcore:pred . Sending build context to Docker daemon 1.265MB Step 1/11 : FROM mcr.microsoft.com/dotnet/core/sdk:2.2 AS build ---> 155911c343f3 Step 2/11 : WORKDIR /code ---> Using cache ---> 3e2cb7223b3b Step 3/11 : COPY *.csproj ./ ---> 6f6d88b83c75 Step 4/11 : RUN dotnet restore ---> Running in c538c0a59636 Restore completed in 3.85 sec for /code/User.API.csproj. Removing intermediate container c538c0a59636 ---> 6e45bd786a9c Step 5/11 : COPY . ./ ---> 50ac66ac3f97 Step 6/11 : RUN dotnet publish -c Release -o out ---> Running in 9febf9972a3d Microsoft (R) Build Engine version 16.1.76+g14b0a930a7 for .NET Core Copyright (C) Microsoft Corporation. All rights reserved. Restore completed in 667.65 ms for /code/User.API.csproj. User.API -> /code/bin/Release/netcoreapp2.2/User.API.dll User.API -> /code/out/ Removing intermediate container 9febf9972a3d ---> a7c92c3fd98b Step 7/11 : FROM mcr.microsoft.com/dotnet/core/aspnet:2.2 AS runtime ---> c56aab97bc42 Step 8/11 : WORKDIR /app ---> Using cache ---> 12d1df98dc50 Step 9/11 : COPY --from=build /code/out ./ ---> Using cache ---> b901e53b64f8 Step 10/11 : EXPOSE 80 ---> Using cache ---> c61ad551fa76 Step 11/11 : ENTRYPOINT ["dotnet", "User.API.dll"] ---> Running in 36c66859c548 Removing intermediate container 36c66859c548 ---> 063fc4fe64ed Successfully built 063fc4fe64ed Successfully tagged wyt/aspnetcore:pred
-
运行容器,进行端口映射和容器关联
docker run -d -p 8002:80 --name aspnetcore --link mysql01:db wyt/aspnetcore:pred
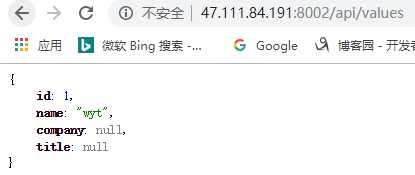
-
成功访问
Docker Network
- 创建新的桥接网段
# 创建mybridge桥接网段
docker network create -d bridge mybridge
# 显示网络信息
docker network ls
- 通过桥接网络创建新的 aspnetcore 容器
我们可以通过命令查看容器 aspnetcore 的ip信息,为172.17.0.4# 删除之前创建的容器 docker rm aspnetcore -f # 使用mybridge桥接网段创建新的容器 docker run -d -p 8002:80 --net mybridge --name aspnetcore wyt/aspnetcore:pred
docker inspect aspnetcore
- 将 mybridge 桥接网段与 mysql01 进行桥接
# 将mybridge网段与mysql01所在网段进行桥接
docker network connect mybridge mysql01
这时可以查看 mysql01 的ip,然后进入 aspnetcore 容器内尝试是否可以ping通
docker exec -it aspnetcore bash
apt-get update -y
apt-get install iputils-ping -y
apt-get install net-tools -y
ping 172.18.0.3
-
由于我们没有进行数据卷映射,所以配置文件无法更改,备注: appsettings.json 中使用的数据库为db,所以我们只能将 mysql01 改为 db
# 容器重命名
docker rename mysql01 db
方法二
# 进入容器
docker exec -it aspnetcore bash
ls
apt-get install vim -y
# 修改配置
vim appsettings.json
exit
# 重启容器
docker restart aspnetcore
- 完成
curl http://47.111.84.191:8002/api/values
或者访问
制作 docker compose
- 修改User.API项目
View Code# Startup.cs public void Configure(IApplicationBuilder app, IHostingEnvironment env, ILoggerFactory loggerFactory) if (env.IsDevelopment()) app.UseDeveloperExceptionPage(); app.UseMvc(); UserContextSeed.SeedAsync(app,loggerFactory); # /Data/UserContextSeed.cs public class UserContextSeed private ILogger<UserContextSeed> _logger; public UserContextSeed(ILogger<UserContextSeed> logger) _logger = logger; public static async Task SeedAsync(IApplicationBuilder app, ILoggerFactory loggerFactory) using (var scope = app.ApplicationServices.CreateScope()) var userContext = scope.ServiceProvider.GetRequiredService<UserContext>(); var logger = (ILogger<UserContextSeed>)scope.ServiceProvider.GetService(typeof(ILogger<UserContextSeed>)); logger.LogDebug("Begin UserContextSeed SeedAsync"); userContext.Database.Migrate(); if (userContext.Users.Count() == 0) userContext.Users.Add(new AppUser() Name = "wyt" ); userContext.SaveChanges();
- 安装docker-compose
# 下载Docker Compose的当前稳定版本
sudo curl -L "https://github.com/docker/compose/releases/download/1.24.0/docker-compose-$(uname -s)-$(uname -m)" -o /usr/local/bin/docker-compose
# https://github.com/docker/compose/releases/download/1.24.1/docker-compose-Linux-x86_64
# 建议迅雷下载后进行重命名,这样速度快
# 对二进制文件应用可执行权限
sudo chmod +x /usr/local/bin/docker-compose
# 测试安装
docker-compose --version
- 新建文件 docker-compose.yml
version: ‘3‘

services:
  db:
    image: mysql/mysql-server
    container_name: db
    command: mysqld --character-set-server=utf8 --collation-server=utf8_general_ci
    restart: always
    ports:
      - ‘3306:3306‘  #host物理直接映射端口为3306
    environment:
      MYSQL_ROOT_PASSWORD: pwd123456 #root管理员用户密码
      MYSQL_USER: jeese   #创建jeese用户
      MYSQL_PASSWORD: pwd123456  #设置jeese用户的密码
      MYSQL_ROOT_HOST: ‘%‘
    volumes:
      - "/home/wyt/beta/mysql-init:/docker-entrypoint-initdb.d"  #设置数据库自动执行脚本目录,目录要存在

  web:
    build: .
    container_name: aspnetcore
    ports:
      - ‘8003:80‘  #host物理直接映射端口为3306
    depends_on:
      - db
# 初始化脚本mysql-init/init.sql
use mysql;
ALTER USER ‘jeese‘@‘%‘ IDENTIFIED WITH mysql_native_password BY ‘pwd123456‘;
ALTER USER ‘root‘@‘%‘ IDENTIFIED WITH mysql_native_password BY ‘pwd123456‘;
FLUSH PRIVILEGES;
-
docker-compose构建
docker-compose build
View Code[[email protected] User.API]# docker-compose build db uses an image, skipping Building web Step 1/11 : FROM mcr.microsoft.com/dotnet/core/sdk:2.2 AS build ---> 155911c343f3 Step 2/11 : WORKDIR /code ---> Using cache ---> 7525de38c042 Step 3/11 : COPY *.csproj ./ ---> Using cache ---> 397affedf1a6 Step 4/11 : RUN dotnet restore ---> Using cache ---> 964ce7a0de36 Step 5/11 : COPY . ./ ---> Using cache ---> 5d18774ff1df Step 6/11 : RUN dotnet publish -c Release -o out ---> Using cache ---> 3353849a8dd8 Step 7/11 : FROM mcr.microsoft.com/dotnet/core/aspnet:2.2 AS runtime ---> c56aab97bc42 Step 8/11 : WORKDIR /app ---> Using cache ---> 12d1df98dc50 Step 9/11 : COPY --from=build /code/out ./ ---> Using cache ---> 4e6819b010fe Step 10/11 : EXPOSE 80 ---> Using cache ---> 2ee374887860 Step 11/11 : ENTRYPOINT ["dotnet", "User.API.dll"] ---> Using cache ---> 2b06acc1b707 Successfully built 2b06acc1b707 Successfully tagged userapi_web:latest
docker-compose up
View Code[[email protected] User.API]# docker-compose up Creating network "userapi_default" with the default driver Creating db ... done Creating aspnetcore ... done Attaching to db, aspnetcore db | [Entrypoint] MySQL Docker Image 8.0.16-1.1.11 db | [Entrypoint] Initializing database aspnetcore | warn: Microsoft.AspNetCore.DataProtection.KeyManagement.XmlKeyManager[35] aspnetcore | No XML encryptor configured. Key 67f35cc4-a4c3-4224-ba07-7a0753ed0d09 may be persisted to storage in unencrypted form. aspnetcore | Hosting environment: Production aspnetcore | Content root path: /app aspnetcore | Now listening on: http://[::]:80 aspnetcore | Application started. Press Ctrl+C to shut down. db | 2019-07-05T09:27:43.358708Z 0 [System] [MY-013169] [Server] /usr/sbin/mysqld (mysqld 8.0.16) initializing of server in progress as process 20 db | 2019-07-05T09:27:43.360043Z 0 [Warning] [MY-013242] [Server] --character-set-server: ‘utf8‘ is currently an alias for the character set UTF8MB3, but will be an alias for UTF8MB4 in a future release. Please consider using UTF8MB4 in order to be unambiguous. db | 2019-07-05T09:27:43.360052Z 0 [Warning] [MY-013244] [Server] --collation-server: ‘utf8_general_ci‘ is a collation of the deprecated character set UTF8MB3. Please consider using UTF8MB4 with an appropriate collation instead. db | 2019-07-05T09:27:46.943704Z 5 [Warning] [MY-010453] [Server] [email protected] is created with an empty password ! Please consider switching off the --initialize-insecure option. db | 2019-07-05T09:27:48.131450Z 0 [System] [MY-013170] [Server] /usr/sbin/mysqld (mysqld 8.0.16) initializing of server has completed db | [Entrypoint] Database initialized db | 2019-07-05T09:27:49.902213Z 0 [System] [MY-010116] [Server] /usr/sbin/mysqld (mysqld 8.0.16) starting as process 66 db | 2019-07-05T09:27:49.903376Z 0 [Warning] [MY-013242] [Server] --character-set-server: ‘utf8‘ is currently an alias for the character set UTF8MB3, but will be an alias for UTF8MB4 in a future release. Please consider using UTF8MB4 in order to be unambiguous. db | 2019-07-05T09:27:49.903389Z 0 [Warning] [MY-013244] [Server] --collation-server: ‘utf8_general_ci‘ is a collation of the deprecated character set UTF8MB3. Please consider using UTF8MB4 with an appropriate collation instead. db | 2019-07-05T09:27:50.456492Z 0 [Warning] [MY-010068] [Server] CA certificate ca.pem is self signed. db | 2019-07-05T09:27:50.477501Z 0 [System] [MY-010931] [Server] /usr/sbin/mysqld: ready for connections. Version: ‘8.0.16‘ socket: ‘/var/lib/mysql/mysql.sock‘ port: 0 MySQL Community Server - GPL. db | 2019-07-05T09:27:50.558190Z 0 [System] [MY-011323] [Server] X Plugin ready for connections. Socket: ‘/var/run/mysqld/mysqlx.sock‘ db | Warning: Unable to load ‘/usr/share/zoneinfo/iso3166.tab‘ as time zone. Skipping it. db | Warning: Unable to load ‘/usr/share/zoneinfo/leapseconds‘ as time zone. Skipping it. db | Warning: Unable to load ‘/usr/share/zoneinfo/tzdata.zi‘ as time zone. Skipping it. db | Warning: Unable to load ‘/usr/share/zoneinfo/zone.tab‘ as time zone. Skipping it. db | Warning: Unable to load ‘/usr/share/zoneinfo/zone1970.tab‘ as time zone. Skipping it. db | db | [Entrypoint] running /docker-entrypoint-initdb.d/init.sql db | db | db | 2019-07-05T09:27:52.092496Z 12 [System] [MY-013172] [Server] Received SHUTDOWN from user root. Shutting down mysqld (Version: 8.0.16). db | 2019-07-05T09:27:54.191280Z 0 [System] [MY-010910] [Server] /usr/sbin/mysqld: Shutdown complete (mysqld 8.0.16) MySQL Community Server - GPL. db | [Entrypoint] Server shut down db | db | [Entrypoint] MySQL init process done. Ready for start up. db | db | [Entrypoint] Starting MySQL 8.0.16-1.1.11 db | 2019-07-05T09:27:55.417600Z 0 [System] [MY-010116] [Server] /usr/sbin/mysqld (mysqld 8.0.16) starting as process 1 db | 2019-07-05T09:27:55.419490Z 0 [Warning] [MY-013242] [Server] --character-set-server: ‘utf8‘ is currently an alias for the character set UTF8MB3, but will be an alias for UTF8MB4 in a future release. Please consider using UTF8MB4 in order to be unambiguous. db | 2019-07-05T09:27:55.419504Z 0 [Warning] [MY-013244] [Server] --collation-server: ‘utf8_general_ci‘ is a collation of the deprecated character set UTF8MB3. Please consider using UTF8MB4 with an appropriate collation instead. db | 2019-07-05T09:27:55.858661Z 0 [Warning] [MY-010068] [Server] CA certificate ca.pem is self signed. db | 2019-07-05T09:27:55.880107Z 0 [System] [MY-010931] [Server] /usr/sbin/mysqld: ready for connections. Version: ‘8.0.16‘ socket: ‘/var/lib/mysql/mysql.sock‘ port: 3306 MySQL Community Server - GPL. db | 2019-07-05T09:27:56.066024Z 0 [System] [MY-011323] [Server] X Plugin ready for connections. Socket: ‘/var/run/mysqld/mysqlx.sock‘ bind-address: ‘::‘ port: 33060 aspnetcore | Application is shutting down... aspnetcore exited with code 0 aspnetcore | Hosting environment: Production aspnetcore | Content root path: /app aspnetcore | Now listening on: http://[::]:80 aspnetcore | Application started. Press Ctrl+C to shut down.
# 停止docker-compose
# docker-compose down
启动问题解决方式:由于docker-compose.yml文件中存在db依赖,所以要修改/Data/UserContextSeed.cs进行延迟数据库自动初始化
public static async Task SeedAsync(IApplicationBuilder app, ILoggerFactory loggerFactory,int? retry=0)

    var retryForAvaiability = retry.Value;
    try

        using (var scope = app.ApplicationServices.CreateScope())

            var userContext = scope.ServiceProvider.GetRequiredService<UserContext>();
            var logger = (ILogger<UserContextSeed>)scope.ServiceProvider.GetService(typeof(ILogger<UserContextSeed>));
            logger.LogDebug("Begin UserContextSeed SeedAsync");

            userContext.Database.Migrate();

            if (userContext.Users.Count() == 0)

                userContext.Users.Add(new AppUser()

                    Name = "wyt"
                );
                userContext.SaveChanges();


    catch (Exception ex)

        if (retryForAvaiability<10)

            retryForAvaiability++;
            var logger = loggerFactory.CreateLogger(typeof(UserContextSeed));
            logger.LogError(ex.ToString());
            await Task.Delay(TimeSpan.FromSeconds(2));
            await SeedAsync(app, loggerFactory, retryForAvaiability);
以上是关于基于ASP.NET Core 6.0的整洁架构,asp.net core 6.0 功能的主要内容,如果未能解决你的问题,请参考以下文章