Hive的架构原理及组成
Posted hunter95671
tags:
篇首语:本文由小常识网(cha138.com)小编为大家整理,主要介绍了Hive的架构原理及组成相关的知识,希望对你有一定的参考价值。
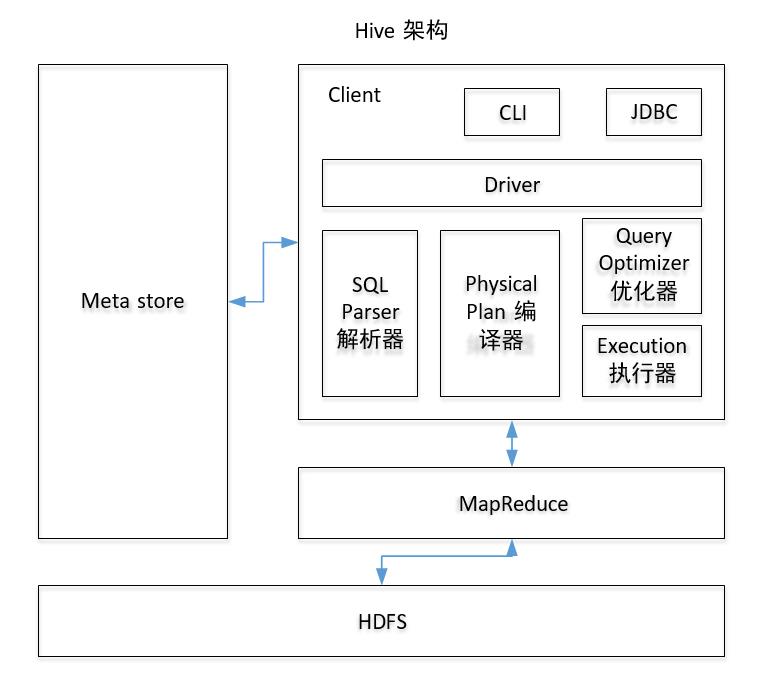
一、Hive架构图

二、架构组成
(1)、用户接口:Client
CLI(command-line interface)、JDBC/ODBC(jdbc 访问 hive)、WEBUI(浏览器访问 hive)
(2)、元数据:Metastore
元数据包括:表名、表所属的数据库(默认是 default)、表的拥有者、列/分区字段、 表的类型(是否是外部表)、表的数据所在目录等;
默认存储在自带的 derby 数据库中,推荐使用 mysql 存储 Metastore
(3)、Hadoop
使用 HDFS 进行存储,使用 MapReduce 进行计算。
(4)、驱动器:Driver
1.解析器(SQL Parser):将 SQL 字符串转换成抽象语法树 AST,这一步一般都用第 三方工具库完成,比如 antlr;对 AST 进行语法分析,比如表是否存在、字段是否存在、SQL 语义是否有误。
2.编译器(Physical Plan):将 AST 编译生成逻辑执行计划。
3.优化器(Query Optimizer):对逻辑执行计划进行优化。
4.执行器(Execution):把逻辑执行计划转换成可以运行的物理计划。对于 Hive 来 说,就是 MR/Spark。
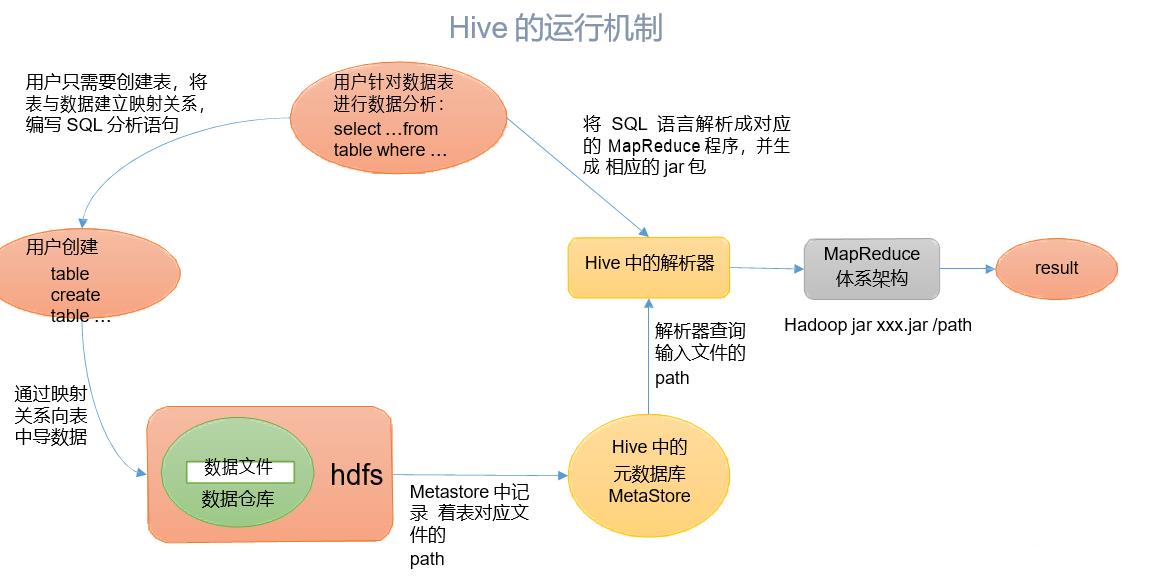
三、Hive的运行机制

Hive 通过给用户提供的一系列交互接口,接收到用户的指令(SQL),使用自己的 Driver, 结合元数据(MetaStore),将这些指令翻译成 MapReduce,提交到 Hadoop 中执行,最后,将 执行返回的结果输出到用户交互接口。
hive概念架构部署及原理介绍
1.Hive 是什么?

- 用户接口
|
1
|
./hive |
|
1
|
hive - -service cli |
|
01
02
03
04
05
06
07
08
09
10
11
12
|
[hadoop@ywendeng hive]$ hivehive> show tables;OKstockstock_partitiontstTime taken: 1.088 seconds, Fetched: 3 row(s)hive> select * from tst;OKTime taken: 0.934 secondshive> exit;[hadoop@djt11 hive]$ |
|
1
|
hive - -service hwi |
|
01
02
03
04
05
06
07
08
09
10
11
12
13
14
15
16
17
18
|
异常:16/05/31 20:24:52 FATAL hwi.HWIServer: HWI WAR file not found at /home/hadoop/app/hive/home/hadoop/app/hive/lib/hive-hwi-0.12.0.war[/align]解决办法:将hive-default.xml 文件中关于hwi的配置文件拷贝到hive-site.xml文件中示例: <property> <name>hive.hwi.war.file</name> <value>lib/hive-hwi-0.12.0-SNAPSHOT.war</value> <description>This sets the path to the HWI war file, relative to ${HIVE_HOME}. </description> </property> <property> <name>hive.hwi.listen.host</name> <value>0.0.0.0</value> <description>This is the host address the Hive Web Interface will listen on</description> </property> <property> <name>hive.hwi.listen.port</name> <value>9999</value> <description>This is the port the Hive Web Interface will listen on</description> </property> |
|
1
|
nohup hive - -service hiveserver2 & //在Hive 0.11.0版本之后,提供了HiveServer2服务[/align] |
|
1
2
|
hive --service hiveserver2 & //默认端口10000hive --service hiveserver2 --hiveconf hive.server2.thrift.port 10002 & //可以通过命令行直接将端口号改为10002 |
|
1
2
3
4
|
< property>[/align] < name>hive.server2.thrift.port< /name> < value>10000< /value> < description>Port number of HiveServer2 Thrift interface when hive.server2.transport.mode is ‘binary‘.< /description>< /property> |
|
01
02
03
04
05
06
07
08
09
10
11
12
13
14
15
16
17
18
19
20
21
|
import java.sql.Connection;import java.sql.DriverManager;import java.sql.SQLException;public class HiveJdbcClient { private static String driverName = "org.apache.hive.jdbc.HiveDriver";//hive驱动名称 hive0.11.0之后的版本 //private static String driverName = "org.apache.hadoop.hive.jdbc.HiveDriver";//hive驱动名称 hive0.11.0之前的版本 public static void main(String[] args) throws SQLException { try{ Class.forName(driverName); }catch(ClassNotFoundException e){ e.printStackTrace(); System.exit(1); } //第一个参数:jdbc:hive://djt11:10000/default 连接hive2服务的连接地址 //第二个参数:hadoop 对HDFS有操作权限的用户 //第三个参数:hive 用户密码 在非安全模式下,指定一个用户运行查询,忽略密码 Connection con = DriverManager.getConnection("jdbc:hive://djt11:10000/default", "hadoop", ""); System.out.print(con.getClientInfo()); }} |
- 元数据存储
准备工作 ,需要根据你的linux 系统版本下载对应的MySQL rpm 包。
|
1
2
3
4
|
rpm -qa | grep mysql//查看当前系统是否已经安装了mysql rpm -e mysql-libs-5.1.66-2.el6_3.i686 --nodeps//如果已经安装则删除,否则滤过此步骤 rpm -ivh MySQL-server-5.1.73-1.glibc23.i386.rpm rpm -ivh MySQL-client-5.1.73-1.glibc23.i386.rpm |
|
1
2
3
4
5
6
7
|
[root@ywendeng app]# service mysqld startInitializing MySQL database: Installing MySQL system tables...OKFilling help tables...OKTo start mysqld at boot time you have to copysupport-files/mysql.server to the right place for your system |
3) 设置 mysql 的 root 密码。
MySQL在刚刚被安装的时候,它的 root 用户是没有被设置密码的。首先来设置 MySQL 的 root 密码。
|
1
2
3
4
5
6
7
|
[root@ywendeng app]# mysql -u root -pEnter password: //默认密码为空,输入后回车即可Welcome to the MySQL monitor. Commands end with ; or g.Your MySQL connection id is 3Server version: 5.1.73 Source distributionCopyright (c) 2000, 2013, Oracle and/or its affiliates. All rights reserved.mysql>set password for root@localhost=password(‘root‘); 密码设置为root |
4) 为 Hive 建立相应的 Mysql 账户,并赋予足够的权限。
|
1
2
3
4
5
6
7
8
9
|
[root@ywendeng app]# mysql -u root -p rootmysql>create user ‘hive‘ identified by ‘hive‘; //创建一个账号:用户名为hive,密码为hivemysql> grant all on *.* to ‘hive‘@‘localhost‘ identified by ‘hive‘; //将权限授予host为localhost的hive用户//说明:(执行下面的语句 *.*:所有库下的所有表 %:任何IP地址或主机都可以连接)//grant all on *.* to ‘hive‘@‘%‘ identified by ‘hive‘; //将权限授予host为的hive用户Query OK, 0 rows affected (0.00 sec)mysql> flush privileges;Query OK, 0 rows affected (0.00 sec) |
备注:查看host 和user 之间的关系——在mysql 库中的user 表
|
1
2
|
use mysql;//使用数据库select host,user from user; |
如果 hive 账户无法登陆。为hive@ywendeng 设置密码。
|
1
2
|
[root@ywendeng ~]#mysql -u root -p rootmysql>set password for hive@localhost=password(‘hive‘); |
5) 建立 Hive 专用的元数据库,记得用刚才创建的 “hive” 账号登录,命令如下。
|
1
2
3
4
|
[root@ywendeng ~]#mysql -u hive -p //用hive用户登录,密码hiveEnter password: mysql> create database hive; //创建数据库的名称为hiveQuery OK, 1 row affected (0.00 sec) |
6) 找到Hive安装目录 conf/下的 hive-site.xml文件,修改以下几个属性。
|
01
02
03
04
05
06
07
08
09
10
11
12
13
14
15
16
17
18
19
20
21
22
23
24
|
[hadoop@ywendeng conf]$ vi hive-site.xml< property> < name>javax.jdo.option.ConnectionDriverName< /name> < value>com.mysql.jdbc.Driver< /value> < description>Driver class name for a JDBC metastore< /description>< /property>< property> < name>javax.jdo.option.ConnectionURL< /name> < value>jdbc:mysql://localhost:3306/hive?characterEncoding=UTF-8< /value> < description>JDBC connect string for a JDBC metastore< /description>< /property>< property> < name>javax.jdo.option.ConnectionUserName< /name> < value>hive< /value> < description>Username to use against metastore database< /description>< /property>< property> < name>javax.jdo.option.ConnectionPassword< /name> < value>hive< /value> < description>password to use against metastore database< /description>< /property> |
如果conf/目录下没有 hive-site.xml文件,则需要拷贝一个名为hive-site.xml的文件。
|
1
|
[hadoop@ywendeng conf]$ cp hive-default.xml.template hive-site.xml |
7)将mysql-connector-Java-5.1.21.jar驱动包,拷贝到 $HIVE_HOME/lib 目录下。可点击下载 mysql驱动包
|
1
2
3
|
[hadoop@ywendeng lib]#rz //回车,选择已经下载好的mysql驱动包即可[hadoop@ywendeng lib]$ lsmysql-connector-java-5.1.21.jar |
8) 启动 Hive Shell,测试运行。
|
1
2
|
[hadoop@ywendeng hive]$ hivehive> show databases; |
hive切换到mysql元数据库之后,hive启动时如果遇到以下错误:
|
1
2
3
4
|
[hadoop@ywendeng hive]$ mkdir iotmp[hadoop@ywendeng hive]$ lsbin derby.log hcatalog lib metastore_db README.txt scriptsconf examples iotmp LICENSE NOTICE RELEASE_NOTES.txt |
|
01
02
03
04
05
06
07
08
09
10
11
12
13
14
15
16
17
|
[hadoop@ywendeng conf]$ vi hive-site.xml[/align]< property> < name>hive.querylog.location< /name> < value>/home/hadoop/app/hive/iotmp< /value> < description>Location of Hive run time structured log file< /description>< /property>< property> < name>hive.exec.local.scratchdir< /name> < value>/home/hadoop/app/hive/iotmp< /value> < description>Local scratch space for Hive jobs< /description>< /property>< property> < name>hive.downloaded.resources.dir< /name> < value>/home/hadoop/app/hive/iotmp< /value> < description>Temporary local directory for added resources in the remote file system.< /description>< /property> |
保存,重启hive即可。
|
1
2
3
4
5
6
|
[hadoop@ywendeng hive]$ hivehive> show databases;OKdefaultTime taken: 3.684 seconds, Fetched: 1 row(s)hive> |
- 解释器、编译器、优化器。
|
01
02
03
04
05
06
07
08
09
10
11
|
将多 multiple join 合并为一个 multi-way join;对join、group-by 和自定义的 map-reduce 操作重新进行划分;消减不必要的列;在表扫描操作中推行使用断言(predicate);对于已分区的表,消减不必要的分区;在抽样(sampling)查询中,消减不必要的桶。 |
- Hive 文件格式
|
1
2
3
4
|
1、TEXTFILE 2、SEQUENCEFILE 3、RCFILE 4、ORCFILE(0.11以后出现) |
|
01
02
03
04
05
06
07
08
09
10
11
12
13
14
15
16
|
示例:create table if not exists textfile_table(site string,url string,pv bigint,label string)row format delimitedfields terminated by ‘ ‘stored as textfile;插入数据操作:set hive.exec.compress.output=true; set mapred.output.compress=true; set mapred.output.compression.codec=org.apache.hadoop.io.compress.GzipCodec; set io.compression.codecs=org.apache.hadoop.io.compress.GzipCodec; insert overwrite table textfile_table select * from textfile_table; |
|
01
02
03
04
05
06
07
08
09
10
11
12
13
14
15
16
17
|
示例:create table if not exists seqfile_table(site string,url string,pv bigint,label string)row format delimitedfields terminated by ‘ ‘stored as sequencefile;插入数据操作:set hive.exec.compress.output=true; set mapred.output.compress=true; set mapred.output.compression.codec=org.apache.hadoop.io.compress.GzipCodec; set io.compression.codecs=org.apache.hadoop.io.compress.GzipCodec; SET mapred.output.compression.type=BLOCK;insert overwrite table seqfile_table select * from textfile_table; |
|
01
02
03
04
05
06
07
08
09
10
11
12
13
14
15
16
|
RCFILE文件示例:create table if not exists rcfile_table(site string,url string,pv bigint,label string)row format delimitedfields terminated by ‘ ‘stored as rcfile;插入数据操作:set hive.exec.compress.output=true; set mapred.output.compress=true; set mapred.output.compression.codec=org.apache.hadoop.io.compress.GzipCodec; set io.compression.codecs=org.apache.hadoop.io.compress.GzipCodec; insert overwrite table rcfile_table select * from textfile_table; |
三、Hive 工作原理

四、Hive安装步骤
|
1
2
3
|
[hadoop@ywendeng app]$ tar -zxvf apache-hive-1.0.0-bin.tar.gz[hadoop@ywendeng app]$ mv apache-hive-1.0.0-bin hive |
|
1
2
3
4
|
[root@ywendeng ~]$ vi /etc/profileHIVE_HOME=/home/hadoop/app/hivePATH=$JAVA_HOME/bin:$HADOOP_HOME/bin:$HIVE_HOME/bin:$PATHexport HIVE_HOME |
|
1
|
[root@ywendeng ~]$ source /etc/profile |
|
1
2
|
[hadoop@ ywendeng ]$ hive hive> |
|
01
02
03
04
05
06
07
08
09
10
11
12
13
14
15
|
[错误1]Caused by: java.net.ConnectException: Connection refused at sun.nio.ch.SocketChannelImpl.checkConnect(Native Method) at sun.nio.ch.SocketChannelImpl.finishConnect(SocketChannelImpl.java:739) at org.apache.hadoop.net.SocketIOWithTimeout.connect(SocketIOWithTimeout.java:206) at org.apache.hadoop.net.NetUtils.connect(NetUtils.java:529) at org.apache.hadoop.net.NetUtils.connect(NetUtils.java:493) at org.apache.hadoop.ipc.Client$Connection.setupConnection(Client.java:604) at org.apache.hadoop.ipc.Client$Connection.setupIOstreams(Client.java:699) at org.apache.hadoop.ipc.Client$Connection.access$2800(Client.java:367) at org.apache.hadoop.ipc.Client.getConnection(Client.java:1462) at org.apache.hadoop.ipc.Client.call(Client.java:1381)异常原因: hadoop 没有启动 解决办法:在hadoop 安装目录下启动hadoop: 使用命令 sbin/start-all.sh |
|
01
02
03
04
05
06
07
08
09
10
11
12
13
14
15
16
17
18
19
20
21
22
23
24
25
26
27
28
29
30
31
32
33
34
35
36
37
|
[错误2][ERROR] Terminal initialization failed; falling back to unsupportedjava.lang.IncompatibleClassChangeError: Found class jline.Terminal, but interface was expected at jline.TerminalFactory.create(TerminalFactory.java:101) at jline.TerminalFactory.get(TerminalFactory.java:158) at jline.console.ConsoleReader.<init>(ConsoleReader.java:229) at jline.console.ConsoleReader.<init>(ConsoleReader.java:221) at jline.console.ConsoleReader.<init>(ConsoleReader.java:209) at org.apache.hadoop.hive.cli.CliDriver.setupConsoleReader(CliDriver.java:787) at org.apache.hadoop.hive.cli.CliDriver.executeDriver(CliDriver.java:721) at org.apache.hadoop.hive.cli.CliDriver.run(CliDriver.java:681) at org.apache.hadoop.hive.cli.CliDriver.main(CliDriver.java:621) at sun.reflect.NativeMethodAccessorImpl.invoke0(Native Method) at sun.reflect.NativeMethodAccessorImpl.invoke(NativeMethodAccessorImpl.java:57) at sun.reflect.DelegatingMethodAccessorImpl.invoke(DelegatingMethodAccessorImpl.java:43) at java.lang.reflect.Method.invoke(Method.java:606) at org.apache.hadoop.util.RunJar.main(RunJar.java:212)Exception in thread "main" java.lang.IncompatibleClassChangeError: Found class jline.Terminal, but interface was expected at jline.console.ConsoleReader.<init>(ConsoleReader.java:230) at jline.console.ConsoleReader.<init>(ConsoleReader.java:221) at jline.console.ConsoleReader.<init>(ConsoleReader.java:209) at org.apache.hadoop.hive.cli.CliDriver.setupConsoleReader(CliDriver.java:787) at org.apache.hadoop.hive.cli.CliDriver.executeDriver(CliDriver.java:721) at org.apache.hadoop.hive.cli.CliDriver.run(CliDriver.java:681) at org.apache.hadoop.hive.cli.CliDriver.main(CliDriver.java:621) at sun.reflect.NativeMethodAccessorImpl.invoke0(Native Method) at sun.reflect.NativeMethodAccessorImpl.invoke(NativeMethodAccessorImpl.java:57) at sun.reflect.DelegatingMethodAccessorImpl.invoke(DelegatingMethodAccessorImpl.java:43) at java.lang.reflect.Method.invoke(Method.java:606) at org.apache.hadoop.util.RunJar.main(RunJar.java:212)异常解决办法:将hive下的新版本jline的JAR包拷贝到hadoop下:cp /hive/apache-hive-1.2.1-bin/lib/jline-2.12.jar /cloud/hadoop-2.4.1/share/hadoop/yarn/lib |
|
1
2
3
|
hive> show tables;OKTime taken: 0.043 seconds |
|
1
2
3
|
hive> create table test_table (id int ,name string,no int);OKTime taken: 0.5 seconds |
|
1
2
3
|
hive> select * from test_table;OKTime taken: 0.953 seconds |
以上是关于Hive的架构原理及组成的主要内容,如果未能解决你的问题,请参考以下文章