序列化模块 json pickle shelve
Posted 年轻a
tags:
篇首语:本文由小常识网(cha138.com)小编为大家整理,主要介绍了序列化模块 json pickle shelve相关的知识,希望对你有一定的参考价值。
什么是模块:-----------
常见的场景:一个模块就是一个包含了python定义和声明的文件,文件名就是模块名字加上.py的后缀。
模块分类:1----内置模块
2----扩展模块(https://pypi.org/)
3----自定义模块 自己写的文件
为何要使用模块?
如果你退出python解释器然后重新进入,那么你之前定义的函数或者变量都将丢失,因此我们通常将程序写到文件中以便永久保存下来,需要时就通过python test.py方式去执行,此时test.py被称为脚本script。
随着程序的发展,功能越来越多,为了方便管理,我们通常将程序分成一个个的文件,这样做程序的结构更清晰,方便管理。这时我们不仅仅可以把这些文件当做脚本去执行,还可以把他们当做模块来导入到其他的模块中,实现了功能的重复利用,
序列化模块:
什么叫序列化??
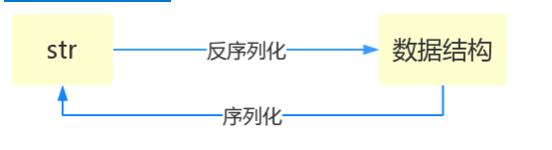
序列化 (Serialization)将对象的状态信息转换为可以存储或传输的形式的过程
通俗点说-------将原本的字典、列表等内容转换成一个字符串的过程就叫做序列化。


比如,我们在python代码中计算的一个数据需要给另外一段程序使用,那我们怎么给?
现在我们能想到的方法就是存在文件里,然后另一个python程序再从文件里读出来。
但是我们都知道,对于文件来说是没有字典这个概念的,所以我们只能将数据转换成字典放到文件中。
你一定会问,将字典转换成一个字符串很简单,就是str(dic)就可以办到了,为什么我们还要学习序列化模块呢?
没错序列化的过程就是从dic 变成str(dic)的过程。现在你可以通过str(dic),将一个名为dic的字典转换成一个字符串,
但是你要怎么把一个字符串转换成字典呢?
聪明的你肯定想到了eval(),如果我们将一个字符串类型的字典str_dic传给eval,就会得到一个返回的字典类型了。
eval()函数十分强大,但是eval是做什么的?e官方demo解释为:将字符串str当成有效的表达式来求值并返回计算结果。
BUT!强大的函数有代价。安全性是其最大的缺点。
想象一下,如果我们从文件中读出的不是一个数据结构,而是一句"删除文件"类似的破坏性语句,那么后果实在不堪设设想。
而使用eval就要担这个风险。
所以,我们并不推荐用eval方法来进行反序列化操作(将str转换成python中的数据结构)
序列化的目的
1---->>>>json
适用于不同语言之间,支持的数据类型 str int list dict bool
import json
# dic = {"alex": (\'women\',\'women\',\'老女人\')}
# dic2 = {"alex1": (\'women\',\'women\',\'老女人\')}
# dic3 = {"alex2": (\'women\',\'women\',\'老女人\')}
# with open("json-file",mode="w",encoding="utf-8")as f:
#     s1=json.dumps(dic)
#     s2=json.dumps(dic2)
#     s3=json.dumps(dic3)
#     f.write(s1+"\\n")
#     f.write(s2+"\\n")
#     f.write(s3+"\\n")
# with open("json-file",mode="r",encoding="utf-8")as f1:
#     for line in f1:
#         print(json.loads(line))
写入多数据用dumps 和 loads
dump一次只能读取和写入一个序列化字符串
Serialize obj to a JSON formatted str.(字符串表示的json对象)
Skipkeys:默认值是False,如果dict的keys内的数据不是python的基本类型(str,unicode,int,long,float,bool,None),设置为False时,就会报TypeError的错误。此时设置成True,则会跳过这类key
ensure_ascii:,当它为True的时候,所有非ASCII码字符显示为\\uXXXX序列,只需在dump时将ensure_ascii设置为False即可,此时存入json的中文即可正常显示。)
If check_circular is false, then the circular reference check for container types will be skipped and a circular reference will result in an OverflowError (or worse).
If allow_nan is false, then it will be a ValueError to serialize out of range float values (nan, inf, -inf) in strict compliance of the JSON specification, instead of using the javascript equivalents (NaN, Infinity, -Infinity).
indent:应该是一个非负的整型,如果是0就是顶格分行显示,如果为空就是一行最紧凑显示,否则会换行且按照indent的数值显示前面的空白分行显示,这样打印出来的json数据也叫pretty-printed json
separators:分隔符,实际上是(item_separator, dict_separator)的一个元组,默认的就是(‘,’,’:’);这表示dictionary内keys之间用“,”隔开,而KEY和value之间用“:”隔开。
default(obj) is a function that should return a serializable version of obj or raise TypeError. The default simply raises TypeError.
sort_keys:将数据根据keys的值进行排序。
To use a custom JSONEncoder subclass (e.g. one that overrides the .default() method to serialize additional types), specify it with the cls kwarg; otherwise JSONEncoder is used.
import json
data = {\'username\':[\'李华\',\'二愣子\'],\'sex\':\'male\',\'age\':16}
json_dic2 = json.dumps(data,sort_keys=True,indent=2,separators=(\',\',\':\'),ensure_ascii=False)
print(json_dic2)
2------>>>>pickle
用于序列化的两个模块
- json,用于字符串 和 python数据类型间进行转换
- pickle,用于python特有的类型 和 python的数据类型间进行转换
pickle模块提供了四个功能:dumps、dump(序列化,存)、loads(反序列化,读)、load (不仅可以序列化字典,列表...可以把python中任意的数据类型序列化)
# dic = {\'alex\': (\'women\',\'women\',\'老女人\')}
# dic2 = {"alex1": (\'women\',\'women\',\'老女人\')}
# dic3 = {"alex2": (\'women\',\'women\',\'老女人\')}
# with open("pickle_file",mode="wb")as f:
#     pickle.dump(dic,f)
#     pickle.dump(dic2,f)
#     pickle.dump(dic3,f)
# with open("pickle_file",mode="rb")as f:
#     while 1:
#         try:
#             print(pickle.load(f))
#         except EOFError:
#             break
注意:文件读写模式问btyes:
3----->>>>shelve
shelve也是python提供给我们的序列化工具,比pickle用起来更简单一些。
shelve只提供给我们一个open方法,是用key来访问的,使用起来和字典类似。
import shelve
f = shelve.open(\'shelve_file\')
f[\'key\'] = {\'int\':10, \'float\':9.5, \'string\':\'Sample data\'}  #直接对文件句柄操作,就可以存入数据
f.close()

import shelve
f1 = shelve.open(\'shelve_file\')
existing = f1[\'key\']  #取出数据的时候也只需要直接用key获取即可,但是如果key不存在会报错
f1.close()
print(existing)
这个模块有个限制,它不支持多个应用同一时间往同一个DB进行写操作。所以当我们知道我们的应用如果只进行读操作,我们可以让shelve通过只读方式打开DB
import shelve
f = shelve.open(\'shelve_file\', flag=\'r\')
existing = f[\'key\']
f.close()
print(existing)
由于shelve在默认情况下是不会记录待持久化对象的任何修改的,所以我们在shelve.open()时候需要修改默认参数,否则对象的修改不会保存。
import shelve
f1 = shelve.open(\'shelve_file\')
print(f1[\'key\'])
f1[\'key\'][\'new_value\'] = \'this was not here before\'
f1.close()

f2 = shelve.open(\'shelve_file\', writeback=True)
print(f2[\'key\'])
f2[\'key\'][\'new_value\'] = \'this was not here before\'
f2.close()
writeback方式有优点也有缺点。优点是减少了我们出错的概率,并且让对象的持久化对用户更加的透明了;但这种方式并不是所有的情况下都需要,首先,使用writeback以后,shelf在open()的时候会增加额外的内存消耗,并且当DB在close()的时候会将缓存中的每一个对象都写入到DB,这也会带来额外的等待时间。因为shelve没有办法知道缓存中哪些对象修改了,哪些对象没有修改,因此所有的对象都会被写入。
-------->>>>hashlib<<<<-------
算法介绍
Python的hashlib提供了常见的摘要算法,如MD5,SHA1等等。
什么是摘要算法呢?摘要算法又称哈希算法、散列算法。它通过一个函数,把任意长度的数据转换为一个长度固定的数据串(通常用16进制的字符串表示)。
摘要算法就是通过摘要函数f()对任意长度的数据data计算出固定长度的摘要digest,目的是为了发现原始数据是否被人篡改过。
摘要算法之所以能指出数据是否被篡改过,就是因为摘要函数是一个单向函数,计算f(data)很容易,但通过digest反推data却非常困难。而且,对原始数据做一个bit的修改,都会导致计算出的摘要完全不同。
我们以常见的摘要算法MD5为例,计算出一个字符串的MD5值:
import hashlib

md5 = hashlib.md5()
md5.update(\'how to use md5 in python hashlib?\')
print md5.hexdigest()

计算结果如下:
d26a53750bc40b38b65a520292f69306
如果数据量很大,可以分块多次调用update(),最后计算的结果是一样的:
md5 = hashlib.md5()
md5.update(\'how to use md5 in \')
md5.update(\'python hashlib?\')
print md5.hexdigest()
MD5是最常见的摘要算法,速度很快,生成结果是固定的128 bit字节,通常用一个32位的16进制字符串表示。另一种常见的摘要算法是SHA1,调用SHA1和调用MD5完全类似:
import hashlib

sha1 = hashlib.sha1()
sha1.update(\'how to use sha1 in \')
sha1.update(\'python hashlib?\')
print sha1.hexdigest()
SHA1的结果是160 bit字节,通常用一个40位的16进制字符串表示。比SHA1更安全的算法是SHA256和SHA512,不过越安全的算法越慢,而且摘要长度更长。
摘要算法应用--------
任何允许用户登录的网站都会存储用户登录的用户名和口令。如何存储用户名和口令呢?方法是存到数据库表中:

如果以明文保存用户口令,如果数据库泄露,所有用户的口令就落入黑客的手里。此外,网站运维人员是可以访问数据库的,也就是能获取到所有用户的口令。正确的保存口令的方式是不存储用户的明文口令,而是存储用户口令的摘要,比如MD5:

考虑这么个情况,很多用户喜欢用123456,888888,password这些简单的口令,于是,黑客可以事先计算出这些常用口令的MD5值,得到一个反推表:

这样,无需破解,只需要对比数据库的MD5,黑客就获得了使用常用口令的用户账号。
对于用户来讲,当然不要使用过于简单的口令。但是,我们能否在程序设计上对简单口令加强保护呢?
由于常用口令的MD5值很容易被计算出来,所以,要确保存储的用户口令不是那些已经被计算出来的常用口令的MD5,这一方法通过对原始口令加一个复杂字符串来实现,俗称“加盐”:

经过Salt处理的MD5口令,只要Salt不被黑客知道,即使用户输入简单口令,也很难通过MD5反推明文口令。
但是如果有两个用户都使用了相同的简单口令比如123456,在数据库中,将存储两条相同的MD5值,这说明这两个用户的口令是一样的。有没有办法让使用相同口令的用户存储不同的MD5呢?
如果假定用户无法修改登录名,就可以通过把登录名作为Salt的一部分来计算MD5,从而实现相同口令的用户也存储不同的MD5。
摘要算法在很多地方都有广泛的应用。要注意摘要算法不是加密算法,不能用于加密(因为无法通过摘要反推明文),只能用于防篡改,但是它的单向计算特性决定了可以在不存储明文口令的情况下验证用户口令。
附带文件分段验证代码:
import hashlib
def file(file_name,modes):
    ret=hashlib.md5()
    with open(file_name,mode=modes)as f:
        while 1:
            content = f.read(1024)
            if content:
                ret.update(content.encode("utf-8"))
            else:
                break
    return ret.hexdigest()
print(file("a.txt","r"))
configparser模块
该模块适用于配置文件的格式与windows ini文件类似,可以包含一个或多个节(section),每个节可以有多个参数(键=值)。
"""
Django settings for webwx project.

Generated by \'django-admin startproject\' using Django 1.10.3.

For more information on this file, see
https://docs.djangoproject.com/en/1.10/topics/settings/

For the full list of settings and their values, see
https://docs.djangoproject.com/en/1.10/ref/settings/
"""

import os

# Build paths inside the project like this: os.path.join(BASE_DIR, ...)
BASE_DIR = os.path.dirname(os.path.dirname(os.path.abspath(__file__)))


# Quick-start development settings - unsuitable for production
# See https://docs.djangoproject.com/en/1.10/howto/deployment/checklist/

# SECURITY WARNING: keep the secret key used in production secret!
SECRET_KEY = \'mpn^n-s-&+ckg_)gl4sp^@8=89us&@*^r1c_81#x-5+$)rf8=3\'

# SECURITY WARNING: don\'t run with debug turned on in production!
DEBUG = True

ALLOWED_HOSTS = []


# Application definition

INSTALLED_APPS = [
    \'django.contrib.admin\',
    \'django.contrib.auth\',
    \'django.contrib.contenttypes\',
    \'django.contrib.sessions\',
    \'django.contrib.messages\',
    \'django.contrib.staticfiles\',
    \'web\',
]

MIDDLEWARE = [
    \'django.middleware.security.SecurityMiddleware\',
    \'django.contrib.sessions.middleware.SessionMiddleware\',
    \'django.middleware.common.CommonMiddleware\',
    # \'django.middleware.csrf.CsrfViewMiddleware\',
    \'django.contrib.auth.middleware.AuthenticationMiddleware\',
    \'django.contrib.messages.middleware.MessageMiddleware\',
    \'django.middleware.clickjacking.XFrameOptionsMiddleware\',
]

ROOT_URLCONF = \'webwx.urls\'

TEMPLATES = [
    {
        \'BACKEND\': \'django.template.backends.django.DjangoTemplates\',
        \'DIRS\': [os.path.join(BASE_DIR, \'templates\')]
        ,
        \'APP_DIRS\': True,
        \'OPTIONS\': {
            \'context_processors\': [
                \'django.template.context_processors.debug\',
                \'django.template.context_processors.request\',
                \'django.contrib.auth.context_processors.auth\',
                \'django.contrib.messages.context_processors.messages\',
            ],
        },
    },
]

WSGI_APPLICATION = \'webwx.wsgi.application\'


# Database
# https://docs.djangoproject.com/en/1.10/ref/settings/#databases

DATABASES = {
    \'default\': {
        \'ENGINE\': \'django.db.backends.sqlite3\',
        \'NAME\': os.path.join(BASE_DIR, \'db.sqlite3\'),
    }
}


# Password validation
# https://docs.djangoproject.com/en/1.10/ref/settings/#auth-password-validators

AUTH_PASSWORD_VALIDATORS = [
    {
        \'NAME\': \'django.contrib.auth.password_validation.UserAttributeSimilarityValidator\',
    },
    {
        \'NAME\': \'django.contrib.auth.password_validation.MinimumLengthValidator\',
    },
    {
        \'NAME\': \'django.contrib.auth.password_validation.CommonPasswordValidator\',
    },
    {
        \'NAME\': \'django.contrib.auth.password_validation.NumericPasswordValidator\',
    },
]


# Internationalization
# https://docs.djangoproject.com/en/1.10/topics/i18n/

LANGUAGE_CODE = \'en-us\'

TIME_ZONE = \'UTC\'

USE_I18N = True

USE_L10N = True

USE_TZ = True


# Static files (CSS, JavaScript, Images)
# https://docs.djangoproject.com/en/1.10/howto/static-files/

STATIC_URL = \'/static/\'
STATICFILES_DIRS = (
    os.path.join(BASE_DIR,\'static\'),
)
创建文件
看一个好多软件的常用文档
[DEFAULT]
ServerAliveInterval = 45
Compression = yes
CompressionLevel = 9
ForwardX11 = yes

[bitbucket.org]
User = hg

[topsecret.server.com]
Port = 50022
ForwardX11 = no
如果想用python生成一个这样的文档怎么做呢?
import configparser

config = configparser.ConfigParser()

config["DEFAULT"] = {\'ServerAliveInterval\': \'45\',
                      \'Compression\': \'yes\',
                     \'CompressionLevel\': \'9\',
                     \'ForwardX11\':\'yes\'
                     }

config[\'bitbucket.org\'] = {\'User\':\'hg\'}

config[\'topsecret.server.com\'] = {\'Host Port\':\'50022\',\'ForwardX11\':\'no\'}

with open(\'example.ini\', \'w\') as configfile:

   config.write(configfile)
查找文件
import configparser

config = configparser.ConfigParser()

#---------------------------查找文件内容,基于字典的形式

print(config.sections())        #  []

config.read(\'example.ini\')

print(config.sections())        #   [\'bitbucket.org\', \'topsecret.server.com\']

print(\'bytebong.com\' in config) # False
print(\'bitbucket.org\' in config) # True


print(config[\'bitbucket.org\']["user"])  # hg

print(config[\'DEFAULT\'][\'Compression\']) #yes

print(config[\'topsecret.server.com\'][\'ForwardX11\'])  #no


print(config[\'bitbucket.org\'])          #<Section: bitbucket.org>

for key in config[\'bitbucket.org\']:     # 注意,有default会默认default的键
    print(key)

print(config.options(\'bitbucket.org\'))  # 同for循环,找到\'bitbucket.org\'下所有键

print(config.items(\'bitbucket.org\'))    #找到\'bitbucket.org\'下所有键值对

print(config.get(\'bitbucket.org\',\'compression\')) # yes       get方法Section下的key对应的value
增删改操作
import configparser

config = configparser.ConfigParser()

config.read(\'example.ini\')

config.add_section(\'yuan\')


config.remove_section(\'bitbucket.org\')
config.remove_option(\'topsecret.server.com\',"forwardx11")


config.set(\'topsecret.server.com\',\'k1\',\'11111\')
config.set(\'yuan\',\'k2\',\'22222\')

config.write(open(\'new2.ini\', "w"))
logging模块
函数式简单配置
import logging
logging.debug(\'debug message\')
logging.info(\'info message\')
logging.warning(\'warning message\')
logging.error(\'error message\')
logging.critical(\'critical message\')
默认情况下Python的logging模块将日志打印到了标准输出中,且只显示了大于等于WARNING级别的日志,这说明默认的日志级别设置为WARNING(日志级别等级CRITICAL > ERROR > WARNING > INFO > DEBUG),默认的日志格式为日志级别:Logger名称:用户输出消息。
灵活配置日志级别,日志格式,输出位置:
import logging logging.basicConfig(level=logging.DEBUG, format=\'%(asctime)s %(filename)s[line:%(lineno)d] %(levelname)s %(message)s\', datefmt=\'%a, %d %b %Y %H:%M:%S\', filename=\'/tmp/test.log\', filemode=\'w\') logging.debug(\'debug message\') logging.info(\'info message\') logging.warning(\'warning message\'